Tomb Raider 1: Atlantean Scion Walkthrough & Game Guide
Level 8: The Cistern
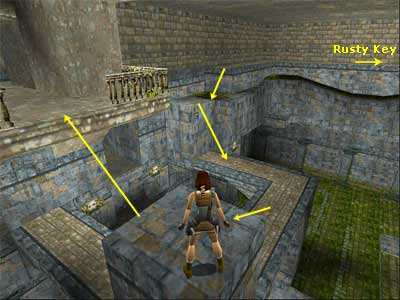
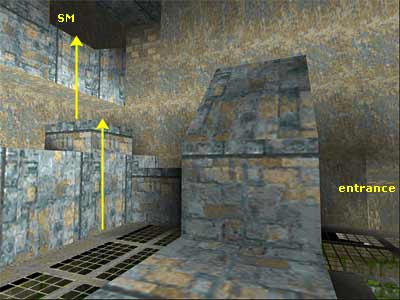
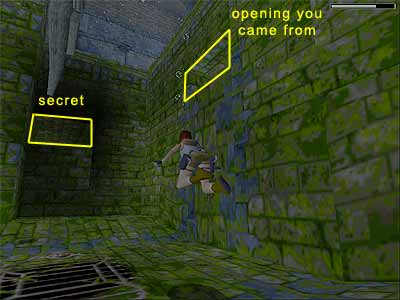
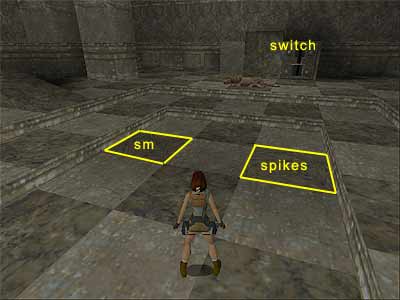
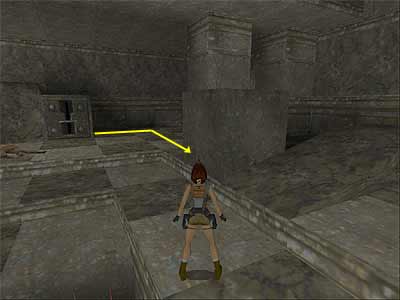
Turn around and hang from the ledge. Drop down and kill the rat. Locate the movabe block on the south wall and push it three times to reveal a room behind. Then push it to the right and beneath the switch. Climb on the block and use the switch to open the trapdoors on the left and the silver door, which releases two rats. Kill them from above and drop down. Enter the small room and pick up the Large Medi Pack. Then drop through the trapdoors. Into the Cistern - Exit to the walkway. Take a mental note of the two closed gates on the left. You need to find two keys in order to open them, something that you will do now. Walk up to the front edge and kill the two rats on the ground, plus two crocodiles in the pool. With the entrance to your back, turn right and take a running jump to the platform. Kill the rat and go down the steps. Grab the crevice and shimmy to the left. When you reach the corner, drop onto the square ledge and pick up the Shotgun Shells. Then grab the left hand crevice and continue shimming until you can pull up. Vault onto the walkway on the right and go all the way around, where you will find the Rusty Key #1. (Note - If you accidentally fall down whilst shimming across the crevice and before getting the Key, climb up the blocks on the east side. You will see an opening in the wall, but do not bother with it. Turn to face south and jump on the walkway. Turn left and climb on the ledge. Then follow the walkway to the Key.) Room with pipes - Return back to the ledge you climbed onto after shimming across the crevice. Drop onto the L-shaped walkway and climb on the column in the corner. (The PS players will find a Save Crystal here.) Turn right and jump to the balcony (the procedure is shown here). Draw weapons and go up the steps. You will have to deal with Pierre again, so jump backwards to reach the balcony, shooting Pierre at the same time. When you reach the opening, start side-flipping left and right in front of the doorway. When he leaves, enter the pipe room. Climb on the block in the back right corner (northwest), vault onto the higher one and climb on the ledge above (as shown in this screenshot). Pick up the Small Medi Pack. 1st Secret - Do not drop down yet. Go up the short ramp and climb into the opening on the left. Climb up the next three blocks and pick up the Shotgun Shells. Slide down the ramp and before reaching the end, jump to grab the block ahead. Pull up and pick up two more sets of Shotgun Shells. Then slide down the ramps to the pipe room. For the least damage, you can slide down backwards, grab the edge of the ramp and release. Climb on the same block in the northwest corner and jump to grab the pipe that goes halfway across the room. Pull up and take a running jump to grab the opposite pipe. Pull up and pick up the Large Medi Pack and Shotgun Shells. Then hang from the edge above the slide. Drop onto the slide and before reaching the end, back-flip. Do not use the switch yet. It floods the cistern outside and you need to do some things first. Approach the opening in the floor and kill the two rats in the water. If they do not show up, jump over the opening to lure them. Once they are dead, drop into the water and swim through the tunnel to reach a room with pillars. Quickly climb out of the water and kill the rat, which swims in there. Go up the steps and take a running jump to grab the platform with the Rusty Key #2. Pull up, pick up the Key and approach the opening ahead. Two more rats lurk below, so kill them from above. If you cannot aim at them, jump to the alcove on the left hand side. Then hang from the edge and shimy left. Halfway, drop down. Then slide down the ramp to return back to the cistern. (The PS players will find a Save Crystal here.) Back to the cistern - From the opening, take a running jump to the L-shaped walkway on the left. Or, drop to the block below and jump to grab it, then pull up. Climb on the left hand ledge and onto the walkway, where you got the first Key. Go to the end and drop to the steps where you killed the rat before. Take a running jump to the walkway in front of the entrance and jump to the next one. Turn left and take a running jump to the ledge in front of the left hand door. Left hand door - Use one of the two Keys to open the door. As soon as you enter, turn around and climb on the ledge above the entrance. Two gorillas will attack, so kill them from here. If they leave, hang from the edge to lure them back and pull up. When they are dead, take a running jump to the opposite ledge. Pierre is now exactly beneath you, so once again, you have to make him leave. If you do not want to lose a lot of health (and probably not at all), jump back to the ledge above the entrance. Shoot Pierre and lock the target. He will have difficulties hurting you from this spot, so keep on shooting whilst side-jumping to the left and right. When he leaves, take a running jump to the opposite ledge and another one to grab the ledge with the Large Medi Pack. Pull up, pick up the Medi Pack and take a running jump to grab the next ledge; pull up. Move to the right, face the alcove with the Magnum Clips and walk up to the edge. Take one step backwards and turn around. Back-flip to land into the alcove. Alternatively, do not turn around. Perform a swan dive into the alcove (Walk+Jump+Up). Pick up the Clips (or a pair of Magnums if you do not have them) and take a running jump to grab the ledge you came from. Pull up and turn around. Take a running jump to grab the crevice above the alcove and shimmy to the right. Drop into the passage and go to the end. Drop to the ledge below and slide down the ramp. You will be able to kill a crocodile from here, and if you hang from the edge, you will alert a second one that, again, you can kill from above. Slide down the ramps to reach the ground. A third crocodile will come from the back of the room if you approach that area. Quickly run and jump on the block in one of the room's corners and kill it from there. (The PS players will find a Save Crystal here.) Then go through the passage it came from, kill the rat and pick up the Large Medi Pack. Climb up the blocks in the corner and jump to grab the first square ledge. Take a running jump to grab the second square ledge and pull up. Turn right and take another running jump to the third square ledge. Run off the ledge to drop to the platform below. Grab the crevice on the left and traverse to the left. Pull into the opening and throw the switch to open the door. Enter carefully! There are spikes in the pit beyond. Walk up to the edge and kill the rat below. Then jump to the opposite ledge to lure a second one. Kill it and drop down next to the spikes. Follow the tunnel and drop onto the block. Kill a third rat and drop down. Enter the room with the pool and kill yet another rat. Go up the steps and climb on the ledge ahead. Climb on the next one on the right and go to the end. Turn right and take a standing jump to the lower one. Climb on the ledge ahead and go around to the end. Jump into the alcove with the switch that opens the door below. Make your way down using the ledges you came from and go through the door you just opened. Pick up the Silver Key #1 facing the way you came. On getting the Key, Pierre appears, but do not bother with him. Quickly jump into the pool and swim through the tunnel, leaving Pierre shooting in the air. You reach another pool, but do not climb out yet. Swim through the other tunnel to the pool at the bottom of the cistern. 2nd Secret - As you exit, locate the opening on the right side (see this screenshot if you cannot find the opening). Swim through it and follow the tunnel. Get the Magnum Clips from the depression and swim back out. Flooding the cistern - Climb out of the water, using the ledge on the side of the two gargoyle's. Go towards the ramp and climb up the blocks there. Jump to grab the L-shaped walkway and climb on the column in the corner. Jump to the balcony and enter the pipe room. Use the switch to flood the cistern. Return back and jump into the water. Swim to the pool in the middle and through the opening you came from (south). Surface in the first room and climb on either ledges. Kill the two rats and pick up the Small and Large Medi Packs and the Shotgun Shells (or the Shotgun if you do not have it. Also, the PS players will find a Save Crystal on the ledge with the Small Medi Pack). Then jump into the water and pull the underwater lever to open the gate exactly below you. Swim there and get the Silver Key #2. The second gate opens automatically, so exit to the cistern. Right hand door - Swim to the right (west) and climb on the ledge in front of the closed door. Use the second Rusty Key to open it and go through it. Jump into the water with the spikes and swim down and beneath the spikes to a tunnel that gets you to a room. Get the Small Medi Pack and the Gold Key. The door opens when you get the Key, so exit to the cistern. Quickly climb out of the water and kill the crocodile that has now joined you. Jump into the water and climb on the square ledge on the south side. This leads you to the steps with the railings alongside. 3rd Secret - Before using the Silver Keys, locate the movable block on the left of the closed door. Push it to reaveal a secret room. Stand beneath the balcony facing the slide. Jump forwards onto the slide and do not let go of the Jump button. Lara will back-flip onto the balcony. Or, stand with the slide to your back, back-flip onto the slide, and whilst having the Jump button compressed, press Action to grab the balcony. Then pull up. Pick up the two sets of Magnum Clips and the Large Medi Pack. Drop down and return to the closed door. Use the two Silver Keys to unlock the doors and enter. Climb on the right hand pillar (the PS players will find a Save Crystal here) and then jump to the platform. Take a running jump to the ledge with the gold keyhole and immediatelly roll and take a running jump to the previous ledge. Draw weapons and kill the gorilla. Take a running jump to the ledge with the keyhole and use the Gold Key to unlock the door below. Do not drop down yet. Two lions will exit, so stay here and kill them. If you want, jump back to the previous ledge, so as to have a better range. Once they are dead, drop down. Room with checkerboard floor - Enter the room with the checkerboard floor. Be careful as you move around because there are some decrepit crumbling floors that reveal spiked pits. However, there is a pit that contains a Small Medi Pack and you can find it on the left hand side (see this screenshot). Use the switch to open the door on the right. Three lions will charge out, so hop back and jump on the block above the switch. Kill them from here. There is a movable block behind the switch. Pull it twice to reveal the exit. Before going there, pull the block four times, go around it and push it once more to position it next to the sloped floor (as shown here). Climb on it, then climb on the ledge above. Pick up the Large Medi Pack and the two sets of Magnum Clips. When you approach the opening on the right, two rats will attack from behind, so turn around and kill them. (Note - Instead of using the switch that releases the three lions, you can ignore it and pull\ push the block in order to get the pick-ups above. If you are not interested in all kills, you can avoid the two rats and the three lions. If you want the kills, take care of the two rats and then go through the opening and kill the lions from above. If you fall into the room, you will find a switch that opens the door.) Drop back down and fall through the opening you revealed before to end the level.
|
||
| « Level 7: Palace Midas | Index | Level 9: Tomb of Tihocan » |
| We would like to thank Nicky for her help. Many parts of this walkthrough would not have been written without her participation. Special thanks to George Maciver for proofing the text. Last update: 16 Dec. 2006 |
||
Tomb Raider: Atlantean Scion Walkthrough & Game Guide © 2000-2007 www.tombraiderhub.com |
||