Tomb Raider 1: Atlantean Scion Walkthrough & Game Guide
Level 12: Sanctuary of the Scion
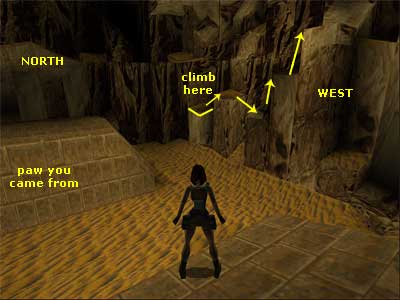
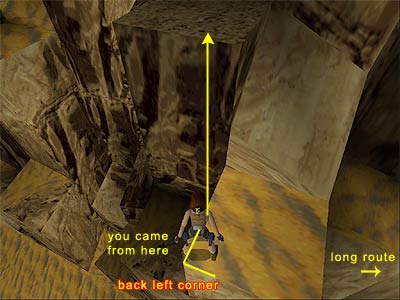
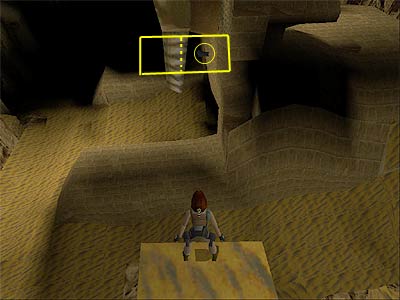
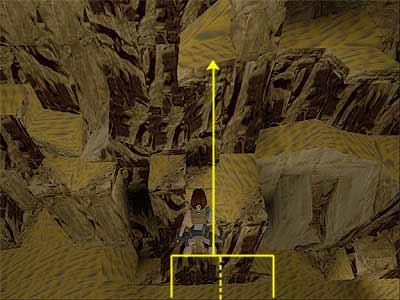
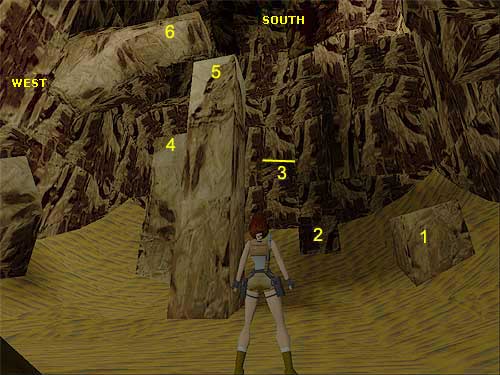
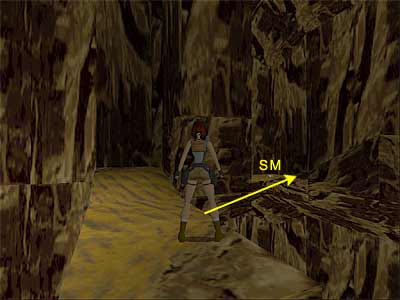
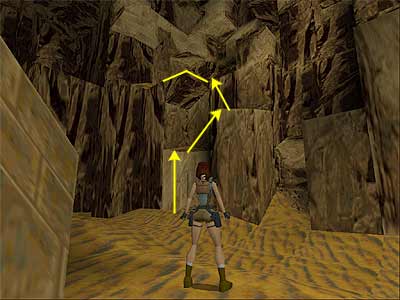
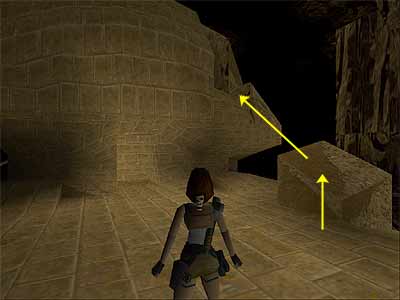
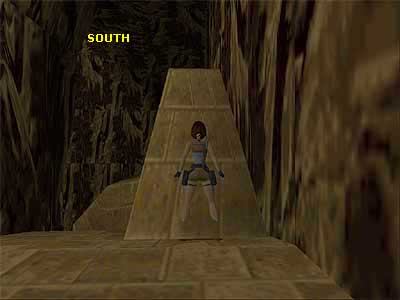
Go down the steps and through the doors that close behind you. Pick up the two sets of Magnum Clips from the bottom corners of the rooms (or a pair of Magnums instead of one of the sets if you do not have them). You will come back for the two closed gates at the end of the level, so continue up the steps with your weapons drawn. Two mutants (a variation of the mummies) will start coming down, so start shooting immediately as soon as Lara aims at them. Do not use the Pistols, because they are useless now. The Magnums or the Shotgun are far better. When the mutants are dead, go up the steps where they came from. Enter the next room and pick up the Magnum Clips from the far right. Vault onto the low block and climb on the higher one. Then pull onto the upper ledge. On the back of a Sphinx - This is the back-side of a huge Sphinx. Straight ahead is a ledge with a Large Medi Pack. Pick it up and drop back down. Facing the opening you came from, go to the left and walk on the Sphinx's shoulder. When you reach the end, you will be able to see a mutant running around on the ground. Be careful because it throws fireballs. Start shooting, hoping back if necessary to avoid the hits. If it leaves, drop onto the ledge below and hang from the edge to lure it back. Once it is dead, safety drop onto the Sphinx's paw. On the ground\ Climbing up the rocky blocks - Drop to the ground and pick up the Magnum Clips between the two paws. You will open the door here later. Now facing the Sphinx, go to the left and to the back-side, where you can get some more Magnum Clips, in case you need them for the mutants (notice the door, you will open it in a short while). Return to the front side and having the Sphinx to your back, go to the far left (northwest), where you will find a low block you can climb on (as shown in this screenshot). When you do that, turn right and jump to the next block. Then take a running jump to grab the next block and pull up. Climb on the next lighter block. Instead of continuing straight ahead (which is a long route), turn left to face the wall and stand in the back left corner of the block. Turn a bit to the left to face diagonally towards the higher block and take a standing jump with Action to grab it (see here to get oriented). Pull up, climb on the next block and pick up the Magnum Clips. (The long route - If you want to see everything, instead of grabbing the aforementioned block, continue jumping\ climbing the next blocks until you reach the one beneath the crevice. You can either grab the crevice and shimmy across or take a running jump to grab the opposite block, jumping from the right hand side. Then climb on the block in the corner, vault on the ledge next to the wall and jump\ climb the blocks until you reach the Magnum Clips. Be careful though because you will need to take a running jump over the slide that drops you to the lower level.) From the block you got the Clips, face north and jump on the slope. Jump over the slide to land on the next ledge, then jump to the next one. Go around to the left where you will find a switch that opens the door to the left of the Sphinx. (The PS players will get a Save Crystal on their way.) Once you flip it, draw weapons and turn around. A flying mutant comes from beyond and it will not hesitate to damage Lara and push her off the ledge. So, you better go to the left (if the switch is to your back) and close to the corner, where the mutant cannot throw you down. Make sure you have at least half of your health, because you lose some of it when the mutant explodes close to you. When it is dead, return close to the switch and whilst facing it, locate the ledge with the Shotgun Shells on the left. Take a running jump there, pick up the Shells and take another running jump to grab the opposite ledge. Pull up and pick up some more Shotgun Shells. Secret - Before going to the door you just opened, take a running jump to the next ledge and take a look on the left. You may not see it directly, but there is a dark thing floating in the air. This is a pair of Uzis and some Clips for them. (This screenshot shows the location). To get them, line Lara to the pick-ups and take a running jump with Action to grab the invisible ledge (as shown here). Then pull up. When you get the pick-ups, two mutants fly from the other side of the Sphinx. You can kill them from here if you start shooting immediately, or quickly return back as described in the next paragraph and kill them from the ground. To return back, turn to face the way you came (north). Walk up to the edge of the invisible ledge, by pressing the Walk button, and take a running jump to grab the ledge you came from (as shown in this screenshot). Then drop onto the ledge below, then to the ground. Back to the ground - Go to the southwest corner of the area (close to the front side of the Sphinx). Here you can see a sandy area with two blocks and two pillars. (The following sequence is shown in this screenshot.) There is only one block you can climb to from the ground, so do that and take a running jump to the next block. From there, jump up to grab the ledge above and pull up. Walk straight ahead and take a running jump to land on the pillar (or grab if necessary and pull up). Turn around and take another running jump to the next higher pillar. Turn right and grab the rocky ledge above. Pull up. (The PS players will find a Save Crystal here.) The walkway around to the right and behind the pillar leads to a jaw trap that you need to pass carefully. Alternatively, if you do not wish to deal with it, take a running jump close to the Small Medi Pack (as shown here). Then follow the walkway and jump the gap. Use the switch to open a door back at the top of the Sphinx. A flying mutant will soon come. You can either deal with it from here or take a standing jump to the pillar with the Large Medi Pack, quickly pick it up, hang from the edge facing south, release to drop onto the slope and land on the ground, from where you can kill the mutant. For the least damage, make sure you press Action whilst sliding down the slopes. Door that leads to a pool and two pillars - Facing the Sphinx, go to the left to reach the back-side. Pick up the Magnum Clips if you did not do it before and go through the door. Slide down the slope backwards, pressing Action to grab the edge. Shimmy to the left and drop to the ledge. Pick up the Magnum Clips and climb up the blocks. On the T-junction, go left and drop into the pool where you will find the Gold Key. Climb back up the blocks and then climb the low blocks on the left. Slide down the ramp and jump at the edge to grab the bridge. If you miss it and drop into the pool, climb up the blocks and try again. Use the Key you just got to open the door on the other side of the bridge. Do not rush to enter. A centaur is running around the room, so kill it from here. Stand somewhere in the middle of the bridge and draw weapons. Lara will aim at the centaur and once she does that, do not release Action. That way you will lock the target and Lara will shoot him when he passes in front of the doorway. Just make sure you do not approach too close or he will start shooting fireballs. When he is dead, enter the room and pick up the Ankh #1 from the central platform and a Small Medi Pack from the ground. (The PS players will also find a Save Crystal here.) You need to return back outside to the Sphinx, so exit the room and drop into the water. Climb up the blocks to reach the first pool, drop into it and use the blocks to the right of the slide in order to climb out. Exit and go to the front side of the Sphinx. Climbing up the rocky blocks to the top of the Sphinx - With the Sphinx to your back, go to the far left (northwest) and climb on the block as you did before (see here). Turn right and take a standing jump to the next block. This time, do not proceed as before. Instead, turn around and take a standing jump to grab the ledge (as shown here). Go around to the left and pick up the Magnum Clips. Jump to the passage on the right and follow it to the end. Jump to the next ledge and follow it as it goes. Jump the gap and climb up the two blocks on the right. Jump the next gap and climb up the low blocks. Take a standing jump to the right and climb up the next blocks to reach the second door you opened. (The PS players will find a Save Crystal here.) Enter the room and go to the right. There is a movable block that you cannot miss as it is darker than the rest. Push it and go around the wall. Climb on the block and then onto the ledge above. Do not rush to proceed because another centaur is lurking in the next room. As the previous one, he will start shooting fireballs if you approach. Back up a bit, lock the target and shoot him until he falls. Then enter the room and pick up the Ankh #2 and the Small Medi Pack. Exit the room and drop close to the movable block. Exit to the ledge that overlooks the Sphinx's head and slide down the ramp on the right. Do not drop down, because a mutant is waiting for you down there. Kill it from here, using the sloped rock as a cover. When it is dead, drop down. Jump on the sloped block and then take a running jump to grab the ledge on the Sphinx's head (as shown in this screenshot). Climb to the top and place one of the Ankhs in the receptacle. Carefully walk to the front side of the head and drop onto the ledge. (The PS players will find a Save Crystal here.) Place the second Ankh in the receptacle. This opens the door between the two paws. You need to get down as you did before, so climb on the head ahead and drop onto the back of the Sphinx. Facing the head, go to the left and walk on the shoulder. Drop onto the ledge below and climb down the blocks to reach the paw. Then drop to the ground. Pool with huge statues beneath the Sphinx - Drop into the pool with the two huge statues. Swim down a bit until you reach the statues' knees where you will find some Shotgun Shells and Uzi Clips. Get them and return to surface if you want. There is a switch close to the right arm of the statue that you can use only on dry land. There is a tunnel beneath each statue that leads to a closed door. The right hand tunnel (as you face the statues) includes a lever that opens the nearby door. This will suck the water and lower its level, dragging you to a place that you can surface. Get out of the water and climb on the low pillar. From there take a standing jump to grab the next pillar and pull up. Turn right and take a running jump to grab the ledge. Go around to the left, but do not slide down the ramp. A mutant is flying just outside, so you better take care of it from here. Draw weapons and when Lara aims at it, shoot and do not let go of Action. That way you will lock the target and Lara will shoot it when it passes in front of the opening. When it explodes, slide down the ramp. (The PS players will find a Save Crystal here.) Turn left and carefully drop onto the ledge below. Turn around (face north) and take a running jump to grab the head of the statue (or land on the block below and grab the head). Then pull up. There is a Large Medi Pack inside the left ear of the statue (left if you face the wall, east). Facing north, position Lara in the ear (as shown in this screenshot) and press Action to pick up the Medi Pack. You need to reach the switch you could not use underwater before. To do that, you can either climb down the blocks between the two statues (losing a small percentage of health), then drop into the water, or take a running jump over the statue's nose. You cannot drop onto the nose, because something pushes you back. By taking the running jump, you will hit an invisible wall and reach the water intact. Climb out of the water, using one of the low ledges close to the right statue (as you face them). Use the switch to open the door in the tunnel beneath the left statue. Jump into the water and swim through the door. Surface in the opening and climb out of the water. Go up the long (really long) passage, picking up two sets of Magnum Clips on your way (and a Save Crystal for the PS players). The passage gets you back to the beginning of the level and behind one of the two gates. When you pick up the Scarab, the gate ahead opens. Quickly back up to the last corner. Two mutants will soon arrive and this is a safe spot. Start shooting and when one or both of them approach, side-flip to enter the last ramp you passed. Do not stay at the top, because the mutants come right up to the first couple of squares. Then they leave. Go to the corner again and repeat the same process until they explode. There is also a centaur outside. You may need to exit for a bit in order to lure it. Then quickly enter the passage and stay almost half way through. Lock the target and shoot the centaur until he falls. Once the coast is clear, use the Scarab to open the other gate. Go through it and pick up the Magnum Clips and Large Medi Pack from the entrance. Then slide down the steps and climb through the opening in the left hand wall. Dealing with Larson - As you probably remember, Lara gave Larson a second chance in the Tomb of Qualopec. He has been really nasty though, so this will be his last one. Once you drop into the room, Larson will appear from the right. Here you can do either: • Climb back to the opening and kill Larson from here. Lock the target and Lara will shoot him when he passes from her range. If you need it, back up a bit for a cover. Once he is dead, drop down and go to the right. Get the Scion from the pedestal. • Totally ignore him. Larson appears from the right hand side of the room, so as soon as you drop down, go to the left and stay behind the pillar for a bit. Larson will try to come behind you, so run to the right and quickly grab the Scion. Note though that you will miss one kill. Once you get the Scion, the level ends.
|
||
| « Level 11: Obelisk of Khamoon | Index | Level 13: Natla's Mines » |
| We would like to thank Nicky for her help. Many parts of this walkthrough would not have been written without her participation. Special thanks to George Maciver for proofing the text. Last update: 16 Dec. 2006 |
||
Tomb Raider: Atlantean Scion Walkthrough & Game Guide © 2000-2007 www.tombraiderhub.com |
||