Tomb Raider 3: Adventures of Lara Croft Walkthrough & Game Guide
SOUTH PACIFIC: Coastal Village
(Note about the statistics (CONTAINS SPOILERS) - The official number of the Secrets and the one that the Stopwatch shows is 3. However, there are 4 Secrets in the level because, once again, the game provides two alternative paths: through the Smuggler's hut or through the cave. There are two common Secrets and one in each path. If you are interested in all pick-ups and want all 4 Secrets, you must follow the First way/ through Smuggler's hut. If you have missed one Secret from a previous level, you can get the "extra" Secret, make it up and gain access to the Bonus Level. The number of kills and pick-ups depends on the path you will follow. The statistics above show the maximum amount of kills and pick-ups if you choose either of the paths and follow a linear route.)
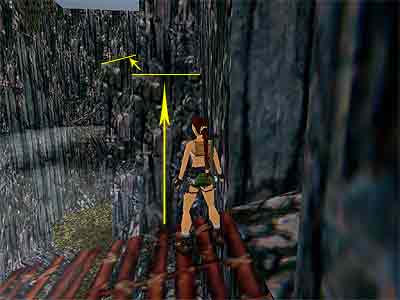
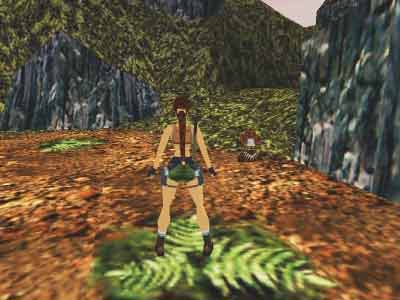
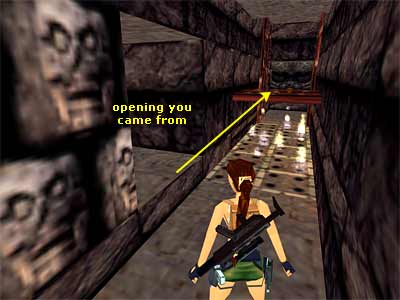
[Note about the enemies - Some of the tribesmen you will encounter throw darts. If one gets you, your health bar will turn into yellow and will start to decrease. You need to get a Medi Pack (or a Crystal) in order to be healed.] You begin the level underwater and the current pushes you forwards. Do not let the current push you a lot and swim to the right hand side between the rocks, where you will find the Smuggler's Key at the bottom of the lagoon. (The next two pick-ups and the Secret are shown in this page.) Turn around and swim back. Once you pass through the rocks, surface and locate the small ledge ahead, where you can climb out. Climb on this ledge, then onto the upper one and pick up the Small Medi Pack. Jump into the water and swim to the other side past the small sandy island. There is a small outcrop beyond that you can climb on. To do that use the ledge of the rock having the shore and the bamboo hut to your back. Climb on it and pick up another Small Medi Pack. 1st Secret - From the rock you got the Medi Pack, turn so that the shore and the bamboo hut are to your back. Take a look across the water and notice the slope and the flat ledge next to it on the right hand side. Walk to the front right corner and take a running jump to grab the slope. Shimmy to the right and pull up onto the flat ledge. Turn right and take a diagonal standing jump to the next flat ledge on the left hand side. From there take a running jump to grab the next ledge. Pull up and pick up the MP5 Clips. Jump into the water and swim towards the shore, where you can climb out of the water and onto the land. Objective - The deal is to reach the Village and there are two possible ways: through the Smuggler's hut (using the Key you found) or through the cave, following the slide behind the greenery on the right hand side (where you need to find three Serpent Stones). Both ways give you the number of Secrets you need in order to access the bonus level, but if you want all 4 Secrets, pick-ups and kills, you must proceed through to Smuggler's hut. Make your choice and follow the Common Route below. First way\ through Smuggler's hut - Climb the rocks and enter the hut. Use the Smuggler's Key on the lock at the other side to open the trapdoor. Be careful of the burning fire because it hurts!! Safely drop through it and get the Crystal. [Note about the Crystal (PC version) - We are not sure if this a bug or not, but we avoided getting the Crystal when we dropped down. We grabbed the corner of the trapdoor, dropped down and made one step away from the Crystal. On our surprise, the Crystal disappeared!!] Drop down and continue slowly to avoid getting hurt by the spiked trap. Crawl beneath it and follow the passage around to the right to reach a cave with a pool. Cave with pool - There are two crocodiles swimming around the pool and a tribesman on a ledge almost at the top of the cave. If you draw your weapons from the ledge in front of the entrance, Lara may try to aim at the tribesman and the crocodiles at the same time, which makes it difficult to shoot them. Take a running jump to the next ledge ahead and kill the crocodiles first, then the tribesman. Jump into the water and get four sets of Harpoons: two beneath the ledge at the entrance (one of them will be the Harpoon Gun if you do not have it), one almost at the middle of the pool on the right hand side and one more at the end of the pool on the left. Once you get them, climb onto the ledge in front of the entrance. Making your way up - Having the entrance to your back, take a running jump to the next ledge ahead. From here take a standing jump to the next one and then climb onto the rock ahead, which is next to the torch. Turn right and jump up to grab the vines. Monkey swing to the end across the pool and drop onto the ledge. Turn right and jump to the next ledge. Follow the path to the end and climb on the rock on the left hand side. Then climb on the next rock. Carefully advance at the end of the path and notice an opening above ahead. Jump to grab the vine-covered wall below the opening and pull into to get the MP5 Clips. (If Lara denies pulling into the opening, release Action and immediately press it again. Quickly press the up cursor key before Lara places her legs on the wall). Crawl back out, grab the vine-covered wall and press Jump to back flip to the ledge behind. Go back to the end of the ledge and take a running jump to the ledge above the entrance. (Note - After getting the Clips from the crawlspace, you can hang from the edge of the opening, climb down as much as you can and drop to the ledge below. You then need to turn around and, once again, follow the path to the end. Climb on the rock on the left hand side and then climb onto the next one. This time, do not proceed to the crawlspace. Instead, turn around to face across the pool to a ledge above the entrance. Take a running jump to this ledge.) Walk to the end and turn right. Jump up to grab the vines above and traverse to the other side. Drop on the bridge (where you killed the tribesman) and cross it to the end. Turn left and take a standing jump to the slide that you cannot see from here. Jump at the end of the slide to land on the ledge beyond. There is another tribesman above that shoots darts. Kill him from here and take a running jump over the spikes to grab the ladder. [Note - If you draw your pistols, Lara may not autoaim from the low ledge. In that case, you can hurry up the ladder (if you are lucky, no dart will get you). Once on the upper ledge, turn to the left and sidestep towards the edge (do not go too far to the edge though). Draw your Pistols and wait. The tribesman will be running about in circles, and Lara will aim whenever she can see him. This way, you can kill him with your Pistols and take no damage at all.] Climb to the top and pick up the Large Medi Pack. Drop backwards, hang from the edge and shimmy to the left until you can pull up. Do that and follow the path on the left to get the Crystal and the Small Medi Pack next to the dead body. Walk to the edge of the walkway and take a standing jump to the ledge below. Make sure you press Action whilst jumping to avoit hitting on the rocks. Or, back up to the wall and start running. At the edge, do not press anything. Lara will step off and land where she is supposed to. Drop backwards to hang from the edge and shimmy to the left until you can pull up. Do that, turn left and take a standing jump to the next ledge. Follow the passage to reach a red wooden bridge outside. 2nd Secret - Before crossing the bridge at all (stay at the beginning of it), turn right and take a running jump to grab the rocky ledge. Pull up and take a diagonal standing jump to the next ledge on the left (see this screenshot). Then jump to the next ledge on the right and pick up the Grenades. Make your way back to the bridge the same way you came (taking standing jumps). (Note - The path below the bridge would be your way if you had followed the way through the caves instead of the Smuggler's hut. You still can go down by sliding down the rocks and get two more Secrets. But since you have reached this part you may want to explore the Temple first in order to get all pick-ups.) Inside the Temple - Cross the bridge to enter the Temple. On the T-junction, the left way leads you inside (the right way is a dead end). Walk slowly to the left or the blade that pops out from the wall will kill you. A tribesman appears from nowhere behind you, so take care of him. You can step backwards having the entrance on your right. When you see the tribesman coming from the dead end, jump over him (otherwise he will push you towards the blade) and kill him. Crawl under the blade to get inside the Temple. When you enter, Lara looks up at the window on the right above. This means something: if you try to pass over the lighted part on the floor, you will trigger poisonous darts and raise spikes. That way, you will not be able to get the Crystal beyond. Head to the back right corner of the room and press the button to cover the window and deactivate the traps. Walk to the edge of the stream, pick up the Large Medi Pack and take a running jump over the stream. Climb on the ledge and start crawling to avoid the poisonous darts. Get the Crystal. [Note - The slide behind the Crystal leads you directly to the Village. The stream you just jumped over and the rocks below the red wooden bridge you passed over outside lead you (from a different way) to the area where you need to find the three Serpent Stones in order to get an access to the Village. So, there are three ways to enter the Village: through the slide, the stream or the bridge. The point you enter the Village through the slide and the point you enter the Village through the stream or the bridge are different. The number of the kills and pick-ups in either of the two last ways (stream or bridge) are the same. You just get them by exploring the area with the Stones and the Village in a different way. If you are interested in all kills and pick-ups, you must follow either the stream or the bridge.] Entering the Village from inside the Temple by sliding down the chute - After getting the Crystal, slide down the chute and draw your weapons. Enter the Village and kill the tribesman that is lurking among the huts. Be alerted for another tribesman that throws darts from the hill on the left hand side. Once you are done with both, locate the ledge on the right side of the entrance (as you face it). Climb on it and get the Grenades. Drop down and enter the nearby hut to get a Rocket. Having the entrance to the back of you, head forwards between the huts and turn right towards the pool or head to the right between the hut and the rocks and kill a third tribesman. Enter the hut with the fire and pick up a Small Medi Pack. Exit the hut but do not even think to enter the one on the right because the swamp prevents you from getting the Large Medi Pack. Instead, continue ahead behind that hut and get the Crystal (follow the Common Route below). Entering the Village from inside the Temple by dropping into the stream - After getting the Crystal, crawl back and drop into the water. The current will push you to an outdoor area and finally drop you onto a ledge in front of a waterfall. Press the Look button if you want to break the camera that shows Lara from a distance and jump into the alcove behind the waterfall. Pick up the Serpent Stone #1. Carefully jump back to the ledge in front of the waterfall. The distance is very short, so you risk of jumping over the ledge instead and fall down to your death. To make sure you do not kill Lara, back up enough steps in the passage behind the waterfall, sticking to the wall diagonally opposite the ledge and angle Lara towards it. Take the standing jump, and note that you may need to press Action to cut off Lara's momentum and make her land on the ledge. You can see the ladder on the left (as you face the waterfall). Ignore it for now and take a running jump to the ledge on the right. Follow the greenish path to the end and carefully drop down to get the Crystal. Climb back up and then climb onto the ledge on the right. Proceed between the trees having your weapons drawn because a tribesman will attack. Take care of him and follow the passage around to the left until you reach a swamp (take a look above. You can see the red wooden bridge you crossed before). (Note - From the place you got the Crystal, you can visit the valley with the small pool and the spikes below. For info, see this page.) Area beneath the red wooden bridge - Take a running jump to the rock at the middle of the swamp and crouch to avoid the darts. Crawl to the other edge of the rock where you can stand. Notice the Large Medi Pack on the left. You can jump to the solid ground beyond the swamp, but there is nothing interesting there, apart from a tribesman that will attack from behind. You can explore this area though and kill the tribesman if you are interested in all kills. Take a running jump to the rock where the Medi Pack is and pick it up. Take a running jump back to the rock at the middle of the swamp, crawl under the darts towards the area you came from and take a standing jump back to the solid ground. On the trees - Having the swamp to the back of you, proceed forwards between the two trees and climb onto the flat ledge ahead (that is supposed to be the roots of the tree). Continue to the left and climb on the tree trunk. Now climb on the rock to the right hand side and turn around. You can see a branch on the right hand side that goes upwards a bit and another branch that ends to a greenish ledge on the left. Jump to the branch on the left, then to the next triangular ledge. Walk to the front corner and notice the rock with the Shotgun Shells. Take a standing jump to grab the rock, pull up and get the Shells. Make your way back the same way you came. Now jump to the right branch and follow it to the end, which ends to a rocky ledge. Take a running jump to grab the opposite branch and pull up. Pick up the Serpent Stone #2. 3rd Secret - Notice the vine-covered alcove opposite you got the Stone. Pull into and pick up the Desert Eagle Clips. Drop back onto the branch. Having the alcove you got the Secret on your right, jump to the greenish ledge ahead above the torch. Step off the ledge to slide onto the lower greenish ledge below. From there, jump into the water and let the current push you and drop you on the small ledge in front of the waterfall. If you do not want to lose health, from the branch you got the Stone, step off the branch onto the purple rock to slide onto the ground between the trees. Make your way back to the ledge in front of the waterfall the same way you came. Follow the part of the walkthrough Once you have the first two Stones below. Entering the Village by dropping down from the bridge - After getting the Crystal, crawl back towards the stream. Drop onto the ledge above the water and take a running jump over the slope to land on the other side (be careful of the dart). Carefully crawl beneath the blade and exit the Temple to reach the red wooden bridge. Cross it to the end but do not enter the cave. Turn left and notice the ledge below. Take a standing jump onto it and safely drop onto the ground. Turn around. There is a swamp on the left that you need to follow in order to proceed with the level and a cave on the right from where you would have entered this area if you had followed the second way, as mentioned at the beginning of the walkthrough. You can explore this cave, but be alerted of the tribesman that will attack from behind. (Skip the next paragraph and continue with the walkthrough.) Second way\ through the cave - Slide down the slope behind the greenery on the right hand side. Follow the passage and pass the shallow pool. Climb on the upper ledge from the left or right hand side and continue ahead. Draw your weapons because a tribesman will attack from behind the rocks on the left. Take care of him and continue ahead towards the swamp. Approach the swamp, pressing the Walk button to reach the edge of it. Take a running jump to grab the rock at the middle of the swamp. Pull up, but do not proceed further because the darts will hit you. Turn right and notice the rock with the Large Medi Pack. Take a running jump to the rock, get the Medi Pack and take a running jump back to the rock at the middle of the swamp. Crawl under the darts towards the other side of the swamp and take a standing jump to the solid ground. On the trees - Having the swamp to the back of you, proceed forwards between the two trees and climb onto the flat ledge ahead that is supposed to be the roots of the tree (if you are interested in all kills, explore the area on the right among the trees to trigger a tribesman). Continue to the left and climb onto the tree trunk. Now climb onto the rock on the right hand side and turn around. There is a branch that goes upwards a bit on the right and another branch that ends to a greenish ledge on the left. Jump to the branch on the left, then onto the next triangular ledge. Walk to the front corner and notice the rock with the Shotgun Shells. Take a standing jump to grab the rock, pull up and get the Shells. Make your way back the same way you came. Now jump to the right branch and follow it to the end which ends to a rocky ledge. Take a running jump to grab the opposite branch and pull up. Get the Serpent Stone #1 on the left. 2nd Secret - Notice the vine-covered alcove opposite you got the Stone. Pull into and pick up the Desert Eagle Clips. Drop back onto the branch. Having the alcove you got the Secret on your right, jump to the greenish ledge ahead above the torch. Step off the ledge to slide onto the lower greenish ledge below. From there, jump into the water and let the current push you and drop you onto the small ledge in front of the waterfall. Having the waterfall to the back of you, turn left and take a running jump to the ledge ahead. Follow the greenish path to the end and carefully drop down to get the Crystal. (Note - From the place you got the Crystal, you can visit the valley with the small pool and the spikes below. For info, see this page.) Climb back up and make your way back to the ledge in front of the waterfall the same way you came. Jump into the alcove behind the waterfall (press the Look button if you want to break the camera that shows Lara from a distance) and collect the Serpent Stone #2. Carefully jump back to the ledge in front of the waterfall. Once you have the first two Stones - Take a running jump to grab the ladder. Do not let go because there are spikes below. Climb up a bit and dismount into the alcove on the right. Follow it around to the left and climb up the next ladder. When you reach the top, climb onto the rock on the right and pick up the Small Medi Pack. Drop to the ground and go to the other side of the area. Climb on the block on the right and kill the tribesman that is lurking in the doorway on the left. (Bug note - Do not place any Stone, unless you have all three. If you place one or two Stones and then come back to place the rest, you may activate a bug where the gates do not open.) Jump to the ledge near the doorway and turn around. Take a running jump to grab the ledge above the block you were standing before. Turn right and take a running jump to the purple ledge, then jump onto the greenish ledge with the torch. Pick up the Serpent Stone #3, slide down and make your way to the doorway. Place each Stone to open the corresponding gate and slide down. Follow the passage to enter the Village. Inside the Village - Draw your weapons and kill the tribesman that throws darts. Go to the other side of the hill and pick up the Small Medi Pack. Slide down to the area where the huts are and kill another tribesman that is coming from inside the hut on the left. There is another hut with a Rocket on the right. Pick it up and as you exit this hut, make a U turn to the right and climb on the ledge next to the hut to get some Grenades. Drop to the ground and either head forwards between the huts and turn right towards the pool or head to the right between the hut and the rocks. Kill a third tribesman and enter the hut with the fire to pick up a Small Medi Pack. Exit the hut but do not even think to enter the one on the right because the swamp prevents you from getting the Large Medi Pack. Instead, continue ahead behind that hut and get the Crystal (follow the Common Route exactly below). Common Route - There is a passage to the left side of the pool, between the hut and the rocks. Proceed carefully because a tribesman pops out from the right and throws darts. You can kill him with your Pistols, but you need to avoid his darts. As soon as he appears, jump back whilst shooting and side-jump to the right behind the rocks. Side-jump to the left to shoot him some more, then immediately side-jump to the right again. You may need to repeat this once or twice, but his poison darts will not harm you at all. Follow the passage to reach an area with a tree house in the middle. Another tribesman attacks, so take care of him. Go towards the swamp and climb on the rock on the left. There is another tribesman that throws poison darts, but if you stay on the rock, he will not attack you, so you can kill him even with your Pistols and with no health loss at all. If, by accident, you jump on the rock where he is standing, instead of shooting you with darts he will start hitting you with his quiver, so avoid doing this. Jump over the sloped rock to land on the ledge where the tribesman was. Turn the wheel to raise a trapdoor above a spiked pit back to the Village. [Note - Some of the leaves in the swamp are solid. You can jump from the one to the other (starting from the one in front of the ledge with the wheel) and proceed until about the middle of the swamp, but you cannot reach the opposite bank for now. Wait until the next level for this.] Jump on the sloped rock and then drop to the ground. A tribesman is waiting for you close to the tree house. If you do not want to lose health at all, turn around and run back towards the swamp. Take a running jump to the solid leaf on the left, so as to shoot the tribesman from safety. If you are lucky, he will fall into the swamp! He will not vanish in the mud and Lara can kill him normally. Note that he does not fall in every time, but most of the times (like this one) he does. Make your way back to the Village. Kill another tribesman that is lurking among the huts and head to the far left of the area, close to the hut with the un-reachable Large Medi Pack. Go around to the backside of it to reach the trapdoor you just raised. Before crossing the trapdoor, jump up to grab the ledge above. Pull up and get the Shotgun Shells. Drop down and enter the next area. 3rd or 4th Secret* - As soon as you enter the new area, you can see two huts in front of you. Go to the right between the rightmost hut and the wall. There is a cave in the far right corner, which includes the level's final Secret. Before getting the pick-ups, turn around and kill the tribesman that attacks from behind. Then pick up the Shotgun Shells and the MP5 Clips. (* Note - If you have followed the normal way, this should be your 3rd Secret. If you backtracked following this walkthrough, this should be your 4th Secret. In that case, the statistics at the end of the level show "4 out of 3" Secrets.) Second Village - The left hut (assuming you have the entrance of the area to your back) contains some Flares and you can enter from the backside. If you pass between the two huts, two more tribesmen will attack. Go to the far left corner of the area (opposite the cave with the Secret) and climb onto the ledge close to the tree roots to reach the upper level. Here you can see two more huts. The first one does not include anything and if you pass through the passage between this hut and the wall on the right, a tribesman that throws darts will appear from behind (avoid this passage if you are not interested in all kills). Enter the second hut, where the entrance is between the two huts, and turn the wheel to open the trapdoor of the tree house and alert one more tribesman that attacks from behind. As soon as you turn the wheel, immediately hop back once and take a standing jump on the block. Turn around to kill the tribesman at your ease, with your Pistols. Tree house\ huts roof - Exit the hut and drop down to the lower level. Climb up the ladder to enter the tree house and dismount on the right. The window opens as you approach, so climb on the windowsill and take a running jump to the wooden ledge on the left hand side. As you enter the hallway, a tribesman attacks. Take care of him, being careful of the burners on the left. You cannot pass the burners now, so go to the right of the hallway. Take a running jump from the windowsill to the bamboo ledge. Continue ahead and take a running jump to clear the gap. Pick up the Harpoons in the dark alcove on the left. Go around the second hut and climb on the top, taking standing jumps if necessary to clear the angled ledges. Jump up to grab the bars and traverse above the spikes. Drop down and continue to the next hut. Carefully jump to the balcony with the red railings and enter the tree house. Press the button to raise a ledge above the burners and alert yet another tribesman that attacks from behind. Safely drop to the ground and make your way back to the burners through the tree house with the ladder. Hallway with burners - To jump on the ledge above the burners, you need to take just a running jump. Walk to the edge of the burners, tap back twice and take a running jump on the ledge. If you cannot do it, stand on the raised ledge of the doorway next to the burners and take a diagonal standing jump to the ledge (as shown in this screenshot). From the edge of it, take a standing jump to land between the two gates. Press the button to open both gates and quickly roll and jump on the ledge above the burners, because a tribesman is coming through the right hand gate. Shoot the tribesman from there. If he hides in the passage on the right, jump back down. Do not enter the passage yet. You will have enough time to shoot him and kill him before he approaches you again. Do NOT push the button in the other alcove because it only turns on a burner beneath. Enter the hallway with the two moving blades. To get past them, stick to the left hand wall and walk until the middle of the gate. When the blades appear, follow them as they move forwards and then sprint. Turn the wheel to open the nearby gate and the trapdoor in the pool below. Slide backwards, grab the edge and safely drop down. Jump into the pool and swim through the trapdoor you just opened. A crocodile appears, so either use the Harpoon or keep swimming until you can climb out. Then kill it or simply ignore it. (Swim as close to the bottom as possible in the tunnel, and at the point where it becomes vertical, immediately swim upwards. The crocodile will not even reach you if you are fast). Climb up the ladder and follow the passage. Cross the bridge and at the end of the next passage take a running jump to grab the edge of the tree house. Pull up to end the level. The cut scene shows Lara entering the tree house. A soldier whisks a fly from his wooden leg (that has been cut off below the knee). Lara asks what happened and he tells her that the tribesmen did that to him, although he is not sure because it was dark. He then tells Lara that his plane crashed into the mountains and Lara asks him if he knows any way to cross the swamp. He gives her a map and tells her that he will not follow. He then tells her that if she meets any of his man, she should warn them to stay away from that place.
|
||
| Index | Crash Site » | |
| We would like to thank Nicky for her help. Many parts of this walkthrough would not have been written without her participation. | ||
Tomb Raider 3: Adventures of Lara Croft Walkthrough & Game Guide © 2000-2007 www.tombraiderhub.com |
||