Tomb Raider 4: The Last Revelation Walkthrough & Game Guide
Level 5: Valley Of The Kings
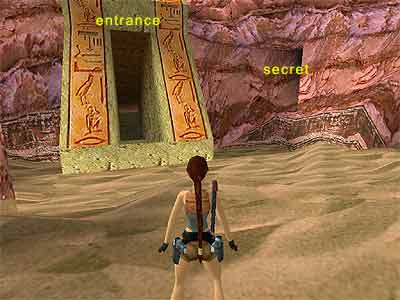
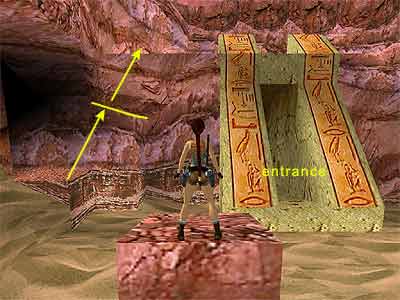
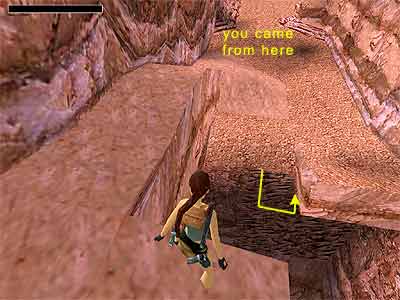
[Bug note - Lara may start this level with her left arm disabled. To cure this, draw a flare and throw it to the ground. Everything should then get back to normal.] The cut scene shows the guide walking. We can also see the van that arrived in the previous FMV and a jeep next to it. Before putting a foot on the sand, be prepared for the up and coming gun battle. Werner's ninjas will shortly be everywhere. The Shotgun does a pretty good job here, and do not hesitate to spend some ammo for it because the next two Secrets, should you collect them, will replenish your supply. Each ninja leaves a pick-up, but wait until the battle is finished before collecting them all. The paragraph below is a decent strategy for getting through the gunfight without losing too much health. Drop onto the sand and walk a few steps out into the open. The first ninja appears from behind the rock on the right. Kill him whilst he climbs the rock and head to the far right corner of the area to avoid the ninja that shoots at you from behind the jeep on the left. Kill the next two ninjas that enter the arena from the alcove. Turn around. The ninja from the jeep will now be coming towards you. Take care of him and be ready for the next two ninjas that materialize from the far right corner of the area (or the bottom left assuming you have the entrance to the back of you). They are quite far away and are easy to kill. Take them out. As soon as you kill them, another ninja appears from the alcove in the far left corner of the area (or the back right assuming you have the entrance to the back of you). Kill him, too. The cut scene shows the guide walking towards the van. This cut scene is triggered when you kill the last ninja as described above. If you killed him before killing all of the ninjas, you will see the cut scene during the fight. Now pick up the goodies which will now be all around you: a Large Medipack, two Small Medipacks and two sets of Uzi clips. The last ninja as described above drops the Ignition Key for the jeep. Before getting the jeep, let's go for a couple of Secrets. 1st Secret (1-3\ total: 19-70) - Assuming you are facing the entrance, enter the alcove in the far right corner of the area (as shown here). Climb up onto the block and pick up the Shotgun (or Ammo if you already have it) and two Normal Ammo's for it. 2nd Secret (2-3\ total: 20-70) - Assuming you are facing the entrance, climb up onto the block in the far left corner of the area. Take a diagonal standing jump to grab the upper block and pull up. Climb up onto the next ledge. (See this screenshot to get oriented) Pick up the two Shotgun Normal Ammo's, Small Medipack and Uzi Ammo. Make your way back down. (Alternative method for killing the Ninjas - You can dash and climb onto the blocks which lead to the 2nd Secret as soon as the level begins, and take out the ninjas from up there. You will only lose a little bit of health. However, you might have to kill one or two ninjas before you go up. You might also need to hang from the edge in order to attract their attention, after which you can hoister yourself back up again and shoot them from safety. After that you can go for the 1st Secret, gather all the ammo the ninjas leave when they die, grab the Ignition Key, and head for the jeep.) When you get into the jeep, the guide starts driving his car up ahead of you. Do not be in a hurry to pass him. This is not a race. As you go, you may need to avoid the grenades that the guide throws (although you do not get hurt in the PC version). The slopes that you are ready to drive over cannot be passed on foot. If you are careful, you will notice that whilst driving up the slopes, the nearby rocks open, creating climbable passages. Those passages will help you in case you get out of the jeep and accidentally slide down a slope. Look for those passages near the slopes. This means that you can explore the level on foot. Be warned though that you need the jeep in order to finish the level! See the Note at the bottom of the page if you do not know how to control the Jeep. Driving the jeep - Follow the cave trail (it is one way). When you reach the first open area, run over the two ninjas and continue downhill. If you are having trouble with the ninjas, wait behind the block to the right as you go up and wait for them to come out from behind it. Then quickly run over them. When you reach the second open area, stick to the right hand wall and go up to the bridge to run over another ninja. 3rd Secret (3-3\ total: 21-70) - Get out of the jeep and leave it on the bridge. Backtrack on foot to the bottom of the bridge's ramp. Hang from the lower ledge of the pit and climb down. Then climb to the right and up to the opening; pull up. (See here if you cannot find the handholds). Drop down at the other side and pick up the Grenadegun Super Ammo and Small Medipack. Climb back out and return to the jeep. (Note - You may have troubles climbing through the opening. This is quite tricky. Lara initially refuses to climb through the opening. In order to get her in there, release Action and press it again immediately to grab the edge a second time, so that Lara is hanging only with her hands. Again, immediately press the Duck and Up arrow keys at the same time before Lara takes the climbing position.) Drive through the cave going uphill. Run over the ninja and be careful not to fall from the bridge. Follow the bridge around to the left and then to the right, running over another ninja as you go. Enter the next cave and go uphill to end the level. (Note - If you want to kill the last ninja without losing any health, you can do it by shooting at him. Before turning right on the bridge, exit the jeep and equip the Pistols. Lara will not target the ninja because you are too far away, but you can easily kill him by shooting towards him. You will see the blood popping out.) Controlling the jeep - To enter the jeep, stand close to either door and choose the Ignition Key from the inventory. Lara will open the door, enter the jeep and start the engine. If she gets in from the right door, she will move to the driver's seat herself. Press Action to run the jeep and the direction keys to maneuver. Press the Jump button to break. If you need to move backwards, press the Sprint button and the Walk button to return to the normal position. To dismount, make sure you are on a flat area and the jeep is still. Press the Jump button along with the left or right direction key. Note however that on some systems only the left key works, so do not stop having a wall on your left.
|
||
| « Level 4: Burial Chambers | Index | Level 6: KV5 » |
| We would like to thank TR-Player and Nicky for their help. Many parts of this walkthrough would not have been written without their participation. Special thanks go to Scottlee for proofing the text. Last update: 07 October 2007: Text has been proofed and screenshots have been added. |
||
Tomb Raider 4: The Last Revelation Walkthrough & Game Guide © 2000-2007 www.tombraiderhub.com |
||