Tomb Raider 4: The Last Revelation Walkthrough & Game Guide
Level 8: The Great Hypostyle Hall
This level is linked with both the previous and the next one (Temple Of Karnak and Sacred Lake). You need to visit each level twice in order to proceed with the game.
First Time
After sliding down the small ramp, climb out of the pit and go to the left to reach the outside area. Get the Shotgun Normal Ammo from the rocks ahead and then go left behind the pillars. Kill the black scorpion that attacks when you approach them. Pick up the Small Medipack and Flares, and kill a second black scorpion that appears when you step on the block where the Flares are. Return back and head to the other side. Climb over the block to reach another room that contains more pillars. Go to the right and kill the two black scorpions. Here you can see three blocks at the back of the room. Climb on any of the blocks, then on the ledge. Pick up the Shotgun Wideshot Ammo from the right hand side and the Uzi Ammo from the left. Depending on where you have stepped to do this, you will have to battle two more black scorpions. Grab the bars in the middle of the ledge and traverse forwards, the left. Drop onto the next ledge and jump to the alcove to the get the Shotgun Normal Ammo. Jump back to the previous ledge, then to the opposite one, and finally to the dark alcove. Pick up the Flares and jump onto the ledge where the bars are at the ceiling. From here, jump to the sandy ledge and go to the end. Get the Uzi Ammo and Small Medipack before safely dropping down to the ground. Approach the deep pit. The cut scene shows Von Croy and his men discovering Lara's abandoned jeep. "After her" Werner orders his men. Do not be in a hurry. They will need a bit of time to catch up with you yet. Go to the left hand side of the deep pit and take a running jump to grab the opposite side. Hoist yourself up, and in the next area go through the opening on the north side (the crawlspace on the left leads to a closed door which you do not yet have the key for). Pick up the Small Medipack from the floor and the Uzi Ammo from the ledge on the right. Slide down the ramp on the left to skip to the next level. Pick up the walkthrough for Sacred Lake (First Time).
|
||
Second Time
|
||
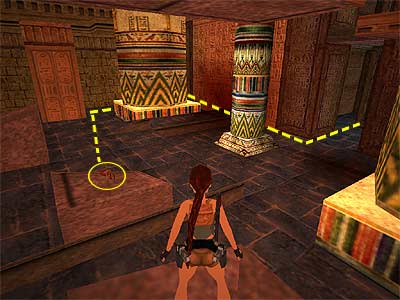
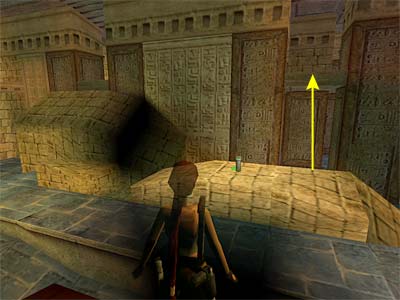
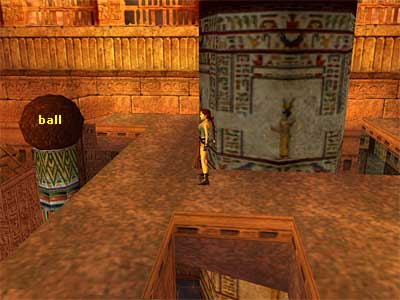
(Note about the ninjas - You will encounter ninjas again here, but this time they will appear in black and red uniforms. This newer variety is considerably more dangerous than their counterparts in light blue. They each carry a sword with them, and they are not afraid to attack with it. They also use it to protect themselves from your bullets. So, it is useless to keep shooting at them whilst they are twirling it around. What you can do is to first shoot them, and when they then use the sword for protection, keep holding your gun and turn to the left or right. This will make them stop using the sword and you can shoot them again. Do that until you kill them. Alternatively, you can holster your gun and draw it again.) After sliding down the slope, climb out of the pit and go to the left to reach the area outside. Be on your toes. A ninja in black and red uniform is waiting outside. Take care of him by dropping into the pit you just climbed out of and killing him from there, as he does not seem to follow you in there (or see the note above on how you can kill him). Pick up the Uzi ammo he drops and climb over the block on the right to reach the room with the pillars. When you enter the room, a second ninja appears. Immediately jump backwards and kill him. Go to the left of the pillars to reach the sandy passageway. When you reach the corner at the end, two more ninjas appear - one from ahead and one from behind. Now that they are two of them, survival has become more difficult, because when you focus on attacking one of them, the second one will attempt to catch you unawares. Here is what you can do: • If you want the kills and do not want to lose health, turn around when you reach the corner of the sandy passageway and sprint back to the room with the pillars. Continue to the left and head to the blocks you formerly used to climb up to the higher part of the room. Monkey-swing to the other side and jump onto the ledge above the sandy passageway. Kill the ninjas from here. When you are done, safely drop onto the ground. • If you triggered the two ninjas whilst on the ground but do not wish to waste time killing them, sprint past them instead. You should be able to run to the edge of the pit and jump to grab the opposite ledge before they can reach you. Be careful, though, not to fall into the deep pit as a consequence of your haste. • If you want, you do not even need to trigger their appearance in the first place. Just climb to the upper part of the room with the pillars, make your way to the sandy ledge by traversing on the bars, go to the end of the ledge around to the left, and drop to the floor. With this way, you will pass the trigger block from above. Follow the sandy passageway to the end and stand on the left hand side of the pit. Take a running jump to grab the opposite side and pull up. This time, do not follow the opening on the North side. Instead, crawl through the opening at the far left corner (Northwest). Follow the passage and use the Hypostyle Key to open the door at the end. Inside the Hypostyle Hall - Be on your guard for the two ninjas who come at you shortly after entering the Hall. It is advisable you equip a powerful weapon like the Shotgun, at least for this encounter. First though, enter the hall and go to the left. One of the ninja's emerges from the passage on the right and the other from behind the rocks on the left. The one on the left will start shooting at you using the Uzis, so you had better take care of him first. Then you will have all the time you want to kill the other one with your Pistols. Get the Uzi that one of them dropped (Ammo if you already have it) and the Small Medipack from a stone close to the columns in the centre of the room. (Note: If you cannot see the Medipack, it means that one of the two ninjas took it, even though that it obviously did not do him much good.) If you think that heading to the left is difficult because of the encounter with the ninjas, and you are not interested in collecting the Medipack, you can go to the far right corner and climb onto the rocks. This way you can kill the ninja's one by one, i.e. more comfortably. You can complete the next part in two different ways. You need to pass through two more halls, and you can do that following the ground or the upper ledges. Note though that by following the ground, you will encounter the ninjas face to face, where as by following the upper ledges, you can potentially avoid this and take a shortcut. So, make your decision and then follow the Common Route below. Following the ground - Go through the opening on the right from where one of the ninjas came popped out from to reach a second hall with columns. Get the Shotgun Normal Ammo from the rock almost at the centre of the room and kill the ninja that emerges from the right. (Note - Although the last ninja is triggered when you step on the rock, you can avoid him. When you enter the hall, go to the right and then around the big circular column. Step on the rock where the Shotgun Ammo is and the ninja will not appear. See this screenshot to get oriented. Note though that the small room between the two halls you passed before is a reset area, and if you go through it again and come back, the ninja will appear if you once again on the rock.) There are three openings on the other side. Go through the opening that is almost blocked off by stones on the right. Climb over the stones, drop into the small room, and get the Large Medipack from the right corner. Return back to the hall and go through the second opening to reach a third hall. Jump onto the block with the Flares and draw your weapons to kill a ninja that emerges from up ahead. Kill him quickly or he will start shooting at you with his Uzis. From the block where the Flares were, turn to face the way you cam and jump to grab the edge of the opening above (as shown in this screenshot). Pull up and turn around. Grab the bars above and traverse across. At the T junction, go to the right (West). When you drop onto the ledge, turn around and kill the ninja that all of a sudden is traversing towards you. Now, stand underneath the switch and jump up to grab it. Make sure you stick to the wall in doing so, otherwise Lara will grab the bars instead of the switch! This will raise a trapdoor in the previous - second - hall (skip to the Common Route below). Following the upper ledges - When you are done with the two ninjas, go to the far right corner of the hall (southwest) and climb onto the rocks. Jump to the middle of the ledge and grab the bars above. Traverse forwards, and at the T junction continue to the right to reach the small room. Drop down and go to the other side. Jump to the ledge on the left of the doorway or hang and shimmy to the right to avoid falling down. Take a running jump to the next ledge (south) and draw your guns because there is a ninja that lurks behind the rock below. Shoot the air to wake him up and then kill him (you will get the Shotgun ammo later). [Note - Here you can take a shortcut, allowing you to ignore the next Hall. Jump up to grab the bars and traverse towards the trapdoor. Seeing how it is not raised yet, as you have not used the switch in the next Hall, let go of the monkey bars and grab the ledge directly beneath the trapdoor (as shown here). If you decide to do that, skip the next two paragraphs.] Jump up to grab the bars and traverse forwards. Then traverse to the left. Drop into the small room and go to the other side. Kill the ninja below you in the third hall quickly or he will start shooting at you with his Uzis. When you are done, grab the bars and traverse forwards and then right. When you drop onto the ledge, turn around and kill the ninja that is traversing towards you. Now, stand underneath the switch and jump up to grab it. Stick to the wall in doing so, otherwise Lara will grab the bars instead of the switch! Flicking the switch will raise a trapdoor in the previous hall (the second one). Common Route - Grab the bars again and traverse forwards (East). Then traverse to the left, making your way back to the second hall. Keep going, and at the intersection go to the left, passing underneath the trapdoor you just raised as you do so. Drop onto the ledge and turn around. A ninja is swinging towards you, so kill him (if he drops onto the ledge, you can get the Shotgun Wideshot Ammo he left. Otherwise, wait and get it later). Pick up the Uzi Ammo from the left corner and climb up the blocks on the right to reach the upper part of the hall. Cross the ledges, passing (or jumping) above the trapdoor as you do so. Jump to the right or left to clear the column in front of you and head to the middle where the hole is. The camera changes view, disabling the Look button. However, it helps you locate the large brown ball on the top of the column at the end of the ledge (as shown in this screenshot). Shoot the ball. You may need to duck to do this. Otherwise, walk to the upper left corner of the ledge, turn so as to face the stone diagonally, take three steps back, and shoot it. The ball will fall down, breaking a section of the floor below. Make your way down the same way you came, or take a running jump to the column with the sloped top opposite (east) the ledge you are standing on. In the case of the latter, slide backwards down the sloped top, hang from the edge, safety drop onto the lower block, and step down to the floor. If you are willing to sacrifice half of your health, you can hang from the edge and drop down. Get the Shotgun Wideshot Ammo that the hanging ninja dropped if you did not get it earlier. If you followed the upper ledges, you need to pick up the Shotgun Normal Ammo from the second hall, a Large Medipack following the right opening (Northwest) that is blocked by the stones in the second hall as well, and the Flares from the third hall. Into the pit the ball revealed - Drop into the pit that the destructive brown ball has revealed to you. Crawl through the opening on the right (east) to get the Uzi Ammo. Crawl back and climb up onto the two ledges on the left (north). There are two openings on the left hand side of the hallway, both leading to the same room. You can see the tall block with the glowing pyramid on top, but you cannot yet pull the chain in the same room. (Lara says "No"). There are three more openings. There is the left one (South), which does not include anything, the middle one (West), which includes some Flares and Shotgun Normal Ammo, and the right one (North), which contains Uzi Ammo. Get these extras if you want and return back to the hallway. Go to the left and stand underneath the opening in the ceiling. Jump up to grab the ladder and climb to the top. Needle Puzzle - You must have noticed the big needles in the rooms where you got the pick-ups. If you were really observant, you might also have noticed their red pointy spikes on the end. This part of each needle must face the glowing pyramid in the central room. To view this central room and the red pointed part of each needle, simply crouch and take a look through the barred hole in the floor. In the first room, the needle is pointing east and you need to point it south. So, stand in front of the handle facing south and press Action once (Lara will push it. She cannot pull it anyway). Follow the next opening to reach the second room. The needle here is pointing west and you need to point it east. So, stand in front of the handle facing north and turn the needle twice. Follow the next opening to reach the third and last room. The needle is pointing east and you need to point it north. So, stand in front of the handle facing north and turn the needle once. Do not worry. You are not supposed to see a cut away even if you do everything correctly. Return to the room with the glowing pyramid and pull the chain. The cut scene shows the three needles to breaking the glowing pyramid with blue energy bolts. Climb onto the block where the pyramid was and pick up the Sun Disk. Drop through the hole in front of the west wall that opened when you collected the Sun Disk. Then follow the hallway. Pick up the walkthrough for Sacred Lake (Second Time).
|
||
| « Level 7: Temple of karnak | Index | Level 9: Sacred Lake » |
| We would like to thank TR-Player and Nicky for their help. Many parts of this walkthrough would not have been written without their participation. Special thanks go to Scottlee for proofing the text. Last update: 14 October 2007: Text has been proofed and screenshots have been added. |
||
Tomb Raider 4: The Last Revelation Walkthrough & Game Guide © 2000-2007 www.tombraiderhub.com |
||