Level 17: The Lost Library
* Plus 3 destroyed fire elementals\ 4 for the PS version.
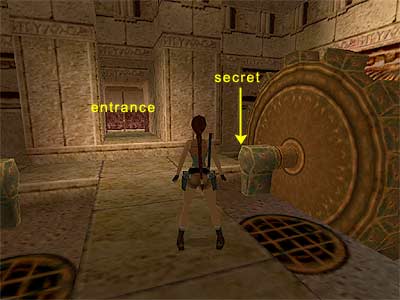
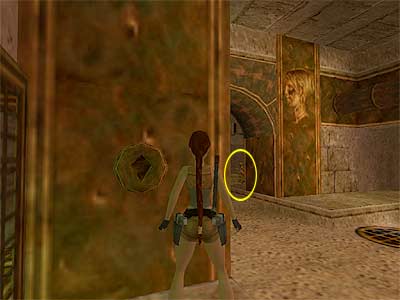
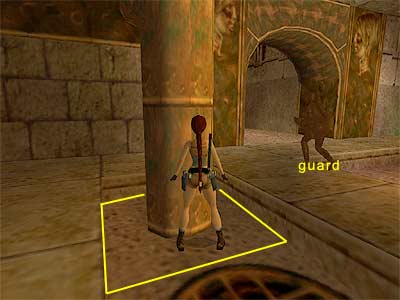
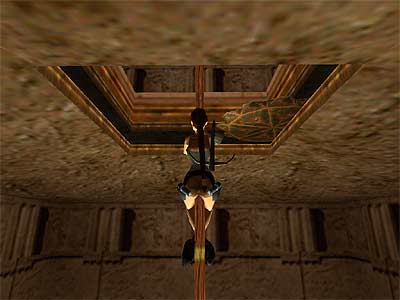
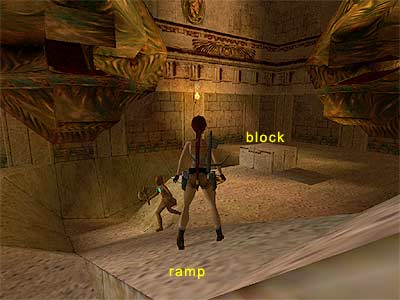
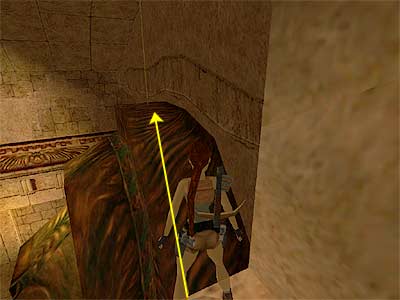
[Note about the enemies - You will encounter mechanical guards in this level, also known as horsemen, that attack with an axe. They have a blue gem on their chest that is their weak spot. You need to shoot this gem repeatedly in order to cause them damage, so there is no reason at all to shoot them from behind. You need quite a few shots to take them down, so in most situations it is better to use the Pistols that contain unlimited ammo. It will take you some time, but it is counter-productive to use powerful weapons (like the Shotgun) to kill them. When you hear the mechanical guards produce a stifled grunt, it means you just registered a successful hit to the gem. Conversely, the sound of bullets hitting metal means your shot was unsuccessful. Every time you meet a mechanical guard during this walkthrough, we will display ways where you can kill them without receiving a lot of damage.] This level is linked to the previous (Temple Of Poseidon) through the crawlspace you enter at the beginning. If you are low on health and do not have enough Medipacks to be going along with, you can always backtrack there every time you are in the Main Hall. Main Hall - Crawl through the opening and drop down at the other side. Follow either of the two ways available in the hallway to reach the library's Main Hall. The goal is to open the big double doors on the east side. From the six smaller doors (three on each side) you can open only four to begin with. The other two can only be opened from the inside. Just to get an indication of what you are looking for, open the door in the far right corner first (south). Shoot the vase and pick up the Small Medipack. Continue through the hallway to enter the Planetarium. You will see a Blue globe in the back right corner, but the other four are locked away behind steel gates. As the receptacles indicate, you need to find three stars in order to open those gates. As you have not got those yet, return back to the Main Hall. You can open the middle doors on the right hand side, but if you go down the steps beyond them you will trigger two fire elementals that can only be extinguished in a nearby pool. Since there is no reason to go down there yet, avoid that route for now. If you are playing on the PC, it is not compulsory to go down there anyway, unless you are interested in getting some pick-ups (the PS players MUST venture inside). Left middle doors\ pole and blades - Open the middle double doors on the north side and follow the hallway. Approach the hole with the pole and take a look below. There are three moving blades that you need to pass and two middle ledges in-between that include some pickups. If you do not mind losing a small percentage of health, jump to grab the pole and slide down without stopping at all. You can get the pickups on your way back (in this case, skip the next paragraph). If you do not want to lose health, it is fruitless to try and get to the bottom by virtue of using the pole. Descent is too slow. Instead, stand against the edge and have the pole to the back of you. Press the Look button and the up direction key to watch the blade. When you see it drifting behind the back side of the pole, tap back once and press Action like you do when you want to hang from an edge. On this occasion, though, let go of Action just before Lara grabs the edge. This will magically make you land on the ledge below. Shoot the vase and pick up the Small Medipack. Do the same thing to land onto the next ledge. Shoot the two vases and pick up the Large Medipack and the Shotgun Normal ammo. Follow the same strategy to land on the ground. Follow the hallway to the end but do not climb up the pole. Instead, grab the edge of the opening and pull up. Room with two huge moving cogs - When you enter the next room with the two huge moving cogs, a mechanical guard will appear from the other side. Stay on the raised ledge of the room, between the two cogs, and shoot the horseman. When you see him coming towards you, jump over him and press Roll at the same time. This will induce you into twisting around in midair in order to face him again. The long, raised ledge will help you to move back and forth over the horseman until you have got enough shots away in order to put him down. Alternatively, you can climb up the ladder on the side of the left column (southwest corner) and shoot the mechanical guard from the upper ledge. This will take you a lot of time, as he will be clever and move underneath you, making impossible to aim at his blue gem. You can use this upper ledge however if you want to take a breather. Once you are done with him, use the Crowbar to pry the Golden Star from the column. 1st Secret (1-3\ total: 50-70) - Stand so that you have the column where you got the Star to the back of you, and move to the southeast corner of the room (behind the cog - as shown in this screenshot). Climb down the ladder, then the next two ledges, and pick up the Small Medipack, the Revolver ammo and the Uzi ammo. Climb back up to the room with the cogs. Assuming you have the entrance to the back of you, climb up the ladder on the side of the left column to reach the upper ledge. Then go through the opening. Jump to grab the pole and slide down. Just to warn you, there are two mechanical guards in the next room. If you rush wildly into the room, you will trigger both and it will be difficult to defeat them. So, better trigger and kill them one by one. Enter the next room, but stay on the raised ledge, that is do not step on the sandy ground. If you go to the left, you will be able to see one of the two guards. He is standing behind the corner, but you have not triggered him yet (as shown here). Leave him alone for now and go to the right hand side of the ledge to trigger the other guard. Use the long raised ledge from whence he came to move back and forth. Use the above strategy (jumping over him and pressing Roll at the same time) to take him down. Just make sure you stay in this room or you will trigger the other guard. Now you have the rest of the room at your disposal to take care of the second mechanical guard. If all of the above does not work for you, you can stand on either of the two squares where the huge pipes/ circular columns are (as shown in this screenshot), and kill them from there, as they do not follow you. You need something in order to open the closed gate, so continue to the room in the south. Approach the hole and climb down the ladder. Crawl through the opening and step outside. Can you see the horse on your left? Save your game and enter the next room. The cut scene shows a mechanical guard/ horseman mounting his horse. (Now you know why they are sometimes called this!) There are two ways to kill the horseman - staying on the ground and shooting at him in the conventional sense, or accessing the next Secret which is on an upper ledge (check below for the Secret). Destroying the Horseman - If you are an experienced TR player and know how to control Lara effectively, you can kill him on the ground. You need to jump around manically, staying on the left side of the horseman where he does not carry his shield, and aiming for his blue gem. Shooting to the right hand side of him where his shield is, is useless. After a few shots in the right spot he will finally get off the horse. Keep shooting at him and stay away from the horse, or he may mount it again. Once you are done, pick up the Horseman's Gem. 2nd Secret (2-3\ total: 51-70) - From the main room where the horseman appeared, go to the next room in the south. The closed gate opens when you shoot the nearby ball. Equip the Crossbow combined with the LaserSight and shoot the ball. Climb into the alcove and pick up the Large Medipack, the Shotgun Normal ammo and the Uzi ammo. You can use this alcove if you find it difficult to destroy the horseman on the ground. After the cut scene, enter the south room, shoot the ball to open the gate, and kill the horseman from the alcove. The PS players must be careful because the horseman may stick on the wall below you, and if this happens it may be impossible to continue without first re-loading a previous saved game. So, when you see him approaching the wall, drop down, make a round turn, and climb back into the alcove again. For the PC players - There is a way to destroy him even if he gets stuck, as long as he gets stuck directly below the secret opening. If he gets stuck on the corner between the sloped ledge on the left of the opening and the nearby column, you cannot kill him. When he gets stuck, stand on the edge of the secret alcove DIRECTLY above the horseman, and select the crossbow combined with the LaserSight. As you will see, Lara will not aim. So, target his blue gem with the LaserSight scope, apply the Lasersight bug and start shooting with the Pistols. You will know that you are doing it right because every time you hit his gem, he will growl, and green sparkles around will appear on the red dot of your scope. If you do not see any sparkles and he does not react, you will need to change your standing position. It will take some time, but eventually he will dismount. When he does, take out your Shotgun and jump down. He is a bit harder to kill one-on-one than the others, incidentally. Once you are done, return to the room where the horseman first appeared, crawl through the opening, and climb up the ladder to make your way back to the room where you killed the previous two horsemen\ mechanical guards. Place the Horseman's Gem in the receptacle to open the gate. Then step inside and pull the chain. The cut scene shows a gate opening in an underwater room directly below you. You need to make your way back to the room with the two huge, moving cogs. So, exit the small room, turn right, and climb up the pole. Turn if necessary and back flip onto the ledge. Go outside and climb down the ladder. There are two openings on the west side of the room. Both have moving chains you can avoid by passing through on the opposite side from where they are moving at the moment you choose to try and pass. You finally reach a small room with a trapdoor and a smaller cog. If you followed the right opening, you can open the trapdoor having the cog on your right (west). Drop into the water, and when you reach the main underwater room, the gate you opened is on your right. If you followed the left opening, you can open the trapdoor having the cog on your left. Drop into the water, and when you reach the main underwater room the gate you opened will be directly ahead (west). Use the Crowbar to pry the two Golden Stars from the wall. Jump into the water again and follow the same way you came. Climb out of the water and pass the moving chains again to reach the room with the two huge, moving cogs. Follow the east opening and carefully drop through the hole where the pole is. Follow the hallway to reach the other pole with the three moving blades. Climbing up the pole\ 3 moving blades - It is quite tricky to get past these blades without using a Medipack, but it is possible. Stand at the bottom of the pole and press Action make Lara to grab the pole. Initiate three 'climbing up' movements. When you see the blade reaching the front right corner (as shown in this screenshot), climb up once more and press Jump to land on the upper ledge. Or, stand having one of the corners in the opening to the back of you, and when you see the blade just about reaching the corner opposite you, jump backwards. The ledge may seem higher, but it is not as high as you might first think. If you moved quickly, you should not have lost health. If you did not do it before, shoot the vases and pick up the Large Medipack and the Shotgun Normal ammo. To get past the second blade, walk to the edge, use the Look button to align yourself with the pole, and tap back once so that your back sticks to the wall. Take a standing jump pressing Action to grab the pole. Lara's hands will brush against the ceiling, lowering her finishing position on the pole to one almost level with the blade's path below. You should not get hurt too much, though. Shimmy up the pole three times, and when you see the blade reaching the front right corner, press Jump to back flip. If you did not do it before, shoot the vase and pick up the Small Medipack. Repeat the above process for the final blade, but make sure you figure out where the upper ledges are because there are only two of them (the other two are walls). Make your way back to the Main Hall. Healing Lara - Those blades were probably a nightmare and if you are low in health now and not keen on spending a Medipack at this juncture, back track to the Temple of Poseidon level just to restore your health. To do that, follow the west side of the Hall from where you started the level and crawl through the opening. Once you have the three Stars - Since you have all the necessary Stars, you can now go to the Planetarium following the far right doors on the south side and solve the puzzle. The solution is hidden behind the middle doors on the south side of the Hall, but if you followed this walkthrough to the word you will not have visited it yet. Note however that you will need to visit this room later from another side, and not only for the pick-ups. So, open the doors but do not go down. The PS players may want to visit this room now - spoilers below for solving the second (fire) puzzle. [Solution of the Planetarium puzzle - If you are anxious to see the solution before solving the puzzle (as the logic demands), open the middle doors on the south side and go down the stairs. When you enter the next room, two fire elementals emerge from the hanging light. Follow either of the two hallways beyond to reach a small pool. Drop into it to extinguish the fire elementals. Climb out of the water, approach the southeast corner of the pool room, and stand on the tile with the gold circles. Lara will look into a dark opening. Use the Binoculars and press Action to activate the night vision. You will see the solution of the Planetarium puzzle. Later you will see that the colors do not correspond to reality. Since you are here, follow the west hallway and shoot the vase to get the Small Medipack. Return to the Main Hall.] Planetarium Puzzle - Go through the bottom right doors on the south side. If you have not done so, shoot the vase to get the Small Medipack. Continue through the hallway to enter the Planetarium. The first globe is already out - the Blue one in the back right corner. Place the Golden Stars in the receptacles to open the gates. You need to push the globes onto the black holes. Every time you push a globe onto the correct hole, a purple glowing sphere will appear above it. Each black hole is above a circle on the floor, apart from the hole in the center of the room. Starting from the center, we have four circles. First, push\ pull the Blue globe (the one that is already out) onto the hole in the center of the room. Then push\ pull the Purple globe onto the hole that is just outside the first (inner) circle. The Green globe goes on the hole in the second circle, the Pink globe on the hole in the third circle, and the Yellow globe onto the hole of the most outer circle. When you have repositioned all the globes correctly, their purple glowing spheres join together via a blue energy light, hitting a gold circle in the back left corner of the room, revealing an opening. Go through it and follow the hallway. Shoot the vase to get the Large Medipack and continue onwards. At the end of the passage, shoot the second vase and pickup the Shotgun Wideshot ammo. The doors on your left lead you back to the main hall, and you can open them only from this side. For the PC players it is not so essential to open them, but for the PS it is (you will see the reason why in a little while). (Note about the PS players - Open those double doors to enter the main hall. If you have not opened the middle doors on the south side, do it now and return back. Continue with the walkthrough.) Snake puzzle with fires - Continue through the hallway to enter the next room with the snake statues. The solution of this puzzle is hidden behind the bottom left doors on the north side of the main hall. If you have reached this part by virtue of following this walkthrough, you will not have opened those doors yet. If you want you can open them and get the spoiler for the puzzle, but be warned that two mechanical guards will attack. If you are interested in all kills, or you want to see or get everything, exit to the Main Hall and open the bottom left double doors on the north side. Shoot the vase to get the Small Medipack and the Uzi ammo, and enter the next room. The Fire Circle Scroll is on the pedestal in the far left corner. Grab it and take care of the two mechanical guards, or ignore them by returning back to the Main Hall where they will not follow you. Return back to the room with the snake statues. (By the way, you can get the Medipack and the ammo without triggering the horsemen. Just do not enter the room.) (Note about the Scroll - If you opened the doors that lead to the Scroll before entering the room with the snake statues, the Scroll at the time would be transparent and you would not previously have been able to get it. You need to enter the snake statue room in order to trigger the Scroll and make it solid.) The Fire Circle Scroll reads "For the serpents to live, all must first be stilled. Provoke each in turn and the circle will burn complete" which means that you need to throw in any order all seven switches on the back of the snake statues. To avoid getting confused, start with the one in front of the entrance and throw the switches following a clockwise route. If you want to reset the puzzle, step on the ledge on the east side. Once you are done, two blocks rise up in the middle of the room, giving you your route out. [Note for the PS players - In solving the puzzle, you also trigger a fire elemental. You need to find water, so exit the room the same way you came, cross the hallway, and if you have not already done so, open the double doors that lead back to the Main Hall. Head to the other side (south) and go through the middle doors (you need to open them if you have not done so). Go down the stairs. When you enter the next room, two more fire elementals emerge from the hanging light (if you have not been here before). Follow either of the two hallways to reach a small pool. Drop into it in order to extinguish the fire elementals. Since you are here (and have not been before), follow the west hallway and shoot the vase to get the Small Medipack. Return back to the room where you solved the statue puzzle.] Climb onto the two blocks and turn left. Walk to the edge and jump up to grab the upper ledge; pull up. Go up the stairs to reach a room with scrolls littered about the place. Climb up the ladder and follow the balcony around to the right. Shoot the vases and pick up the Small Medipack. Climb down the ladder and follow the right opening on the south side (the left one is from where you came). Shoot the vase to get the Uzi ammo and enter the next room. Go to the left and down the stairs, and follow the hallway to the end. Open the double doors. Upper level of the main hall - You have reached the balcony you might previously have been looking up at from below. When you step out onto this balcony, the camera will show you a shot of Lara from the front. The Look button though is not disabled, so you can use it and get re-orientated with what is the norm. Go to the right hand side of the balcony until you reach three closed double doors. Open all of them (to avoid backtracking later), but do not go through the left one as you will trigger a fire elemental that you can avoid later. Right double doors\ two lion's heads - Go through the right double doors, but save your game before sliding down in case you miss the next Secret. 3rd Secret (3-3\ total: 52-70) - Slide down, and just before you reach the end of the slope, jump to grab the ladder. Climb to the top of what you might not realize is a lion's head statue. A huge ball rolls from an alcove at the other side of the room. Turn right and take a running jump onto the ledge below. Pick up the Large Medipack and the Crossbow Normal ammo. Safely drop to the ground. Alternative method for getting the Secret - If you are having trouble grabbing the ladder, slide down whilst pressing the Look button to disable the cut scene that is triggered whilst you are on the last part of the slope (just before the edge). Jump at the end of the slope to grab the opposite ledge to the lion's mouth. Once you have done that, pull up whilst pressing the Duck button and crawl to the right until you can stand. The ledge with the Secret is in front of you. Take a few steps backwards and perform a running jump to grab the ledge. You may need to turn left a bit in midair. Hoist yourself up, and collect the Large Medipack and the Normal Crossbow ammo. Safely drop to the ground in the aftermath. If neither of the above methods help you get the Secret, and you decide to just leave it, slide down backwards whilst pressing Action to grab the ledge. Do not let go until you see the huge ball roll out below you. Then you can safely drop to the ground. The immediate area surrounding the ramp (left, right, or in front) triggers a mechanical horseman that comes at you from the east side of the room. Take care of him. You can stand on the block that is in front of the second lion's head or on the ramp from where the balls rolled and kill the guard from there (as shown in this screenshot). Note though it will take you more time, as more often than not he will run around with his back to you. When done, go up the ramp but jump to the left or right to avoid a second ball that rolls out from the alcove. Go up the ramp again and take a diagonal standing jump to grab the switch on the left of the ramp that raises a block in front of the second lion's head. Climb onto the block and face south. Take a running jump to grab the opposite ledge and pull up. Climb onto the opening at the left and then the next ledge. You need to jump to the top of the head, to the ledge where the chain is (as shown in this screenshot). Or at least land on the triangular ledge beneath the chain. This is quite tricky. Walk to the front right corner and turn right to align yourself with the chain. Use the Look button and make sure that Lara's head is lined up with it. Take a running jump to land on the head, but WITHOUT pressing Action, or you will decrease Lara's momentum. Pull the chain. What just happened that you did not see was the lion's mouth opening. Slide backwards whilst pressing Action to grab the lion's nose. Release and press it again to grab the mouth. Pull up, and make sure you press the Duck button and keep it held as you are pressing Forward, or you will fall down (if you fall down, climb onto the block and jump to grab the nose. You do not need to make your way up again). Crawl through the mouth, climb up the pole, and back flip onto the ledge. Both of the gates open as you approach. Pharos Pillar room - Go through the one in the north and take the Pharos Pillar from the pedestal. You can open the trapdoor by standing on the side that faces the pedestal. Notice the ladder on the right below the trapdoor? The doorway opposite the pedestal leads back to the balcony (it is the left one if you opened all the three double doors before). If you have followed this walkthrough to the word, and if you attempt to go through the doorway now, you will trigger a fire elemental. You can avoid it if you want. However, if you do trigger it, you will need to climb down the ladder and find a pool in the room below in order to extinguish the thing. Room with the wooden floor - Return to the small room where the pole is and go through the gate on the west (that closes behind you). Pick up the Torch and step on either of the two raised ledges to light one of the two nearby burners. Approach the burner carefully and press Action to light the Torch. Continue through the hallway. The gate opens as you approach it. The opening on the east side leads back to the balcony. It is the middle door if you opened the three of them before and there is no reason to go there. Stand a few steps away from the wooden floor and press the Draw weapon button to throw the Torch onto it. Wait for a few seconds and the Torch will burn away the wooden floor. Drop down through the opening on the floor and pick up the Music Scroll that resides in front of the pedestal (Lara looks at it when you pass close to it). Shoot the vase and pick up the Shotgun Normal ammo. Climb through the only opening in the room and follow the hallway. Open the double doors to reach the bottom part of the main hall again. You need to make your way up to the balcony again. There are two ways you can do it depending on whether or not you have avoided the fire elementals by following this walkthrough - if you want to avoid them again (via the snake room) or you have already triggered them, or if you do not care about triggering them (via Pharos Pillar room). • Through the Snake room - From the Main Hall, go through the left door on the north side to reach the room where you solved the snake puzzle. Climb onto the blocks and then to the upper ledge. It is one way - follow it as you did before to reach the balcony. Go to the left. • Through the Pharos Pillar room - From the Main Hall, go through the middle door on the south side. Go down the stairs, and when you reach the next room climb up the ladder on your right. If you are arriving in this room for the first time, you will trigger two fire elementals when you reach the bottom of the stairs. To get rid of them, follow either of the two hallways to reach the pool. Drop in and wait for the elementals to destroy themselves. Then return to the bottom of the stairs and climb up the ladder. Go through the doorway on your right (not the gate that leads to the small room with the pole) to reach the balcony. Again, if this is your first time through this door, you will trigger a fire elemental. You will have to return to the room with the Pharos pedestal, climb down the ladder and lure the elemental into the pool. Then, return back up to the Pharos pedestal room. Follow the balcony to the left, passing the door from where you very first reached the balcony as you do so. At the end of the balcony, and if you have not done so, open the double doors. Go through the hallway and shoot the vase to get the Uzi ammo. Continue on to the next room and place the Music Scroll on the stand next to the harp. The cut scene shows Lara playing a tune. This girl is very knowledgeable about musical chords, and it is not long before the nearby door open as a result of her competent playing. Go through the door and pull the chain to open the big double doors below. Jump over the railings and go through the doors you just opened to end the level. (Important - Do not leave if you do not have the Pharos Pillar.)
|
||
| « Level 16: Temple of Poseidon | Index | Level 18: Hall of Demetrius » |
| We would like to thank TR-Player and Nicky for their help. Many parts of this walkthrough would not have been written without their participation. Special thanks go to Scottlee for proofing the text. | ||
Tomb Raider 4: The Last Revelation Walkthrough & Game Guide © 2000-2007 www.tombraiderhub.com |
||