Level 21: City of the Dead
You need to be in this level just once, but if you are interested in all Secrets, you will need to come back here a second time in order to get the level's 2nd Secret.
First Time
* Plus 2 destroyed ice elementals. The sentry guns are not counted of course, since Lara does not actually "kill" them.
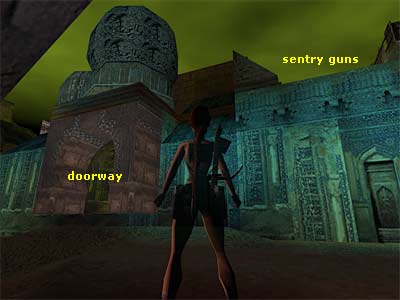
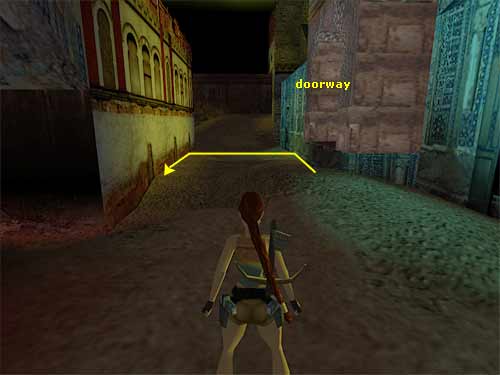
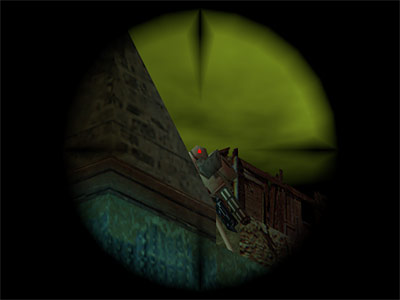
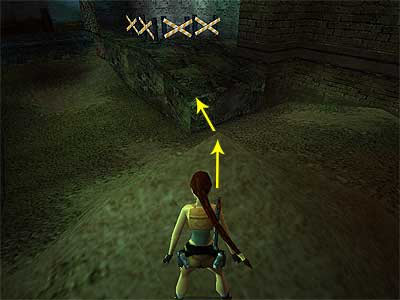
As soon as the level begins, two snipers shoot at you from the building on the left. Run up the short stairs at the front of the building and crouch to avoid the shots from one of them that is standing on the lower block. Equip the gun you prefer and turn to face the sniper. Shoot him any way you choose from here, but releasing the Duck button, shooting him a couple of times, and then crouching again, is our preferred one. Do this about four or five times and he will die. He may throw grenades at some point during the fight, but at least in the PC version you do not get damage from this. Alternative method - Run to the northeast and stand against the block the sniper is standing on. Equip the Pistols with unlimited ammo and jump up to shoot at him. This way he will not throw grenades that may be harmful on the PS version. The PC players can take advantage of the LaserSight bug (info at the bottom of the page). Stand against the block and take one or two steps backwards. Aim for his head and shoot. He needs about forty shots, so keep shooting a while. Once you are done with him one way or the other, climb onto the block he was standing on and pick up the Revolver. Drop onto the ground but do not walk away. The second sniper is standing on the roof of the building. To kill him, stand at the bottom of the stairs (close to where the motorbike is) and turn to face the building. He cannot see you here, but you can see him. Use the Revolver combined with the LaserSight and shoot his head. One shot is enough. The sentry gun on the block in the corner is harmless, so there is no reason to bother with it. If you want to blow it up anyway though, use the Revolver combined with the LaserSight and shoot its tank with the red shape on it. There is a soldier behind that block. You can kill him by shooting at him - stand behind the block with the sentry gun, because for some reason he does not notice you from there - or use the motorbike to run him over. Continue on down the street. The next soldier is lurking behind a slope that you cannot pass with the motorbike. If you want to kill him now, stand at the back of the street on the black square in the corner, and kill him by shooting with the Pistols or by using the Revolver combined with the LaserSight to shoot his head. A third soldier is patrolling beyond. He is in front of a ledge that has some barricades with yellow X's. Just to let you know in advance, a fourth soldier resides behind a sandy hill at the end of the street. Run over them both or kill them by shooting at them. Be sure to pick up the Shotgun Normal ammo that the fourth soldier drops. Regardless of the method you used to kill them, make sure you have the motorbike with you at this point. Otherwise, backtrack to where you started the level and bring the motorbike close to where the yellow barricades are. The plan - You can complete the next two parts of the level in any order. For the first part, you need to open the gates back at the beginning of the level, that is, behind Lara when the level began. In the second part, you need to open a door in a place you have not been to yet, and you can go through this after opening the two gates. You can open the door and then the two gates that give you access to it, or open the gates and backtrack to open the door. We follow the first way. At the end of the street, and beyond the sandy hill, there is a block with a crawlspace above it. You need to do some other stuff first, so ignore it for now. Next to the yellow barricades there is a street that leads to a building with two sentry guns at the top. They shoot at you ceaselessly, so better get the motorbike to help you get past these. Drive towards that building and stand below the sentry guns where they cannot see you. Dismount and stand having the building to the back of you. On the far-left hand side and behind the architecture pillars, there is a closed door that you can open now. Let's get a couple of pickups first. Having the building to the back of you, turn right and continue beyond the corner until you see a doorway on your right (as shown here). If you stick to the wall, the sentry guns will not see you. Go through it and pick up the Small Medipack and the Grenade Launcher (Normal ammo if you already have it). [Note - The street on the right (west) leads to a deep pit you can only jump over after getting the Nitro items from the levels beyond. You will also encounter two soldiers. If you are not interested in the Secrets, you can totally ignore this area and the soldiers as well, but if you are interested, wait for later. If this is not your first time through the game and would like to see how you can get the Secret without the Nitro, check the note about Getting the 2nd Secret without the Nitro below. The pick-ups and the kills are count in our second time through the level.] Destroying the two sentry guns - If you are willing to spend a Medipack, you can open the door behind the architecture pillars now (skip to the next paragraph). If not, let's take care of the guns now so we can move freely. The goal is to make them point forwards down the road. If they do not point like that, attract their attention and stand against the wall below them. Save your game and load it so you have locked their pointing there (otherwise they will move where you go). Now go to the west towards where you got those last pickups to date, but make sure you stick to the wall or the sentry guns will start shooting at you again. Pass the doorway where you got the pickups and turn left to reach the opposite wall (as shown in this screenshot). You will find the correct spot (the closest to the guns) by trial and error, having to load your game a couple of times if the guns shoot you. Equip the Crossbow or the Revolver combined with the LaserSight (or use the LaserSight bug), and from around about where you are now shoot the red shape on the tanks of the two sentry guns (as shown here). You will find that exploding the left gun (the closest to you) is easy, while the second one will take you more time. If you cannot aim\ explode its tank, make it face downwards. To do that, attract its attention by standing close to the architecture pillars with the closed door, make it shoot you and then stick to the building below the gun. Save your game and load it in order to lock the gun's position. Then go to the same point (you may be able to proceed further this time) and explode the tank. Room with the dead soldier - Once you are done, open the door behind the architecture pillars opposite the sentry guns and enter. Lara looks at the dead soldier, so obviously you need to do something with him. Stand above his head and press Action to drag him away from the crawlspace. Make a mental note of the trapdoor, because you will open it in a short while. You cannot get to the crawlspace now, so exit, get the motorbike, and drive to the road in the south. Turn left where the sandy hill is and dismount. Climb onto the block and crawl through the opening. Climb down the blocks beyond and pick up the Small Medipack at the end. Pull the lever to open the trapdoor that the dead soldier used to lie above (if you have not already dragged the soldier, nothing will happen when you pull the lever). You do not need to go outside. The trapdoor is directly above the Medipack you just got. Climb onto the block and then clamber through the crawlspace. Go up the ramp and pull the second lever to open a door directly above. Return back outside where the sandy hill is the same way you came. Jumping the motorbike to the barricades - You need to do a jump with the motorbike onto the ledge where the yellow barricades are. The sandy hill will help you out with this. Just look for the angled ledge at the top of it. Run over this angled ledge and aim for the left-hand corner of the raised area where the barricades are (see this screenshot). Make sure you have a good run up by starting from the block on the East Side and try to aim the left lower corner of the ledge. When you are done, let the motorbike fall through the unstable floorboards. Continue driving around to the left, then up the ramp to break the wall that leads you back to the streets. Dismount (yes, leave the motorbike outside) and return back through the destroyed wall. Pick up the Small Medipack from the corner, just on the right at the bottom of the ramp, and climb onto the ledge in the south. Drop through the opening and into the pool below. Climb out of the water and continue on to the next room on the right. Four bats attack, so take care of them. Pick up the Flares and the Shotgun Wideshot ammo from the two corners, and go through the opening in the west. Slide down the ramp to drop into a square hallway. Square hallway - Pick up the LaserSight next to the dead soldier. If you look around you will be able to see a closed gate in the southeast corner and a set of stairs on the opposite side from where you entered. The stairs lead to a pool, but you do not need to go there now. If you accidentally fall into the pool, the current will push you to the left. You then need to follow the tunnel, climb out of the water, and drop into the square hallway again. Jump up to grab the crevice in the northwest corner of the hallway. Shimmy to the right around the corner until you can pull up. Now turn around. You should be able to see the moving blue ball and a basket in front it. If you shoot the basket, you will release a swarm of locusts. They bite Lara and disappear after a few seconds. If for some reason you cannot avoid the basket, release the locusts, save your game, and load. The locusts should be gone now by the time you are reloaded. You need to shoot the moving blue ball in order to release two ice elementals. Use the Crossbow or the Revolver combined with the LaserSight, and shoot the ball. Drop to the ground and go to the right. Then go up the stairs before dropping into the pool around the corner. The ice elementals will follow you into the pool and freeze it, but luckily not before the current has pushed you to the left and out of harm's way. Follow the tunnel, climb out of the water, and drop into the square hallway. Go up the stairs again and walk over the now frozen pool. Stand against the slide and take a standing jump over it. Pull the lever to open the door back in the square hallway. (Note - If you are interested in the level design, read the Note about the ice elementals below.) Return back and go through the door you just opened. Run up the ramp and pick up the Small Medipack from the southeast corner. Backtrack to the doorway where you entered this room and go through the opening in the south. 1st Secret (1-2\ total: 55-70) - Before climbing up the blocks, use the Crowbar to open the dark blue wooden door. Pick up the Large Medipack and the Uzi ammo. Exit and climb up the blocks to the top. Back at the start - Follow the hallway and climb through the crawlspace. Turn around, hang from the ledge, and shimmy to the right until you can pull up. Then turn around and take a look below. It is the area where you started the level. There is a jump switch exactly opposite to you, and you need to take a running jump in order to grab it. You may want to save your game here in case you do not line Lara up perfectly the first time. If you miss it, you cannot climb back up onto the ledge without making a huge detour. Behind the gates at the beginning of the level - Once you throw the switch, the nearby gates open. Kill the soldier that emerges from beyond them and pick up the Small Medipack he drops. Before going through the gates you need to get the motorbike. If you have followed this walkthrough in the order it is printed, your vehicle should be in front of the ledge where the yellow barricades are. Get it, go through the gates, and drop into the pit. There is a soldier at the bottom of the building. You can either run over him or shoot him. Get the Crossbow Poison ammo from the crawlspace in the southeast and carefully drive up the stairs towards the top of the building. The wide opening leads back to the sandy hill. If you accidentally fall down, return back by following the streets. Use the ramp to leap heroically over to the sloped opening in the opposite wall. Dismount and go up the ramp on the left-hand side. Climb up onto the block at the end and kill the two bats that attack. Pull the lever to raise a block almost at the bottom of the stairs. Get the motorbike and go up the ramp on the left of the lever to reach the stairs again. When you reach the stairs, you can see the block you just raised opposite you below. Leave the motorbike here and climb onto the block, then into the hallway above. Follow it to the end until you reach an opening that overlooks the sandy hill. The sentry gun on the opposite roof is harmless. Take a running jump to grab the roof and pull up. Pick up the Revolver ammo next to the sentry gun and go through the doorway to reach the roof at the back of the area. If you did not blow up the two sentry guns before, you need to do it now. However, this time it is easier. Stand close to the entrance, equip the Crossbow or the Revolver combined with the LaserSight, and shoot the red barrel with the tinder that is behind the sentry guns. This will blow up the two sentry guns and the helicopter. If you blew up the sentry guns before, you do not need to do this, unless you want to see the helicopter explode. Walk to the edge of the roof and drop onto the extended ledge. Take a running jump to grab the opposite ledge and pull up. Diagonally jump to the left where the two sentry guns were, then onto the roof where the helicopter was. Pick up the Small Medipack from the southwest corner and pull the lever to open the exit gate below in the streets. DON'T be in a hurry to leave. You need the motorbike. So, jump to the previous roof the same way you came and cross the hallway to reach the roof with the harmless sentry gun. Take a running jump, pressing Action as you do so to land in the opening from where you came. Then follow the hallway. Drop onto the block you raised before and get the motorbike. If you accidentally fall down into the street while jumping, run back to the beginning of the level, pass through the open gate there, run up the stairs, and get on the bike. Drive up the stairs to the top and go through the wide opening to reach the sandy hill area. Go to the right and eventually through the gate you just opened. Drive up the ramp to enter the Chambers Of Tulun (First Time). LaserSight bug (confirmed for the PC version) - Combine the Crossbow (or the Revolver) with the LaserSight and equip the gun. Press the Look button to use the LaserSight, and having this button compressed, press the number '1', the hot key for Pistols. You will hear the sound of Lara drawing the Pistols. Shoot the targets with unlimited ammo. You will not be able to hear the shots, but this works fine. Getting the 2nd Secret without the Nitro - If you decide to give it a try, here is one possible solution. It is rather difficult, but this is what worked for us. We will try to explain it as clearly as we can. Save you gave in any case, because you may not be able to jump over the pit on your way back. First, go around the corner near to the pit (either on foot or with the bike) and kill the soldiers. Then go back again and start your run up from the open area with the blue building. Position your bike so that the end of the blue building with the machine guns is on your right. Then angle the bike a bit to the left so you see a little bit of the block that the soldier was standing on. Start driving and turn around the corner without stopping, being careful not to brush up against any walls. When you are approaching the bottom of the steep hill that leads to the pit, turn very slightly to the left, but be careful not to lose momentum. It is essential that Lara maintains her momentum at that specific point! Now, we need Lara to literally stick to the left wall of the pit. You may have noticed whilst unsuccessfully trying to jump the pit, that if Lara bangs into the left wall, her bike angles downwards and ends up crashing at the bottom of the pit. However, if you manage to maintain her momentum and make her touch the wall without banging onto it (which is rather tricky and difficult to repeat), she will fly parallel to the wall, keeping her touch onto it, and also maintaining her straight direction. In short, she will not fall to the bottom of the pit, instead flying in a straight line through the air, and gaining even more momentum as she does so. So, the secret is to make Lara's bike fly over the pit in a straight line by "scratching" the left wall during her flight. If you do it correctly, Lara will land not only on the other side of the pit, but moreover many meters away from the edge! When you have landed, run over the soldier and dismount. Make the jumps successfully on the sloped blocks to get the secret, and then get on the bike again in preparation to tackle the pit once again. Returning is very easy, and repeatable. Supposing you are facing the pit, go to the far left-hand corner of the open area. Angle the bike a bit to the left, so that you are facing diagonally towards the steep, narrow part on the left of the edge. Start driving, and when you are crossing the steep part, angle the bike a bit to the left. Lara's bike will make an impressive jump over the pit and end up safe and sound on the other side. Phew! Note about the ice elementals - The ice elementals are triggered to only appear for few seconds. In fact, the ice elementals do not freeze the pool permanently. After releasing them, you enable an extra trigger that is activated when you drop into the pool. So, by dropping into the pool you activate a "flipmap" which changes the surface of the pool into ice. Jump into the pool as many times as you want before releasing the ice elementals. The water will not freeze. If you release the ice elementals and make rounds in the circular hallway (that is, do not drop into the pool), they will follow you around, but they will disappear after a few seconds. If you then drop into the pool and make your way back, the pool will be frozen, although the ice elementals never passed through it!! This is because you dropped into it after releasing the ice elementals, triggering the "flipmap".
|
||
|
||
You return to this level in order to get the 2nd Secret. You must have attached the Nitrous Oxide Feeder to your motorbike by combining the Nitrous Oxide Canister you got from the Citadel Gate, and the Valve Pipe from the Trenches level. If you have not done this, check the corresponding walkthrough for the pickup you missed. You may get the Secret without having the Feeder, but this makes the jumps an awful lot trickier. 2nd Secret (2-2\ total: 59-70) - Drive through the gates and go to the right. Follow the street down to the west. If you have not visited this area before, you will encounter one soldier on a block to the left after turning the corner, and a second soldier at the end of the street. Run over the second one and dismount to kill the soldier that is standing on the block. The slope at the end of the street leads to a deep pit. To get past it you need to take a long run up and use the extra boost. Drive up the slope on the left-hand side and press the Sprint button BEFORE reaching the slope. If you attempt to use the extra boost whilst on the slope, Lara will not make it. Once at the other side, run over the soldier and dismount. Climb onto the ledge in the southeast corner but do not drop down to the other side. You can see several sloped columns here and you have to start with the one on the right hand side (south). Jump up to grab it and pull up. Press the Jump button and do not let go of it. Lara will do the entire job herself. She will jump over three sloped columns in total and finally land on a ledge. If she does not land, after jumping off the third ledge, press Action to grab and pull up. Drop to the ground and pick up the Grenadegun Super ammo, the Large Medipack, and the Crossbow Explosive ammo. Climb out the same way you came and safely drop to the ground. Get the motorbike and jump over the deep pit. Tthe raised ledge on the left will help you clear it. Ddrive over it normally, and before reaching the end, release Action. This will cause the motorbike to move backwards. Press the down direction key to move the motorbike even further backwards after this, but be careful not to hit the wall behind you because this will result in the motorbike changing its direction slightly, and you need it lined up to the angled ledge. Press Action to drive forwards and immediately press the Sprint button BEFORE you reach the angled ledge. Once on the other side, follow the street around the corners and head to the east. Go through the gates and then up the ramp to enter the Chambers Of Tulun. Chambers Of Tulun - Drive down to the left, then right around the corner. Jump over the deep pit and follow the street. Go up the ramp opposite the back door of the Chambers to return to the Trenches. Pickup the walkthrough for the Trenches (Second Time).
|
||
| « Level 20: Cleopatra's Palaces | Index | Level 22: Chambers of Tulun » |
| We would like to thank TR-Player and Nicky for their help. Many parts of this walkthrough would not have been written without their participation. Special thanks go to Scottlee for proofing the text. | ||
Tomb Raider 4: The Last Revelation Walkthrough & Game Guide © 2000-2007 www.tombraiderhub.com |
||