Tomb Raider 6: The Angel Of Darkness Walkthrough & Game Guide
Level 1: Parisian Back Streets
Kills: 1
Pick-ups: 12
Upgrades: YES (arms)
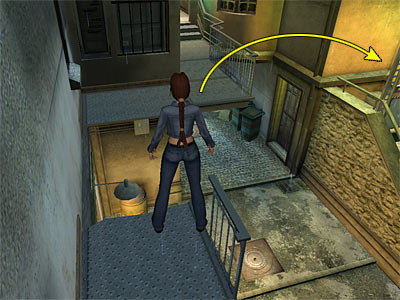
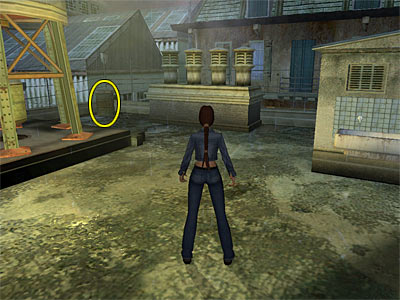
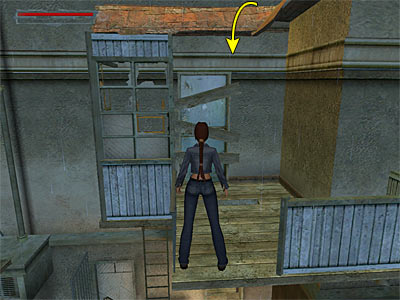
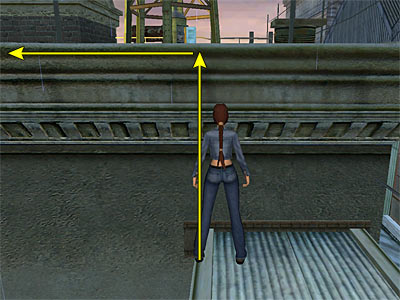
The game opens with an FMV. Lara is at Werner's apartment where he asks her to help him. Werner is tracking five Obscura Paintings for a client called Eckhart, who is a psychopath. He then tells her to see a woman, called Carvier, and he gives Lara her details. Lara is ready to go, but she turns back and pushes Werner on the chair, reminding him that back in Egypt, he walked away and left her. He then shouts at Lara to get out. Fires are heard from the darkness and we then see Werner motionless on the ground. Lara approaches him and she finds that he is dead. The police are coming and Lara is running to save herself. The dogs burst out from the police van and Lara finds a way out by breaking the door of a building. She runs through the hallway and the dogs are still after her. She finds herself in a dead end and the dogs attack her, throwing her out of the window. She looks at them, as they tear apart her backpack. She finally escapes by jumping over the railings of a balcony and into an alley. Alley at the beginning - The level begins with Lara in an alley. This is the training level and Lara will guide you through the rest of it. Follow her instructions in order to learn how to control her. The controls are similar to the previous games and if you have already moved her a bit, you should have noticed that Lara moves a bit differently. In this level, you need to find a way out from the Parisian Back Streets. "This looks like a safe area, but I need to find a way out." If you move to the right, Lara will tell you how you can perform the basic moves. There is nothing to pick up in the short hallway. Watch out of the dog because you cannot kill it and it can harm you. Besides, you cannot open the door at the end. You cannot also open the gate at the top of the stairs around to the left. Making your way upwards - The only way out of the alley is upward. Pick up a Chocolate Bar (10% of health) from the alcove opposite the starting position. Approach the green bin and Lara will tell you that it looks climbable. So, stand against the bin to get Lara's instructions on how you can climb on it. Climb on the green bin and Lara will tell you how you can climb on the above ledge. Just jump up and Lara will grab it automatically; pull up. (Note for the new players – To avoid falling from the bin, press the Walk button. Veterans Tomb Raider players should have noticed by now that they have not used the Action button to grab anything in order to climb.) Walk up to the edge of the ledge and Lara will tell you that you need to press the Jump button and the up cursor key at the same time in order to jump the gap. So, jump to the opposite ledge and turn right. Notice the Large Health Pack (100% of health) in the alcove above where you started the level. Stand against the railings, take some steps backwards (Lara cannot hop backwards anymore) and take a running jump over the railings to land into the alcove (as shown in this screenshot). Get the Health Pack and take a running jump to grab the railings of the balcony you came from. Then pull up. If you fall down, climb back up using the bin again. Balcony with ladder - Turn around the corner and approach the ladder. Once Lara grabs onto it, press Up to climb. As soon as you reach the top, press the left cursor key to get off. Small room with locked cupboard - Go around the corner to reach an open window. Lara says she can climb through it and she gives you the instructions. When you enter, Lara tells you that if you want to open drawers and cupboards, stand in front of them and press Action. Get a wad of 160€ from the drawer and a Chocolate Bar from the cabinet. Also, pick up the Antique Doubloons from the floor. If you try to open the wardrobe, Lara will say that she needs something to force this open. (Note for the PS2 players - When you read Up, Down, Right and Left in the walkthrough, you need to push the Left Analog Stick to the desired direction.) Exit the room from the window and climb up the ladder on your right. Dismount on the ledge on the right hand side and turn around. Pick up the Antique Doubloons from the left of the wooden ledge and, as Lara says, walk up to the edge. To jump to the canopy, press Up and Jump together. Hold down Action in midair to grab it; pull up. Alternatively, back up a bit and take a running jump to land on the canopy. Walk to the left, stand against the railings and press the Up cursor key to vault over. Pick up the Chocolate Bar and jump back to the canopy. Walk to the end of the canopy and listen to Lara on how you can hop. Hold down Walk and press Jump. This is a new move and it is quite tricky. Lara hops to the direction of the last command. For example, if the last cursor key you pressed was the right one, Lara will hop to the right. To avoid this, slightly press Down or Up and then hop. Now cross the wooden ledge. Whilst doing that, Lara reminds you that by holding the Walk key she will not fall off any ledges. Climbing up the drainpipe to the roof - To climb up the drainpipe, walk up to it and press Up. Whilst doing that, Lara explains that you need to press Up along with the right or left cursor key, depending on the direction you want to go. So, keep pressing up and as soon as you reach the top, press Rright to start shimming across the ledge (you cannot go anywhere to the left). Shimmy to the right quickly, because your strength bar starts to decrease. When you see a roof top just below you, drop down to regain your strength. From here, jump up and grab the edge of the roof on the right hand side, shimmy around the corner and pull up at the broken railing on the roof. Top roof – Cross the roof to reach the far left corner where a movable barrel is (as shown in this screenshot). On your way, the camera focuses on a small shed and Lara says that something useful could be in there, but she needs a way to prize those doors open. To move the barrel, stand next to it and press and hold Action. Whilst still holding Action, press Up or Down to push or pull the barrel. You need to pull it, so press Action and Down. There is a part of the roof without fence behind it. Step on the ledge, walk to the edge and press Action. Lara will turn around and hang from the edge. Press Action again to let go. When you pick up the Crowbar, the camera shifts back showing a walkway. Lara mentions that she needs to shimmy to that walkway, but she thinks she is not strong enough yet. Jump up to grab the roof and pull up. Go to the small shed on the left hand side. Use the Crowbar to pry off the lock and gain a strength upgrade. Open the door and enter. Open the cabinet and get the M-V9 Gun. Exit the shed and make a U turn to the right to find some Health Bandages (40% of health) on a barrel. Climbing down back to the small room with locked cupboard - Now that you have got the Crowbar you can return to the room with the cupboard you could not open before. Go back to the edge of the roof where you climbed up earlier. Hang from it and traverse to the left around the corner. Drop to small orange roof below. Instead of climbing down the drainpipe and going around, slide down the roof you are standing on, but make sure you do it close to the corner to land on the wooden ledge where you got the Antique Doubloons earlier (as shown in this screenshot). If you slide from the other side, Lara will fall to her death. Grab the ladder and climb down. Climb through the window on the right and use the Crowbar to pry off the lock on the cupboard. Open it and get the Necklace. Then return back to the roof. Traversing along the ledge where you got the Crowbar - Drop to the ledge on which you picked up the Crowbar before. Turn to face the roof and side-step to the left edge (as shown in this screenshot). If you do not, you may not have enough strength to make it across. Jump up to grab the roof, traverse to the left past the door and drop to the walkway. Lara says she needs to move quietly. Press the Stealth key and then use the cursor keys to move around. When you reach the corner, Lara explains how you can hug the wall. Whilst moving in Stealth mode, press Action when you are standing next to the wall and Lara will hug it. Push right or left to move. When you reach a corner you will peer around. To return back to the normal position, press the Stealth button again. The Gantry Gate Key is on the sawhorse and a police officer on the ledge above. Here you can do one of the following: • Jog until the sawhorse, grab the Key and leave. • Sneak behind the officer whilst in Stealth mode and press Action to break his neck. • Alert the guard and fight hand to hand. You will lose some health but you are ready to finish the level. Once you get the Key, use it to open the gate close to where you dropped down. Move forward and Lara will grab the ladder. Climb down and ignore the walkway on the left, because you cannot jump there. Keep climbing down the ladder to end the level. The cut scene shows the police after Lara. She enters the Derelict Apartment and locks the door by dropping a metal bar. The police officers try to get in. [Note – After getting the Key, if you take a look at the streets below, you will see a crow on a ledge and something shiny next to it (as shown in this screenshot). This is a key, but unfortunately you cannot get it. For your information, the streets below belong to the unfinished part of the training level. You cannot access this part, unless you cheat. The PC players may download the StartUp Configuration Utility (made by Bokkie) and run the game using this program. The PS players can use the Level Select Cheat. You can find details in our Cheats section.]
|
||
| Index | Level 2: Derelict Apartment Block » | |
| Last update: 06 October 2007: Text has been proofed and screenshots have been added. 17 February 2009: Text has been improved and all screenshots have been replaced. Also, new screenshots have been added. |
||
Tomb Raider 6: The Angel of Darkness Walkthrough & Game Guide © 2000-2009 www.tombraiderhub.com |
||