Tomb Raider 6: The Angel Of Darkness Walkthrough & Game Guide
Level 6: The Serpent Rouge
Kills: 10
Pick-ups: 33 via Pierre's help/ 34 via Bernard's help
Upgrades: YES (arms via Bernard, legs in Common Route)
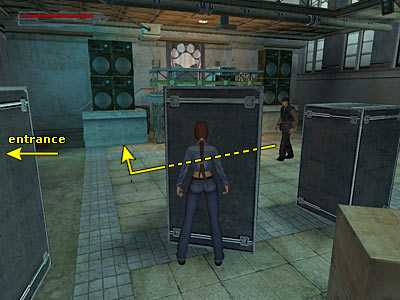
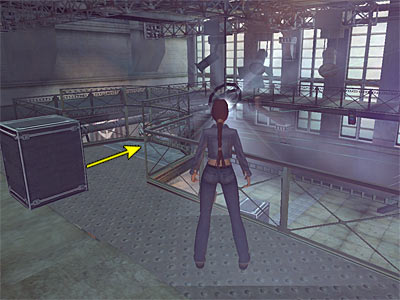
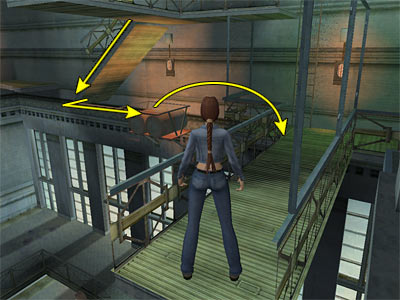
In this level, you need to find the Trinket Box and give it to the owner (Pierre or Bernard). (Note about the enemies – The guards use the M-V9 Gun. Every time you kill one, he leaves the gun but you get ammo instead. So, you better kill the guards using that gun too. Also, if you shoot them from a close range, three shots are enough.) If you got Bernard's help, you enter the club from the garage door. If you got Pierre's help you enter the club from the stage door. Pick up one of the two walkthroughs below and then follow the Common Route. Pierre's help via the stage door – When you enter the club, a cut scene shows the area around and a guard in an office. The guard is patrolling in the office on the left if you have the entrance to your back. If you want to kill him stealthily, you can do either: (Both methods are shown in this page.) • Position Lara to the left of the doorway near the boxes. From this spot, you can see the guard making roundes in the office, ending with his back to you. When he does this, activate the Stealth mode and walk inside the small hall, the get into the office. Sneak behind him and press Action to take him down. • With the entrance to your back, head forward in Stealth mode and use the switch to turn off the lights in the office. Still in Stealth mode, enter the room on the left of the switch and stand in the corner between the two doorways. The guard will come out to see what is going on, so wait for him to pass and turn around the corner. He will stop near the switch, so sneak behind him and take him down. Once the guard is dead, pick up the M-V9 Clip he drops and enter the office if you followed the second way. Get the Desert Ranger Gun, the Stage Door Key, the Chocolate Bar and the Desert Ranger Clip from the desk. If you have not done so, get the Desert Ranger Clip from the boxes outside the office. Continue to the corridor where the switch is, head up the stairs and open the door with the Key you just got to enter the main area of the club. There are two guards in the room. You can take out stealthily the one with the hat, but you have to be very lucky, because the other guard patrols around and if he sees you he alerts the guard with the hat too. Take both out and pick up their two M-V9 Clips. Go to the right of the bar and open the left door (the right one is the one you came from). Head down the stairs and open the next door. Pick up the Vintage Cognac from the floor in front of the boxes at the far side of the room. Climb down the ladder and go to the other side of the hallway. Climb on the lowest crate and pick up the Chocolate Bar and the Vector R-35 Clip. The trapdoor above opens from the other side (Bernard's help). Now return back to the main area of the club the same way you came. Skip to the Common Route below. Bernard's help via garage door – When you enter the garage, go to the opposite side beyond the jeep and search the four lockers to get the Health Bandages, Antique Flintlock, Desert Ranger Clip and K2 Impactor Battery. Go to the desk on the right and get the Socket Spanner. Now go to the side of the jeep and use the switch to raise it. Return to the desk and pull the lever to the right side of it to open a trapdoor beneath the jeep. Doing so, you also get a strength upgrade (you cannot pull the lever if you have not used the switch). Before dropping through the trapdoor, head up the stairs near the entrance and open the door (you cannot open the door if you have not got the upgrade). Get the Desert Ranger and the Clip for it from the desk and exit. Storage room beneath the garage - Drop through the trapdoor and pick up the Chocolate Bar and the Vector R-35 Clip from the lowest crate. The camera does not help you see them, unless you drop onto this crate. Follow the hallway and climb up the ladder. Dismount and turn around. There is a door on the left, but you cannot open it. This means that someone else will do it for you. Go to the other side of the storage room and pick up the Vintage Cognac in front of some boxes. Then enter the nearny cabin and place the Socket Spanner to the panel. It now works as a switch, so press Action to use it. The cut scene shows a dumbwaiter lowering and a guard coming through a door from the main area of the club. The guard from the cut scene is now coming to see what is going on, unlocking the door that you could not open before. You can shoot or kick\ punch him but you cannot kill him stealthily, because he does not give you the chance to stand behind him. Once he is history, pick up his M-V9 Clip he drops. Go through the door and up the stairs and open the next door to enter the main area of the club. You can easily kill the second guard here stealthily, if you have already killed the other one and you now have a clear area. Activate the stealth mode and stand behind the boxes on the right. When he passes in front of you, start following him. Eventually, he will stop in front of the big loudspeaker (as shown in this screenshot). Stand behind him and press Action to break his neck. Then pick up his M-V9 Clip. You cannot open the door next to the one you came from. This would have been your entrance if you had got Pierre's help. Lara says she needs a key for that door, but you will never find it. (Continue with the walkthrough as is.) Common Route/ Ground floor – Go behind the bar and press the button to call the dumbwaiter. Get the two sets of V-Packer Cartridges that it brings from below, plus two Chocolate Bars from the left side of the bar. You will also find a Vintage Cognac on the right. Head to DJ's console and pick up the Health Pills from the right side of it. Go around it and up the stairs. Get the Antique Record from the DJ's stuff on the right and use the switch on the left. The cut scene shows the lights of the club turning on (along with the music) and a guard emerging from the ticket room. Go down the stairs and kill the guard. A second guard exits the ticket room after a few seconds, so kill him too. Then pick up the two M-V9 Clips they dropped. First floor - Go up the stairs and kill the guard that comes through the door at the top. Pick up his M-V9 Clip and go to other side of the balcony. If you reached that point via Bernard's help, a second guard will show up through the same door, as long as you follow the left hand side of the balcony and do not enter your inventory. If you go from the right or enter your inventory, the guard will not appear. Push the movable box towards the railings until you cannot push it further (as shown in this screenshot). Climb on it and jump up to grab the metal support above. Pull up and walk to the part that goes to the other side. Halfway through, the front part collapses. Take a running jump to land on the opposite balcony, or grab it if necessary and pull up. Second floor - Draw your weapons and kill the guard that emerges from the door on the right hand side. A second guard is coming from behind you, so take care of him too. Pick up the Large Health Pack, the two M-V9 Clips the guards dropped and the Health Bandages from the right hand corner of the balcony. Climbing up the mobile lightbox – You have to jump on the mobile lightbox, the one that goes up and down. (The following sequence is shown in this page.) Facing the lightbox, walk up to the edge of the balcony where there are no railings. When it reaches the lowest point, jump to land on the metal support that is closest to you. Then jump to land on the opposite support. Turn left and approach the framework. Lara will grab onto it, so climb up and traverse around to the right. Climb to the top and pull up. Take a standing jump to the other corner. Turn right to face the walkway with the ladder and jump when the mobile lightbox reaches the highest point. If it has lowered a bit, you can press Action, grab the railings and pull up. Third floor – Turn left and climb up the ladder. Then dismount on the ledge to the left. Or, from the walkway, simply jump up to grab the ledge and pull up. Notice the rigs on the left. This is the next puzzle and for the record these are the rigs that either Pierre or Bernard (depending on the help you got) was talking about. You cannot do anything with it now, because there are somethings you have to do first. Slide down the ramp forwards or backwards, pressing Action to grab the edge. Shimmy to the right around the corner across the wooden board. Pull up on the grating and pick up the Desert Ranger Clip. Turn right and take a running jump to the walkway with the raised bridge. If it is necessary, grab the railing of the walkway and pull up. (The above sequence is shown in this screenshot.) If you cannot do the last jump, safely drop to the balcony below and make your way up as you did before. Climb up the ladder again and dismount on the ledge. Slide down the ramp forwards and, this time, jump to land on the ledge ahead. Turn left and jump the gap. Go to the other side of the ledge and jump to grab the metal support ahead. Traverse to the left until you are able to pull up. Do that, turn left and approach the edge. Jump to the walkway below that is in front of the Control Room. Lara cannot open the door as she is not strong enough. So, kick the raised bridge to gain an upgrade in leg strength. The cut scene shows the Control Room and then focuses on the box of the lighting rig. Control Room – Now open the door and enter the Control Room. Pick up the Ticket Office Key and climb down the ladder to get a Chocolate Bar. The door here leads back to the second floor, but there is no reason to go there now, so climb back up to the Control Room. (Note – You may want to open this door in case you decide to go down for a couple of pick-ups later. If you open and unlock the door now, you will not have to use the lightbox again on your way back, because you will be able to open it from the other side. This door closes again, so if you do not open and unlock it now, you will not be able to access it from the other side.) Solving the rig puzzle - There are two levers you can use. The left one rotates the lights and the right one places each light in the box. Since you want to retrieve something from the light that is flashing, use the left lever twice. Then use the right lever once to place it into the box. Exit the room and cross the bridge. Climb up the ladder and dismount on the ledge to the left. Turn left and get the Trinket Box from the lighting rig. You can exit the club and end the level through the door in the Control Room. There is nothing more essential for the game to do here, but if you want all the pick-ups and kills you have to make your way down. If you are not interested, skip the next paragraph. Getting all pick-ups and kills - Slide down the ramp forwards or backwards, pressing Action to grab the edge. Drop to the balcony below and jump to the metal support that collapses earlier. Go to the other side and drop to the first floor. Follow either side and go down the stairs. Kill the guard that is waiting for you and pick up his M-V9 Clip. Exactly opposite the DJ's console is the ticket office. Use the Ticket Office Key to open the door, and enter. Get a wad of 160€ and a second Ticket Office Key from the desk. Exit the room and make your way back to the Control Room. If you opened the door on the second floor from inside the Control Room, you can go through it. Otherwise, you need to use the lightbox. (Note - The second Ticket Office does not fit anywhere, so do not waste your time trying to find the door it opens.) To exit the club you have to use the door in the Control Room. There is a guard in there now that appeared from nowhere when you got the Trinket Box. Kill him and pick up his M-V9 Clip. Then open the door to exit and return back to Parisian Ghetto. (The nearby switch does not do anything.) Pick up the walkthrough for Parisian Ghetto (Second Time).
|
||
| « Level 5: Parisian Ghetto (First Time) | Index | Level 5: Parisian Ghetto (Second Time) » |
| Last update: 18 February 2009: Text has been improved and all screenshots have been replaced. Also, new screenshots have been added. |
||
Tomb Raider 6: The Angel of Darkness Walkthrough & Game Guide © 2000-2009 www.tombraiderhub.com |
||