Tomb Raider 6: The Angel Of Darkness Walkthrough & Game Guide
Level 15: Wrath Of The Beast
* You can force the knights fall through the hole, but since Lara does not actually kill them, we do not count them as kills.
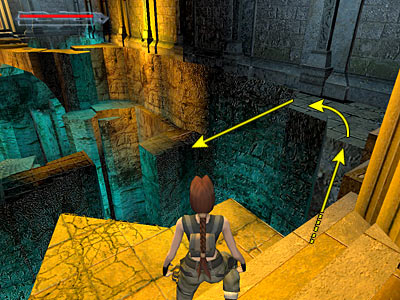
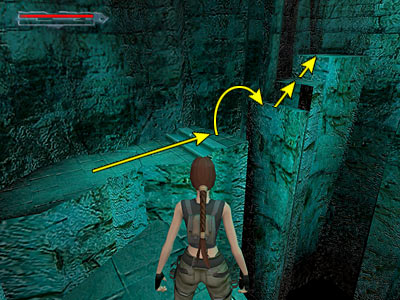
Proceed ahead. When you step on the stairs, a cut scene shows the huge statue ahead. The earth starts shaking and the statue collapses, destroying the floor. You have to reach the opposite side to get the Crystal, but this requires many tricky jumps. So, better save your game frequently. After walking and stepping off the stairs, the ledge ahead collapses. There are two ways to get to the other side, but before doing anything, drop down on the right hand side to get the Health Bandages. Now choose your way and then follow the Common Route. First way - After getting the Bandages, climb on the ledge ahead. Follow it around to the left and take a running jump to land on the ledge ahead below. Ignore the left part, the one that looks like a bridge, and head to the narrow ledge on the right hand wall. (See this screenshot to get oriented and refer to the second paragraph of the Second way on how you can perform the jump across.) Second way - (The following sequence is shown in this page.) After getting the Bandages, climb back up to the entrance and drop down at the other side. Follow the ledge around to the right. Hop (Jump+Walk) to the opposite ledge or take a couple of steps backwards and perform a standing jump. The ledge ahead collapses so turn right and start running on the bridge. Do not stop at all, because the bridge is ready to collapse. Jump at the edge to land on the opposite block and head to the narrow ledge on the left hand side. Step on the narrow ledge and side-step to get to the other side. When Lara takes the normal position, turn right. Your target is the orange ledge at the far side. The lower greenish ledge ahead collapses when you step on it. Start running and jump at the edge of the lower ledge. Make sure you jump from the right side and grab the right hand edge of the orange ledge. If you grab the left part, you will be hit by the greenish ledge that collapses and die. Pull up and immediately turn right and take a standing jump on the green ledge. This ledge is about to fall, so start running and jump on the lower ledge at the far left corner. Common Route - Turn right. You can see the stairs ahead and beyond two more blocks. There is a lower ledge between these two blocks, but you cannot see it from here. All of them collapse when you step on them. Run up the stairs and jump at the edge. This will make you jump over the first block and land on the lower ledge. Immediately press the forward key to vault on the second block and again immediately take a standing jump to the opposite (safe) block. (See this screenshot to get oriented.) Turn right and take a standing jump to grab the block ahead. Pull up and keep pressing the forward key to vault onto the next block, as the previous one is ready to collapse. From there, take a standing jump to grab the bridge above and pull up. Cross the bridge following the right hand side (the left one collapses) and keep running, jumping at the end to land to the opposite side or grab it if necessary and pull up. The cut scene shows what was left from the bridge that collapsed. If after the cut scene you are hanging from the edge, pull up. Pick up the two V-Packer Cartridges from the floor and grab the Earth Crystal from the door ahead. The cut scene shows a swirl rebuilding the floor with many hexagonal ledges. Your way back - Turn around and enter the room. There is a hole in the middle of the room, so be careful not to fall through it. There are also two levers (one on each side) that you have to use in oder to open the exit. When you approach the hole, three knights with flaming swords appear and start throwing fireballs at you. Since you cannot kill them, you have to avoid them and pull the two levers. If a fireball hits you, you can extinguish Lara by standing under one of the two flows of water. One of them is close to where you got the Crystal and the other one near the exit. Do not worry if you get hit by a fireball. Lara starts losing health and does not die instantly. This means you have enough time until you extinguish her. Also, do not forget that you are about to finish the level and reload your health. Some players have managed to throw the knights into the swirl. They kept jumping above the hole and while the knights were following Lara, they fell into. After pulling both levers, head to the exit to return back to the Hall Of Seasons.
|
||
| « Level 13: The Hall of Seasons | Index | |
| Last update: 03 March 2009: Text has been improved and all screenshots have been replaced. Also, new screenshots have been added. |
||
Tomb Raider 6: The Angel of Darkness Walkthrough & Game Guide © 2000-2009 www.tombraiderhub.com |
||