Level 21: The Strahov Fortress
|
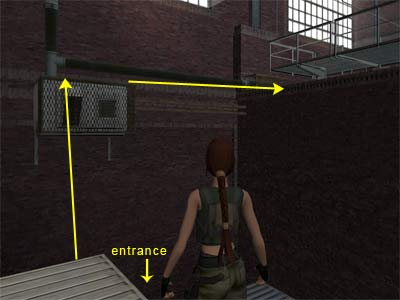
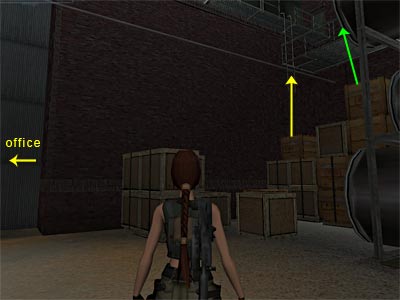
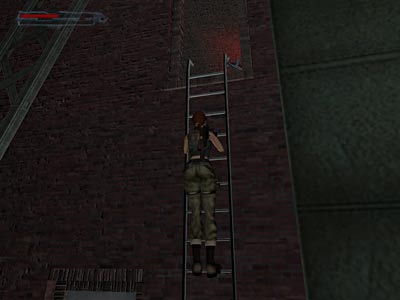
The level begins in a warehouse with some containers and the Notebook indicates that you need to find the Security Control Room. Proceed forward to the open container and pick up the Large Health Pack. Approach the big blue metal door with a lion's head on it to trigger a huge magnet which pick ups one of the three stacked containers. Climb on the container next to the metal door, turn left and jump to grab the edge of the upper one. Turn again left and wait for the magnet to lower the container a bit. Take a running jump to grab the edge of the container that is hanging from the magnet and pull up. The magnet moves the container (and you) to the other side of the warehouse. It finally drops the container (and you) on the floor. Alternatively, you can hang from the container and drop onto the walkway as it passes above. That way you can ignore the guards on the ground. (If you miss the magnet - You can go to the other side of the warehouse climbing up the wall. First, climb on the either left or right container next to the stacked. Jump to grab the edge of the upper container and pull up. Go to the side close to the entrance of the warehouse. Take a running jump to grab the grate part of the air condition and pull up. Turn right and jump to grab the wall where the gab is. This screenshot shows the procedure. Pull up and take a diagonal jump to the right to land on the metal walkway.) There are three guards on the ground. Two of them patrol around and the third one stays in the office. If you have the Low Security Pass that Luddick gave you (that you should) or you are not interested about the pick-ups, you can entirely avoid this room, assuming you jumped down to the walkway whilst the magnet was passing above it (skip the next three paragraphs). Just in case you do not have the Low Security Pass or you are interested in all pick-ups and kills, you may to go down. All the pick-ups and kills - If you went to the other side of the warehouse by using the container, you probably landed on the floor. You can see the two guards patrolling around. They see you in a few seconds and you do not have another choice but to shoot them in order to kill them. Better start shooting at them immediately, because they have powerful weapons that take a lot of your health. You cannot kill them stealthily as they are moving all the time. Pick up their two Mag Vega Clips and the Strahov Low Security Pass from the other guard in the office. There is nothing more to collect or do here. There are some movable crates around the room and a button that lowers a crate (on which Lara dies without a reason sometimes), but they do not seem to do anything. If you used the air condition or you dropped on the walkway after using the container, you can kill the guards from here. If the guards are standing exactly beneath the metal walkway you are standing on, you can climb on the upper walkways and either shoot them from there or make them follow you. Once you kill them, go down climbing down the ladder that is on the far right corner of the room (assuming you are standing on the wall) and get the pick-ups. To climb back up, use the crates opposite the office, the ones that are next to the huge pipes and the scaffolding. You can climb either on the crate beneath the ladder and jump to grab the latter (if you cannot grab the ladder, you need to stand at the back side of the crate) or climb on the topmost crate and jump up to grab the railings, then pull up (see this screenshot). Walkway above the office\ Second warehouse - Do not climb the long ladder here, because there is nothing interesting up there, apart from the view. You can open either green door and use the Security Pass to the socket to open the metal door. There are two guards on the walkway at the far side of the next warehouse. If you entered from the right hand door, you can see a ladder on the left (this is where you have to go now). As long as you do not walk towards the guards, they will not spot you. So, you can avoid them for now. If you entered from the left door, you do not have a choice but to kill them, as the ladder is on the other side of the walkway and you need to get past in front of the guards. Once you kill them, pick up the two Mag Vega Clips they drop. Security Control Room - Climb up the ladder and stop when you are able to see the opening at the top of your screen (as shown here). There is a guard in the Security Control Room above. If you killed the two guards before, the guard above is now alerted and sometimes he is hiding on the right. As you do not have another choice, climb to the top and shoot him. If you did not kill the two guards, he patrols in the room. Watch the opening and when you see him passing to the right, climb to the top, activate the Stealth mode, stand behind him and press Action to take him down. Pick up the Mag Vega Gun he drops and use the lever of the control panel. The cut scene shows another Control Room outside. In fact, you just unlocked its door. Exit climbing down the ladder. If you have not killed the guards and they show up in front of you, kill them and get their Clips. Do not climb down the ladder on the left because there are two gun turrets, which can kill you (Note: You can run past them and open the door down there, but bear in mind that you may need to take a Health Pack.) Follow the walkway and climb up the long ladder to the top. Head to the left and follow the walkway to the Control Room. When Lara reaches the bottom of the stairs, a cut scene shows her using the magnet to destroy the two gun turrets. Return to the long ladder and climb back down. Turn around and cross the left hand side of the walkway. Now you can climb down the ladder which leads to the bottom. If Lara does not take the "climbing position" at the top of the ladder, release and press Action again. That way, she will grab the ladder. Head to the other side of the room and open the green door. Second part\ area with the destroyed wall - You can see a destroyed circular wall in the middle of the room. There is a door on the left, but it is protected by blue horizontal laser beams*. So, avoid it for now as it electrocutes you when you approach it (you need to turn off the power first). [ Notebook Reference ] Walking close to it though, your Notebook is updated with what you have to do: Gain access to the Biodome. Beyond the room, on the left hand side of the destroyed walls, are two stacked crates but Lara cannot push\ pull them now, as she needs a strength upgrade. At the end and around the corner there are more blue horizontal laser beams* that you cannot pass through. (*Note about the PC players - If you have not installed the patches, you will not be able to see the blue laser beams, so do not wonder what kills Lara. This screenshot shows where the lasers are supposed to appear in both cases.) There are some movable crates on the right of where you entered this room. When you approach this area, Lara locates a pipe she can use in order to get to the other side, behind the fence where the two rapid dogs are. You cannot do that now because the steam will burn you. So, you need to shut it off first. To reach the valve that does this, you have to push the two stacked crates you saw before, so you first have to get an upgrade. During the following sequence, the dogs may hurt you by attacking through the fence!! You can kill them now, even if you are behind the fence. So, get rid of them before they take some of your health. The Crate Puzzle/ Getting the upgrade - (The following procedure is shown in this page.) Face the crates and the fence. There are two movable crates on the ground. The left one differs from the others. Leave it for now and push the right one (1) to the end towards the fence, and then push it to the left against the stacked crates. (Note: The Hand icon appears every time you stand close to the socket, but Lara does not have the card to open it.) Climb on the crate (1) you just pushed and push the crate (2) that is now in front of you to the end. Drop to the ground. Now you have to move the first crate (1) to the front side of the stuck. So, facing the fence, pull it twice and then go to the right side and push it to the left. (Note - Some times, after pulling this crate, you cannot push it to the side, so you need to move it circularly. Pull it three times, then go to the right side of it and push it once. Then push it towards the stacked crates.) Now go to the crate (3) that differs from the others and push it towards the stacked crates and next to the first crate. Go to the right side of the stack (assuming you see the fence) and climb on the box that is closest to the fence. Turn so that you have the fence to the back of you and push the crate (4) on the top of the first crate (1). Now, stand on the different crate (3) and pull the crate you just moved (4) as much as you can (press Action and the down direction key many times). This will result half of the crate (4) to be on the different one and the other half on the first one. Go to the other side and push it on the top of the different crate (3). Climb on the crate (4) you last moved and push the topmost crate towards the fence. When you do that, Lara gains a strength upgrade. Drop to the floor and go to the two stacked crates that are behind the destroyed wall. Push them to the end, climb on them and climb on the air condition unit. Turn the valve to shut off the steam. Drop to the ground and head to the crates. Climb on the topmost and jump up to grab the pipe. Press Duck to tuck Lara's legs up and traverse forward to get past the fence. Drop down and if you did not do it before, kill the two dogs. Behind the fence\ area with two saws - [ Notebook Reference ] You need to shut down the power. This will clear a route through the Biodome to the Vault of Trophies. This is your objective, as the Notebook says. Climb up the ladder on the left hand side of the room and use the lever of the control panel. The cut scene shows two big saws trying to cut a stone. It seems difficult for them, so they get destroyed and finally cut the duct at the top of the room. Jump up to grab the beam on the left. Traverse a bit to the right if necessary and pull up. Go to the right and vault on the wooden support beam. Turn left and climb on the duct. Go to the end of it, turn around and hang from the edge. Release Action and press it again to grab the bottom edge of the duct. Pull up and crawl into. At the end, keep pressing forward and Lara will somersault (you cannot climb down backwards). The cut scene shows Gunderson dragging Luddick in a cell. He tells Eckhardt that he found him skulking around in the loading bay, probably using a pass code. Gunderson leaves and Eckhardt electrocutes Luddick to death (even Lara cannot watch this scene). Maybe Luddick knew too much. Eckhardt leaves and Luddick's body is burning. Crawl to the end of the duct. When you reach the edge, the camera shows a guard patrolling down. You can somersault and shoot him or kill him stealthily. Wait for him to go to the left of your screen (to the right of Lara). Somersault and enter the Stealth mode. Follow him to the other room and when he stops, stand behind him and press Action to take him down. Pick up the Strahov High Security Pass he drops and use it in the socket at the top of the stairs. (Note - The opening close to the lasers is protected by blue laser beams. Again, if you are a PC player and have not installed the patches, you will not be able to see them. This screenshot shows where they are supposed to appear.) Control Room - Kill the guard in the office and pick up his Mag Vega Clip. There are two more guards beyond around the corner. Enter the room and kill them. You cannot kill them stealthily, as they notice you as soon as you enter. Pick up their two Mag Vega Clips along with a third Clip on the table, plus a Chocolate Bar from the other table. Finally, get the three Scorpion X Clips from the two metal lockers outside. Approach the Control Panel and use it. The cut scene shows Lara tracing her next steps. She needs to shut down the power to clear a route through the Biodome to the Vault Of Trophies. So she does and says better moving quickly before the power comes back on. A second cut scene shows a guard that is not able to control a Panel because Lara turned off the power. A creature (Proto) is getting released (if you were careful, the last button Lara pushed was called "Proto"). Two more guards are running to escape. Unfortunately, they do not make it. Even if Lara said she needs to move quickly before the power comes back on, you do not have to rush, simply because the power never comes back on in this section. Exit swiping your card and head to the room with the lasers. Enter the hallway that was previously protected by blue laser beams on the left hand side and use the card to open the door. Poor Luddick!! Get the Scorpion X Gun from the bed (it will be counted as a Clip if you got it from Luddick at the end of the Monstrum Crime Scene level) and the Health Bandages from the metal locker. Return back and draw your weapons. Lara will aim at the red fire extinguisher, so shoot it. Make sure you are not close to it or it will kill you when it explodes. The spool will roll and detonate two of the three mines. Before crawling under the lasers, get the Mag Vega Gun from the metal shelf on the right (it will be counted as a Clip if you already have the gun). Commando crawl under the lasers, staying on the left to avoid the explosion of the third mine. Continue to the left around the corner. If you want, you can go and open the foor close to where you solved the crate puzzle, but as you have probably guessed, there is nothing interesting behind the fence. Follow the right hand side of the destroyed wall and use one of the cards you have to unlock the door. Open it to end the level.
|
||
| « Level 20: The Monstrum Crime Scene | Index | Level 22: Bio Research Facility » |
Tomb Raider 6: The Angel of Darkness Walkthrough & Game Guide © 2000-2007 www.tombraiderhub.com |
||