Tomb Raider 7 - Boss Fights | |
 |
This page has been created in order to help you out with five bosses in this game. If you have any detailed questions, suggestions or comments, feel free to contact us. |
The text has been written by TombRaiderCool. |
 |
Takamoto
(Japan) |
|
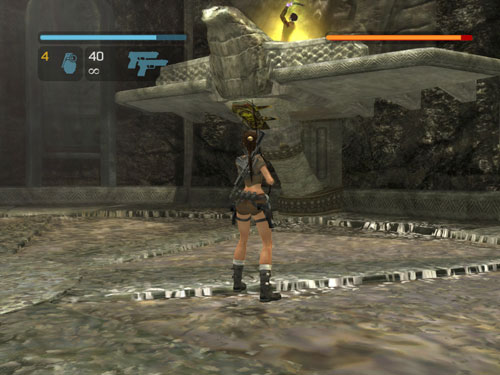
Before taking the elevator to the roof for a fight with Takamoto take time to get some powerful weapons from the conference room area with the hanging dragon. Either take a shotgun from one of the five henchman from an earlier battle or search Takamoto's office on the upper level to get an assault rifle. Make your decision which one to take for the upcoming fight with Takamoto as you can only take one. The shotgun is a better choice if you prefer close range combat, however it is not recommended for this battle. If you'd rather engage the fight from a distance, take the rifle. After choosing your weapons of choice take that elevator witch is on the upper level of the conference room.
When the cut scene "Artifact revealed" ends, Lara will be standing at a checkpoint. Lara will be on the lower level of the room and Takamoto is on the higher platform.
NOTE: The orange bar on the top right-hand corner represents Takamoto’s health and will appear during all boss battles.
There are four automated turrets on the lower level, so immediately run behind one of the four large statues to avoid being shot and losing valuable health. There will be a vertical pole behind any one of the four statues. Climb up it and jump off at the top to land on the higher platform. The automated turrets can’t fire at you from here but now you must face Takamoto. He has three main attacks: at a long distance he will send high or low shockwaves that can be dodged by, respectively, jumping or rolling/crouching. At close range he will send out a powerful vertical energy beam that can prove deadly but can easily be avoided to flipping sideways with your guns drawn.
Take any opportunity to shoot at him while dodging his attacks and he will quickly lose health. It is easier to dodge his energy bolts from a distance rather than close range so don’t approach him much. After a while he will need to stop firing for a few moments - take this opportunity to blast him. If you have a powerful weapon, he will lose up to one third of his health, so this shouldn't be a very difficult battle. After repeating the process once or twice, Takamoto should kneel over and say his last few words before dying. A cut scene will immediately follow.
Cover and shoot method
NOTE: The rifle is recommended for this method.
Begin the same as the previous method, climb up one of the poles to avoid getting hit by one of the turrets and up to the higher platform, then hide behind one of the four statues. If that statue is not the one opposite from Takamoto along the circular platform, quickly run to the opposite statue and go behind it.

Take out you rifle and run toward the next statue, sideflipping if needed to dodge Takamoto's shockwaves and firing at him while moving. Stay behind that statue until he's done firing his shockwaves, run back to the previous statue and firing at Takamoto as before. Shooting while running to the next statue and back should use up about one round of your weapon’s ammo. Wait behind that statue for Lara to reload her weapon and then repeat the process. If Takamoto runs to a different part of the platform, run to the statue opposite where he ends up and start the process again. Just keep repeating this until he is dead. He will continue to attack Lara but as long as you keep moving and flipping when necessary, he shouldn't hit her. This method is safe and is quicker. Also you shouldn’t lose all your rifle ammo with this method.
Lower Level method
When cut scene ends, instead of climbing the statue on the upper platform, stay on the lower level but still hide behind a statue to avoid being hit. Stay close to the wall, for best results with Lara's back touching the wall. The camera awkward to control in this position, but it stops Lara from being hit by any of the gun turrets. Once you're in position switch targeting to Advanced Toggle or Advanced Hold. Take out your weapon preferably the rifle, because of it decent long range. With weapon drawn, move out from behind the statue runs to the side or sideflipping, while firing at the same time. When Takamoto sends out his shockwaves, hurriedly duck behind one of the statues to avoid losing valuable health. Then come out again and repeat this process. If he runs to another section of the platform, run along the wall so Lara is behind the opposite statue and repeat this until he is dead.
NOTE: If you run out of rifle ammo and switch to your handy dual pistols. With this strategy Lara should lose just a slither to none of her health at all.
Head on approach with Takamoto
NOTE: The shotgun is recommended for this strategy.
Climb up the pole as mentioned previously, so you are on the higher platform with Takamoto. The shotgun blasts are very powerful up close and can make this battle last a mere few seconds. When on the higher platform run towards Takamoto with your shotgun drawn, dodging his blasts along the way, by jumping or flipping for the high blasts and rolling or crouching for the lower blasts. When you let close to him he starts firing his vertical blasts, you can avoid these by sideflipping. At this point pump as much lead into him as you can before he retreats to the opposite end of the platform, then run up to him again and keep repeating the process until he finally dies. Between 10-15 shots at close range should do the job.
NOTE: This method can be very life risking due to the power of Takamoto’s blasts up close, if doing this method be sure to the maximum amount of medipacks.
|
| |
Rutland
(West Africa) |
|
This battle can be quite a bit tougher than the one with Takamoto, since Rutland is very tough and fast. The sword fragment has also given him the ability to heal himself during battle, using the four pedestals around the edge of the room. So, your first priority is to destroy the ledges. It is best to stick to Lara's dual pistols for this battle. Rutland has two main attacks. From a distance he will throw grenades which can be quite easily dodged due their long delay. He also slashes Lara with his sword fragment when up close, which is harder to avoid. If you use your combat lock while both flipping and shooting, you can dodge Rutland's attacks. If Lara does get hurt by these attacks, they both can badly injure Lara or even knock her to the ground.
Use the shoot and flip method mentioned above to avoid his attacks. Once you have gave Rutland sustainable damage he will leap up onto one of the pedestals to heal. Now you are able to target the red crystals on the underside of each pedestal pressing the interact button. Destroying each of these crystals reveals a shiny grapple point. Shoot Rutland again until he retreats on one of the pedestals to heal, then use your magnetic grapple to pull down the pedestal he is on, as shown in this screenshot:
He will fall down for a brief period, now take this opportunity to shoot him. Grenades also work, but should be saved until you have knocked down all pedestals. Once you've destroyed them all, Rutland has nowhere to retreat and heal, so now the rest of this battle should be easier. Just continue to shoot/throw grenades at him until his health drops to zero. A cut scene will follow.
Alternative method – Can take less than a minute
• video link
As soon as the battle begins, Rutland will jump off a pedestal and attack you. Shoot him to bring his health down and make him jump on a pedestal to heal himself (if you took the grenade launcher from earlier on in the level, target Rutland with it now). Wait for him to jump off the pedestal and make sure you have locked your target on him. When he jumps off, midair throw/shoot a Grenade. It will explode when Rutland lands on the ground. This will make him go flying up and then fall on the ground, so he will not come after you. Still with the aim locked, throw/shoot as many Grenades as you have timing a chain. Before you know it the battle will be over. |
| |
Unknown Entity
(Kazakhstan) |
|
The Unknown Entity can't be hurt by any of Lara’s weapons so don't waste any ammo or time. There are four levers positioned around the perimeter of the room, so turn your attention to those. Watch out for the flaming spot on the ground indicating where the beast’s fireballs will land next. It does take some time for the fireballs to be fired so you can quite easily avoid these. While dodging the Unknown Entity's fireball attacks, one by one pull the four levers. When you've pulled all four of them, the huge orbs above the Tesla gun lower and the sword fragment is revealed (it is still surrounded by an energy force field, however).
Now, run to the middle of the room and mount the Tesla gun. Then target the large, dangling orbs. To push an orb, you need to tap (not hold) the fire button repeatedly, shown in this screenshot:
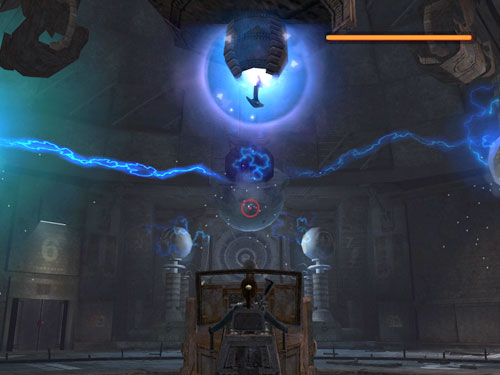
Two or three shots are enough. Then turn to the next orb and repeat the process for all four orbs. You must do this quickly for all four to be activated at the same time, so don't waste any time or you will have to repeat this whole process all over again. If the Unknown Entity gets into your way, shoot some electricity to keep it at bay. When you have activated all four orbs, the force field around the sword fragment disappears. Quickly get off the gun and use the magnetic grapple to pull the sword fragment hanging directly above the gun to active a cut scene. |
| |
Sea Serpent
(England) |
|
After retrieving the final sword fragment from King Arthur's tomb and hearing Zip and Alister's frantic calls from the headset, it appears you are ready to leave. The door exiting the tomb will open, so walk out and a checkpoint will register. You will find yourself in the giant room with hanging cages, only this time there is one difference: a giant sea serpent who will not go down without a fight. Much like the Unknown Entity, Lara's weapons are ineffective against this beast, so again don’t waste any time or bullets. The serpent has varied attacks - it can swipe you to the ground with its huge head and spit toxic liquid. Whatever you do, don't fall in the lake or the serpent will pick you up in its jaws and throw you across the room. In most cases, it will prove fatal.
NOTE: It is best to use your dual pistols for this battle.
The only way you can kill it is by luring it under each of the four cages by shooting the giant bells underneath the cages to mesmerize the beast. Then use your grapple to pull the levers beside the cages to drop the cages on the serpent’s head.
NOTE: Use you’re grapple of the lever before serpent even goes to the bell. As soon as you see it turn around to the sound, press the grapple button then the Interact button.
IMPORTANT BUG NOTE: Many people have encountered a bug with the two front cages (those in the middle of the pool), where they do not lower when the the levers are pulled. So, start with the front tanks first in case you will not be able to lower the cages after spending time with the back ones. If you are a console player and after trying a couple of times the bug still occurs, you need to load a previous saved game. Otherwise, you will have to start the game from the beginning (we have not found a solution for this bug until now). If you are a PC player, you can download a saved game.
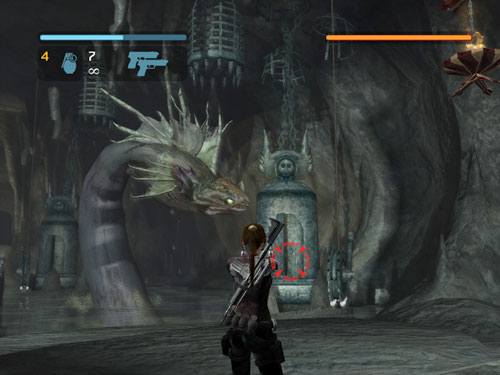
It is probably best to start with one of the two closer bells. Lock on to the bell and repeatedly shoot at it until you see sound waves coming out of it. The serpent will come up to bell dazed by the sound, as shown in this screenshot:
Now quickly holster your pistols, then use the grapple to catch the lever and pull it to lower the cage and hit the beast. If done in time the serpent will lose one quarter of its health and destroy that particular bell and cage. You must repeat this four times, once for each cage. However, if you lower the cage without a successful hit, do not stay where you are and do not shoot the bell. The sea serpent will not hear the noise while the cage goes up. You better go for another bell that is still intact.
Once you drop the last cage on the sea serpent, a cut scene will play in which you see it dying and then half its body floating on the surface which is used for your exit. |
| |
Amanda
(Bolivia Redux) |
|
NOTE: In the options, set the combat mode to Advanced Toggle for this battle. That way Lara will always aim at the monster.
OK, so Amanda has merged with the Unknown Entity and now you must bring her down to find the truth about Lara's mother. However, unlike during your last meeting, you can now directly attack the Unknown Entity with Excalibur. The creature will attack with energy bolts, and just like during your last battle with it there will be a glowing spot on the ground indicating where it will next hit. Even though you will have a chance to roll or flip out of the way, there will be times that her harmful bolts will hit you, which can be quite damaging. Still, it is more effective to stay close to her than keeping a far distance from her. Just keep on Advanced Toggle and move and shoot continuously. The fight can be even more difficult due to the fact that the whole perimeter is a deadly drop, so try and avoid the edges in case you accidentally fall over or Amanda's bolts knock you over. In order to kill the creature, you must first give it sustainable damage so that it falls down for a few moments. At that point, you'll see the Interact icon appear above Amanda's head, which appears inside the creature. Use flips to move more quickly. Then stab her with Excalibur by pressing the interact button. You need to move fast, or the monster will get up and regenerate its health before you can reach it. So remember to stay close! Even if you manage to stab Amanda she will regenerate some health. During this process she's invulnerable, so wait until she stops regenerating before you attack again. Each time you're able to hit Amanda, the monster is weakened and regenerates less of its health. You must successfully stab her at least three times, the last will provide a fatal blow. Now sit back and watch the final cut scene.
Alternative on Hard Mode
NOTE: Be sure to bring the maximum amount of medipacks for this battle.
By playing Hard mode (or even medium) can make this battle extremely difficult and can even sometimes result in one hit deaths for Lara, especially up close so try and avoid the first method when playing hard mode and stick to this one.
The outer ring of pillars (the 4 with rectangular bases) can be used for cover, as shown in the screenshot:
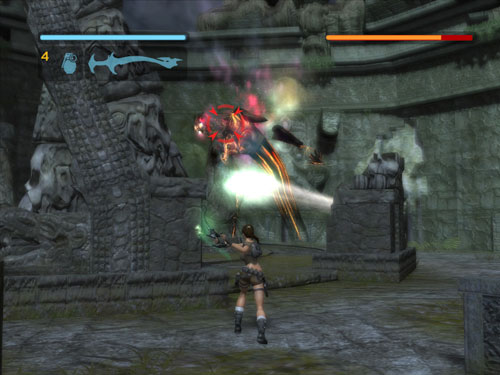
But be careful since Amanda keeps moving around from spot to spot. If one of Amanda's bolts pushes you back, you will not fall off the edge. The pillar will eventually break from either Excalibur’s bolts or Amanda's attacks. Stay behind the broken pillar, having Amanda opposite you, and shoot her from there. Amanda will usually attempt to go up to Lara and attack so move to the side of the broken pillar, remember to try and keep opposite her. When Amanda drop down, quickly come out and stab her before retreating again. If she fall far away from the pillar you are hiding behind, holster Excalibur and very quickly run (or roll, as it is a bit faster) towards her and stab her with the sword, be careful though as you might not be able to hide in time and get hit by one of Amanda's attacks. Use a medipack if necessary. Keep shooting and repeating this method and after providing the last fatal blow, watch the ending cutscene. |
| |