Level 5: KAZAKHSTAN - Project Carbonek
(If you are looking for Time Trial Tips, see our dedicated section.)
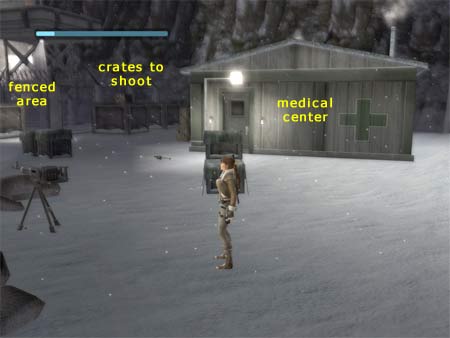
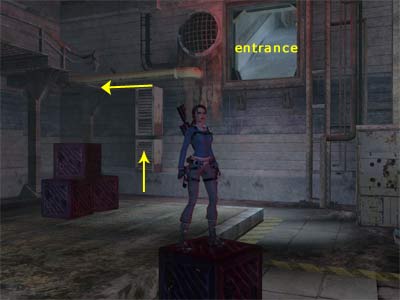
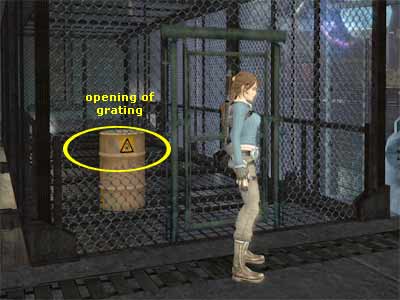
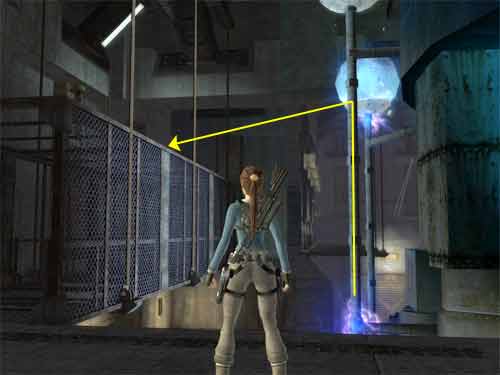
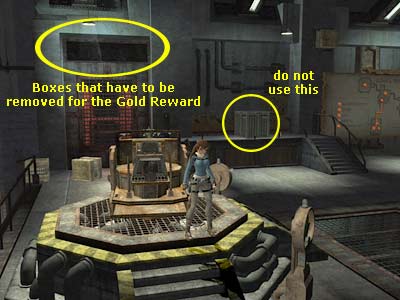
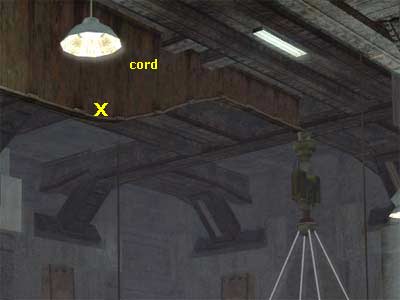
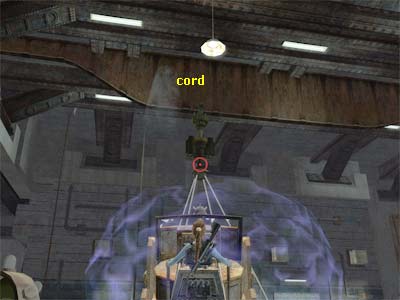
In the cut scene, Lara slides down a slope and informs Alister that she is at the base. Alister says he was right; it was a secret Soviet project from the 50's called "Carbonek". The laboratory was stydying an ancient sword fragment, but a mysterious disaster brought the KGB down and they erased everything for history. Lara uses her Binoculars and says that there seems to be trouble below whilst she is watching Rutland's men killing the Kazahks. Alister says that they are probably Amanada's men, since she is behind all this. He also tells her that the laboratory is somehow connected to the militay base, but he does not know how. If Lara could find the command center, they could get a better idea. (Bug warning: Two annoying bugs can be activated later. One of them has a tendency to appear on the PS2 and XBOX versions, which may make you unable to finish the level. You are advised to save your game before AND after using the bike. No more spoilers will be mentioned here, so be careful.) The sword fragment was taken to a secret Soviet laboratory decades ago, a facility rumored to study the paranormal. While Lara is en route, Alister is going to try to confirm the facts of the story. You need to find Kazakh army base command center, find and enter the abandoned Soviet laboratory and acquire the ancient sword fragment. [Checkpoint] Slide down the slope ahead. Lara will swan dive, but you need to press the correct button (as the game shows). Lara will use the parachute and land safely on the roof of a building. [Checkpoint] You can see some guards patrolling on the ground and at this point, there are eleven of them. Grab the big gun and kill them all. You can also explode the various barrels if a guard is close to it to make your job easier. The guards drop Health Packs, Grenades and guns (which will count as ammo), but wait before going down. Assuming you are still on the roof with the big gun, climb on the next roof on the right and jump to grab the pole of the flag. From there jump to grab the crate and climb on the roof (as shown in this screenshot). Shoot the crate and pick up the Bronze Reward (1/5). Five more guards are patrolling below, so kill them from here or jump down. (Note about the Bronze Reward: If you are on the ground, you can reach the roof with the big gun, by using the crates around it. Or, as you face the building with the windows, where the guards were shooting from, go to the right and climb on the box next to the building (as shown here). Turn to face the building with the crate at the top. Enable the Accurate Aim and shoot the crate. Use the Grapple to get the Reward.) Enter the building with the windows, turn right and enter the small storage room on the left. Pick up the Bronze Reward (2/5) from the left and exit. Climb up the ladder opposite the entrance to reach the roof of the building. [Checkpoint] Continue ahead and kill the guard on the opposite roof. Jump to grab that roof and pull up. Pick up the items he dropped if you need them and slide down the ramp on the left. You can use the wire and slide down, but this will get you on the ground, making your job harder. Kill the four guards on the ground. You can explode the barrels if a guard is close, and make sure you kill quickly the guard that uses the big gun, because it takes more health. Drop to the ground (if you are not there) and locate the building with the cross (it is the medical center). Exactly opposite is a fenced area with a crate and a barrel. The door will not open, so go around and shoot the crates next to the fence (see this screenshot to get oriented). There is a missing part of the fence, so get into and shoot the barrel to explode the entrance and the crate (in the opposite scenario, shoot the crate by yourself). Pick up the Silver Reward (1/3) and exit. Enter the medical center. In the cut scene, Lara breaks into the building and sees a guard with two Kazahk hostages. Lara shouts at them to get down and she kills the guard. They ask her if she is American and Lara replies that she is British and they (she and the two men) share an enemy. Lara asks where the command center is. The two men talk in Russian. The one does not want to tell her, but the other says that if she opens the gate with the code and not the Key, they might find them and come to rescue them. So, they tell her that the command center is through the opposite gate and the code is K1879. Lara speaks in Russian too, meaning that she thanks them and asks them to wish her luck. [Checkpoint] If the guard left his gun, get it to replain your ammo if you want. Then exit the building. Alister talks to Lara and says that although he did not understand what they were talking about, he thinks that the gate they mentioned is up ahead. Draw weapons, because five more guards are waiting outside. Kill them and pick up what you want from the items they drop. If you want, after exiting the medical center, go to the right and climb on the crate, then on the roof of the building you came from (at the bottom of the ramp you slid). You can kill the guards from there, backing up for cover. Go to the gate and use the keypad to open the door. Command center - There are two guards at the top of the ascent that throw some barrels that explode. So, go through the gate. [Checkpoint] Go up the ascent from the either left or right side and kill the guards. Then enter the building. This is the command center you are looking for. In the cut scene, Lara checks some satellite photos from a computer. Alister tells her that they have many of them and there is nothing there. Lara says that the laboratory would not be visible from above, so they need maps. Lara finds the laboratory from the computer and Alister says that it is quite far. She is not willing to walk and she mentions that there is a military train that runs past the lab. She says it looks like Amanda's boys are ahead of her, so she better run. Alister says that the train is about to roll and Lara had better run fast. Your objective now is to catch up with the train that runs past the abandoned Soviet laboratory. Climb up the ladder close to the control panel to reach the roof of the building. [Checkpoint] Jump to grab the ladder of the tower and climb to the top. Grab the wire and slide to the roof on the other side of the area. Grab the wire there to slide to the roof of the opposite building (which is close to the train). Draw weapons, drop down and shoot the three guards around. When the camera shows the tunnel of the train and Alister says that the train is leaving, you need to hurry a bit. The door of the tunnel will open and two guards will start shooting from there. Approach the door and Lara will tell Alister to forget the train, as she has a better idea. She refers to the bike which is at the entrance, so ride it and drive into the tunnel. BIKE - Parallel to the train (Bug note: Save your game before using the bike. Many people have encountered an annoying bug, where after entering the first side-road, they accidentally fell off the cliff and the checkpoint that loaded had them is the air, falling down to their death. We have not found a solution for this bug, so you need to load a previous saved game. If you are a console player and have not a saved game to load, you will have to start the game from the beginning. The PC players can download a saved game.) [Checkpoint] You will have to drive parallel to the train. Like the previous time, you will meet some guards on their bikes, so you need to kill them. Again, the quicker you kill them, the sooner this part ends. Avoid the obstacles on your way (like rocks and trees) and try to collect the Health Packs. When you start, you are close to the train. Do not stay there. Drive to the middle part of the area, where the guards appear. Do not forget the barrels that you can explode. This time, the trip is longer and your target is to catch up with the train. You will enter a side-road, which means you will not be able to see the train. [Checkpoint] When you reach the train again, [Checkpoint] guards will also appear on cars. The second time you reach the side-road [Checkpoint], you will have to jump over the train twice (using some bridges) and finally drive pararrel to the train. You have to jump on the train's flat car and keep driving on it until you get the cut scene. In the cut scene, Lara dismounts and climbs on the front car of the train. As she approaches to the front, a guard shoots her from the engine car, but he misses. The train hits a barrel that explodes, but Lara crouches and survives. Her jacket catches fire, so she takes it off and throws it away. ON THE TOP OF THE TRAIN/ ENTERING LABORATORY Lara is on the top of the train. You need to press the appropriate buttons (as the game shows) and save her. Area with burning train - [Checkpoint] Lara assumes that Amanda is here, because the electricity is on. From the starting position, use the Grapple to catch the metal beam that holds the rope and pull it to your side. Once you release it, it will return to its initial position, so jump to grab the rope. Swing and jump to the ledge ahead. Climb up the ladder on the left and jump to grab the sign on the right. Traverse to the left and jump to grab the pole. Swing and jump to grab the next pole. Jump to grab the sign beyond the train and drop down. [Checkpoint] Drop to the ground and shoot the crate in the corner to get the Bronze Reward (3/5). Then climb back up on the ledge, using the nearby crate. Again, use the Grapple to catch the metal beam and pull it close to you. Jump to grab the rope before it moves back to its initial position. Climb up the rope, because the fire from below may catch you. Swing and jump to the ledge ahead. Shoot the opposite moving fan to break it and jump to grab the ledge beneath it. Then jump to grab the ledge above; pull up. [Checkpoint] (If you accidentally fall down, you can use the movable crate to climb back to ledge.) Going through the vents - Go through the circular opening and follow the hallway. Lara comments that it is cold here. Slide down the slope and jump over the electrified wires (press and hold Jump to jump higher and farther). Crouch beneath the next wires and pick up the Health Pack at the end of the hallway if you need it. [Checkpoint] There is a dead man behind the bars and a piece of paper close to him. Alister wonders what this man is doing here and Lara says that the scientist was trapped here since the 50's and he freezed to death. Pick up the paper. "The experiment has gone wrong. The KGB sealed the facility", Lara reads and assumes that he tried to escape from the vents, but got trapped. Go through the opening and jump to grab the horizontal pole. Swing and jump to grab the rope. Climb up a bit, swing and jump to grab or land on the ledge ahead. If you accidentally fall down, you can find a crate that you can use to climb to the top, then try again. Slide down the slope, jumping over the electrified wires. Follow the hallway to the right and crouch beneath the wires. Shoot the moving fan and follow the hallway around to the left. Before sliding down, shoot the moving fan at the bottom of the slope. Then slide down, jumping over the wires. Jump over the next wires and crouch beneath the ones beyond. Slide down the slope on the right, jumping over the wires. Jump at the edge to grab the horizontal pole and release to drop down. Shoot the crate and pick up the Bronze Reward (4/5). Then climb on the box on the other side, turn to face the way you came and with a double jump, use the Grapple to catch the shimmering ball above. Turn around, swing and jump to grab the ledge. Pull up, shoot the moving fan at the bottom of the slope and slide down. Drop into the next room. [Checkpoint] Room with generator - You just entered the abandoned Soviet lab you are looking for. Lara says that Amanda was here, since the lights are on. Alister tells her that she came in through the main door and she has probably not been here yet, because there is a generator at the other side of the room and she could have started it. So, you now need to turn on the generator in order to power up the lab. If you approach the right hand side of the room (where the big red sign is) Lara will say that it is a map of the facility. Turn to face the duct you came from and locate the metal boxes on the left. Climb on them and shimmy to the left around the corner (as shown in this screenshot). Pull up and go to the left. Use the Grapple to catch the padlock of the gate and pull it to open it. Jump through the gate and shoot the crate to get the Silver Reward (2/3). Then drop back down. Climb on the metal box that is on the right of the opening you came from (right if you face it). Jump to grab the box on the left and then jump to grab the letal ledge. Pull up and jump to the ledge ahead. Go to the right, and from the part that the railing is missing, jump to grab the rope. Lara's weight will lower the pipe and the cut scene will show fuel dropping from the pipe and filling up the generator. Go to the front side of the generator and use the Grapple to catch the ball. Pull it to activate the generator that will light up the map and unlock the door of the room. Go to that door and it will open automatically. Hallways with green coolant - [Checkpoint] Zip assumes that the green smoke ahead is a coolant, but Lara is not willing to find out. In any case, this thing is harmful, so avoid it. Jump to grab the grating on the right and jump to grab the pole. Swing and jump to the ledge ahead. Jump to grab the next pole, swing and jump to grab the rope. Swing and jump to the ledge ahead. Go to the right and jump to the next square ledge. Jump up to grab the ledge above and pull up. You need to grab the pipe on the right and shimmy to the other side, but there is an electrical light that goes across the pipe. So, wait for it to come to your side and when it starts leaving, grab the pipe. Travesre to the left until you reach the end (use the Interact button to go faster). Before the light comes, jump to grab the box behind you. Traverse around the corner and release to grab the grating below. Then jump to grab the grating behind you and drop down. There is an electrical light that goes across the horizontal pole, so you need to follow the same procedure. Grab the pole when the light leaves and traverse to the other side. Drop to the ledge, then to the ground. The door opens automatically. Go through it. The cut scene shows Lara entering a room, where Amanda is examining a huge gun. Lara calls her, but Amanda says that she is busy. Lara notices that Amanda changed her look and realizes that she was the one who was with Rutland in Bolivia. Amanda says she goes to many places that Lara cannot conveive of and that this time Lara was the one who was left behind. Amanda crosses a metal bridge and goes to the other side of the room, whilst Lara apologizes to her, saying that if she knew that Amanda was alive, she could have done anything to save her. Amanda does not care about that any more. She got over it a long time ago. She goes through a door and orders the guard not to let Lara follow her. Lara is crossing the bridge when the guard throws a grenade. Lara jumps back and the bridge collapses after the explosion. Alister tells Lara that this big gun might help her. Area with electric Tower and big gun - [Checkpoint] If you examine and use this gun, you will see that it works now, but not for too long, because it needs more power. So, leave it for now. (Note - You can take a shortcut here and skip a big part of the level, missing of course many kills, pick-ups and Rewards. This shortcut will take you to the opposite side, beyond the hanging metal ledge. If you want to try it, check this page.) There are three guards below. Slide down the ramp on the right and take care of them. Pick up the items they drop if you need them. Facing the tower, go to the right and pick up the Bronze Reward (5/5). Now you need to go up. Go to the left of the Tower and locate the vertical pole with the electrical light that goes accross it. Grab the pole when the light has moved upwards and climb up. Jump to grab the ledge on the right and pull up. [Checkpoint] Then climb to the ledge above. Turn around and jump to grab the horizontal pole. Swing and jump to grab the next pole. Then jump to grab the rope. Turn left, swing and jump to grab the vertical pipe. You need to grab the pipe with the moving light, so wait for it to move upwards and jump to grab the pipe. Climb to the top and jump to the grating. Go to the left and drop down. [Checkpoint] There is a Health Pack next to the dead scientist if you need it and a piece of paper. Pick it up and Lara will read it. "They funneled Tesla energy into the artifact, and there was an enormous discharge of some sort. The KGB shut down the operation, removed the core, sealed off the lab in sections, and left behind those scientists who weren't forcibly removed." Approach the cage you dropped from and shoot the barrel inside to explode the entrance. If you have problems aiming at the barrel, shoot through the opening in the grating (as shown in this screnshot). Either use the Interact button or enable the Accurate Aim. Enter and pick up the Silver Reward (3/3) from the end. Exit, follow the hallway and the door will open automatically. Room with Control Room and Core - Follow the twisted passage with the pipes and hanging cords until you reach the green coolant. Climb on the grating and jump to grab the pole. Swing and jump to the ledge ahead. Jump to grab the pole in the doorway and release to drop into the room. [Checkpoint] There are five guards here, so kill them. Be careful, because they throw grenades. You can explode the barrels if the guards are close to make your life easier. When you are done, pick up the items they drop if you need them, including ammo, Grenades and a Health Packs. Going to the control room - Go to the far right of the area and push\ pull the Core close to the ladder. Climb on it and jump to grab the ladder. Then jump to the ledge on the right. In the cut scene, Amanda talks to Lara through her headset. Zip asks Amanda how the hell she got into this channel and Lara says that Amanda probably got a headset when she was rearranging his office. Amanda asks Lara if she knows why the Soviets called their project "Carbonek" and Lara replies that it is the castle where Lancelot sought the Holy Grail. She also says that this is not the first connection to Arthurian myth (the first was in Peru, where Lara learned about the last Queen of Tiwanaku). Amanda obviously thinks that this is not a myth. The Russians activated a power in the artifact that literal minds cannot handle. When Amanda disconnects, Lara tells Zip that Amanda is having difficulty obtaining the sword fragment and she does not want to blow up everything in the process. Jump to grab the pole of the light and jump to the grating ahead. Turn right and jump to grab the rope. Swing and jump to grab the ledge above the orb. Traverse to the other side and jump to grab the hanging metal pole. Swing and jump to the broken grating. Jump to grab the ladder on the right. The second part of the ladder will lower, which means you can start from here if you accidentally fall down. Climb up a bit and jump to grab the grating on the right. Pull up and go to the other side. Draw weapons and shoot the barrel in the control room to smash the windows. Jump to grab the rope, swing and jump into the control room. [Checkpoint] There is another dead scientist here with a Health Pack and a piece of paper. Lara reads it and says that at least a dozen of scientist's colleagues were killed in the experiment. The artifact converted the Tesla voltage into something else... a wave of concussive force of some kind. The scientists refused to repeat the experiment and when the KGB tried to persuade them otherwise, it got nasty and they were shut down. Pull the lever from the control panel. The cut scene shows one of the orbs generating the Core. To fully work, the Core must be generated by the other two orbs. Drop down and use the Grapple to move the Core across the tracks on the floor. All obstacles will be smashed by the Core, so keep pulling it. As you do it, the other orbs will throw power to the Core. Pull it close to the door that will open automatically. The Core will pass through it and through the hallway with the cords. Be careful of the coolant as you exit. [Checkpoint] Use the gratings and the pole to pass above them. The Core generated the cords, so do not pass through the blue light. [Checkpoint] Use your Grapple to catch the cord, pull it and release it. The cord will start swinging, so move when the blue light does not appear. Do the same for the next cords until you exit to the room with the Tower. [Checkpoint] (Note: The Core slides on the track by itself. When it reaches the door that leads back to the Tower, the door is supposed to open as the Core approaches. If the door remains closed, you have to open it by yourself. Carefully approach the either left or right side of the Core, as shown in this screenshot, and the door will open. This will allow the Core slide outside.) Go to the left side of the wooden door of the tower. [Checkpoint] Use the Grapple to open it. When the Core slides into the tower, you can release the Grapple. The Tower is activated by the electricity and some boxes are thrown around. On of them hits the door on the other side, which starts working. Carefully pass through the malfunctioned door. Enter the next room. The cut scene shows Lara entering a control room with another dead scientist. There is a box with a shield on top in the middle of the room. Lara approaches the shield and says it is from the 10th or 11th century and it was probably recovered with the piece she is looking for. She says it resembles Launcelot's crest. She spots something that looks like a map at the back of the shield and asks Alister to have a good look and see what he can make of it. Lara assumes that the knight needed help to find his way home or this piece was not all he had. Alister asks if it has to do with the sword segment they are looking for and Lara says that it is useless without a reference point. Alister will work on it and goes offline. There is a Health Pack (that you probably need) and a piece of paper next to the dead scientist. [Checkpoint] Lara reads it and says that a number of relics were recovered along with the artifact, but the scientist could not find anyone to help him study them. Go through the other malfunctioned door. [Bug warning: At this point, the ramp that leads to the bottom of the Tower is no longer there. If you accidentally fall down and survive from the drop, you can make your way up again, using the poles with the electrified light. The door (close to the Tower) that used to be out of order is now partly open and you can pass through it and return to the Tesla gun. However, you may encounter a bug here (which has a tendency to appear on the PS2 and XBOX versions), where the opening is not big enough and Lara cannot pass through it. So, save your game before jumping to the hanging ledge, in case you fall down and cannot return back. If you are stuck there and you do not have a previous saved game to load, you have a chance to leave by performing one tricky jump. First, you need to reach the top of the grating, where you got the Silver Reward (next to the Tower), as shown in this screenshot. Go to the other side. You have to jump to the metal ledge opposite the Tesla gun, but this is a tricky jump. See this screenshot to get oriented. You need to jump to the narrow ledge next to the wall, then to the metal ledge. Lara CANNOT stand on the narrow ledge (she slides down), so once you reach it, you must immediately jump to the metal ledge. This works fine, so do not give up if your first try is not successful. Download this video and watch the process. The PC players can also download a saved game.] Back to the area with the Tesla gun - When you return back to the room with the Tesla gun, three gurds come through the door on the opposite side. Get the gun and use it to kill them. Pull some barrels from your left and right side and throw them to the guards to explode them. Throwing the barrels against the railings is enough. You do not have to throw them on the ledge. You can also use the boxes above the guards or the metal movable boxes from your side. If you decide for the latter, do NOT use the metal box that is on the ledge (or at least leave a box on your side), because you will need it for the next Reward (see this screenshot to get oriented). Moving the ledge for the Gold Reward - Move the hanging metal ledge to the right side, where there are no railings. Quickly start pushing the hook that holds the ledge, before it loses its momentum. You need to push the ledge even farther (as shown here), to the upper part of the cord. The screenshot shows an X. This is where the hanging ledge usually ends, but notice where the ledge is hanging from. It is important to give a momentum to the ledge, otherwise you will not be able to push it farther and it can end up really frustrating!! If you are stuck here, try the following. First, move the hanging ledge back to the left. Do not forget: the Lock Target button pulls a metal object (the hanging ledge in our case) and the Shoot button fires electricity, which pushes the object. Move the target of the Tesla gun to the top part of the ledge, aiming the hook (as shown in this screenshot). Press and hold the Lock Target button and move the ledge to the right. When it reaches the part where the cord goes higher (as shown here), quickly start pressing repeatedly the Shoot button to push the ledge. If you do not hesitate at all, the metal hanging ledge will gain momentum and you will not have problems. Remove the crates from the opening on your right (as shown here) and leave the gun. Go to the movable metal box and push it to the end of the ledge. Climb on it and jump to grab the opening where the boxes were. Traverse to the left and jump to grab the ledge above. Traverse to the left around the corner and drop to the grating. Turn around and jump to the hanging metal ledge you moved before. From there, jump to the next ledge. [Checkpoint] Jump to grab the pole, swing and jump into the alcove. Pick up the Gold Reward (1/1). Jump back to grab the pole, swing and jump to the ledge. Jump down to the metal ledge you moved, then to the opposite side, where the guards appeared. Hallway with electrified poles and pipes that block your way - Go through the door that opens automatically. [Checkpoint] Climb on the grating and shoot the broken pipes in front of you. You can either shoot at the general directional of the pipes or enable the Accurate Aim. Use the Grapple to catch the shimmering mechanism on the right and move yourself to the other side of the hallway. Jump on the next grating, use the Grapple again, but crouch beneath the electrified pole whilst the grating moves to the other side. Jump on the next grating [Checkpoint] and shoot the broken pipe. Again use the Grapple to move the grating, but this time jump over the next electrified pole. Drop down [Checkpoint] and go to the right around the corner. The door opens automatically. Go through it. The cut scene shows Lara entering a room with electrified orbs. She takes a look around and spots Amanda working in a control room above. Lara apologizes to Amanda for what happened and says that they can still work together. Amanda says that they cannot do that, because she was alone down there (to the place she was trapped); she and the artifact she has on her neck (it is the stone that she pulled out in Paraiso when the creature were chasing her and Lara). The creature appears and Amanda says that it is a little friendier than it was in Paraiso. Amanda tought the creature how to fetch. Lara gets angry, because this thing killed their friends. Amanda says that once she mastered it, it saved her life, and advices Lara to stay away from it. Fighting the creature\ acquiring the sword segment - [Checkpoint] The first thing you need to know is that you cannot kill the creature. So, do not waste you ammo and time shooting at it, using either your gun or the Tesla gun in the middle of the room. After the cut scene, run around the room and use the four levers between the small electrified orbs on the walls. Every time you use a lever, a hook catches a big orb above the Tesla gun. When you pull all fours levers, the big orbs lower and the sword fragment is revealed. Run to the Tesla gun and use it. You need to push the four big orbs towards the small electrified orbs on the walls. Every time you do that, a blue energy shield appears on both sides of the big orb, the latter of which stays to this position for a few seconds. You have to push all four big orbs and make them stay at this position at the same time. To push an orb, you need to press the Shoot button repeatedly (do not just hold it). Two or three shots are enough. Then turn and shoot (push) the next orb. If the creature gets into your way, shoot some electricity to keep it away. When all four orbs are activated (puhed) at the same time, the shield that protects the sword fragment above will shut off and you have to jump off the gun and use the Grapple to catch the sword fragment. You have to turn the camera upwards and face the fragment; otherwise, Lara will not be able to catch it with the Grapple. When you do that, the cut scene shows Lara pulling the sword fragment with the Grapple. The glass floor beneath the gun shatters and Lara sees that Amanda is leaving. Lara jumps through the broken floor and crawls through a pipe. Lara asks Alister if he found anything about the map and he says that it leads to Cornwall.
|
||
| « Level 4: Ghana - Persuing James Rutland | Index | Level 6: England - King Arthur's Tomb? » |
Tomb Raider: Legend Walkthrough & Game Guide © 2000-2007 www.tombraiderhub.com |
||