Level 6: ENGLAND - King Arthur's Tomb?
(If you are looking for Time Trial Tips, see our dedicated section.)
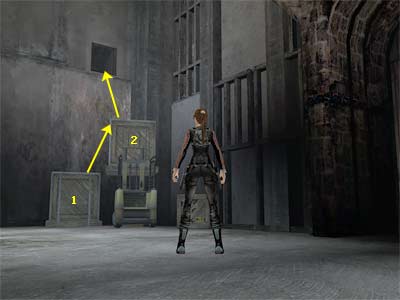
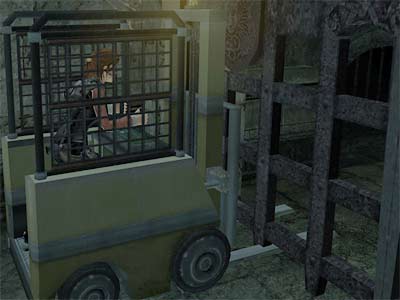
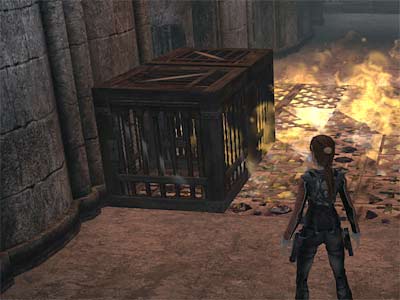
In the cut scene, Lara meets Zip and Alister, who are waiting in the van. Zip asks Alister if he is sure about the map. Alister says that he is, although there were some nonsense about the discovery of the King Arthur's real tomb, but soon discreted, and another roadside attraction was born (meaning Professor Worth's King Arthur Museum, where they met). Lara says what they can see from this. She climbs up a pipe and enters a place that was used as King Arthur's attraction. (Bug warning: A possible bug can be activated later in the level, when you fight with the boss. You are advised to save your game during the level.) The map on the knight's shiled that Lara found in Kazakhstan leads to a place that seems to have King Arthur's grave. If this place meant something to a knight one thousands years ago, it probably means something to Lara as well. So, you need to find out if the ruins of this place contain a sword fragment. [Checkpoint] Lara is looking at a shimmering grating above that hides an opening. Use the Grapple and throw it down. There is a sword stuck in a stone in the nearby room, but Lara cannot pull it out. She says that she sprobably needs to turn on the power first. So, you have to turn on the power in order to enter the museum exhibit rooms that are located behind the door. Enter the room beneath the opening that was hidden from the grating and pull the movable crate beneath the opening. Climb on the crate, then through the opening. Alister tells Lara that this place was owned by a Professor Worth, who had once students. Shoot the crate and pick up the Bronze Cross (1/9). Use the Grapple to remove the grating on the right and fall through the opening. [Checkpoint] Small courtyard - Go to the other side and jump to grab the third sill above the window. Jump to grab the ledge above and traverse to the left past the gate. Drop down and use the lever to turn on the power. Climb up the pipe at the end of the alley and jump to grab the ledge on the right. Traverse to the right and grab the sill below. Do not drop to the ground, because the water is harmful from the wires. Jump to grab the next two sills and then jump to the part of the ground, where there is no water. Room with destroyed floor - Open the door to the building and go to the room with the sword. [Checkpoint] Pull it to open the nearby door. Enter the next room with the destroyed floor. [Checkpoint] If you accidentally fall down, you will find some narrow ledges to climb back up. Go to the right (if the entrance is to your back) and jump to grab the small window. Get into the small room and shoot the crate to get a Bronze Cross (2/9). Climb back to the small window, hang from the edge and jump back to the floor. Notice the horizontal pole close to the small window. Jump to grab it, swing and jump to grab the second pole. It will rotate 90 degrees, but it will go back to its initial position after a few seconds. Before it does so, jump to grab the third pole behind you. Swing and jump to grab the pole of the door ahead*. Lara's weight will lower the door, so quickly jump back to grab the previous pole. The door will fully open, but it will start closing. So, quickly swing and jump through the doorway. (*Note: Most of the times, Lara grabs the pole of the door with one hand. In this case, an icon appears that prompts you press the Interact button and make Lara grab the pole with both hands before she loses her grip. This icon depends on the version of the game. For example, it is a Triangle icon for PS2 and a yellow hand icon for PC.) Second room with destroyed floor - You reach a second room with destroyed floor. Again, if you accidetally fall down, there are narrow ledges that you can use and climb back up. Use the Accurate Aim to shoot and break the ring that holds the boat. Jump on the boat and jump to the opposite side. Go around to the right and crouch through the duct to a small room. Shoot the crate and pick up the Bronze Cross (3/9). Return back and pull the sword. This will cause some planks to fall, revealing a mechanism. Back up a bit and use the Grapple to pull the mechanism and open the nearby door. Release and go through the door before it closes. [Checkpoint] Warehouse - You enter a warehouse with some crates an a forklift. There is also a grating in the back right corner that hides an opening which leads to the next Cross. So, use the Grapple to throw it down. Use the forklift and position a crate beneath the opening. Take a second crate with the forklift and approach the either left or right side of the first one. Raise the second crate, so its bottom touches the top of the first one (as shown in this screenshot). Climb on the crates, then through the opening. This is professor's office. Lara reads some papers that say that King Arthur's tomb - where his museum was built over - is a fake. Pick up the Silver Cross (1/5) and return back to the warehouse. Get the forklift and drive down the ramp behind the crates. Lara says that this is definitely not King Arthur's tomb. She has seen so many tombs and she can know. She also says that this place is hiding something. So, you need to find access to the hidden ruins. Drive the forklift opposite the entrance to break the tomb. Pick up the Silver Cross (2/5) and drive the forklift to the crates on the left to smash the wall and find the access to the hidden ruins. Go through the opening. [Checkpoint] Stay on the forklift and drive through the two sets of spikes. Use the forklift to open the gate. Position the forks beneath the gate (as shown here) and raise it. Drive through the next spikes and crash the wall ahead. In the brief cut scene, press the appropriate button (as the game shows) to save Lara from falling into the deep pit. (Note: Save your game here. Check the Important note below!!) Going down the pit - [Checkpoint] As you can see, it is a long drop down, so be careful. First, take a look on the right to spot the Bronze Cross (4/9) in the alcove. Use the Grapple to catch it. Go down the broken steps and use the Grapple again to catch the Bronze Cross (5/9) from the alcove on the other side. Jump to grab the sill on the left and then jump to grab the ledge on the right. Quickly traverse to the right and drop down. The stairs are about to collapse, so go down them and jump to the stairs below. Again, the stairs will collapse, so jump to grab the pole. Swing and jump to land in the alcove ahead. Hang from the edge and jump to grab the narrow ledge on the right. It is ready to collapse, so quickly traverse to the right. [Checkpoint] Pull into the opening, follow the passage to the left and pick up the Bronze Cross (6/9). Return back and drop down. (Important note: The game creates a checkpoint whilst you are hanging from the edge of the opening that leads to the Bronze Cross. If you fail to the next part and kill Lara, the game will load, but Lara will be standing on the stairs beneath the opening without the Bronze Cross in her backpack. So, be careful, because you will not be able to reach the opening.) Jump to grab the rope and swing diagonally to the right to land on the stairs that are ready to collapse. Quickly jump to the stairs ahead. Go down them and jump to grab the small opening on the left. Traverse around the corner and drop down. Hang from the edge and drop to the ground. Ground - There is an arched pushable stone with the III sign on it. If you push it, it will return back. This and two more of this kind open a stone door here that leads to a Cross (the Gold one if you mind), so leave it for now. Go up the stairs on the other side. [Checkpoint] Follow the hallway around to the left and jump over the lava pool. Continue to the right to reach a fire trap. Use the Grapple to pull the metal box close to you. Position the box on the first grating (you can push\ pull it). Climb on it and notice the fire that comes from the second grating beyond. When it comes on, jump there. Until you land, the fire will have gone off. Jump over the last fire. Pull the box close to you and use it for the next fire trap. When you pass it, bring the box close to you. Push it next to the stone door and climb on the box. Climb on the door and drop down to the other side. [Checkpoint] Use the lever to open the door. Area with rotating blades - Bring the box inside [Checkpoint] and push it to stop the blades on the left (if the entrance is to your back). You do not have to push it in the room; just push it beneath the blades to stop them. Enter and pick up the Silver Cross (3/5). Exit and pull the box back. Push it beneath the blades on the opposite side (to the right if the entrance is to your back) and bring the second metal box outside. Push one of the two boxes beneath the third blades (opposite the entrance) . Take the other box and push it to the room behind the third blades. If you want the Gold Cross, you have to push the box to both left and right sides of the room and push the two arched stones, which along with the other one you saw before will open the secret room. First, go to the left ledge and push the arched stone with the I sign. Then go to the right ledge for the stone with the II sign. You will use the last stone when you return back later. Bring both boxes into the big room (behind the third blades). Push the one to stop the fourth blades on the other side and push the second behind them. Position the box above the fire. Now push the first box behind the second one and keep pushing it until both boxes are on the fire (as shown in this screenshot). That way you will make a path, which will be long enough to jump over the fire. Climb on the boxes and jump over the fire. Continue through the hallway and pull the lever to open the door. Area with pool and coffin - Go through it and follow the hallway that will get you to a pressure plate. [Checkpoint] If you step on it, the gate on the other side will open. If you step off, the door will close. So, you need something to put on the plate. Jump into the pool and swim to the other side. Climb out of the water and use the Grapple to move the chandelier above the water. It will break some bars and a coffin will be revealed. Use the Grapple to throw it in the water. Now move the other chandelier to break the bars on the side. Use the Grapple to get the Bronze Cross (7/9). Climb on the coffin and use the Grapple to catch the light that is close to the entrance. Move the coffin (and you) close to it. Then catch the light above the pressure plate and move the coffin on the ground. Then position it on the plate. Go down the stairs and through the gate. Channels with water - Follow the hallway to reach a channel with water. [Checkpoint] (This diagram shows the channels.) Jump into the water and swim through the opening beneath the entrance. Get the Bronze Cross (8/9) and exit. Pull the lever to open the nearby gate. The current will push both you and the coffin through the gate. Quickly climb on the coffin and turn having the way you came from on your right. There is an opening in the wall halfway through the channel, so jump into it. If you miss it, climb on the coffin and use the Grapple to catch a light on the wall. Pull the coffin (and you) close to the light and as the coffin returns back (beause of the current) jump into the opening. Jump into the water and swim forwad (notice the Cross in the alcove on the right). Swim through the channel on the left and turn left. Use the lever to open the nearby gate and allow the coffin enter the channel. Climb on the coffin and use the Grapple to catch the lights on the walls and move the coffin close to the alcove with the Silver Cross (4/5). Jump to the opening and claim the secret. Jump into the water and climb on the coffin. There is an opening exactly opposite the alcove where you just got the Cross. Move the coffin there and jump into. Drop to the water, which will push you to a huge pool. Area with huge pool and Temple - Lara cannot dive into the water here, so swim to the other side and climb out of the water. Lara is amazed by the Temple. The door is closed, so you need to find another way to enter. Notice the two hanging fire pots. Go to the right one first. Use the Grapple to rotate and make it face the pool (the pot must be to the pool's direction). Go the left fire pot and turn it to face the left wall (if the pool is to your back). (Note: You cannot turn the pots in any other direction, apart from the correct ones.) Climb up the narrow ledges on the left to reach the top ledge. [Checkpoint] Jump to grab the pole, swing and jump to the slope. As you slide down, jump to grab the pole of the fire pot. It will rotate, so swing, jump and use the Grapple to catch a fire pot above. Swing and jump to grab the other pole with the fire pot. It will rotate, so swing and jump to grab the rock ahead. Pull up and climb on the second rock. Then jump to grab the ledge. Jump to grab the sill above, then the one on the right. Jump to grab the chain and climb up it. Jump to the Temple's roof [Checkpoint], go to the other side and pick up the Silver Cross (5/5). Return back almost to the middle and jump to grab the chain. Slide down to enter the Temple. In the cut scene, Lara enters the Temple. Alister asks what she is looking at and she replies a myth, except it is real. As she passes in front of the tombs, she says that they are all here - the court of Kamelot. Alister asks if she is sure and Lara says that has no doubt about the authenticity of this tomb. She approaches a statue which is surrounded by a lighted shield. Lara says that there was not only one Excalibur or one Merlin. They keep seeing swords and dais in all over the world, simply because they are everywhere. In their case, their Merlin was killed and their sword was left in pieces. You have to now find King Arthur's sarcophagus. Go to the left side of the Temple (if the main entrance is to your back) and locate Bedwyr's tomb. In the cut scene, Lara reads that Bedivere returned a fragment of Excalibur to Arthur after the other pieces were carried off by the knights. This fragment was left with Arthur to help him leave this mausoleum when the time came. Pull the tomb and position it next to the broken pillar on the other side. Notice the bell and the hanging stone. If you grab the chain of the stone, it will lower and the bell will go higher. So, use the Grapple to catch the chandelier. Back up as much as you can (close to the statue) and pull the chandelier. Release it and it will start swinging. Quickly climb on the broken tomb, then on the pillar and jump to grab the chain where the stone is hanging from. If the chandelier is still swinging, it will hit the bell. The cut scene shows the shield of the statue exploding. Lara approaches the statue and takes from Arthur Pendragon's statue a sword segment of Excalibur. Lara would not take it if she did not need it so. Zip talks to Lara and says that something is going on there. They start shouting while Lara asks to know what's happening. She does not get a reply. You just got the sword fragment, but Alister and Zip's voices worried Lara. You need to get back to surface and save Zip and Alister. [Checkpoint] Exit the Temple. The cut scene shows a huge snake monster appearing from the water. Fighting the snake monster - You cannot kill the snake monster directly (by shooting at it) so do not waste your time and ammo. Do not let its size scare you! There are four tanks in the water with a lever each. You have to approach each tank and shoot it (that's why the target appears). The monster will hear the sound of the tank, be hypnotized and turn its head towards the cage that is hanging. You then have to quickly use the Grapple, catch the lever and pull it to lower the cage and hit the monster. You can understand that you made it correctly, when a brief cut scene will show the monster destroying the tank. Since there are four tanks, you need to repeat the same procedure three more times. The monster not only attacks with its head, but it also spit toxic liquid. This takes some of your health, but also tosses Lara up. If you are close to the lake, you will fall into. The moster will then get you and throw you to the ground, which makes you lose more health. So, stay away from the lake as much as you can (not too far away though and make your job harder). In case you lower the cage without a succesful hit, do not stay to the spot and do not shoot the tank. The monster will not hear the noise while the cage goes up. You better go for another tank. [Bug note: Many people have encountered a bug with the two front cages (those in the middle of the pool), where they do not lower when the the levers are pulled. So, start with the front tanks first in case you will not be able to lower the cages after spending time with the back ones. If you are a console player and after trying a couple of times the bug still occurs, you need to load a previous saved game. Otherwise, you will have to start the game from the beginning (we have not found a solution for this bug until now). If you are a PC player, you can download a saved game.] When you make it, the cut scene will show the moster dying. Half of its body remains on the surface. Jump into the water and climb on the ledge close to the monster. Vault onto the monster's back and walk on it. Climb up the ledges and go through the opening. Follow the hallway to reach a deep pit. [Checkpoint] Jump off the ledge and press Jump in midair to use the Grapple and catch the hanging pot above. Swing and jump to the opposite side. Jump to grab the pole and jump to land on a slide. Jump over the gap. Eh? Another one? Quickly press the appropriate buttons (as the game shows) to save Lara and seal the snake monster behind the gate. Turn around and enable the Accurate Aim. Shoot the ring at the top of the gate to release the rope. Grab the shield on the gate and jump to grab the top of the gate. Jump to grab the rope, swing and release to drop down. Pick up the Bronze Cross (9/9). Climb up the gate as before and jump to grab the rope. Turn around, swing and jump to the ledge. [Checkpoint] Pull the lever to open the gate and slide down the slope. You are back close to the fire traps. Going back - Draw weapons, because you are not alone this time. Two guards are waiting in the hallway, so kill them. Keep your weapons drawn. They have company. Two more guards will attack at the end of the hallway, so kill them too. Then pick up the items you need. One of them was shooting from a ledge, so you need to climb there for the pick-ups. (Note: Make sure you have pushed the two arched stones in this room for the Gold Cross). Use one of the boxes to stop the blades. Pass them and continue ahead towards the fire trap. [Checkpoint] A guard will shoot from behind the bars and another one from the other side of the fire trap, so kill them. You can shoot and kill the one behind the bars and throw a grenade to the other one who is standing beyond the fire trap. Jump over the two fire traps and pick up any item you need from the guards (you may want to pick up the SMG gun they dropped, because this is what the rest use). Go back the hallway and kill one more guard on the other side of the lava pool. Jump over it and go down the steps. [Checkpoint]Kill yet another guard. Push the arched stone with the III sign. This along with other two will open the stone door here. Go through it and pick up the Gold Cross (1/1). These guys came down using an automatic metal ledge that you can see in the middle of the room. Climb on it and push the button to go up. A guard will start shooting from the top, so kill him. Use the Grapple to catch the shimmering bars. Pull to start swingning. Jump to grab the sill above the bars and jump to the stairs on the left (or jump from the ledge directly to the stairs). A dog and two guards will attack, so kill them. A third guard with his dog are waiting behind a crate beyond, so take care of them too. [Checkpoint] When you reach the circular room, two more guards will attack. They carry a buckler, so a Grenade will be better. Return back to the warehouse and kill yet two more guards. Once you kill them, a cut scene plays. The cut scene, shows Lara hearing a man calling the last pair of guards you killed. We then see this man (who is a gurad) holding a gun and pointing Zip and Alister. The guard does not get a reply, so he tries to check. When the gate to the warehouse opens, no one is inside. The gurad enters and the camera shows Zip and Alister. We suddenly see the guard dropping down. Lara appears and asks if everything is ok. The two men says yes, so Lara says they should better go home. Back to Croft Manor, the cut scene shows Lara, Winston, Zip and Alister looking at the sword. Alister is amazed that King Arthur, the Knights and the Round Table were real. Lara says that the Excalibur was for King Arthur an afrtifact that predated him by the milenia. Zip reminds them that it is still in pieces and Lara asks him if he found anything about the Ghalali Key. Winston says that it was not in her father's collection, but Lara says that it was not in Ghana either. Lara puts two pieces together and she sees a familiar symbol. She then takes a look at the painiting above the fireplace. This is a painting with her parents, and Lara can see that her mother has a pendant on the lapel of her coat, representing this symbol. Winston says that it was a gift by her father, but he (Winston) never knew where it came from... until now. Alister asks where this pendant is now and Lara says in the Himalayas, because her mother had it with her (when the plane crashed. Do you remember the first cut scene of the game, where Lara's mother unpinned a pendant from the lapel of her coat and put it on the seat?). She informes Zip and Alister that she is going to Nepal and asks them to make the usual arrangements. As Lara goes up the stairs, Winston asks her not to try to use the sword after what happened to her mother. Lara says that her mother was killed by removing the sword, so she does not intent to do the same.
|
||
| « Level 5: Kazakhstan - Project Carbonek | Index | Level 7: Nepal - The Ghalali Key » |
Tomb Raider: Legend Walkthrough & Game Guide © 2000-2007 www.tombraiderhub.com |
||