| |
Tomb Raider 7: Legend - MODDING, Tutorial & Troubleshoot by shimodax |
|
 |
| (The original tutorial was written by shimodax on the Tomb Raider Forums.) |
| |
For this tutorial, we will make a mod of the Evening, Ripped dress, since this seems to be everybody's favourite. Once you have unziped Tomb Ripper and installed the Photoshop Plug-In, you are ready.
IMPORTANT: Create backups of the files you edit. If something goes wrong, you can always restore. You can either backup the file you edit (.DDS file) or the .BIG file you extract the .DDS from. The .BIG files are indeed BIG, so backup the DDS files that are smaller. |
Run Tomb Ripper, choose Open and select your game folder. It is most likely somewhere in C:\ Program Files\ Crystal Dynamics\ Tomb Raider Legend folder, unless you installed the game elsewhere. |
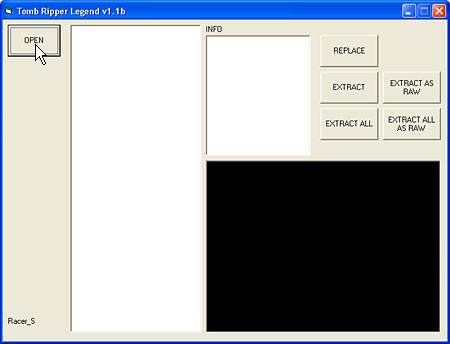 |
It will take a while doing the indexing on the first start. When it is done, it will fill the list with numbers. From now on, the numbers are called ID's.
The next time you will run the program, the listing will take a couple of seconds. |
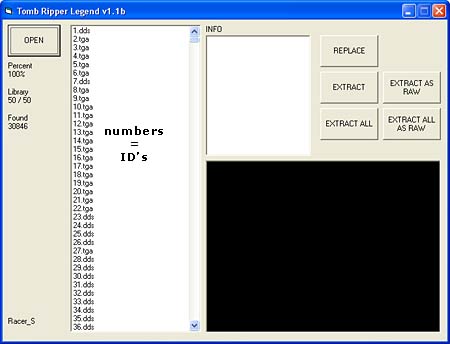 |
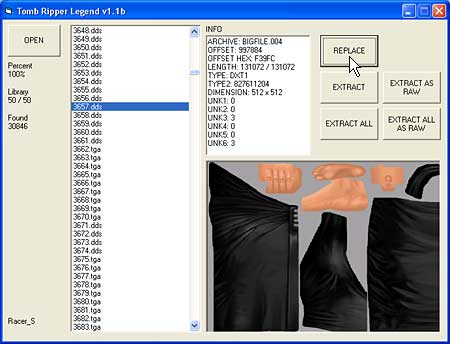
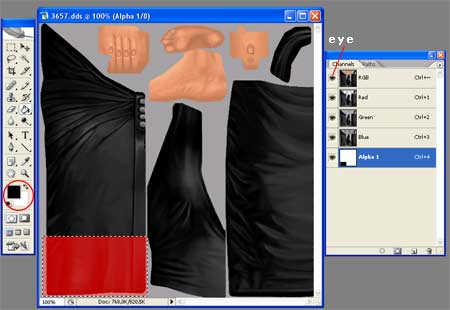
Scroll the list and locate the ID 3657.dds, which is the Evening, Ripped dress. You should see the parts of the dress, as shown in the image on the right. If the dress is not located there (it happens in some versions of the game), look somewhere close (some ID's up or down).
Once you locate it, hit Extract.
Note: When you select the ID, you can also see some information about the .DDS file. You can see which .BIG file you are extracting from, which is good if you want to backup or restore. |
 |
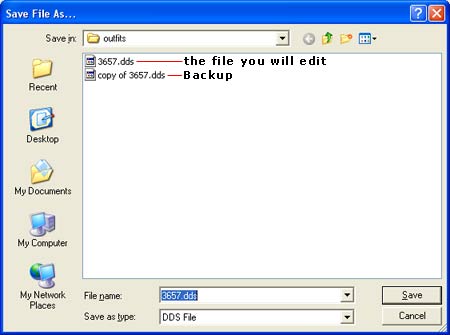
Now save the .DDS file, so that you can edit it with Photoshop.
IMPORTANT: Create a backup of the .DDS file. If you make a mistake, you can always restore. For example, you can save the backup as Copy of 3657.dds. |
 |
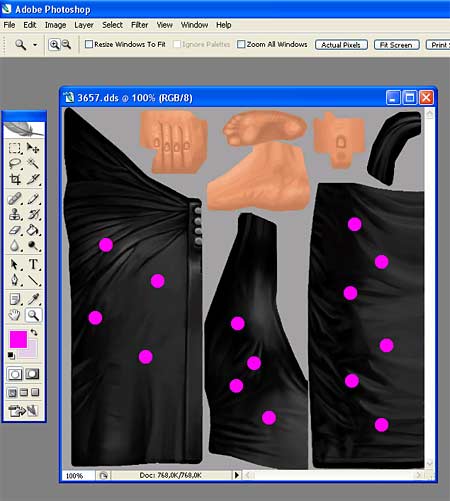
Open Photoshop and load the 3657.dss file (or right-click the file and select Open With).
The NVIDIA DDS Read Properties window will appear. Leave the Load Using Deafault Sizes selected and hit OK.
The file will open. Make some changes. For a start, add some pink dots or something simple. |
 |
Now save the file. You can either Save and replace the file or Save As (and select the DDS file format) and give a name like 3657-black-dress-pink-dots so that you can remember what kind of editing you made.
The NVIDIA dds Format window appears. For the black dress*, you will select:
1. DXT1 ARGB (1 bit Aplha)
2. No MIP maps
The hit Save.
* Other outfits require the MIP maps. You will have to experiment with that. You can check the DDS Formats below for the some basic editing, like legs and gear. |
 |
Go back to the Tomb Ripper. With the 3657.dds file still selected, hit Replace. Browse and find the 3657-black-dress-pink-dots.dds file (or the name you gave when you saved the file). The program will give you the message Done. If you take any other message, it means you saved in the wrong format or you had MIP maps enabled.
(The Troubleshoot section below answers to the common problems that appear.) |
 |
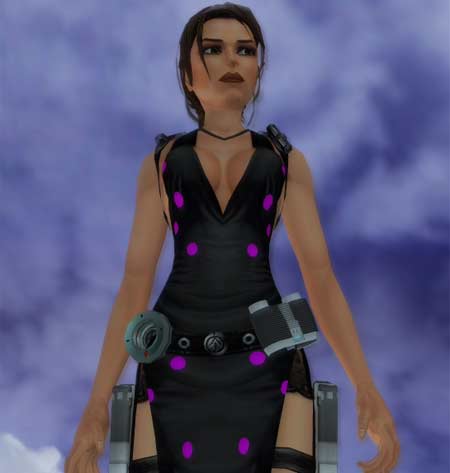
Start the game and select to Replay a Level. Select the Evening, Ripped dress and load the level. You should see the pink dots on Lara's dress.
Tip: To avoid loading the dress zillion times, go to the Manor, change a dress and exit Lara's bedroom to create a checkpoint. The game will remember what you wear, so for further tests you can just fire up the game and go to the Manor.
Note: Legend may not run if you have the Tomb Ripper open. Also, you will not see the changes you made in the preview window. For this, you will have to edit additional DSS files.
To share your outfit, all you have to give are the .dds files. If you wish to send your mod to our website, follow these simple instructions. |
 |
|
DDS FORMATS
| Legs |
DXT1 - No Alpha - MIP map on |
| Backpack, Belts, Undies |
DXT1 - Alpha - MIP map on |
| Dress |
DXT1 - Alpha - No MIP maps |
Most of the outfits require the MIP map. For some others you need to specify the level (the muber list on the right side of the MIP map selection). You are not supposed to know which outfit require the MIP map or not (until we make the complete list), but depending on the error message you get when you replace the DDS file in Tomb Ripper, you can experiment. The Troubleshoot below explains the error messages that sometimes are related to MIP maps. |
|
TRANSPARENCY
If you want to remove parts of the outfits (e.g. shorten the black dress or make the gear invisible) you can make parts transparent by painting the Alpha Channel black. |
In Photoshop, bring up the Channels box (Window, Channels). Normally, the RGB, Red, Green and Blue channels should be selected. If not, click the small box to the left of the RGB channel to bring up the eye. Then click the box of the Alpha 1 channel to bring up the eye there. Now select the Aplha 1 channel. Briefly, all eyes must be visible and the Aplha 1 selected.
When you select the Alpha 1 channel, the foreground and background colours turn to Black & White. Use drawing tools (pen, rectangle tool) and paint the areas you want to appear transparent. When you paint with the black colour, the area will appear reddish. These parts will appear transparent in the game. When you paint with the white colour or use the Eraser, you delete the reddish parts.
IMPORTANT: Keep copies of your files (e.g. in Photoshop format or the original backup), because when reloading .DDS files into PhotoShop, the transparent areas will be black and the original content lost.
And no, you will not be able to make nude pictures that way. If you try, you will find that she does not wear anything underneath... and that means not even a body. |
 |
|
TROUBLESHOOT
» Dress changes fading away into the old format when camera is in the distance.
You will need to save with MIP-Maps.
» Loaded graphic has a cascade of images.
Select "No MIP" when loading (images are usually square 512x512 pixels).
» File many bytes too long.
Try saving without MIP maps or without Alpha.
» File many bytes too short.
Try adding MIP maps (otherwise you may get the fade problem mentioned above).
» File few (8) bytes too long.
Keep MIP saving on, but select number of MIP maps manually in the save dialog (8,9,10) until the size is right.
» File apears as black in TombRipper.
It is usual for self created files with MIP maps. The program will show it correctly.
» Can't save. Too many channels (5).
Do not use extra channels in Photoshop (e.g. storing a selection mask will create a channel). Also, make sure you have the standard background layer turned on and have it fully painted (none of the gray checkered background showing through). |
|
|
|
|