Tomb Raider 8 Expansion: Beneath The Ashes Walkthrough & Game Guide (only for XBOX 360)
Beneath The Ashes: Father's Secret Study
Health Supplies: 10
Treasures: 28
Relics: 1
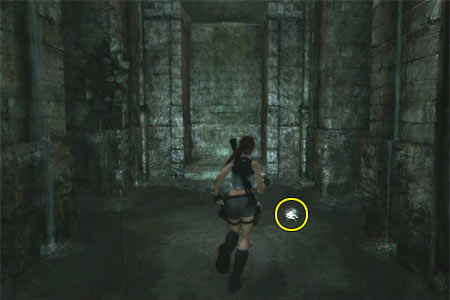
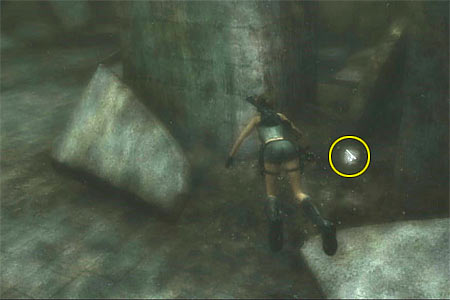
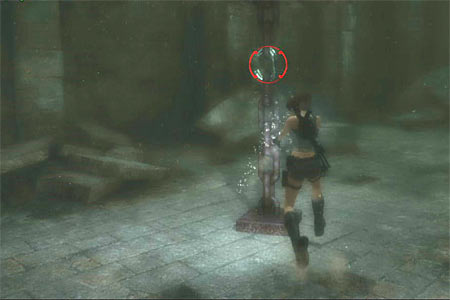
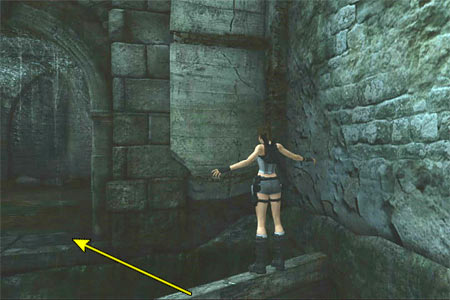
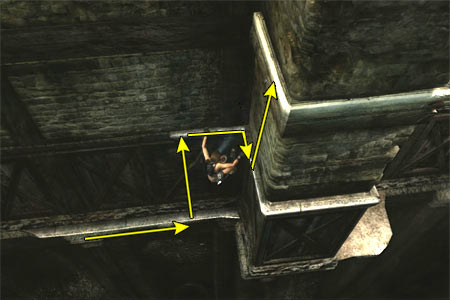
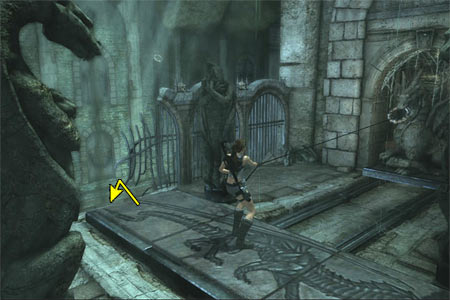
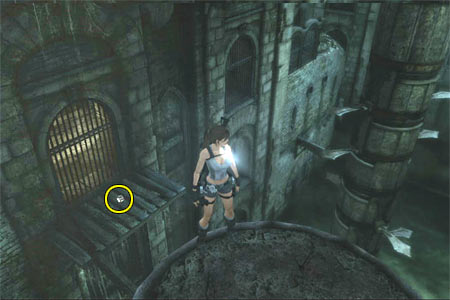
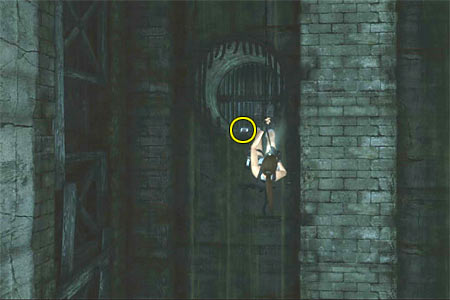
[Note - Just before the level loads, you have the option of choosing Lara's outfit. Six of them are new; Casual Explorer, Grey Jungle Shorts and four Bikinis (Black and White, Gold, Blue, and Camo). There are also the Casual and Jungle Pants outfits from Underworld, plus any other costume you have downloaded from Xbox LIVE Marketplace. You can also select your secondary weapon to start with, although you can change it any time from your PDA.] The level starts with a cut scene where Lara returns to this familiar room. It is her father's study where she found the Right Gauntlet earlier. She is holding a piece of paper and approaches the desk whilst Zip tells her through the headset that whatever she is looking for will still be there tomorrow, so she should quit for tonight. Lara doubts it saying at the same time that the artifact shown in the picture is nowhere to be found. Zip makes a guess, telling Lara that her father may left it in Thailand. He asks Lara to read the blue glowing carvings on the artifact, but she cannot make it out. She leaves the paper on the desk and whilst she wonders where the artifact may be, a knight thrall appears from the nearby pit. Lara shoots and sends it back into the pit. Zip asks "What the hell was that?" and Lara says "A rather big clue". At least she knows where to start from, so she jumps into the pit. Area with decrepit wooden bridge - After the cut scene, you are standing on a ledge opposite a wooden bridge. Turn around and smash the vase on the left to find a Treasure (1/28). Turn around to face the wooden bridge and walk towards it. Just before reaching it, pick up the Health Pack on the left. Jump across the gap to land on the wooden bridge. At this point, a situational adrenaline begins. The bridge collapses, so run forward and quickly throw the Grapple to catch either metal ring above. If you make it on time, you will be hanging from the Grapple cable. If you grappled the first ring, swing, jump and throw the Grapple in midair to catch the second ring. Then swing to the ledge ahead. If you grappled the second ring, just swing forward and jump to the same ledge ahead. Quickly draw weapons, because a giant spider crawls down the opposite wall. Make sure you stay away from the edge whilst shooting or the spider may push you off the edge. Once you are done, smash the vase on the right (if the bridge is to your back) and pick up the Treasure (2/28). (The retrieval of the Treasure is shown in this page.) Go to the other side of the ledge (to the right as you face the bridge) and jump up to grab the wooden handhold. Jump up once more to grab the second handhold and traverse to the left. Jump back to grab the wooden ledge behind you and pull up. Step on the beam to the right and walk to the other side until you reach the wooden platform. If you want to move faster, hang from the beam and traverse to the platform. Kill the two bats that attack and pick up the Treasure (3/28). Turn to face the ledge where you killed the spider earlier. Use the Grapple to catch the ring below (the one you used before) and step off the platform. Alternatively, jump down and throw the Grapple whilst in midair to grab the ring. Turn left and climb down the cable line if necessary. Swing and jump to the ledge ahead. Pick up the Health Pack on the right and go to the left. Climb on the wooden platfrom and kill the small spiders that come from the tunnel above. Enter the alcove and perform the Chimney Jump to grab the handhold on either wall. Then traverse to the tunnel and pull into. Roll to the end. Room with two timed gates - You reach a room with two gates; one on each side. For now, go to the other side and pick up the Treasure (4/28) from the shallow water on the right (as shown in this screenshot). (The entire process is shown in this page.) Enter the alcove and perform the Chimney Jump to grab the ledge above; pull up. The two switches here raise the gates below, so you can climb into the alcoves exactly above. However, they are timed and close after about 30 seconds. First, use the right hand switch (if the entrance is to your back). Then use the left one. The timed run - Drop to the floor below and head to the right hand gate (as you face the entrance). Jump up to grab the first handhold on the gate, then the next one above. Traverse to the very left and jump to grab the handhold on the left wall which is above the entrance. Now you can relax and take your time. Shimmy to the left. When you reach the end, jump up to grab the handhold above. Now lean back (make Lara look backwards) and use the Right Stick to move the camera, so you can see the left hand gate. When you see it lowering (you will also hear a crashing sound), jump to grab the edge of the alcove above. Pull up and roll into the low opening at the end. Get the Treasure (5/28) and return back to the edge of the alcove. [Note - To get the Treasure, you just need the right hand gate open (facing the entrance) and this only for a few seconds, so as to reach the handhold on the wall above the entrance. Once there, do not rush and just take your time to reach the alcove with the Treasure. There are many players who follow a more complicated method by rushing to the left gate, jumping back to the right one, then again jumping back to the left one. This is not necessary.] Jump to the alcove above the other gate (which should be down by now) and roll through the low opening. Room with waterwheel - When Lara stands up, draw weapons and kill the flock of bats that attack. To the left is an inactive waterwheel, but ignore it for now. Jump into the pool below and stay close to the entrance. Swim behind the pillar closest to you and get the next Treasure (6/28). (See this screenshot.) Swim back to the middle of the pool and draw weapons. Lara will aim at the ring of the chain that holds the raft underwater (as shown in this screenshot). Shoot it to break the chain, so the raft floats to the surface. Climbing to the wooden platform with the Treasure - (The following sequence is shown in this page.) Swim up and climb on the floating raft. Turn to face the entrance (the waterwheel should be on your right) and use the Grapple to catch the metal ring on the wall ahead. Press the Interact button to pull the raft through the water. When you reach the last pillar with the handholds on the right, press the Crouch (B) button to release the cable. Jump to grab the first handhold, then jump up to grab the next above. Jump up once more to grab the third handhold and jump to grab the wooden beam on the left. Shimmy to the right and pull up on the platform. Smash the vase and pick up the Treasure (7/28). Climbing up the waterwheel - (The following sequence until you get the next Treasure is shown in this page.) Walk back to the wooden beam you came from. Jump to grab the smaller one above the handhold you climbed up before. Pull up and turn having the entrance to your back. Jump to grab the next small beam which is above to the right. Pull up and turn left to face the waterwheel. Jump to grab the handhold ahead and traverse to the right. Jump to grab the next handhold on the right and, again, shimmy right. Taking a detour for a Treasure - Let's go for a Treasure. Drop to the beam below and walk to the other side. If you take a look at the opposite wall, you will see the Treasure inside the big pipe. Jump off the beam and use the Grapple to catch the metal ring above the pipe. Climb down the cable line if necessary and angle Lara to the pipe. Swing and jump inside. Get the Treasure (8/28) and drop back into the pool. Now make your way back to the handhold before dropping to the beam for the Treasure (as shown in the fourth image of the previous page). Climbing up the waterwheel (cont.) - (The entire process is shown in this page.) Jump up to grab the handhold above and traverse to the left around the corner. Pull up on the beam and jump to grab the next beam ahead. Pull up and turn right to face the waterwheel. Jump up to grab the small handhold. Then jump to grab the next handhold on the right and traverse around the corner. Pull up on the beam. Take a look below and to the left. You should be seeing a metal ring on the back wall of a ledge. Angle Lara to that ledge and jump there. Use the Grapple to catch the ring and step off the edge. Climb down the cable line until you see another ledge below. Swing and jump there. Turn right and walk on the beam. Turn left and jump to grab the horizontal bar. This is a mechanism that Lara's weight lowers and opens the gate below. More water flows into the room, so release the bar drop into the pool. Swim through the gate and follow the pipe until you reach a wider area with a junction. There are two ways that go upwards. First, swim to the right to find a Treasure (9/28). Return back to the junction and continue to the other side of the pipe to reach the next room. Surface to get some air, but do not climb out of the water. Swim down and get one more Treasure (10/28). Dungeon - Climb out of the water. The brief cut scene shows a thrall moving behind the bars. Do not worry about the thrall now. Exit through the doorway to a small room and go through the second doorway on the left. Draw weapons and kill the giant spider, along with his little friends, that drop from a ledge above. Once you are done, grab the vertical column in the middle of the room and climb to the top. Perch on it and turn to face the entrance. Jump to grab the ledge diagonally to the right and pull up. Smash the vase and pick up the Treasure (11/28). Jump back on top of the column and jump to grab the horizontal pole ahead. Swing and jump to the opposite side. Kill the small spiders and pick up the Health Pack from the left. Drop down and enter the next room with your weapons drawn. A knight thrall attacks from the opening ahead, so shoot it until it falls down. Like in Underworld, when a thrall falls down, stand close to it and press the Interact (Y) button. Lara will jump on its body and smash its bones. If you do not do that, the thrall will revive and you will have to start over. When you kill it, go to the right and pick up the Health Pack. Approach the opening the thrall came from and turn to face the way you came. Use the Grapple to catch the metal ring on the wall ahead and step off the edge. Climb down the cable line to reach the room below. Area with two wooden structures - When you reach the ground, the camera shows a knight thrall jumping down from a high ledge. Immediately draw weapons and finish it off. When you destroy it, a second thrall appears, so take care of it. Once you are done, find the only doorway that gets you out of this room, but before going through it, pick up the Health Pack from the right hand side of it. Back to the dungeon - Go through the doorway and follow the tunnel to reach a room with a slightly bent vertical column. Kill the thrall that appears, but make sure you do not run to the right past the column as you fight, because you will trigger a giant spider's appearance and it will be more difficult to deal with both threats at the same time. First, destroy the thrall and then move to the right where the spider attacks. Grab the column and climb to the top. Perch on it and jump to the nearby wooden beam. Ignore the horizontal pole above for now and jump into the doorway (as shown in this image). Kill the small spiders and go around the hallway. Deal with mama spider and smash the vase to find a Treasure (12/28). Return back to the doorway and jump back to the wooden beam. Turn to face the wall beside the doorway. You have to perform the Chimney Jump in order to reach the horizontal pole above. So, jump to the wall and once you connect with it, press Jump again to leap off and grab the pole. Pull up on the pole and jump forward. Quickly throw the Grapple in midair to catch the metal ring on the wall above. Wall run and you will notice a doorway on the right. Adjust the length of the cable if necessary and wall run again to grab the edge of the doorway. Then pull up. (Note - If you climb up the cable line, you will see a ledge with a vase on the right. You can wall run to the ledge, and get the Treasure hidden in the vase, but if you proceed into the next room, you will not be able to go anywhere from there because there are some things you have to do first. You will visit this ledge later and get the goodies in one round.) As soon as you enter the room, go left and pick up the Health Pack in front of the barred doorway. Go through the opening on the right with your weapons drawn. As you turn around the corner to the left, you will have to deal with a knight thrall. When you destroy it, continue through the hallway and up the stairs. When you pass the arched doorway, turn around to face the way you came. Smash the vase on the left and pick up the Treasure (13/28). Walk up to the edge of the ledge and kill the bats that attack. Jump to grab the horizontal pole jutting out from the left hand wall and pull up to stand on it. Jump to grab the handhold on the wall ahead and traverse to the right. When you reach the end, jump to grab the handhold on the pillar to the right. Shimmy right and release to grab the lower handhold. Traverse around the corner and kill the flock of bats, shooting with one hand. Do not let them bite Lara or she will lose her grip and fall down. (Note - From this point, you can take a shortcut and avoid climbing around the room. After killing the bats, do not jump to the handhold behind you. Instead, traverse to the right and jump directly on top of the column. You may have to press the Interact (Y) button to help Lara balance on the pillar. Then slide down, get the Treasures and climb back up.) Jump back and grab the handhold on the pillar behind you. Traverse around the corner to the left and jump up to grab the handhold above. Traverse around the corner and jump to grab the horizontal pole on the left. Swing and jump to grab the handhold on the wall ahead. Shimmy left and jump to grab the next handhold. Traverse to the left around the two corners until you reach the doorway. Drop down. If you want, you can walk farther into the room and trigger the next Checkpoint just to be safe. Turn to face the doorway you just came from. Pick up the Health Pack from the left and walk to the edge of the doorway that overlooks the previous room. Jump to perch on the column ahead and press the Crouch (B) button to hug the column. Then climb to the bottom. Search for two Treasures (14 and 15/28) down here. The first one is inside a vase at the bottom of the broken column at the other side of the room and the other one is in the alcove that does not have bars. When you get the second Treasure, a giant spider appears, so draw weapons and kill it. Grab the column and climb to the top. Then jump into the doorway. (If you took the shortcut, do not forget to get the Health Pack on the right as soon as you enter.) Hallway with two spiked traps - Follow the hallway and go up the staircase. Be careful of the spiked trap ahead that goes in and out of the walls. A thrall also approaches from behind the trap, but it will not have the chance to reach you. As it passes through the trap, the spikes smash it to pieces! To get past the trap, stand close to it and run past it when it opens. Follow the hallway and turn around the corner. This time, there are two sets of spiked traps, but you cannot just run through them, because there is a deep pit below. Perform the Chimney Jump using the walls of the hallway to grab either handhold. Jump to the either left or right (depending on which side of the hallway you are hanging from) to grab the horizontal pole. Traverse to the centre of the pole and climb on it. Turn to face the trap and jump forward when it opens to grab the second pole. Alternatively, you can start swinging on the first pole and jump when the trap begins to open. From the second pole, follow either method to get past the second trap. Follow the hallway with the scattered skulls. The end gets you to a wooden platform. Grinder room - As soon as you reach the room, turn left and shoot the giant spider that crawls down the wall ahead. If it approaches, back into the hallway so it will not push you off the platform. Go down the stairs and drop to the ground. Draw weapons and kill the thrall that dropped from a ledge. When you are done, a second thrall appears, so take care of it. Now enter the alcove at the rear of the stairs you went down before and smash the vase to get a Treasure (16/28). There is one more vase with a Treasure (17/28) hidden in it at the base of the grinding machine. (The following sequence is shown in this page.) Locate the stone ledge with the destroyed corner. Jump to grab the handhold to its side, then climb on the ledge. Pick up the Health Pack and use the Grapple to catch the metal ring on the wall above. Approach the wall and press Jump so you hang from the cable. Wall run and jump to grab the handhold on the wall to the right. Traverse to the right and jump to grab the next handhold. Shimmy around the corner and pull up on the beam. Turn right 45 degrees and jump to the next beam. Then walk to the wooden platform. A giant spider comes down the wall ahead, so quickly draw weapons and kill it before it reaches you. If you spot it on time, you can throw a sticky grenade. If you think it approaches badly, walk back on the beam and jump to the previous one to avoid the explosion. There are also some bats you have to kill. Climbing to the ledge with two vertical planks - (The following part until you use the planks is shown in this page.) Once you kill everything that moves, walk up to the edge of the wooden platfrom near the grinding machine. Jump to grab the metal band on it and traverse to the left around the machine. Keep traversing until you reach a wooden beam. Traverse along the beam and pull up at the end. Jump up to grab the ledge above and pull up. A giant spider will come up from below, so kill it. Then smash the vase on the left and pick up the Treasure (18/28). Ledge with two planks - Use the Grapple to catch the metal ring on either of the two vertical planks. Walk around the other plank so the cable actually hugs it. Stand between the two planks and press the Interact (Y) button to pull the cable and bring the planks together. When this happens, they will sink in the floor and a gate at the other side will open. Walk up to the edge of the ledge towards the gate that opened and jump to grab the handhold on the left wall. Jump to grab the edge of the doorway and pull up. Back to the waterwheel room/ Upper level - (This page shows the following sequence.) You are back in the room with the waterwheel, only this time you are a bit higher. Use the Grapple to catch the metal ring on the opposite wall and jump/ step off the ledge to hang from the cable line. Climb up a bit and wall run to the broken ramp on the left. Go up it and kill the bats that attack. Step on the beam and walk to the other side. Turn slightly to the right and jump to grab the metal bar on the gate on the right hand wall. The brief cut scene shows more water flowing in the room, activating the waterwheel. (Note - If you fall into the water before activating the waterwheel, save your game and load it. The last Checkpoint was created on the ledge where you killed the bats. Alternatively, climb on the floating raft and climb to the wooden ledge where you got Treasure 7. The gate that leads to the Grinder room is now open, so you have to do the climbing routine once more and reach the wooden beam before jumping to the metal bar.) Once you do it successfully, drop into the water and climb on the floating raft. As before, jump to grab the first handhold on the nearby pillar and jump up twice to grab the next two above. Jump to grab the wooden beam on the left and shimmy to the right. When you reach the end, pull up on the platform where you got Treasure 7. (You did this climbing almost at the beginning of the level, but if you have problems, see this page again.) Go through the doorway to return back to the Grinder room. Back to the Grinder room (after activating the waterwheel) - When you enter the Grinder room, a knight thrall attacks, so kill it. You now have to climb up the grinding machine, using the various bands. However, some parts of the central cylinder rotates, sending the bands (and Lara while hanging from them) to one of the three rollers with spikes. (Note - The spiked rollers are supposed to hurt Lara, making the climbing more difficult. In some cases though, a friendly bug is activated where Lara can actually pass through the rollers without damage. If this happens to you, just take your time to climb up the grinding machine.) Climbing up the grinding machine - (The entire process is hown in this page.) Do you remember the wooden platform in this room where you killed the spider? You got there using the matal ring above the ledge with the destroyed corner. Make your way again to this wooden platform and, as before, jump to grab the metal band on the grinding machine. (Alternative method - You can reach this band climbing up the grinding machine from the bottom. Step on the low ledge at the base of the machine, to the side near the doorway you just came from. The main cylinder rotates clockwise and towards the spiked roller, so move to the right in order to give Lara some time before the band reaches the roller. Wait until you see two metal bands; one above the other. Jump up to grab the first one, quickly jump to grab the second one, then the third band above that does not rotate. This third band is the one you climbed around earlier, remember?) The next part of the main cylinder above rotates anti-clokwise, so traverse to the left. As before, you will give Lara some time to climb up the next bands. Wait until you see two metal bands; again, one above the other. Jump up twice to grab them and jump up once more to grab the band that does not rotate. Traverse to the right as much as you can, but be careful of the spiked roller. When you see a band passing above Lara, jump up to grab it. The band rotates to the left, so keep an eye behind you to spot the vertical column. Jump to grab it. You can time the jump by climbing to the right if you get past the column, pressing the Interact (Y) button at the same time to make Lara move faster. If you pass the column and run out of handhold, do not keep hanging there because the band will rotate and take you to the spiked roller. Instead, release to grab the band that does not rotate below and try again. When you grab the pillar, a giant spider appears below, so shoot it with one hand. Otherwise, jump to the opposite wooden ledge and kill it from there. Pick up the Treasure (19/28) from the right hand side and then go left. Jump to the long wooden beam and walk to the left. When you reach the end, jump to grab the handhold on the open gate and traverse to the right. Then jump into the doorway. Back to the dungeon (again)/ Hallway with deep pit - Follow the hallway around to the right and pick up the Health Pack. Continue down the stairs and through the arched doorway to reach the next room. Draw weapons and kill the thrall that rises up from below. Kill a few bats and approach the edge of the ledge. (The retrieval of the next three Treasures is shown in this page.) There is a metal ring on the ceiling, so grapple it and swing to the small square ledge with the Treasure (20/28) on the right. (You can also ignore the ring and jump directly to the ledge.) Get it and jump to grab the handhold on the pillar. Traverse to the left around the three corners and release to grab the narrow ledge below. Traverse to the left, almost to the end, and pull up on the ledge. Jump forward to land on top of the vertical column and press the Crouch (B) button to hug the column. Slide down to the ground. Go to the side beneath the entrance and break the vase to find the next Treasure (21/28). A giant spider appears from nowhere, so kill it. Go to the other side of the pit to find another vase with a Treasure (22/28) hidden in it. Again, once you get the prize, a giant spider appears from nowhere, so take care of it. Grab the vertical column you used before and climb up it. Perch on it and jump to grab the narrow ledge you came from. Pull up and move to the right (Lara's left arm). Jump up to grab the handhold above and traverse to the right around one corner (as shown in this screenshot). Jump up to grab the handhold above, then jump back to grab the horizontal pole behind you. Swing and jump to grab the handhold on the opposite pillar. Traverse around the corner and jump down to the ledge on the left. Hallway with spiked trap and deep pit below - Enter the hallway on the right and kill the thrall and few more bats. Continue through the hallway to reach three sets of spiked traps. The skeleton indicates that a poor guy failed on the mission! Locate the metal ring on the left hand wall and use the Grapple to catch it. Approach the wall and press Jump to hang from the cable line. Climb to the top and press Jump again to leap off and grab the handhold at the other side. Traverse to the left and jump to grab the horizontal pole. Climb to the centre of the pole and turn to face the trap. Start swinging on the pole and jump when the trap begins to open in order to grab the second pole. Repeat the same process twice to reach the ground beyond the pit. Follow the hallway around to the left and kill the giant spider that crawls down the left hand wall. As you proceed into the hallway, Zip talks to Lara through the headset and tells her that he spotted the doppelganger on the security cameras and she is making her way down here towards Lara. Back to the room with the two wooden structures (which is now flooded) - Approach the opening and hang from the edge. Drop down and turn around. A giant spider is running from the other side, so kill it. Take a look around. You visited this area before, but now that you have activated the waterwheel, a part of it is flooded. (This page shows the retrieval of the next Treasure.) Notice the slightly bent vertical column near the fence (it is exactly opposite the opening you just came from). Climb up it and perch on it. Turn to face the opening you came from and jump to grab the wooden beam on the left. Pull up and walk towards the wall. Jump to grab the handhold above to the right and climb to the next one. Now jump up to grab the next handhold above. Jump to the right to grab the small handhold next to the alcove with the skulls. Then jump up to grab the handhold above. Climb to the right, then upwards, and jump up to grab the handhold above. Jump to grab the small handhold on the left and jump again to the left to grab the edge of the alcove. Pull up and get the Treasure (23/28). To safely get down, hang from the edge of the alcove and traverse to the right side. Release to grab the handhold far below. This is a long drop, so press the Interact (Y) button to save Lara. Traverse to the left and drop on the beam. From there, jump back on top of the column. Getting the Relic - (The entire process is shown in this page.) With the opening from where you entered this area to your back, turn left and jump to grab the wooden beam jutting from the wall. Pull up and walk towards the wall. Jump up to grab the handhold on the wall and climb to the next one on the right. Jump to grab the next handhold on the right and traverse around the corner. Grab the ladder, but do not climb up. Instead, drop into the pool below. Alternatively, after returning to the column from the last Treasure, drop to the ground and go to the left (if the opening you came from is behind you). Jump into the water and swim to the right and through the tunnel. (You walked in this tunnel earlier). Swim to the other side and climb on the wooden beam. As before, perform the Chimney Jump to grab the horizontal pole above. Climb on it and jump forward. Quickly throw the Grapple to catch the metal ring above. This time, climb up the cable line until Lara's legs are lined with the ledge on the right. Wall run to this ledge and break the vase to find a Treasure (24/28). Hang from the edge of the doorway and drop down. Draw weapons and kill the giant spider that attacks. Go to the other side of the room and climb up the shorter vertical column. Perch on it and jump to grab the ledge ahead. Pull up and pick up the Treasure (25/28). Drop back down and roll through the low tunnel to reach a hallway with a pool. (This room would be dry if you came before activating the waterwheel.) Jump into the water and swim to the other side. Climb on the ledge to the right and jump across the water to grab the ledge at the other side. Pull up and get the Relic from the low opening. Drop back into the pool and return to the previous room through the low tunnel. Climb up the taller vertical column and jump into the doorway to return back to the flooded area. Drop into the pool and swim down and through the tunnel. Climb on the ledge to the left to return to the area beneath the entrance. Climbing to the ledge with the Dragon puzzle - (The entire process is shown in this page.) Once again, climb up the vertical column near the fence. Turn left and jump to grab the wooden beam jutting from the wall. Pull up and walk towards the wall. Jump up to grab the handhold on the wall and climb to the next one on the right. Jump to grab the next handhold on the right and traverse around the corner. Grab the ladder and, this time, climb up it. The Dragon puzzle - There are three sliding plates here, each one depicting a part of a dragon's body; head, body and tail. There is also a small room at the end of the tracks with a metal ring on the wall. The goal here is to arrange the three plates in the correct order, so as to have a complete dragon design. The three dragon statues around the tracks will help your job. Step on the plate depicting the dragon's body. Use the Grapple to catch the metal ring in the room and press the Interact (Y) button to pull the cable and make the plate slide towards the room. You do not have to slide it inside the room; just leave some space behind it for the next plate that has to slide on the track. Step on the plate depicting the dragon's tail and use the Grapple to catch the ring. As before, pull the cable to make the plate slide towards the room. That way, the plate sits behind the first one. If you released the cable, throw the Grapple again to catch the ring. Facing the small room, walk around the dragon statue on the right to wrap the cable. Step on the plate depicting the dragon's head and pull the cable to make the plate slide to the right hand side of the track. Again, grapple the ring and wrap the cable around the middle statue (opposite the room). Step on the plate with the tail design and pull the cable to make the plate slide back to the previous track (and in front of the middle statue). Release the cable and grapple the ring again. This time, wrap the cable around the left statue and step again on the plate with the tail design. Pull the cable to make the plate slide to the left side of the track. Lastly, grapple the ring again and wrap the cable around the middle statue. Step on the plate with the body design and pull the cable to make the plate slide between the other two plates. When you do it correctly, the gate beneath the ring opens. Go through it and pick up the Health Pack behind the dragon statue. There is a Treasure behind the bars on the left, but you cannot get it now. Use the Grapple to catch the metal ring on the statue and pull it outside of the room until it reaches the plates. In the brief cut scene, the structures in the pool rise up and the blades around each structure begin to work. Use the Grapple to catch the metal ring on the statue and step off the left hand edge (as facing the statue - see this screenshot). Lengthen the cable line until you are hanging just above the wooden beam on the left. Wall run just a few steps to that direction and release to land on the beam (or grab it and pull up). Climbing the first wooden structure - Walk to the outer part of the beam and notice the handholds on the structure. Start by aiming the handhold just above Lara's head. The blades above will not hurt you, so jump to grab the handhold. Wait for another handhold to appear above, but this time you have to be careful of the rotating blades before jumping. So, as soon as a blade above passes, jump up to grab the second handhold. (The retrieval of the Treasure is shown in this page.) As the structure rotates, locate the metal ring on the wall opposite the ledge with the dragon puzzle. You have to jump and grapple the ring in midair, so lean back and wait for the appropriate moment. When you feel ready, jump and grapple the ring. When you grapple the ring, a small ledge in the guillotine below opens. This can come in handy if you accidentally fall into the water after grappling the ring. You can climb on this ledge and grab the wooden bar. Then climb on it and jump to the beam on the right (Lara's left arm). From there, you can grapple the ring again and climb up the cable line. If you fall into the water before grappling the ring (for example, if you fail when you jump from the wooden structure), you have to climb out of the water and make your way up to the ledge with the dragon puzzle as you did before (refer to this page to refresh your memory). Then rappel down to the beam and try again. Or, save your game and load it. The last Checkpoint was created after solving the puzzle. This way you will avoid climbing up the ledges. While hanging from the ring, notice the alcove with the Treasure on the left. Adjust the cable so you are hanging at the same level with the handhold. Wall run and jump to grab the handhold. Then climb into the alcove and pick up the Treasure (26/28). Drop into the water and climb on the ledge beneath the guillotine. Jump to grab the wooden bar and pull up. Jump to grab the beam on the right (Lara's left arm) and pull up. Jump to grab the handhold on the wall and climb to the right until you reach the end. Jump to the next wooden beam on the right and walk to the other (outer) side. Climbing up the second wooden structure - Now you have to climb up the second structure with rotating blades. Turn to face the structure and wait for a handhold to appear in front of Lara. When it does so, jump to grab it. Wait for another handhold to pass above Lara. As soon as one of the blades spins past, jump to grab the second handhold. Do the same three more times until you grab the top of the structure. Then pull up. Turn around and locate the Treasure on the small wooden ledge below (as shown in this screenshot). Jump to that ledge and pick up the Treasure (27/28) you saw earlier through the bars. Walk on the beam and jump to grab one of the handholds of the wooden structure. Again, make your way to the top. Turn to face the next bluish area. There is a metal ring on the ceiling ahead, so use the Grapple to catch it. Jump/ step off the edge to hang from the cable. Before jumping to the bluish area, turn right to face the wall. There is a big pipe with the level's last Treasure (as shown in this screenshot). Line Lara to the pipe and adjust the cable line so you are hanging above the wall on the left. Now swing and jump to grab the edge of the pipe. Pull up and pick up the Treasure (28/28). Approach the opening and jump forward. Grapple the ring in midair and turn right. Swing to the bluish area. The brief cut scene shows a thrall rising up from the toxic water. Bluish area with four hallways leading to toxic water - After the cut scene, draw weapons and kill the thrall that comes from one of the hallways on the right. There are four hallways in total (two on each side) and thralls will keep rising up from the toxic pools as long as you stay here. Lara has to enter the artifact room at the top of the stairs, but the doorway is blocked by four gates. To open each gate, you have to visit a hallway and use a switch. Just jump up to grab it and Lara's weight will lower it. Every time you use a switch, not only you open a gate to the artifact room, but you also close the gate next to you, trapping the thralls inside. So, run into the four hallways and use the switches, killing the thralls that rise up from the water. When you use all four switches, the gates to the artifact room will open. Go through the doorway to end the level. In the cut scene, Lara enters the room and approaches the pedestal with the artifact. Now that she can see it closely, she can read the carving on the artifact "Ok Eshivar". A thrall appears from behind and Lara quickly turns around and commands "Ok Eshivar!". The thrall obeys and stands still. Soon enough the doppelganger is running into the room and Lara orders the thrall to kill her. The thrall runs for the doppelganger, but she manages to smash it. She runs towards Lara who calls the power words again. The doppelganger stops and Lara asks "You have to do whatever I ask now, correct?" and the doppelganger nods. "Make sure Natla suffers" Lara orders and the double leaves. Zip asks Lara why she let her go since she killed Alister and Lara relies "And now she is the instrument of his vengeance."
|
||
| Index | ||
| We would like to thank Slate and StuffedGamer for sharing the screenshots! 01 March 2009: The walkthrough was first posted online. Last update: 05 March 2009: Newer version of the walkthrough with several screenshots. |
||
Tomb Raider 8 Expansion: Beneath The Ashes Walkthrough & Game Guide © 2000-2009 www.tombraiderhub.com |
||