Tomb Raider 8: Underworld Walkthrough & Game Guide
Level 2: Mediterranean Sea | Part 2: Niflheim
Health Supplies: 2
Treasures: 9/26
Relics: 0/1
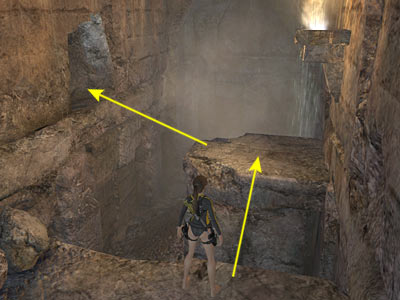
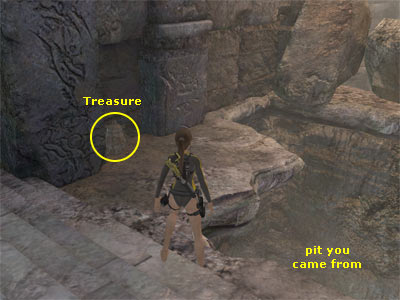
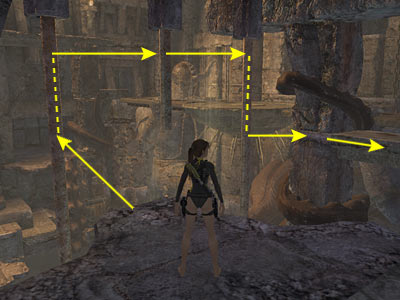
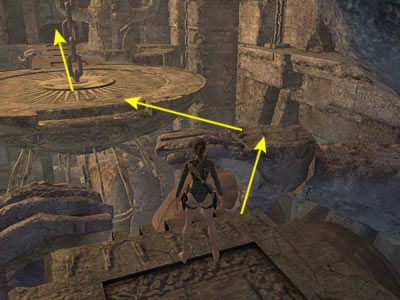
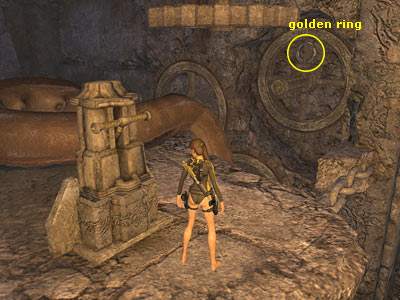
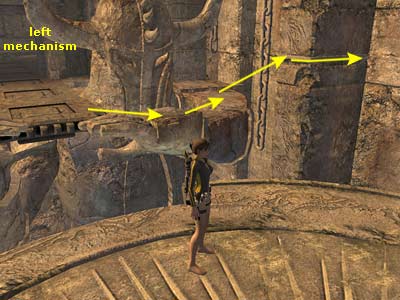
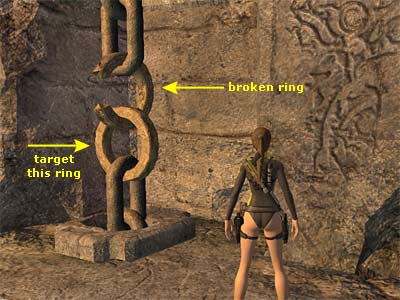
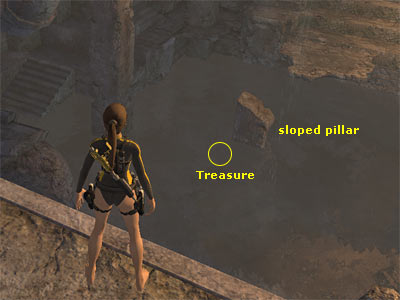
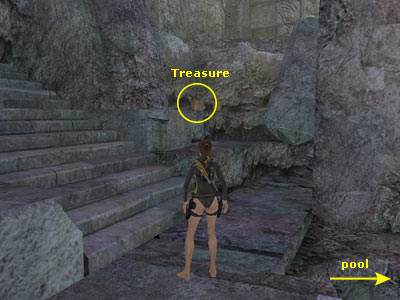
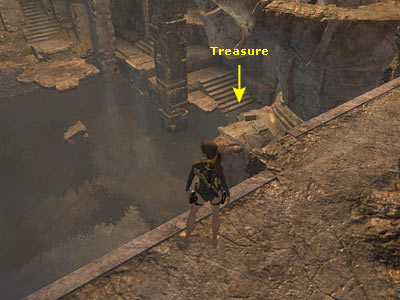
Go through the doorway and up the two sets of stairs. Climb on the stone ledges and jump to the one ahead. There is an alcove on the left that contains some vases (as shown in this screenshot). Jump there and break the vases to get a Treasure (11/26). Then drop to the ground. If you miss the jump for the alcove, you can climb on the last stone ledge and try again. Continue through the hallway and go up the next stairs. Crouch beneath the stones and Lara will grab the edge of the pit. Release to drop to the ground. Turn around and crouch into the alcove to the left. Proceed to the end of the low tunnel to reach a second pit. Lara will automatically grab the edge, so release to drop down. Turn around and climb on the stone ledge on the left. Then jump to grab the next ledge and pull up. Pick up the Health Potion and climb on the ledge at the bottom of the stairs. Turn around to face the pit you came from and locate the vase on the left (as shown here). Smash it and collect the Treasure (12/26). The handholds above the Treasure lead back, but there is no reason to go there now. Even if you missed a Treasure, you will come back from here anyway. Go up the stairs to reach a hallway with an alcove on each side. The left one contains a Health Potion and the right hand one some vases that you can break and get a Treasure (13/26). Continue through the hallway and towards the wide opening. Whilst Lara reaches the opening in the cut scene, a huge tentacle destroyes the ledge she was about to reach. When it retracts, Lara discovers that the tentacle belongs to a kraken (a legendary sea monster of Norse mythology). Using her camera, Lara spots a spiked platform above its head, and focusing on its left eye she comments "I hope it's as blind as it looks". Room with kraken - The first thing you should know is that you cannot kill the kraken with your weapons. Although you want it dead because it blocks the exit, you have to find another way of killing it. The spiked platform above its head will do the job, so you have to find a way of releasing it. To do that, you have to operate two mechanisms; one on the left and one on the right side of the room. Whilst doing that, you had better avoid the creature's tentacles because they can be harmful and sometimes deadly. Right hand side mechanism - The left way here is blocked by some rocks, so go through the hallway on the right until you reach a pit. Jump to grab the handhold on the left and traverse to the right. Jump from handhold to handhold until you reach the opposite side. If you accidentally fall into the pit, use the handholds to get back to the top. Continue through the hallway until you reach a second pit. Here you have the option of sliding down the ramp or continuing with the handholds on the left that keep you at the top. It does not matter wich way you follow, since both lead to the mechanism. First way/ Sliding down the ramp - Slide down the ramp and continue through the hallway. Pass the first junction and proceed to the end and around the corner. Break the vases and pick up the Treasure (14/26). Return back to the junction and turn left (where the lit torch is). Turn left around the corner and go through the opening to reach the room with the mechanism. You can see some gears to the left and a golden ring on the support column. (Skip to the part of the walkthrough Dealing with the gears.) Second way/ Staying at the top - Instead of sliding down the ramp, jump to grab the handhold on the left and use the rest two to get across. Continue around to the left to reach a ledge that overlooks the pool. Here you can see three vertical poles coming down from the ceiling. (The following sequence is shown in this screenshot.) Jump to grab the first (leftmost) one, then jump to grab the second pole. When you reach the third one, you can clearly see that one of the tentacles of the kraken is coiled around the pillar. For now, you do not have to worry about it. Slide down a bit and jump to grab the handhold on the pillar. Traverse to the right as much as you can, but do not pull up on the platform yet. Notice the horizontal pole just ahead. When you pull up, time slows down. This is the situational adrenaline and you have to act quickly. This means that once you pull onto the platform, the kraken will destroy it, so quickly jump off the platform and grab the pole. Swing around and jump to the ledge ahead. If you miss the jump during the situational adrenaline and fall into the pool, climb out of the water on the right (as you face the kraken) and go up the stairs. You will see a high ledge that you can climb on. This takes you to a hallway with a lit torch at the end. Go there and around the corner to the left to reach the room with the mechanism, as you would if you had followed the First way/ Sliding down the ramp. If you succeed with the situational adrenaline, enter the room on the right. Go to the other side where the switch is, which does not do anything yet. Hang from the edge on the left and shimmy to the right. At the end, jump to grab the horizontal pole and swing around it. Then jump and slide down the slope until you reach the ground. You can see some gears and a golden ring on the support column. Before doing anything, go through the opening to the side of the gears and follow the hallway around to the right. On the junction, turn right and then left around the corner. Break the vases and pick up the Treasure (14/26). Make your way back to the room with the mechanism the same way you came. Dealing with the gears - Use the Grapple to cath the golden ring and pull it. The column will fall down, causing some pain to the kraken that will retreat its tentacle. Climb on the ledge next to the opening, then onto the next one. Climb on the rocky platform above and slide down the slope. Before reaching the end, jump to grab the horizontal pole. Swing and jump to grab the handhold ahead. Traverse all the way to the left and pull onto the ledge with the switch; throw it down. The brief cut scene shows the right hand bridge to move away from the spiked platform, thus releasing it. Left hand side mechanism - Exit to the bridge and go to the end, close to the statue's hands. Jump on the flat part of the hand on the right, then on the circular (spiked) platform (see this screenshot). Go to the other side and enter the room with the mechanism. Move close to the switch that, once again, does not do anything yet. Locate the gear with the golden ring (as shown here) and use the Grapple to catch it. Pull the gear to its place and use the switch to activate the mechanism. In the cut scene, the kraken retracts its tentacle and the mechanism gets into motion. The left hand bridge moves away from the spiked platform. Killing the kraken - Exit the room and cross the bridge to the end. Jump to the flat part of the hand on the left and walk on the statue's arm (as shown in this screenshot). Jump to grab the handhold on the pillar and traverse around the corner. Jump to the ledge behind you, which is the one behind and above the kraken. Use the switch to raise the spiked platform. Approach one of the two chains and notice the broken ring. Use the Precision aim to target the ring below the broken one (as shown here). Shoot the ring to break it and do the same thing with the other chain. In the cut scene, the spiked platform falls on the kraken's head and kills it. The kraken then retracts its tentacles from the exit door. If you are not interested in collecting the remaining Treasures, you can jump into the water and leave the area (skip to the part of the walkthrough The exit door). If you take a look above the switch, you will see a ledge. To reach it, you have to use the brand new Chimney Jump. This works like this: stand in the alcove to the left of the switch (this can also be done in the right hand alcove). Jump towards the right hand wall and when Lara touches it (as shown in this screenshot) press Jump again to leap off. When she touches the wall behind, press Jump again. By pressing the Jump button repeatedly, you bounce upwards between the walls. When you do this correctly, Lara will automatically grab the handhold of the pillar. Now jump up to grab the edge and pull up. Go to the end of the hallway and break the vases to get the Treasure (15/26). Then return back to the ledge with the switch. Jump into the water and swim to the left. There is a sloped pillar in the pool and if you dive down, you will find a Treasure (16/26) closeby. (In this screenshot, Lara is standing on the ledge with the switch.) Swim to the left side of the room (if the exit door is to your back) and climb up the stairs that are half covered by the water. Follow the ledge around to the left and climb on the next ledge. Do not go up the stairs. Instead, look for some vases to the right (as shown in this screenshot). One of them contains a Treasure (17/26). Jump back into the water. Now swim to the exact opposite side. Approach the stairs that are half covered by the water and you will see a Treasure (18/26) beneath the surface. (In this screenshot, Lara is standing on the ledge with the switch.) Go up the stairs and follow the ledge around to the right. Go up the next stairs and climb on the high ledge. The hallway with the lit torch ahead leads to the Left hand side mechanism, so do not go there. Instead, turn left and follow the hallway to the end where you will find some vases. One of them contains a Treasure (19/26). Return back to the pool. (Note - You may have noticed the ledges at the top of the kraken pool, but you cannot go up there from here. You will visit them later.) The exit door - Swim towards the exit door and climb on the ledge to the right of the door. Use the switch to open the door and go through it. Go up the two sets of stairs to reach a deep pit. Approach the left wall and Lara will grab the handholds. Use the direction keys and follow the handholds that run above the pit. When you cannot go any farther, press Right and Jump to grab onto the next bunch of handholds. Climb a bit more to the right and release to drop to the ground. Go up the next stairs to reach a second pit. This time, there is a narrow beam that you have to cross. Step on it and move forwards. If Lara loses her balance, press the opposite direction key to correct. If you want to get across faster, hang from the beam (press the Crouch button) and traverse to the other side. Then pull up and step on even ground. Crawl under the rocks and go up the stairs to reach the next room. In the cut scene, Lara looks through the closed gate and recognises the statue. It's Thor, the Norse Gof of Thunder. She also spots a glowing glove and comments that according to Eddas (a collection of poems; the most important source on Norse mythology) "Thor needed special iron gauntlets to wield his mighty hammer Mjolnir".
|
||
| « Mediterranean Sea | Part 1: The Path to Avalon | Index | Mediterranean Sea | Part 3: The Norse Connection » |
Tomb Raider 8: Underworld Walkthrough & Game Guide © 2000-2009 www.tombraiderhub.com |
||