Tomb Raider 8: Underworld Walkthrough & Game Guide
Level 5: Southern Mexico | Part 1: The Unnamed Days
Health Supplies: 3
Treasures: 9/50
Relics: 0/1
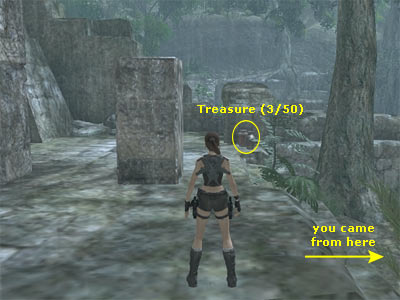
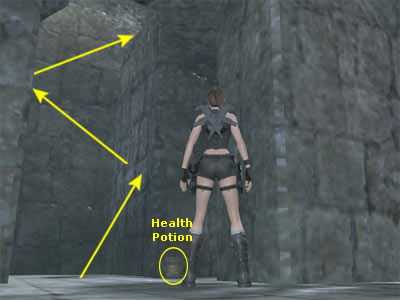
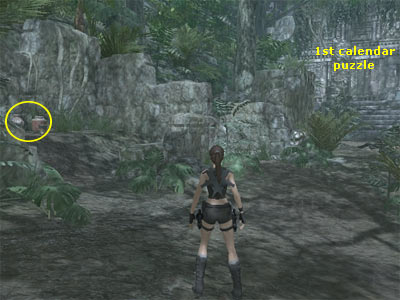
(Important bug warning - You are advised to save MANUALLY at least twice each part. This level can be proved really buggy and make you unable to finish it. If you have not downloaded the PC patch, do it now. Among other fixes, the game autosaves at the beginning of each part. So, in case you activate a bug, you can load an autosave and start from the beginning of the part or level instead of the game.) (Note - Just before the level loads, you have the option of choosing between Jungle Heavy, Shorts or Pants outfit. You can also select your secondary weapon to start with, although you can change it any time from your PDA.) The brief cut scene shows Lara reaching Central America riding her motorbike. Jumping off some rocks, she lands on a road inside a forest. Drive with the motorbike up the stairs, then down the next ones. Continue down the road and enter the small tunnel. Dismount and break the rectangular vase to find a Treasure (1/50). Mount the bike, take a a good run up and drive over the deep pit. Make sure you use the small white ledge in the middle of the edge. Dismount and break the vase on the right to find another Treasure (2/50). Mount the bike and follow the road as it goes left. The cut scene gives you an outside view of the nearby building, focusing on a window that leads to a metal ring. Outside the building - Leave the motorbike and approach the building. Vault on the two ledges and turn right. There is a vase close o the low pillar that you can break and get a Treasure (3/50). (See this screenshot for the location.) Climbing to the window - You have to reach the window that the last cut scene showed. (The following sequence is shown in this page.) Climb on the low pillar and jump to grab the first handhold of the taller pillar. Jump straight up to grab the handhold above and traverse to the left around the corner. Jump to grab the stone ledge on the building to the left and pull up. Jump up to grab the handhold above, then next two. Jump to grab the handholds on the left and climb down a bit. Release to grab the edge of the window and pull up. Use the Grapple to catch the metal ring of the mechanism and step backwards. As you fall off the edge, Lara's weight pulls the lever that opens the gate on the right. When it fully opens, hang until Lara's legs are just above the sill of the door. Wall run and jump to grab the edge of the doorway. Pull up and go through before the gate closes. Inside the small room - Go to the other side of the room and get the Jaguar Head from the pedestal. Turn around and enter the alcove on the right. Break the vase and get the Treasure (4/50). There is an another alcove on the left that contains a Health Potion. Stay in this alcove and perform the Chimney Jump to reach the room above (as shown in this screenshot). Approach the window and hang from the edge. Jump back to land on the beam. Hang from the edge and traverse around the corner of the pillar. Drop to the ground and stay alert. Two black panthers will come from the ruins on the left, but if you spent some time in the last room, they may have already reached the place. If you want a safe spot, climb on the low pillar and shoot from there. Mount the bike and drive to the left. Turn around the corners that the low walls create until you reach an underground tunnel. Before entering, dismount and head for some Treasures. Look for some vases to the right of the tunnel entrance. Break the rectangular vase and get the Treasure (5/50). Turn having the tunnel to your back. Enter the small area on the right. You will find the next Treasure (6/50) hidden in a vase in a corner behind a plant. Turn around and look right to spot another vase that contains one more Treasure (7/50). When you have everything, get on the bike and drive through the underground tunnel. When you exit, follow the road as it goes. It makes some turns, but there are no forks. Keep driving until you reach an area where you can see the next building. At this point, the building is no the right. The road continuous to the left, but do not go there now. [Important bug warning - The road on the left leads to another area of the level, but you do not have to go there now. You will visit it later anyway, so avoid it for now. If you go there, you will meet a spiked pit with a wooden ramp. Just before that, the game creates a Checkpoint. If you die after this Checkpoint (and you risk to fall into the pit and die) before the game creates another Checkpoint, you will activate a bug that you will face in the third part of the level, Midgard Serpent, where the first ramp will be down and you will not be able to continue. However, if you proceed in the level as described in the walkthrough, enter the building with the first calendar puzzle and let the cut scene play, you will not activate the bug even if you die on the specific spot.] Leave the bike and look to the left. There is a hillock with a Health Potion and a rectangular vase that contains a Treasure (8/50). (See this screenshot.) Once you get them, go up the stairs to the building. Pick up the Health Potion just to the left of the entrance and break the rectangular vase to find a Treasure (9/50). Roll through the opening to enter the building and approach the circular calendar. In the cut scene, Lara uses her videocamera and records the area. She explains that the Mayan calendar had only 360 days. The remaining five were the Unnamed Days during which the gates to the underworld would open. She then walks to the front side of the ledge and gets a panoramic view of the Ball Court.
|
||
| « Croft Manor: Protected by the Dead | Index | Southern Mexico | Part 2: Xibalba » |
Tomb Raider 8: Underworld Walkthrough & Game Guide © 2000-2009 www.tombraiderhub.com |
||