Tomb Raider 8: Underworld Walkthrough & Game Guide for PS2
Level 5: Southern Mexico | Part 4: Land Of The Dead
Treasures: 5/6
Secondary weapon: Assault Rifle plus Sticky Grenades
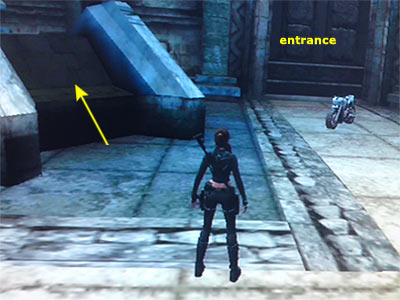
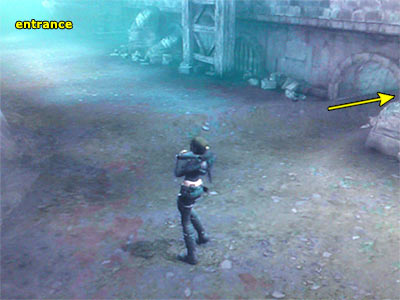
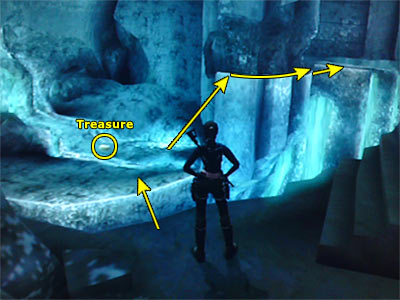
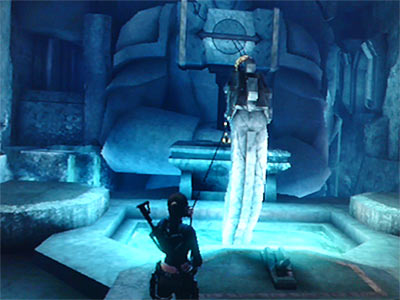
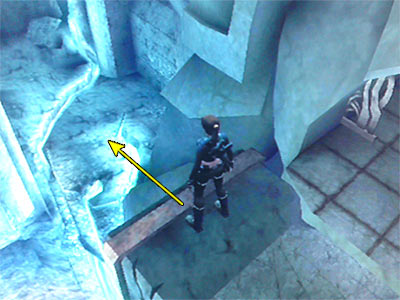
[Checkpoint] Room with Lords of Xibalba statues - After the cut scene, the door you came from closes and Lara finds herself trapped in this room. If you did not get the bike while entering this area, the game designers predicted the disaster that would follow and placed the bike in front of the entrance (phew!). Before doing anything, let's go for a Treasure. Facing the entrance, go up the broken ramp on the left (as shown in this image). Jump to the small square ledge ahead and climb on the other part of the broken ramp. Go to the top and jump to grab the handhold on the wall, then the next one above. Traverse to the left and around the corner. When you reach the end, jump to the left to land on the third part of the broken ramp. Go to the other side and jump over the gap to grab the fourth part of the ramp. Pull up and head forwards. Carefully, step on the wooden beam and walk to the other side. Climb on the next part of the ramp and pick up the Treasure (2/6) from the end. Make your way back the same way you came. (Note - There are a couple of things that may go wrong as you return back after getting the Treasure, ending to frustrating momemnts. This page describes the difficulties and how you can solve possible problems.) There is another stone ramp to the right of the entrance, but it leads to a closed door that you cannot open now, because you need Thor's Belt. So, ignore it for now. Area overview - Now get an idea of what is going on here. There are seven statues in the room, but only four are sitting diagonally to the toxic pool. Notice that two of these four statues are missing their Scepter. The first Statue Scepter is lying on the ground in front of a stone block to the right side of the room (if the entrance is to your back). The other Statue Scepter is stuck in a low pedestal on the left side of the room. To place each scepter, stand in front of each statue's right hand and press the Interact button. When you place each Scepter, a stone lock to the side of the statue retracts, enabling you to move it. The deal is to stop the toxic water from falling from the serpent's mouth. In the process, you have to find two Keys which are hidden in two side rooms, but you first have to open the doors. To do that, you have to move the four statues towards the toxic pool. Three of them have to be rotated in order to face the pool before you move them. When you move the two statues on the right, a door behind them opens. The same thing happens when you move the two statues on the left; a door behind them opens. [Checkpoint] Through the left hand door - First, go to the left hand door (if the entrance is to your back). To reach it, go up either flight of stairs and enter the room. Get the Statue Key #1 from the pedestal and return back to the room with the statues. You can place the Key into its place now or wait until you have found the second one. Through the right hand door - To reach the right hand door, climb on the stone block (close to where you found one of the Scepters) and jump to grab the edge of the ledge above. Pull up and go through the doorway. Follow the hallway to reach a T-junction. Both ways lead to the same place, so follow either. Keep going to reach a second T-junction. Again, both ways gets you to the same place, so follow either. At the end, go through the door. [Checkpoint] The brief cut scene shows the door closing behind Lara. Room with stairs and platform with icicles hanging from the ceiling - The stairs opposite the entrance lead to a panel with a golden skull, but you cannot do anything with it yet. So, go up the stairs on the right to reach a platform with many icicles hanging from the ceiling. The camera shifts back, so be careful as you maneuver Lara. Carefully, go left and stand in front of the circular opening in the opposite wall. [Checkpoint] At this point, the camera gets back to normal. Jump across the gap into the opening and slide down the slope to the room below. Both sides of the icy rock in the middle of the passage lead to the same place, however the left way offers a Treasure (3/6). Continue through the passage to reach the next room. [Checkpoint] Room with two small gates - Go up the stairs opposite the entrance and step on the pressure plate in front of the panel to open the two small gates. There is another wooden door in the back right corner, but you will open it in just a bit. Go through either gateway with your weapons drawn. A jaguar thrall attacks as you move into the passage, so take care of it. At the end, go up the stairs and pick up the Statue Key #2. [Checkpoint] Make your way back to the previous room. Go up the stairs where the pressure plate is and stand in front of the panel with the golden skull. Press the Interact button to place one of the Keys into the panel and open the wooden door. Lara takes the Key back automatically. [Checkpoint] Go through the door you just opened. As you probably expected, it closes behind you. [Checkpoint] Follow the hallway to the next room. Tall room with climbable walls and broken beams\ Climbing from the floor to the first level - (The following sequence until the next Checkpoint is shown in this page.) Enter the alcove ahead and jump to grab the handhold on the wall. Climb upwards and right to grab the corner handhold. Traverse around and jump back to grab the narrow ledge behind you. Jump straight up to grab the upper ledge, then jump back to grab the broken ledge behind. Go around to the right and hang from the edge (the entrance should be now behind Lara). Traverse to the right and jump up twice to grab the topmost handhold. Hang from the left side and jump to grab the handhold on the wall behind. Climb upwards and to the right and pull up on the ledge. [Checkpoint] Climbing from the first to the second level - Turn around and jump to grab the handhold on the left wall. Jump to the beam on the right and walk to the other side. Jump to the next beam and walk to the other end. Jump to grab the handhold on the wall ahead and shimmy to the either left or right. It does not matter which way you follow, since both lead to the same place. Drop to the ledge below and enter the alcove. Jump to grab the handhold on the wall and jump straight up four times to grab the topmost handhold. Traverse around the corner and pull up on the ledge. Follow the hallway around the corner to reach an opening that overlooks the tall room. This time, you are standing even higher. Second level - Carefully, step on the beam and walk to the other side. Turn Lara 45 degrees to the right and jump to the next beam. Walk to the other side to reach the safe ledge. You have to open the wooden door ahead, but the mechanism is placed higher. So, turn left and approach the edge of the ledge. Jump to grab the handhold on the left wall and traverse around the corner to the right. Climb on the next handhold and jump up to grab the upper handhold. Jump back to grab the horizontal metal pole that spans the wall behind you. Climb to the left to face the next smaller wooden pole. Swing and jump to grab that pole. Lara's weight lowers the pole and operates a mechanism that opens the wooden door. Drop down and go through it. The door closes behind Lara. [Checkpoint] Follow the hallway and climb up the two ledges. Slide down the icy slope to reach the next room. Room with several square pillars - You reach a room with several square pillars. To the left is an opening in the wall, but you cannot reach it from here (you will come back from it later). Go to the right to see a closed door. The mechanism that opens the door is just on the left. To reach it, jump towards either side pillar and once Lara connects with it, press Jump again to leap off the pillar and grab the horizontal pole (as shown in this image). As before, Lara's weight lowers the pole and operates a mechanism that opens the wooden door. Drop down and go through it. Back to the room with stairs and platform with icicles hanging from the ceiling - Slide down the icy slope and run forward. Turn right around the corner and there you are back to the first room. To open the door that leads back, head up the short stairs and go behind the dais. Stand in front of the panel with the golden skull. Press the Interact button to place one of the Keys into the panel and open the wooden door. As before, Lara takes the Key back automatically. [Checkpoint] Go through the door and follow the hallway to return back to the room with the Xibalba statues. Back to the room with the Xibalba statues - You made a play with four of the seven statues earlier, by pushing them towards the toxic pool. Now you will use the rest three. One of them is opposite the entrance of this room. Notice that the other two have some steps behind them. Approach the first statue and go up the steps. Place one of the two Statue Keys in the small opening at the back of its head to remove its locks. Drop down and grab either handle. Move the statue towards the pool. This action removes one of the two locks of the statue opposite the entrance. [Checkpoint] Now go to the exact opposite statue. Go up the steps behind it and place the second Statue Key in the small opening at the back of its head to remove its locks. Drop down, grab either handle and move the statue towards the pool to remove the second lock of the statue opposite the entrance. [Checkpoint] Go to that statue (the one opposite the entrance) and grab either handle. Move the statue towards the pool to open two doors at the far left and far right corners of the room (if the entrance is to your back). The doors are in a lower area, at the bottom of some stairs. [Checkpoint] It does not matter which doorway you follow, since both lead to the same place. So, go through the doorway and roll under the fallen rocks. Follow the hallway until you reach some stairs. Go down them and draw weapons. Kill the jaguar thrall that attacks and continue down the next stairs. Follow the passage to the next room. [Checkpoint] Room with ramp on the right and toxic pool above to the left - As you enter the room, look for a small tunnel on the left (as shown in this image). Crouch inside and go to the passage at the other end. Turn left and pick up the Treasure (4/6). Then return back through the small tunnel. Go up either ramp and enter the opening between the two pillars. Jump to grab the handhold on the back wall and jump up to grab the next one. Traverse to the left around the corner and jump to grab the handhold above. Jump back to grab the top of the pillar behind you and pull up. Draw weapons and Lara will aim at the belt that supports the box. Shoot the belt so as to make the box fall down. [Checkpoint] Make your way down and notice that the box has been broken into two pieces. Jump to the lower piece and jump to grab the wooden walkway. Pull up and make sure you do not fall into the toxic pool! Run to the other side, but be careful not to fall through the space between the walkway and the stone ledge. If this happens, you will fall into the passage where you got the Treasure earlier. You then have to make your way back here. Jump to the stone ledge ahead and pull the lever. The brief cut scene shows the spiral pipe to stop working. [Checkpoint] This pipe feeds the serpent statue (in the room with the Lords of Xibalba) with toxic water. Now that you have deactivated the machine, the serpent no longer throws toxic water. Make your way back to the room with the Xibalba statues the same way you came. Small circular room beneath Xibalba statues - The pool is now empty, so slide down the slope. There is still some harmful water around the circular opening, so do not step there. Hang from the edge of the opening and release five times to land in a small circular room. Since it is quite dark here, Lara turns the Utility Light on. Turn around and approach the opening at the other side. If you take a look below, you will see two legs. A thrall is waiting for you down there, so draw weapons and shoot it from here. When it falls down (you can see it from the opening), slide down the slope and smash its bones. [Checkpoint] (Note - If you die during the following process and before the game registers the next Checkpoint, the thrall will be standing on the ledge alive, so you will have to kill it again.) Tall room with ledges and toxic pool at the bottom - You have to make your way down, almost to the bottom of the room, by jumping on various ledges. (The entire process is shown in this page.) Making your way down - Having the wall to your back, approach the front left corner of the ledge and jump down to the ledge below. Go to the other side, being careful of the opening in the floor. If you fall through it, you will end up in the toxic pool. Jump to the ledge below, or jump to grab the handhold on the left and drop down. Then drop the lower ledge. Stand on the left side of the ledge and jump to the stone beam ahead, where the part is solid. If you attempt to jump on the broken part of the beam, Lara will fall down. Jump to the right hand side of the next beam, then the left side of the third beam. Finally, jump to grab the ledge ahead and pull up. Turn right and jump to the square ledge below. Approach the front left corner and jump to grab the handhold on the left wall. If you cannot do that, hang from the edge of the ledge and traverse to the right towards the wall. The jump back to grab the handhold. Jump to grab the next handhold on the right and shimmy around the corner. Jump to grab the next handhold and finally jump to the ledge on the right. Still having the wall on your left, walk up to the edge of the ledge and drop to the next ledge below (or hang and drop). Go to the other side and jump up to grab the handhold on the wall. Traverse to the right and release to grab the lower handhold. Climb to the right, then downwards until you see a ledge on the left. Jump to that ledge and go left. Jump to the next ledge and go to the other side. Jump to grab the handhold on the right wall and traverse to the left. Then jump to the angular ledge. Go around to the right into a small passage where you will find the next Treasure (5/6) in a small opening in the wall. [Checkpoint] Return back to the angular ledge. Jump to grab the handhold on the right wall and jump to the next ledge on the left. Go down the two ramps to reach the end and turn left. Jump to the narrow ledge below and proceed forward to step on the lower part. Hang from the right edge and drop on the slope to slide to the ledge below. Go to the other side and jump to grab the extended part of the opposite ledge. Pull up. [Checkpoint] Hallways before reaching Thor statue - Go through the opening ahead and down the ramp. Go through the next opening and drop into the room below. Turn right past the square pillar. In the cut scene, Lara discovers engravings illustrating Jörmungandr and the final battle of Ragnarök. [Checkpoint] Go through either opening and follow the hallway with your weapons drawn. Kill the Mayan thrall that attacks and go up the ramp it came from. The next hallway gets you to a lever. Pull it to open the nearby door. Go through it and enter the next room. The brief cut scene shows Thor statue and a closed gate on his chest. Room with Thor statue - The lever in front of the circular toxic pool is broken, so you can use it. If you use the lever in front of Thor's hammer, nothing will happen, because you have to activate it by using two switches. Go through the opening on the right and up the ramp. Follow the hallway to a deep pit. Jump over it and use the switch #1 ahead. [Checkpoint] Now make your way back to the room with the Thor statue. The opening on the left is blocked by some fallen rocks, so you have to find another way. Facing the statue, approach the left side of the ledge. From this point, you are able to see a Treasure (6/6) lying on the ledge below. (This image shows the location and where you need to go.) Jump to that ledge and get the Treasure. The blue liquid is not harmful here, so proceed freely. Jump to grab the handhold on the rounded pillar on the right and traverse to the other side. When you reach the end, jump to grab the ledge on the right and pull up. You cannot reach the opening high in the wall, so turn left and vault on the ledge. Jump to grab the handhold on the wall and traverse to the left. When you reach the end, jump to the ledge on the left. Enter the hallway and follow it to the end. Use the switch #2, which along with the first one, activates the lever in front of Thor's hammer. [Checkpoint] (Lara grabs the panel on the left, but she cannot do anything with it yet.) Drop through the opening on the right to land on the ledge below. Approach the left side and jump to the ledge with the circular toxic pool. Climb on the platform and use the lever. The cut scene shows the gate on Thor's chest opening. A serpent statue also rises up from the circular toxic pool and Thor's hammer moves upwards, blocking your way to the chamber. [Checkpoint] There is a metal ring on the serpent's head, but do not connect your Grapple cable from here. Instead, go around the toxic pool and stand on the raised platform with the broken lever (as shown in this image). Use the Grapple to catch the metal ring and pull the serpent statue backwards. This will make the statue sink and as a result, Thor's hammer will lower. Go back to the platform with the lever you used and jump to grab the handhold on the hammer. Climb to the top and enter the chamber. In the next cut scene, Lara enters the small chamber and tries to take Thor's belt. While the ornaments turn to dust, a small stone remains, whose glow echoes the gauntlets. When Lara grabs it and puts it on her own belt, the artifact creates a halo similar to the gauntlets one. [Checkpoint] Back to the room with the switch #2 - Exit the chamber and step on the hammer. Turn right and jump to the ledge next to the rounded pillar (as shown in this image). You could also drop down from the front side of the hammer and go around the room like you did before, but this is a longer way. Vault on the ledge to the left and jump to grab the handhold on the wall. Traverse to the end and jump to the next ledge. Follow the hallway to return back to the room where you used the switch #2. Now that you have Thor's belt, grab the movable panel on the left and pull it to reveal a passage. Climbing up the several walls - Go behind the panel and through the passage. Jump to grab the handhold on the wall and jump straight up three more times to grab the topmost handhold. Jump back to grab the ledge behind you and pull up. Go to the end of the hallway by turning around two corners. [Checkpoint] In the next room, jump to grab the crevice in the wall and climb on the ledge above. Turn around and jump to grab the crevice in the wall ahead. Climb to the handhold above and jump up twice to grab the topmost handhold. The angle of the camera helps you to see the next crevice behind you. Jump to grab it and climb to the handhold above. Jump up twice to grab the edge of the ledge and pull up. Jump to grab the handhold on the wall ahead, then jump up to grab the next one. Jump to grab the handhold behind you and climb to the next one above. Jump up to grab the handhold above and climb on the ledge. Turn left and jump to grab the handhold on the wall. Traverse a bit to the left and jump up three times to grab the topmost handhold. Shimmy around the corner and pull up on the ledge. Turn left and jump to grab the handhold on the wall. To reach the next hanhdold which is above and a bit to the right, move the Left Analog Stick to the left and press the Jump button. Climb to the next handhold above and Traverse to the left around the corner. Pull up on the ledge. Draw weapons and kill the jaguar thrall. Follow the tunnel and go through the opening. [Checkpoint] Back to the room with several square pillars - Drop into the room with the several square pillars. You remember this room, don't you? Go to the other side where the door is closed. You have to open it as you did before, so approach the horizontal pole on the left. Jump towards either side pillar and once Lara connects with it, press Jump again to leap off the pillar and grab the pole (as shown in this image). As before, Lara's weight lowers the pole and operates a mechanism that opens the wooden door. Drop down and go through it. Slide down the icy slope and run forward. Turn right around the corner to return back to the room where there is a platform above with icicles hanging from the ceiling. The door that leads back is open, so go through it and follow the hallway to return to the room with the Xibalba statues. Back to the room with the Xibalba statues - As you return back, the camera shows where you need to go now. It is a ledge high above, behind the serpent statue. Drop down. In the cut scene, Lara refers again to Jörmungandr, the Midgard Serpent. She reckons that this site, along with the Mediterranean temple and the Norse remnants in Thailand probably inspired the mythological legends about the underworld, maybe because of their common point; they were guarded by undead creatures. [Checkpoint] Get the bike, which should be in front of the entrance if you have not used it until now. Drive up the ramp to the right of the entrance and jump over the gap. Keep driving until you reach the ledge that the camera showed you when you returned to this room. Dismount and grab the suaqre handle with the skull. Move to the left to slide the door open. Cave with five deep pits - Get the bike again and drive through the doorway. Follow the twisted hallway to reach a cave. [Checkpoint] Take a good run up and use the stone ramp to jump over the first deep pit. Stick to the either left or right hand wall and drive on the ramp to the side of the second deep pit. Do the same for the next two pits and stop. To clear the fifth deep pit, angle the bike towards the pile of stones to the either left or right. Take a good run up and drive on the pile of rocks to jump over the gap behind it and land on the slope on the wall (as shown in this image). Drive along the wall and drop beyond the pit. Drive into the next passage and jump over the next pit. Keep driving forward to end the level. In the cut scene, Lara calls Zip and asks him if he finally could locate where Richard Croft thought Thor's Hammer was. Zip sends the coordinates to Lara's PDA and she also asks him if he has made any progress on the other project. Zip says he has not tracked them down yet and Lara says she will call again when she reaches Jan Mayen Island.
|
||
| « Southern Mexico | Part 3: The Midgard Serpent | Index | Jan Mayen Island | Part 1: Gate Of The Dead » |
Tomb Raider 8: Underworld Walkthrough & Game Guide © 2000-2009 www.tombraiderhub.com |
||