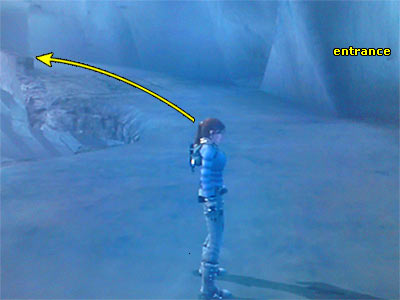
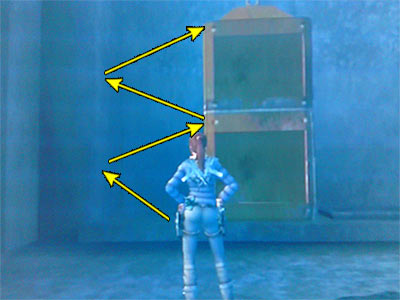
[Checkpoint] Turn to face the tunnel you came from and head up the ascent on the left (as shown in this image). Pick up the Treasure (1/3) at the top and return to the bike.
Going down the ramp - Get the bike and drive down the ramp, being careful of the opening. This and the next ones appear on the right hand side, so stick to the left. Run over the Viking thrall (or totally ignore it) and continue down the ramp. Deal with one more Viking thrall and keep driving around the ramp.
When you reach the bottom, you have to kill two more Viking thralls. Unlike the previous cases, the last pair must be destroyed in order to trigger the next cut scene.
In the cut scene, the engraved door is mentioning the "Gate of the Dead", which Lara identifies as Valhalla, the legendary place where the fallen warriors were preparing for Ragnarök, the apocalypse.
Opening the door - Approach the tower and climb up the two ledges. Grab one of the several handles and start pushing/ pulling anti-clockwise to rotate the base of the tower. This works as a mechanism that opens the door.
Get the bike and drive through the doorway.
(Note - You do not need the bike in order to finish the level. However, it will help you move much faster.)
Hallways beyond the door - What follows is not a maze. You will meet some junctions, but the one way is always a dead end, so you will not get lost.
Drive forward until you reach a T junction. The left way is a dead end, but there is a Treasure (2/3) lying on the floor at the end. Get it and backtrack to the T. [Checkpoint]
Continue to the other side of the hallway. If you have the bike, make an open turn to drive on the ramp on the right and land on the lower part of the hallway. If you are on foot, approach the left part between the wall and the boulders and hang from the edge. Release to grab the handhold below and drop down.
Follow the hallway around to the right and you will reach a second T junction. The right hand way is a dead end, so go left and kill the Viking thrall that runs down the stone ramp.
Drive behind the ramp where the hallway turns left. Continue around the next corner to the left and be careful of the deep pit on the left side. If you have the bike, keep driving on the right side to avoid falling into the second pit on the left and use the small stone ramp to clear the deep pit beyond. If you are on foot, go behind the second pit and jump to grab the handhold on the left wall. Jump to grab the next handhold above and traverse to the right. Release twice to land on the ground.
Follow the hallway around to the right. Go up the ramp and drive forward through the long hallway with a useless stone ramp. Turn left to a second long hallway that also includes a useless stone ramp. The next turns gets you to some fallen rocks that prevent you from getting the bike with you (if you have it), so dismount.
Climb on the first stone ledge, then the next one above. Drop down at the other side and go through the doorway.
First room with two swinging hammers and side rooms - Approach the walkway ahead.
The brief cut scene shows an opening in the left hand wall, which is the exit of the room.
[Checkpoint] Cross the walkway. When you reach the part that seems to be broken, the huge hammers begin to work. As they swing above Lara, one hammer is low enough to crash the walkway. The camera then focuses on a pillar at the other side of the room. The part where you are standing will pitch forward and at this point, a situational adrenaline begins.
Climbing to the first safe walkway - (The entire sequence is shown in this page.) Let Lara slide down a bit and jump forward to grab the handhold on the square pillar ahead before you fall into the chasm. Jump up to grab the egde of the pillar and pull up. [Checkpoint]
The camera shows where you need to go, so hang from the left edge of the pillar and traverse left if necessary. Release to grab the lower handhold and release once more to grab the horizontal pole below. Climb to the end of the pole and release to land on the slope below. Slide down and do not do anything. Lara will land on the beam, so walk to the other side. Jump up to grab the handhold on the next pillar and traverse to the right around the two corners. When you reach the broken part of the handhold, release to land on the beam below. Turn around and walk to the other side. This beam does not reach the next pillar, so jump the gap to grab the narrow ledge there. Traverse to the right around the three corners and pull up on the wider ledge. There is a beam exactly below, but do not go there. Instead, perform the Chimney Jump to grab the edge of the safe walkway above. Then pull up. [Checkpoint]
Walkway beneath the entrance - To get oriented, if you take a look above, you will see that this walkway is beneath the entrance. If you go to the other side and jump to the walkway on the left, you will see that the doorway is blocked by fallen rocks. So, from the poit where you pulled up, turn left and enter the doorway. Do not stop as you do that, because the walkway collapses. 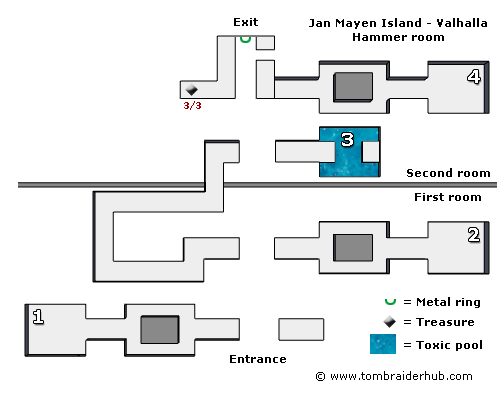
The diagram on the right is a simple layout of the side rooms which are numbered in the order you follow them.
First side room with gears and weights - Follow the hallway to a T junction. Both ways lead to the same place, so follow either. Then cross the second hallway to the next room.
In the cut scene, Lara finds a giant corpse on the ground. She identifies it as a yeti, probably the creature that gave birth to the Frost Giants in the Norse mythology. But what she assumed to be just a corpse starts moving and soon she is facing a very angry yeti thrall.
Immediately draw weapons, because you have to deal with the Yeti thrall. If you are brave enough, you can stay in the room and deal with the yeti, but make sure you jump around or it will smash Lara in a corner. As with the other thralls, once the yeti falls down, you have to stomp it by standing close to it and pressing the Interact button. Alternatively, run back into the hallway you came from. As the yeti follows you, turn to face it and start shooting whilst backing away at the same time. With the Submachine Guns equiped, the monster will drop down shortly.
Climbing to the upper ledge - (This page shows the following sequence.) Once you are done, approach either weight. When it comes down, jump to grab the first handhold of the weight, then the next one. When it reaches the top, jump back to grab one of the moving horizontal poles that connect the highest gears. Wait until it reaches the highest point. When it does so, pull up on the pole and jump up to grab the chain that moves towards the ledge you are headed. Once you reach it, drop onto it.
Back to the room with the hammers - Go through the doorway. [Checkpoint] Follow the hallway, then the next one that leads back to the room with the huge hammers. Jump to grab the first horizontal pole and climb on it. Jump to grab the next one which is close to the opening and start swinging on the pole, waiting for the hammer to approach. When it does so, jump to grab it.
If you grab the top of the hammer, you have to climb to the handhold below, by pushing the Left Analog Stick down. Do not press the Crouch button to release and grab. At least do not do it from this side of the hammer. As it swings back and forth, Lara risks to miss the grab and fall to her death. Instead, first traverse around the corner to the right where the camera shifts back, then release to grab the handhold below.
As the hammer swings back and forth, notice the pillar below (as shown in this image). You have to drop on top of the pillar, but do not just release because the pillar is not exactly below the hammer. Push the Left Analog Stick down so that Lara is facing backwards. Then jump when the hammer passes above the pillar. This jump may end up really frustrating, as the last registered Checkpoint is back in the room with the gears and weights. If you keep missing the jump and fall into the chasm, jump up to grab the top of the hammer and try jumping from there. Alternatively, traverse back to the side where you first hanged from the hammer and jump sideways to land on the pillar (as shown in this image). [Checkpoint]
When you finally make it, the brief cut scene shows the next doorway you have to reach.
If you take a look around, you will see that you are standing exactly in front of the entrance. You can actually jump there, but there is no reason to do that.
Climbing to the second safe walkway - (The entire process is shown in this page.) Facing the entrance, hang from the edge of the pillar ahead, which is next to the extended part. Release to grab the handhold below and climb to the next one on the right. Release three times to grab the lowest handhold and traverse to the right around the corner. Climb to the small handhold on the right and release twice to grab the lowest handhold. Traverse to the left around the corner and release to grab the small handhold below. Jump to the right to grab the handhold on the sloped pillar and traverse to the left. When you reach the end, jump back to grab the handhold on the first pillar. Traverse to the right and drop on the beam.
Walk to the other side and jump to grab the crevice in the pillar ahead. This a long jump, so help Lara grab the crevice by pressing the Interact button. Then jump to grab the narrow ledge on the pillar to the right. Lara will grab the right part, so traverse to the left around the corner. Pull up and perform the Chimney Jump to grab the handhold on the right hand pillar. Traverse to the left around the corner and drop on the beam. Walk to the other side and jump to grab the narrow ledge on the pillar ahead. Traverse to the left around the corner and pull up on the wider ledge. Perform the Chimney Jump to land on top of the right hand pillar. [Checkpoint] Turn right, jump to grab the walkway and pull up.
If you go to the other side, you will see that the walkway on the left is blocked by fallen rocks. Be careful as you do so, because the walkway collapses. To return back, jump over the gap.
Second side room with gears and weights - From the point where you pulled up, enter the hallway on the left. Follow it to the end, go either way and cross the second walkway to reach a second room with gears and weights. The right hand weight does not have a handhold in the middle, so approach the left weight and wait until it comes down. Jump to grab the first handhold of the weight, then the next one. When it reaches the top, jump back to grab one of the moving horizontal poles that connect the highest gears. Wait until it reaches the highest point. When it does so, pull up on the pole and jump up to grab the chain that moves towards the ledge you are headed. Once you reach it, drop onto it.
Back to the room with the hammers (again) - Go through the doorway. [Checkpoint] Follow the hallway, then the next one that leads back to the room with the huge hammers. Jump to grab the first horizontal pole and climb on it. Jump to grab the next one which is close to the opening and start swinging on the pole, waiting for the hammer to approach. When it does so, jump to grab it.
As before, if you grab the top of the hammer, you have to climb to the handhold below, by pushing the Left Analog Stick down. Do not press the Crouch button to release and grab. At least do not do it from this side of the hammer. As it swings back and forth, Lara risks to miss the grab and fall to her death. Instead, first traverse around the corner to the right where the camera shifts back, then release to grab the handhold below.
Once you are hanging from the handhold, traverse to the right and jump to grab the handhold on the other part of the hammer. As it swings to the other side of the room (to the right as the camera is positioned), notice the white handholds on the wall. Do not bother with them. Although they lead to the nearby opening, you may have troubles grabbing onto them. Instead, traverse to the right around the corner, so that Lara's back is facing the opening. Position the camera behind Lara and push the Left Analog Stick down to make Lara face backwards. When the hammer reaches the opening, jump back into the hallway.
Hallway leading to the second room with two more swinging hammers and side rooms - Follow the hallway as it goes. It makes some turns, but there are no junctions. You will soon reach an opening with two familiar horizontal poles and a hammer swinging back and forth in another room.
Second room with two more swinging hammers and side rooms - Jump to grab the first horizontal pole and climb on it. Jump to grab the next one which is close to the opening and start swinging on the pole, waiting for the hammer to approach. When it does so, jump to grab it.
Hang from the handhold of the hammer and traverse around the corner to the right. Jump to grab the handhold on the other part of the hammer. As it swings to the other side of the room (to the right as the camera is positioned), you will notice again two white handholds on the wall. If you have troubles reaching them, do what you did before. Traverse to the right around the corner, so that Lara's back is facing the opening. Position the camera behind Lara and push the Left Analog Stick down to make Lara face backwards. When the hammer reaches the opening, jump back into the hallway.
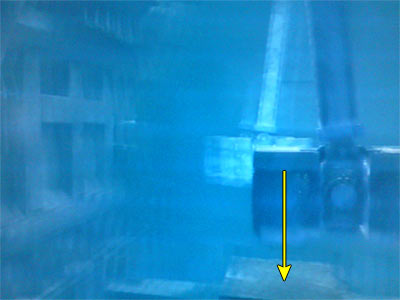
Third side room with toxic pool - (This is the first side room of this area, but we number it as third one so it matches the numbering in the diagram.) Follow the hallway to an opening that overlooks a room with a toxic pool at the bottom. Use the Grapple to catch the metal ring on the opposite wall and jump off the ledge. Once you hang beneath the ring, do not swing. Just climb down the cable line, by pressing the Interact button and pushing the Left Analog Stick down at the same time. When you reach the ledge below, release the cable and turn around. Jump over the pool to land on the ledge below. Then follow the hallway leading back to the room with the hammers. [Checkpoint]
The brief cut scene shows where you need to go.
Climbing to the next safe walkway - (This page shows the following sequence.) With the hallway you came from to your back, approach the edge of the walkway. Jump to the sloped pillar and do not do anything. Lara will slide the slope and land on the beam below. Walk to the other side and jump to grab the handhold on the pillar ahead. Traverse to the left around the corner and jump back to land on top of the pillar behind you. Carefully, step on the beam and walk to the other side. Jump to grab the narrow ledge on the next pillar and traverse to the right around the corner. Pull up on the wider part and turn around. Perform the Chimney Jump to grab the walkway above and pull up.
First, go to the left around the walkway to find the last Treasure (3/3). Get it and return back. Go to the end of the walkway and use the Grapple to catch the metal ring on the wall. Jump off the edge and hang from the cable. You have to wall run to the small ledge on the right, but make sure you do not gain enough momentum or Lara will jump past the ledge and fall into the chasm. As you hang from the cable, push the Left Analog Stick to the right and when Lara walls run to the right, press Jump to leap off the cable. Briefly, you have to swing just once. Once on the ledge, turn right and jump to the next walkway.
(Note about the wall run - If you have played Anniversary, you should know how this move works. If not, check the detailed description at the bottom of the page.)
Fourth side room with gears and weights - (This is the second side room of this area, but we number it as fourth one so it matches the numbering in the diagram.) Go around the walkway to the left and enter hallway. Follow it as it goes and kill the Viking thrall just before entering the next room. [Checkpoint]
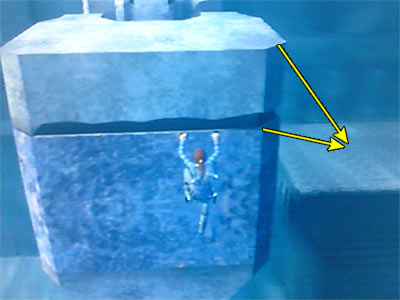
You now have to reach the upper ledge and once again the process is the same as the previous rooms. Approach either weight and stand in the corner. When the weight comes down, perform the Chimney Jump to grab the handhold on the weight (as shown in this image). Climb around the corner so Lara's back is facing the room. When the weight reaches the top, jump back to grab one of the moving horizontal poles that connect the highest gears. Wait until it reaches the highest point. When it does so, pull up on the pole and jump up to grab the chain that moves towards the ledge you are headed. Once you reach it, drop onto it.
Go through the doorway. Follow the hallway, then the next one that leads back to the room with the huge hammers. Jump to grab the first horizontal pole and climb on it. Jump to grab the next one which is close to the opening and start swinging on the pole, waiting for the hammer to approach. When it does so, jump to grab it.
Hang from the handhold of the hammer (not the top of it) and traverse around the corner to the right. As it swings back and forth, notice the walkway below. When the hammer passes above the walkway, release to land onto it. Go to the other side [Checkpoint] and climb on the stairs.
In the cut scene, Lara goes up the stairs and stops in front of the doorway. Using her videocamera, she records the runes and deciphers "Thor, greatest of my sons, and the greatest weapon on Earth, are at last reunited. Upon my return, through rituals old and the power of Mjolnir, together we will open the seals of Helheim and fulfill our destinies."
When Lara enters the room, the belt and gauntlets glow again. Lara grabs the hammer from the pedestal and examins it. "Mjolnir" she says, "slayer of giants and the Midgard Serpent. More importantly, the key to Helheim, wherever that is." It is time for Lara to pay Natla a visit.
Wall Running - Like in Anniversary, Lara can run on the walls and reach far ledges by using her Grapple. To perform the wall run, a ring must be mounted on the wall. To activate the Grapple device, just press the Grapple button to catch the ring. Then jump to hang from the cable. You can maneuver Lara by having the camera either behind her (perpendicular to the wall) or to the side of her (parallel to the wall). However, the first way seems easier for many players.
Once you hang from the cable, position the camera behind Lara (perpendicular to the wall). Push the Left Analog Stick to the left and right (back and forth) to start the wall run and gain momentum. Let's say that the destination ledge is to your right. Once Lara reaches the highest point to the right, press Jump while having the Left Analog Stick still pushed to the right. Lara will release the Grapple line and jump to the right.
Tomb Raider 8: Underworld Walkthrough & Game Guide © 2000-2009 www.tombraiderhub.com
All rights reserved. All trademarks recognised.