Level 1: Mountain Caves
Kills: 14
Supplies: 5
Artifacts: 3
Relics: 1
Additional Secrets: 0
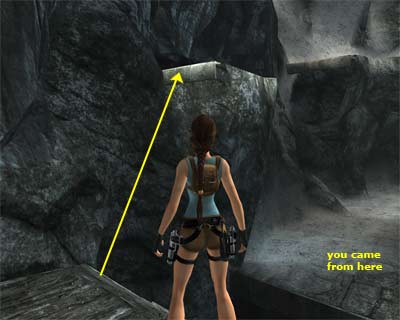
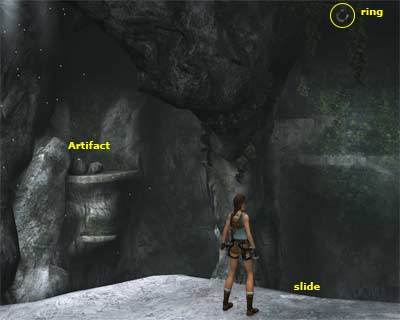
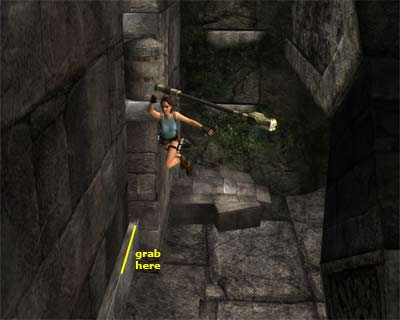
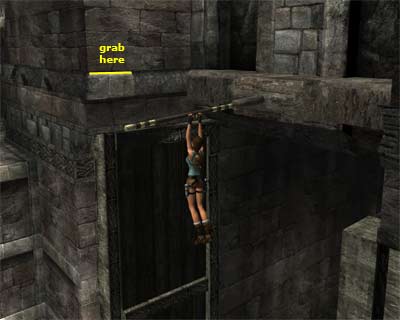
The opening FMV showcases Los Alamos, New Mexico 1945. An explosion occurs and several houses are destroyed. From a crater (from whence the explosion was triggered) a creature escapes and flies away. The cut scene takes place in Calcutta, India (1996). In a beautiful room, Lara is reading a book when a man approaches her. He throws a book on a table and asks Lara for her attention. She replies he is well on his way, but Larson is here to only make an intoduction. He flips open a notebook that shows a blonde woman on screen and asks Lara to meet with Jacqueline Natla, of Natla Technologies. Natla greets Lara and gets directly to the matter in hand. Her research department studies ancient artifacts and Lara is just the woman to find them for her (Natla). Lara plays for sport and Natla knows it, because this is a game Lara has played before with her father. They both spent years searching for the Scion of Atlantis and all they needed was the location of Qualopec's Tomb. Lara seems surprised that Natla has found Vilcabamba, so Natla asks her how quickly she can get to Peru. The next cut scene shows the Mountains of Peru. It is cold and is snowing. Lara's companion climbs up a rock using a ladder, but it breaks. He apologizes to Lara, because he did not bring enough rope, but Lara is not worried; she will find another way up. [Checkpoint] You begin the level on some snowy rocks. From the starting position, head forward and vault onto the rocks. Jump to grab the narrow ledge ahead and shimmy right and around the corner. If you want to move faster, press and hold the Interact button. When you reach the end, jump to grab the next ledge on the right and keep shimming until you see a big rock behind Lara. Jump to grab it and pull up. On Lara's left hand is a ledge that you can jump to. Do that and climb on the next stone ledge. Jump to grab the narrow ledge on the left and again jump to grab the one above and pull up. Notice the gold ring above to the left. Jump off the ledge and use the Grapple to catch the ring. Swing towards the other side and press Jump to release the Grapple and land on the stone bridge. Go up the steps on the right. The brief cut scene shows the big closed doors (that, as you can see, lead to the Mountain Caves) and focuses on a ledge above it. [Checkpoint] You need to reach that ledge, so go up the rocks on the left and jump to grab the ledge ahead. Pull up and, once again, use the Grapple to catch the gold ring above to the right. To do that, jump off the ledge and whilst in midair use the Grapple. Swing and jump to land on the ledge at the other side (or grab it if necessary and pull up). Jump to grab the narrow ledge on the left, traverse to the left and jump to grab the ledge above. Shimmy left and when you reach the end, jump to land on the ledge above the doors. Use the button. The cut scene shows the doors opening. It is quite dark behind them, but it seems that Lara's companion sees something. Suddenly, four wolves run out of the cave and attack him. Lara jumps down, shooting at the same time. When she manages to kill all wolves, she realizes that her friend is dead. She enters the cave, whilst the doors close behind her. Lara does not need her glasses anymore, so she takes them off. [Checkpoint] Inside the cave - Continue into the passage until Lara steps on a big pressure plate that initiates a dart trap beyond. You can carefully pass them by stopping before them and running when they go off. If you cannot do it that way and you keep losing health, you can deactivate the trap. To do that, turn to face the way you came and notice two switches above: one on the right and one on the left hand side. To reach them, jump to grab the narrow handhold on the right (as shown in this screenshot), then jump for the next one, shimmy left and around the corner, jump to grab the upper handhold and lastly jump to grab the first switch. When you pull it, jump to grab the ledge behind you, shimmy left around the corner and press the Crouch button to release and grab the second switch. Both deactivate the darts, so drop to the ground and freely pass through the passage. [Checkpoint] Area with broken wooden ledge - In the next area, go up the stairs on the right, cross the wooden ledge and jump to grab the opposite side. Pull up, go around to the left and jump to the next wooden ledge. Artifact #1 - Before continuing to the left, turn around to face the way you came and notice the ledge above (as shown here). Jump to grab it and pull up. Go to the end and jump to the next one. Go around to the right and jump to grab the edge of a small passage. Pull up and proceed to the other side. Jump to the next ledge, but be careful not to accidentally slide to the ground. Use the ramp to slide a bit, but jump before reaching the end to grab the opposite ledge. Pull up and pick up the Artifact. Go to the other side of the ledge and jump to grab the narrow ledge ahead. Shimmy left around the corner and drop to the ground. [Checkpoint] You enter a second cave which is a bit higher than the previous one. When you reach the fork, three bats will attack from beyond. Once you kill them, go to the left of the fork. Notice the alcove on the right. To reach it, climb on the nearby rock and jump to grab the edge of the cave. Pull up, vault onto the next ledge and pick up the Large Medipack. Return back to the fork and continue to the other side of the cave. Draw weapons and kill three more bats. [Checkpoint] Area with big rock structure in the middle - The slide of course takes you down, but before going there, let's go for a Secret. If you accidentally slide down, you can return back here for the Secret. To do that, use the narrow ledges in the bottom left corner of the bottom area (bottom left as you enter - see this screenshot). Artifact #2 - Jump at the top of the slide (or slide down a bit and jump) and whilst in midair, use the Grapple to catch the gold ring above. Stop swingning and hold down the Interact button. With this key compressed, press Up to climb the Grapple line. When you see the narrow ledge ahead, swing and jump to grab it. Shimmy left and jump to grab the ledge above. Jump to grab the ledge behind you, release for the lower ledge, shimmy right and when you reach the end, jump to grab the edge of the alcove behind. Pull up and pick up the Artifact from behind the rocks. (If you want to get oriented, see this screenshot that shows the Artifact's location.) To get down, hang from the edge of the alcove, shimmy left if necessary and release to grab the lower ledge. Drop to the ground and draw weapons. Two bats will attack, so take care of them. Drop to the lower part of the area that leads to a switch. Use it to open the nearby door. Area with two wooden bridges - Go through the door and down the steps. Follow the passage to reach an area with two wooden bridges. [Checkpoint] Go to the right and as you approach the stone block, you will hear growlings. There is a cave below, down into the pit, from where two wolves will attack, so stay sharp. If you cross the bridge, it will collapse. You need to do that anyway, but it seems like a trap if the wolves are still alive, since they attack as soon as you reach the ground. Once they are history, look for another cave at the other side (still down in the pit) that contains a Small Medipack. As you exit the cave, you will spot the Artifact #3 in an alcove on the left, but it is quite high and you cannot reach it. So, do not waste your time now, because you will get it later. Use the broken part of the bridge as a ladder to climb up and reach the other side of the area. [Checkpoint] Go to the right and jump to grab the handhold on the wall. Then jump to grab the edge above; pull up. Before crossing the second bridge, turn around and notice the alcove with the Small Medipack. To reach it, you need to use the narrow ledges of the two pillars on the left. Once you get the Medipack, return back to the second bridge. Pit with bear - Cross the second bridge and go to the left. Climb on the ledge above to reach an area with pillars, a pit and a rope. [Checkpoint] Before using the rope, use the narrow ledges on the right to land on a block in the back right corner of the pit. A bear will come from the alcove, so stay here and kill it. If it does not come out, you have to jump down and lure it. Artifact #3 - When you kill it, enter the alcove it came from and use the switch to open the nearby door. It is on a slow timer, so you will not have problems passing through it. Drop to the lower ledge and pick up the Artifact. You should recognize the place below. It is where the two wolves attacked before. So, make your way back to the rope the same way as you did before. Approach the left side of the pit and jump to grab the edge of the alcove with the Large Medipack. If you cannot do that and you keep falling down, you will have to use the rope. Note though that you need to gain enough momentum in order to reach and grab the edge of the alcove. When you get the Medipack, drop down, use the stone block in the corner to return back up, grab the rope and this time swing and jump to the opposite side. Go to the far left corner and pick another Large Medipack behind the pillar. Go down the ramp and follow the passage. The next steps take you to a pit with greenery. If you fall down, you can easily climb back up. Jump to grab the horizontal pole on the left, swing and jump to land on the opposite stairs. Negotiate the next two ledges and follow the passage. Area with closed door, two slides and dart trap - [Checkpoint] Carefully pass the dart trap to reach the other side. This is the exit door which you have to open. If you step on the pressure plate, the camera will show the door's wooden bar moving and focus on the locks above. To open the door, you have to remove the two locks, something you will do right now. Use the narrow ledges on the left to reach the topmost one. If you take a look on the left, you will see a passage, but do not go there yet. Instead, locate the mechanism on the right. To reach it, jump to grab the handhold opposite the way you came, jump to grab the upper one, traverse to the right and around the corner and when you reach the end, jump to grab the mechanism. Lara's weight will lower it, thus removing the first lock. Now you can go through the passage, but have your weapons drawn, because a wolf will attack from the opening ahead. When you kill it, go through the opening and proceed to the end. Turn left to spot the three horizontal poles. Use them to reach the opposite side. Again, a wolf will attack from the next opening, but this time it is not alone. A second wolf will soon join you, so stay sharp. At the end of the passage you will see the second mechanism which removes the second lock. To reach it, vault on the rock to the right and climb up the next two narrow ledges. Jump to grab the horizontal pole behind you and wait for it to turn 90 degrees. When it does so, swing on the pole and jump to grab the mechanism. Again, Lara's weight will lower it, thus removing the second lock. Drop to the ground and step on the pressure plate to open the door. [Checkpoint] Relic - Before leaving, make your way back to the second mechanism (unfortunately, you have to take the long route). Vault on the rock as you did before and once again climb up the next two narrow ledges. The next part is tricky and you need to be quick. Jump to grab the horizontal pole behind you and immediately press Jump again (when the pole has turned about 45 degrees - see this screenshot) to release the pole and grab the narrow ledge on the opposite wall. If you cannot time it, jump to grab the pole and keep tapping the Jump button. Traverse to the left and when you reach the end, jump to grab the lower pole. (Note: you must step on the plate and open the door, because this action extends the poles. Otherwise, Lara will not be able to reach the lower one.) You now have to grab the opposite small handhold (as shown here), so move a bit to the right and swing on the pole. Jump to grab the handhold, jump for the upper one and jump to grab the second pole behind you. Swing, jump to grab the handhold on the other wall and finally climb on the ledge above. Pick up the Killer Whale Bottle. Make your way back the same way you came. When you reach the lower pole, drop to the ground. Go through the doors to end the level.
|
||
| Index | Level 2: City of Vilcabamba » | |
| Last update: 08 July 2007: Cosmetic changes | ||
Tomb Raider: Anniversary Walkthrough & Game Guide © 2000-2007 www.tombraiderhub.com |
||