Level 12: Natla's Mines
Kills: 3
Supplies: 10 (plus the Shotgun, SMGs and Caliber Pistols)
Artifacts: 4
Relics: 1
Additional Secrets: 0
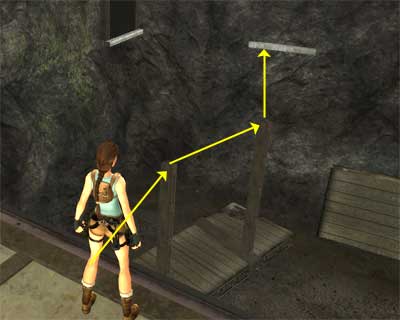
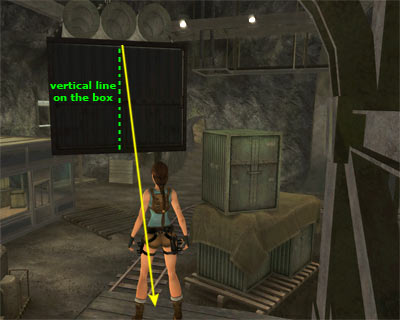
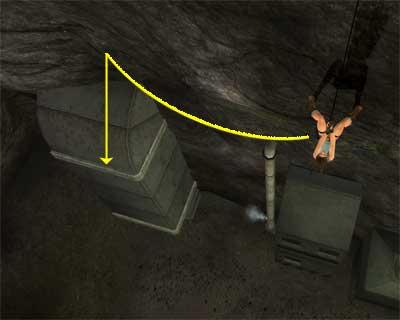
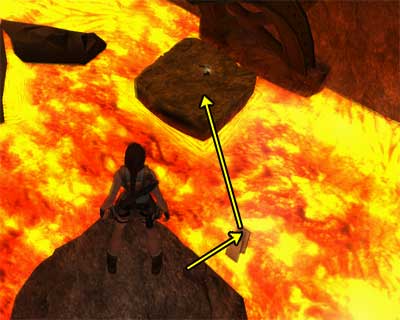
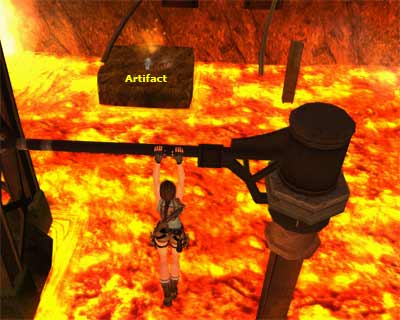
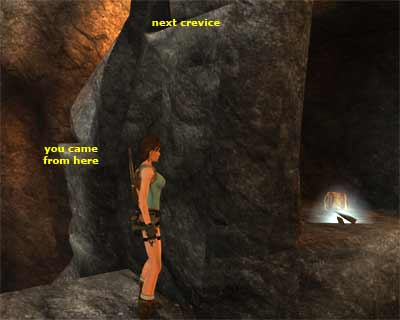
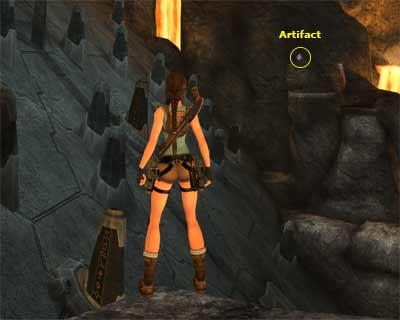
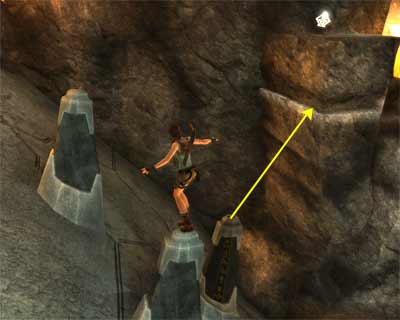
The cut scene shows Lara exiting from a hatch. She spots a small boat that heads towards a cave, so she jumps into the sea and follows it. [Checkpoint] Pool with boat and waterfall - You begin the level weaponless, since the bad guys of the previous cut scene disarmed you, carrying only the Medipacks you have found until now and a round of Shotgun Ammo. So, apart from making your way out, you also need to find some guns. Swim forward to reach a pool with a boat and a waterfall on the right. Swim behind the waterfall and climb into the tunnel. Follow it upwards to reach an opening above the pool. Jump to grab the horizontal pole, swing and jump to grab the ledge ahead. Jump to grab the next ledge on the left, then the rope behind you. You cannot swing on the rope, so release to drop to the metal box. Jump to the next hanging metal box and turn right. Jump to the stack of crates, pick up the Large Medipack and jump back to the hanging box you came from. Jump to grab the rope and, without turning at all, swing and jump to grab the crevice to the left of the waterfall. Traverse around the corner and jump to the ledge behind the fence. Follow the tunnel to the next area. [Checkpoint] Area with control and glassed rooms - You reach an area with a control room to the left and a glassed one to the right. Follow the tracks to the left (if the entrance is to your back) to reach another area with a glassed room above and a fence to the right. [Checkpoint] Two rats are lurking here, but you cannot kill them. So, climb on the dump box and pick up the Red Fuse. Drop down and return back to the previous area. Go up the stairs to enter the control room. Place the Red Fuse to its slot and push the button to move the hanging box above the glassed room, giving you the access to an opening behind. Return back and go to the glassed room. Locate the movable yellow box on the left and push it against the room. Climb on the box, then on the room. Artifact #1 - Jump on the wooden structre of the fallen walkway, then to the next one (as shown in this screenshot). Jump to grab the narrow ledge ahead, then the next one on the left. Jump to grab the upper ledge, then the horizontal pole behind you. Swing and jump to the slope ahead. Before reaching the end, jump to grab the opposite walkway. Pull up and pick up the Artifact. Drop to the ground and make your way to the top of the glassed room the same way as you did before. Jump into the opening and follow the passage around to the right. Its end will take you above the entrance of the area, so jump to the opposite opening. [Checkpoint] Follow the passage to the end and drop to the walkway below. [Checkpoint] Push the movable block and throw it to the ground. That way, you will not have to take the long route back if you accidentally fall down. Jump to grab the opposite walkway and pull up. Turn right and jump to grab the top of the fallen grating. Jump to grab the ledge of the ventilation unit, then the one above. Jump to grab the walkway on the left and pull up. Go to the other side and jump to the fallen walkway. Before reaching the end, jump to grab the walkway ahead. Pull up and jump to the next walkway. Behind the fence - Go to the end of the walkway and hang from the edge. Drop to the metal ledge below and pick up the Green Fuse. Turn to face the pit and locate the ring beneath the small square metal ledge. Jump off the ledge and use the Grapple to catch the ring. Perform the wall run and when Lara reaches the highest point to the left, jump to grab the handhold behind you. Jump to grab the square metal ledge on the right and pull up. Climb up the ladder and jump to the left to exit the fenced area. Return back to the control room and place the Green Fuse to its slot. Push the button to move the hanging box even further. Push the button of the Red Fuse again to make the box approach the stack of green boxes. Exit the control room and go down the stairs. Climb on the crates opposite the stairs and jump to the lower green box. Climb on the next box and pick up the Large Medipack. From there, jump to grab the hanging box and traverse to the left and around the corner. Hang from the middle of this side (you should see a vertical line on the box) and jump back to land on the walkway (as shown in this screenshot). Inside the pit behind the fence - Enter the tunnel and on the T junction go to the right (the way ahead leads to a small square ledge, but do not go there). Climb down the ladder, then the next one. Approach the edge of the alcove and jump to grab the handhold ahead. Release to grab the lower handhold and drop to the ground. [Checkpoint] There is a rat here, so avoid it as much as you can. Go to the other side of the pit, where you will find the Blue Fuse. Going up the pit - Climb on the metal box to the left and jump to grab the pipe when the steam goes off. Climb to the top, wait for the steam of the second pipe to go off, and jump to grab it. Climb to the top and jump to the small square ledge behind you. Notice the rotating mechanism ahead. Jump to grab it when the flat part faces you. Press the right direction key and wait for the mechanism to rotate until you reach the dump box. When it does so, jump to grab it. It will start rotating downwards, so quickly jump to grab the next dump box. Quickly shimmy to the right and jump to grab the bottom of the duct behind you. Traverse around the corner and wait for the steam of the pipe behind you to go off. Jump to grab the pipe and climb up a bit. Wait for the second steam to go off, climb to the top and jump to grab the top of the duct behind you. Traverse around the corner and jump to grab the crevice behind. Shimmy to the right and climb to the alcove above. Turn around and jump to grab the edge of the alcove you came from. Pull up and climb up the ladder. Go to the other side of the passage and climb up the next ladder. On the T junction, the right hand way leads to the top of the pit, but you do not have to go there. Go to the left to return back to the area with the glassed room. Back to the control room - Go up the stairs and enter the control room. Press the button of the Red and Green Fuses once. This move will make the hanging box return above the glassed room. Place the Blue Fuse to its slot and press the button. This will lower the hanging box, thus breaking the roof of the glassed room. Exit and, again, climb on the movable yellow box, then to the top of the glassed room. Drop into the room and get a pair of Pistols from the crate. Shoot the glass and exit. [Note: There is a shortcut you can take after getting the Green Fuse and avoid going back to the control room, re-arranging the hanging box and making your way to the bottom of the pit with all these jumps. Once you get the Green Fuse, jump to grab with your Grapple the ring as you would normally do. Slide down the Grapple line as much as you can and take a look below. Notice the duct on the left. You have to perform the wall run, but without gaining much momentum. When Lara reaches the spot above the duct, release to grab its handhold (as shown in this screenshot). Make your way down and go to the other side of the pit, where you will find the Blue Fuse. The way up is the same, so once you reach the top, go to the control room. The Green Fuse is now useless. If you have not used it at all, the hanging box should be exatcly above the glassed room. But if you have used it, press its button again to make the box return above the glassed room. Place the Blue Fuse to its slot and push the button to lower the hanging box, thus breaking the roof of the glassed room.] Getting two Secrets - Before proceeding with the level, let's go for a couple of Secrets. Follow the tunnel when you first entered this area to return back to the ledge next to the waterfall. Artifact #2 - Drop into the pool and climb on the boat. Shoot the the top part of the rope to break it and release the boat. Turn around and wait for the boat to reach the corner of the left hand wall. It will stop for some seconds, so jump to grab the ledge, then the next one. Jump to grab the upper ledge, then the one behind you. Traverse around the corner and jump to grab the ledge above the alcove with the boxes. Drop down and pick up the Artifact from behind the box. Relic - Jump into the pool and swim behind the waterfall. Climb into the tunnel and go up it to reach the opening above the pool. Shoot the ring that holds the right hand box. When the box falls down, its door opens and you hear the chime signaling the Secret. The other hanging box does not contain anything, so do not bother with it. Make your way down, enter the box and pick up the Chalice of Torment. Back to the area with the glassed room - Make your way back to the area with the glassed room. Follow the tracks to the left and go to the area with the second glassed room which is high on the wall. If the two rats are close, kill them. Also, if you want all the kills, you can go down in the pit at any time and kill the rat down there. Bear in mind though that you will have to make your way to the top of the pit the same way as you did before. Shoot the room's windows and go to the right. Climb on the box and jump to grab the ledge above. Traverse to the left, pull into the room and use the button to move the engine car. Drop down and approach the back side of the car. Climb on it and use it to move it along the tracks and take it back to the previous area. In the cut scene, Lara returns back to the area with the glassed room, only to find that the tracks are blocks by the hanging box. She gets off the car and Larson appears from around the crates, holding the Blue Fuse. Larson tells her that this is the end of the line, but Lara asks him to quit since this has nothing to do with him. Larson replies the same to Lara and tells her that the Scion belongs to Natla and she (Lara) got no business here. Lara does not have time for this and asks Larson to get out of the way or he dies, pointing her guns to him at the same time. Although Larson knows how bad Lara wants the piece, he cannot let her pass. In fact, he thinks that Lara would never kill him for it. Lara hesitates for a bit, but at the end replies that she is not who Larson thinks she is. Be prepared for the Interactive cut scene. Press the correct buttons to make Lara shoot Larson three times. If you do not do it, Larson will use his Shotgun and kill Lara. In the next cut scene, Lara approaches Larson who leaves his last breath and ends dead. She gets the Blue Fuse from his body and realises what she did. She really feels sorry for him. [Checkpoint] You now have the Blue Fuse in your backpack. Pick up the Shotgun from Larson's body and go to the control room again. Place the Blue Fuse to its slot and use the button to raise the hanging box and unblock your way. Exit and use the engine car. It will move on the tracks and, after turning around the corner, it will start working. When it reaches the end, it will break the wooden boards. Get off the car and enter the next room. [Checkpoint] Room with lava and ledges - Needless to say what will happen if you fall into the lava! Approach the end of the broken tracks and jump to the pillar on the left. Turn around and notice the guns on the rock beneath the tracks you came from. To reach them, jump on the vertical metal structure, then to the rock (as shown in this screenshot). Pick up a pair of Caliber Pistols and jump back to the metal structure. Jump to grab the ledge of the pillar you came from and traverse around the corner. Jump to grab the vertical pole behind you and climb to the top. Turn right and jump on the metal structure ahead. From there, jump to grab the ledge of the next pillar and traverse around the corner. Jump to grab the upper ledge and then jump to the stone ledge behind you. [Checkpoint] Notice the ring beneath the ledge ahead. Jump off the ledge and use the Grapple to catch the ring. Swing and jump to the slope ahead. Before sliding into the lava, jump to grab the horizontal pole. When you do that, the pole rotates 90 degrees. Artifact #3 - Turn around and notice the goodies on the opposite rock (as shown here). Swing and jump to land on the rock. Pick up the Small Medipack and the Artifact. Turn right and jump on the two metallic vertical structures. Jump on the slope and jump to grab the pole. When it rotates, swing and jump to the next slope. Before sliding to end, jump to grab the ledge of the pillar. Climb to the top and turn around. Jump off the ledge and grab with your Grapple the ring on the ceiling. Swing and jump to the alcove. Pick up the two Mini SMG's Ammo's and Large Medipack. Swing back to the pillar and jump to the tracks at the other side. The passage gets you an area with some rocks. [Checkpoint] Jump on the sloped rock on the right and before sliding down, jump to grab the opposite ledge. Climb up the rocks to the next area. In the cut scene, Lara enters the next area and draws weapons. This fat guy was hoping she would get here, because he wants to make her scream. Lara asks him to get out of her way or he will end up like Larson. The fat guy does not care about Lara's words and he starts approaching her. Lara points her guns to him when the skateboarder joins them who draws his weapons. Be prepared for the Interactive cut scene. Press the correct buttons to save Lara from the fat guy's attacks and skateboarder's shots. During that, Lara shoots the fat guy who falls down, but not dead. The skateboarder exchanges gun shots with Lara when the fat guy awakes and stabs the skateboarder, because Lara is his. Lara starts shooting him, but he manages to grab her. When he is ready to kill her, the skateboarder uses his last energy and shoots the fat guy who falls dead. Room with huge slope and vertical spires - Pick up a pair of Mini SMGs from the dead skateboarder. There are two movable boxes in this room. Push the right hand one towards the right rocks and climb up them to get a Large Medipack. Drop back down and push the left block towards the left rocks. Climb on the block, then to the first stone ledge. Jump to grab the crevice and pull onto the upper ledge. Jump to grab the next crevice and traverse around the corner. Then jump to the next ledge on the right. Before continuing to the next crevice, rotate the camera to spot the goodies in the alcove behind (as shown in this screenshot). Drop down, jump to the slope and before sliding down, jump to grab the edge of the alcove. Pull up and pick up the Large Medipack and two SMG's Ammo's. Now make your way to the top ledge of the rocks. Procedure/ Artifact #4 - You have to jump on the pressure spires with symbols and there are six of them; three on the left and three on the right hand side. The other spires will help your job. When you jump on a spire that has symbols, it sinks and you have to jump off before it reaches the bottom. If you stay there, Lara will slide down and you will have to start from the beginning. You have probably noticed the Artifact on the ledge at the other side (as shown here), but you have to jump from the spire with the symbols that is closest to the Artifact (as shown here). If this spire is down, you cannot get the Artifact and you will have to load a saved game. This page shows the procedure and includes detailed screenshots. (Note: It is possible to jump on all six spires and get the Artifact in one round. You can see a video here. Also, if you keep failing, continue with opening the door and let the game load the next level. The spires will rise up and will not sink when you jump on them. That way, you can get the Artifact easier. Even if you load the next level, the Artifact will register in your statistics. Thanks to SLAYER for the note.) Once you have step on all six spires, you have to make your way to the top and jump to the opening. Use the switch to activate the mechanism and open the door at the bottom of the slope. This ends the level.
|
||
| « Level 11: Sanctuary of the Scion | Index | Level 13: The Great Pyramid » |
| Last update: 24 June 2007: Detailed screenshots for jumping on the spires and getting the Artifact #4. 29 June 2007: Additional note for getting the Artifact #4. |
||
Tomb Raider: Anniversary Walkthrough & Game Guide © 2000-2007 www.tombraiderhub.com |
||