Level 14: Final Conflict
Kills: 9
Supplies: 24
Artifacts: 4
Relics: 0
Additional Secrets: 0
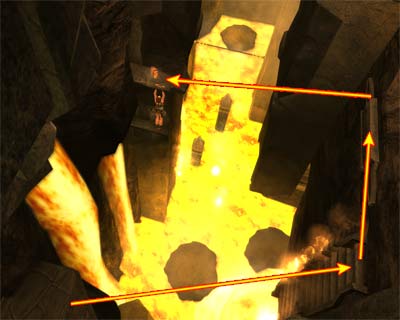
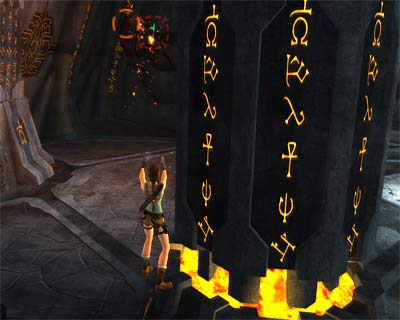
(Note: Those who have played and completed the original Tomb Raider should recognize the level as The Great Pyramid. Since Crystal Dynamics merged The Great Pyramid and Atlantis into one level, this one appears as the Final Conflict.) [Checkpoint] The level begins where the previous one left you. Enter the room. The cut scene shows Lara entering the room. She approaches the three pieces of Scion that rotate on an alter and moves to the other side. She takes a look at the ledge below and spots the big cocoon above. She looks further down and realises that she is at the top of the tall room she was climbing up before. Natla appears, telling her that Lara has reached the top and there is nowhere else to go but down. Four mutants guard Natla and Lara knows that Natla is rebuilding the army of Atlantis. Natla tells her that the pyramid breeds more than the soldiers Lara has faced and with the Scion she can create anything she desires. Lara then asks for what and Natla tells her that what stands in the way for the Seventh Age could not be destroyed by Tihocan and Qualopec. Since it takes Three to rule, Natla asks Lara to join her, but Lara thinks it is madness. Natla reminds her that this is what Lara has been searching for and the answers she has sought are within the Scion. Everything that Lara has done has led her to this place, so Lara is here because she belongs here. After thinking about it, Lara apolgises to her father. But she does not mean that she will join. Instead, she draws her weapons and shoots the Scion. Natla tries to prevent her and they both fall down. Lara throws her Grapple and catches the ledge above, while Natla is falling into the lava. When Lara pulls onto the ledge, a giant mutant appears from the cocoon. [Checkpoint] Dealing with the giant mutant - As soon as the level begins draw weapons, because you have to kill the giant mutant. You cannot do it straight away, since you first have to destroy its left hand. There are two bars at the top right of your screen. The yellow one is the health bar, but in this case it does not have to drop to zero. The red bar is the mutant's rage. When you shoot repeatedly, the bar starts filling, causing the mutant to become enraged. In this case, it will attack and you have to perform the bullet time. As you can see, there is only one side of the ledge that does not touch the wall. This has its meaning, because this part of the ledge leads to the lava pit below. The pattern is as follows: Make the mutant hang from the edge and shoot it until it falls down. The mutant hangs from the edge with the right hand and tries to pull up with the left one. You first have to destroy its left hand, so it cannot pull up. To do that, you must make the creature hang from the edge at least once. This means, that you have to stay close to the edge and shoot the mutant until it becomes enraged. When it attacks, perform the bullet time and it will roll over the edge. As a result, it will hang from the edge. The perfect time to do this is as soon as the level begins, because Lara stand with the pit to her back. So, start shooting until the red bar flashes, wait and when the mutant attacks, perform the bullet time by jumping sideways. Using the Shotgun is more effective, because two shots are enough to make the creature become enraged. When you do that and it pulls up, shoot it until it becomes enraged. When it attacks, perform the bullet time. If you do it correctly, an orange reticule will appear on its left hand. You must shoot its hand and destroy it. Depending on the weapon you use, you may have to repeat the same procedure (bullet time and shoot the orange reticule) a couple or more times. When the left hand has been destroyed, you have to make the mutant hang from the edge as described above. Since the hand that it uses to pull up has been destroyed, it will not be able to pull up. Shoot the hand it hangs from (the right one) until it falls down. If the mutant pulls up, it means that the left hand has not been completely destroyed. You have to repeat the same procedure (bullet time and shoot the orange reticule) until you destroy its left hand. In case the mutatnt grabs Lara and shallows her, start shooting. This will make the mutant spit Lara. If you are able during the battle, pick up the two Large Medipacks, Shotgun and two Mini SMGs Ammo. When you are done, the camera will show the mutant falling into the lava pit. Once the mutant is dead - When you kill the mutant, the door opens. Go through it and follow the tunnel to a lava river. [Checkpoint] Jump to the small ledge ahead and turn right. Jump to the next ledge and pick up the Large Medipack. Jump on the vertical structure ahead, then on the next one. Jump to grab the opposite ledge and pull up. Draw weapons and kill the mutant that flies from below. Use the switch to make the ledge slide inside the wall and extend another one beyond. When the second ledge stops, jump on it and enter the passage. Pick up the Shotgun Ammo and follow the passage. Before reaching the next room, a centaur will come from inside; kill it. [Checkpoint] Room with two lava pits - You have probably noticed the Artifact in the alcove prior to entering this room, but you will get it later. Pick up the Large Medipack and Shotgun Ammo in front of the closed door on the left and go to the other side of the room. Use the switch to close the door you came from and open the other one. This also releases a flying mutant from one of the cocoons, so kill it. Room with pool - Go through the door you just opened with your weapons drawn. [Checkpoint] When you kill the two mutants, go to the other side of the room and pick up the Shotgun and Caliber Pistol Ammo's. Artifact #1 and #2 - Jump into the pool and pull the underwater lever to extend a ledge to the right of the entrance. Surface and climb out of the water. As you approach the ledge, a mutant will get released, so quickly climb on the ledge and kill it from safety. Climb into the opening and pick up the Large Medipack. Climb into the next opening and push the movable cage to throw it down and into the room with the two lava pits. Before going down, turn around and notice the Artifact on the ledge. Jump there, get the Artifact and jump back to the opening. Drop to the room with the two lava pits and position the cage next to the stone pillar. Climb on the cage, then on the pillar. [Checkpoint] A flying mutant attacks, so take care of it. Pick up the Small Medipack and climb on the ledge above the entrance. Use the switch to open the door. Drop down and push the cage outside the room. Position it beneath the alcove. Climb on the cage, then into the alcove. Pick up the Artifact and drop down. Push the cage back inside the room and position it again next to the stone pillar. Climb on the cage, then on the pillar. This time, jump to grab the crevice above the lava pit. This and the rest two throw a kind of steam that can push you back, so quickly make your way to the crevice in the other corner. From there, jump and grab with your Grapple the ring on the wall. Perform the wall run to reach the crevice on the left. Traverse to the left and jump to grab the edge of the opening above. Pull up and pick up the Caliber Pistol Ammo. Drop to the lower room and pick up the Shotgun Ammo. Then drop to the room with the pool, this time behind some rocks. Jump to grab the stone panel with the symbols and it will slide down. Release and, before it goes up again, shoot the button to open one of the three circular gates in the pool. Use the rocks to exit. There two more stone panels that hide a button each; one at the far left and another one at the far right corner of the room. There is a laval pit beneath the right hand panel, so be careful not to fall down, because the last Checkpoint was created on the stone pillar in the room with the two lava pits. So, before using it, approach the entrance of this room (with the pool) to create an additional Checkpoint. Shoot both buttons to open the other two circular gates in the pool. When you use the left one, a flying mutant gets released, so kill it. [Checkpoint] Jump into the pool and swim through the gates, getting a Small Medipack on your way. Surface at the end of the tunnel and climb out of the water. Pick up the Caliber Pistol Ammo and follow the passage to a lava river. [Checkpoint] Area with lava river - Go down the passage and jump to the ledge on the right of the lava river. Be careful of the falling fire shots! Proceed ahead and jump to the opposite side. Turn right and approach the edge. Jump to grab the ladder and climb to the top. Jump to grab the crevice on the left and, before it releases the steam, jump to grab the alcove above. Before it breaths fire, jump to grab the crevice above, then the one on the left. Shimmy left and jump to grab the next crevice. Be careful here, because the lava waterfall can kill you if you touch it. Release to grab the ledge below. Pull up and pick up the Large Medipack. Hang from the edge and release to grab the lower ledge. Jump to grab the crevice behind you and release to grab the lower one. Then drop to the ground. (Note: From the top of the ladder, jump to grab the crevice that releases steam and quicly shimmy to the left and jump backwards to grab the ledge with the Medipack, as shown in this screenshot. Thanks to tanuki for the shortcut.) Artifact #3 - The two ledges in the lava river sink when you jump on them, so you have to be quick. When you reach the second one, turn right and jump on the safe stone ledge (as shown in this screenshot). Go behind the lava waterfall and pick up the Artifact. Then return back. Jump on the ledge in the lava river and, before it sinks, jump to grab the handhold ahead. Jump to grab the upper handhold and traverse around the corner. Jump to land on the vertical structure behind you and turn right. When the alcove stops breathing fire, jump to the next vertical structure. Jump to grab the horizontal pole, swing and jump to the ledge beyond. Before it sinks, jump to the safe ledge ahead. Turn left and jump to the next ledge. It will sink in a couple of seconds, so quickly jump to grab the ladder; climb to the top. Artifact #4 - (Before going for the Secret, you may want to proceed a couple of steps more and create a Checkpoint, in case you accidentally fall into the river.) Turn around and jump off the ledge. Use the Grapple to grab the ring on the ceiling and swing to the opposite side. Wait for the fire to go off and drop down to get a Large Medipack. Turn right and jump to the opposite stone ledge to get another Large Medipack. Then jump into the alcove on the right and pick up the Artifact. Make your way back to the top of the ladder and proceed to the next room. [Checkpoint] In the cut scene, Lara enters the room and Natla is flying from an opening above. It seems she survived from the drop, but it is obvious she has been burned. She is yelling at Lara because of what she did (for shooting the Scion) and tells her that she has waited for this moment for thousands of years. She also accuses Lara and tells her that her heart is black as hers (Natla's). Dealing with Natla (part 1) - After the cut scene, draw weapons. You cannot kill Natla now, but you have to bring her down. There are Shotgun and three Mini SMGs Ammo's to the left of the starting position, so go get them if you need them, although dealing with Natla can be done with the Pistols too. At this point, the only vulnerable part of Natla are her wings. So start shooting at them, side-jumping at the same time to avoid her fireballs. At some points, Natla will fly down and try to kick Lara. In this case, you can press the Crouch button to duck and avoid her. If you want to position Lara a bit higher so you can have a better range, you can jump and land on the side of a pillar (as shown in this screenshot). If you stay at the back of the pillar and not towards the center of the room, Natla's bolts will hardly get you (thanks to L.C for the tip). When half of her health bar is down, the next cut scene will play. The cut scene shows Lara approaching Natla. She spots a glowing part on her back when Natla awakes and grabs Lara from her neck. Natla tells her that she cannot die and throws her away. Sooner or later, Lara will run out of bullets. Dealing with Natla (part 2) - There are two bars at the top right of your screen. The yellow one is the health bar, so the fight ends when it drops to zero. The red bar is Natla's rage. When you shoot repeatedly, the bar starts filling, causing Natla to become enraged. In this case, she will attack with her wing, turning her back to you. You have to perform the bullet time and if you do it correctly, Natla will kneel, giving you some seconds to shoot the glowing part on her back and causing Natla's health bar to decrease. Another way to succeed this is the following: once Natla runs towards you and is about to approach, run towards her too and press Crouch to perform the bullet time. That way, Lara will jump over Natla and land behind her, making it easier to aim at her back (thanks to Mona Sax for the hint). Again, you have to avoid her fireballs while you increase her rage, by side-jumping. When Natla's health drops to zero, be prepared for an Interactive cut scene. Press the correct buttons to save Lara from Natla's attacks and make Lara shoot her. When Natla falls dead by a huge pillar that crashes upon her, Lara climbs up a fallen pillar in the cut scene in order to escape. In the next cut scene, Lara jumps into the water and swins to the boat. The pyramid at the top of the mountain explodes. Lara climbs on the boat and leaves.
|
||
| « Level 13: The Great Pyramid | Index | |
| Last update: 24 June 2007: Mainly cosmetic changes 29 June 2007: Shortcut in the area with lava river. |
||
Tomb Raider: Anniversary Walkthrough & Game Guide © 2000-2007 www.tombraiderhub.com |
||