England: Croft Manor
Kills: 0
Supplies: 4
Artifacts: 8
Relics: 0
Additional Secrets: 0
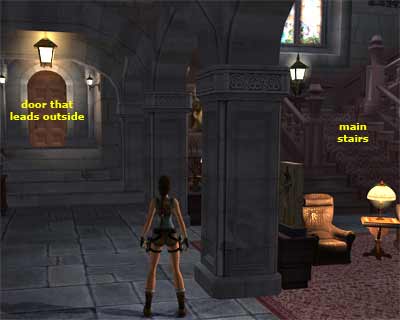
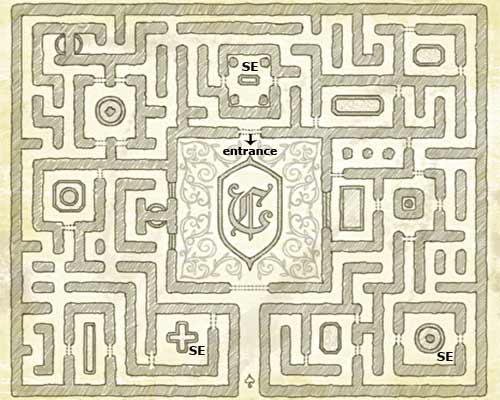
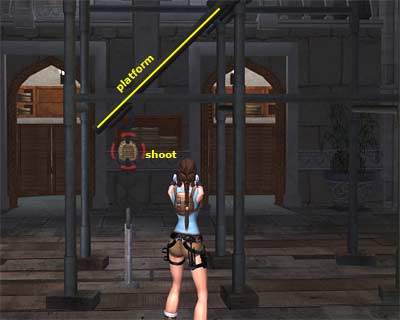
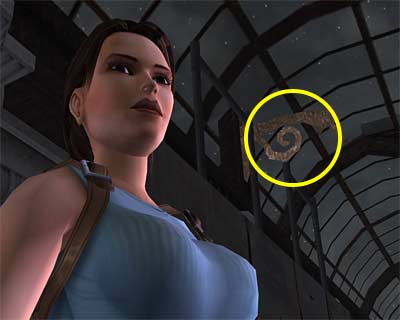
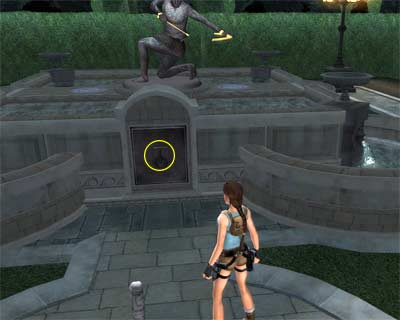
[Note: The Manor can be accessed at any time (before or after completing the game) and is basically a training level. It can be explored in any way you like, but the walkthrough covers the rooms without backtracking, unless it is necessary. You can quit the Manor at any time (there are various Checkpoints, but you cannot save manually) and keep the Artifacts and items you have found. However, if you restart the Manor, you will have all Artifacts, but not the various items (like the Medipacks, pick-ups, Grapple and Pistols).] In the cut scene, Lara enters the Manor and finds a note written by Winston (her butler). He apologizes about the mess in the foyer and explains that some antiquities arrived while she was out. He would put them in the Gallery, but the security alarm to the room has been activated, locking the room from the inside. He also tells her that the renovators shut off the water supply to the entire Manor in order to continue construction of the pool. On the bright side, he found Lara's missing journal and he put it in the appointed hiding place in her room. Main Hall - You begin the exploration from the Main Hall. Lara is standing in front of a table which has an open book. Go to the other side and press the Interact button to read the content. "... And even as their hooves shook the earth beneath him, Gilead gathered his remaining strength and drew back his BOW." -- The Trials of Gilead, Volume I. This is one of the three clues of the main puzzle. Also, notice that the word "BOW" is in capitals, which means that this is the most important thing from the clue. (Note: There are many open books around the Manor. Most of them include information about Lara's past adventures, whereas some others offer clues to the main puzzle. When you read a book and try to re-read it, Lara says something like "I've already read this one". However, if the book contains a clue, Lara will read the content again.) Go to the right side of the Main Hall (if the entrance is to your back) and step on the pressure plate. The camera will show you a small panel sliding down in the fireplace, revealing an item. If you step off, the panel will close. Go to the stack of crates and locate the movable one (as shown in this screenshot). Push/ pull it on the plate and the panel will remain open. You cannot get the item behind the fire now, so do not waste your time. Facing the crates, climb up the ones on the right until you reach the top. Jump to grab the painting and traverse to the left. Jump to the crates on the left and go around where you will find the Sculpture Gear. Climb down the crates to reach the ground. The main stairs (opposite the crates), lead to two balconies. Each balcony has two doors. From the left balcony, the first door leads to the Library and the second one to Lara's bedroom. From the right hand balcony, the first door leads to the Trophy room, but the door is locked and opens from inside, and the second door leads to the Music room, but you are missing an item in order to open the door. Library - Go up the stairs opposite the crates and up the next ones on the left. Open the first door and follow the hallway to the next door (if you want, you can read the books). When you enter the Library, the door behind you locks. You cannot exit from here, so you need to find another way. Go to the left and push the pink book to open the bookcase on the right that reveals a small alcove. Inside you will find the Maze Map. Get it and exit the alcove. Go up the stairs to the upper level. As you cross the balcony, notice the silver elephant behind the glass on the left. Continue to the next room and push the two pink buttons to open the bookcase in the middle and reveal a pair of Pistols. Get them and as you return back, read the open book from the middle stand on the left to get the second clue of the main puzzle. "As he struggled mightily to calm himself, Gilead removed the poison ARROW from its quiver." -- The Trials of Gilead, Volume II. As you can see, the word "ARROW" is in capitals. Exit the room and go to the right. Shoot the glass and get the Silver Elephant #1. Do not go down the stairs. Instead, go back to the entrance of the room and notice that the other side of the balcony has no railings. Jump from there to grab the painting. It will slide down, revealing a button. Jump back to the balcony and shoot the button to open a door at the bottom of the stairs. From the Library to the Trophy room via the secret passage - Drop down and go through the door you just opened to reach a secret passage. Go down the stairs and follow the hallway around to the left. When you reach the crates, take the Empty Bucket from the shelf on the left. Either shoot or climb up the crates and follow the hallway to reach a button. Push it to open the nearby door and enter the Trophy room. The glass cases include the Relics you have found until now from the game. If you have not played any level by now, the cases should be empty. Go up the stairs to reach the balcony and enter the small room. Shoot the glass at the far right and get the Sundial Gnomon. Read the open book from the right hand stand to get a clue of another puzzle. "The concept of the sundial has existed for thousands of years and is one of the earliest devices for time measurement." Then Lara says "There's some numbers written on the inside cover. 11, 2, 7. I wonder what they refer to?" Keep these numbers in mind, as you will need them later. Exit the room and go down the stairs. Use the keypad to the left of the door to unlock it and then open it. Follow the hallway and open the door at the end. You are back in the Main Hall, but you are standing on the right hand balcony (in front of the first door). Lara's bedroom - Go down the stairs, then up the next ones to reach the left balcony. Go to the second door and open it. Follow the hallway and open the door at the end to reach Lara's bedroom. To the right is the wardrobe and to the left is Lara's bed. Use the two swords to open the small circular door between them. Get the Journal and read the open book to the right of the door to get the third clue of the main puzzle. "And Gilead knew the GEARS of his heart would never turn again as he sacrified his one true love to save the kingdom he had fought for so long to protect." -- The Trials of Gilead, Volume III. As you can see, the word "GEARS" is in capitals. There is nothing else to do here apart from reading some books or changing into another suit if you have unlocked any. Once you are done, return back to the Main Hall the same way you came. [Note about the three clues (and some SPOILERS) - Until now, you have read three clues and got three words in capitals: BOW, ARROW and GEARS. If you have followed this walkthrough, you should now carry the Sculpture Gear which refers to the "GEARS" clue. This means that you have to find two more items.) Outside the Manor/ Sundial - To exit the Manor and reach the garden, open the door to the left of the main stairs (as you face them - see this screenshot). Go down the stairs and follow the hallway to the end. Open the next door and exit. Go to the center of the garden to reach a big sundial. Opposite the Manor is the maze, but the gates that lead inside are closed. Stand in front of the sundial and put the Sundial Gnomon on the pole. This will activate the sundial and you only need to display the correct time. Remember the three numbers you read from the open book in the Trophy room? They were 11, 2 and 7. Rotate the sundial so the gnomon points to XI (11), then II (2) and finally VI (7). Any other order will not do it. Every time you point a number, the corresponding block raises up. When you do it corretly, the gates open. Inside the maze - When you enter the maze, the camera focuses on an item. Refer to the Maze Map to move around. There are three Artifacts in the maze (Silver Elephants #2, #3 and #4) and their location is shown in this map. You need to reach the center of the maze, but the gates (opposite the entrance) are closed. So, you need to find another way and this is at the other side of the maze. When you enter, get the Grapple from the rim of the fountain. If you examine the middle statue, you will see two paintings on the floor; an ARROW and a BOW. If you have read the three clues by now, you should recognize them as two of the clues. Back inside the Masion - Exit the maze by opening the gates opposite the statue. Use the Grapple to catch the ring on the gates and pull it. This will save some time when you return back. Pass the sundial and return back inside the Mansion the same way you came. Library (2nd visit) - Go up the main stairs to reach the left balcony. Open the first door and follow the hallway. Open the next door to return to the Library for a second time. Use the Grapple to catch the ring of the chandelier above the desk and pull it down. This will open a door to the left of the entrance (as you face it). Enter the small room and pick the Silver Elephant #5. Return back to the Main Hall the same way you came. Gym - Open the door on the left of the fireplace. Follow the hallway to reach a courtyard with a dry fountain. Go through the opening at the other side to reach Lara's gym. This is where Lara exercises and you will use it to get some Artifacts and an important piece. (The following sequence is shown in this page.) Start from the blue mat with the number 1 on it. Jump to grab the horizontal pole and the structure will rotate 90 degrees. Swing and jump to grab the metal ledge ahead. From there, jump to grab the next ledge, then the horizontal pole behind you. Again, the structure will rotate 90 degrees. Swing and jump to grab the ledge ahead. Jump to grab the green handholds on the right and climb to the top. Press Jump to leap off the handholds and grab the ledge behind you. Pull up and pick up the Small Medipack. Push the button to raise four vertical metal poles. Jump to grab the handholds, climb down and drop to the floor. (The following sequence is shown in this page.) Now go to the blue mat with the number 2 on it. Jump to grab the crevice in the pillar, then the next one above, and traverse around the corner. From there, jump to the first low vertical metal pole. Before losing your balance, jump to the next vertical pole, then jump to grab the crevice of the pillar beyond. Jump to grab the upper crevice and traverse around the two corners. Jump back to grab the edge of the alcove and pull up. Pick up the Silver Elephant #6 and carefully drop down. (The following sequence is shown in this page.) Now go to the blue mat with the number 3 on it. Jump to grab the crevice in the pillar, then the next one above. Traverse to the left and around the corner and jump to grab the crevice above. Jump back and use the Grapple to catch the ring on the wall. Perform the wall run to reach the crevice above the alcove on the left. Traverse around the corner and release to grab the ledge below. From there, jump into the alcove and use the button to rotate a horizontal pole that will give you the access to the next Artifact. Slide down to the ground. (The following sequence is shown in this page.) Again, go to the blue mat with the number 3 on it. Follow the same procedure until you catch with your Grapple the ring on the wall. This time, you have to perform the wall run and jump to the slope opposite the wall. The markings on the wall will help you here, as they show that Lara has done it before. Perform the wall run, following the width of the markings. When Lara reaches the left end of the markings, jump on the slope. If, while moving Lara, the camera faces the wall and you press the right and left direction keys, press down and Jump when Lara reaches the left end of the markings. Once you land on the first slope, jump to the next one. Again, jump to grab the horizontal pole that will rotate 90 degrees. Turn around, swing and jump into the alcove. Pick up the Silver Elephant #7 and slide to the ground. (The following sequence is shown in this page.) Once more, go to the blue mat with the number 3 on it. Jump to grab the crevice in the pillar, then the next one above. This time, traverse around the corner to the right. Jump to grab the upper crevice and jump back to grab the crevice behind you. Traverse around the two corners to reach the metal ledge. Jump to grab the next metal ledge on the right and release to grab the lower one. Shimmy to the right around the three corners and jump back to grab with your Grapple the ring on the wall. Perform the wall run to reach the crevice in the right hand pillar. Then traverse around the two corners. Jump back to grab the horizontal pole which will rotate 90 degrees. Swing and jump into the alcove. Pick up the Large Medipack and push the button to rotate another pole above the mat with the number 3 on it. As you exit the alcove, jump to grab the green handholds on the left. Climb down and drop to the ground. (The following sequence is shown in this page.) For the last time, go to the blue mat with the number 3 on it. Jump to grab the crevice in the pillar, then the next one above. Again, traverse around the corner to the right. Jump to grab the upper crevice and jump back to grab the crevice behind you. Traverse around the two corners to reach the metal ledge. Jump to grab the next metal ledge on the right, but this time jump to grab the horizontal pole behind you. Swing and jump to grab the next pole (the one you rotated before). Swing and jump to grab the vertical hanging pole. Turn left and jump to grab the next hanging pole. From there, jump to land the first taller vertical metal pole, then to the next one. Jump on the ledge and pick up the Wrench. Carefully, make your way to the ground. Outside the Manor (2nd visit) - Exit the gym to the small courtyard and return to the Main Hall. Again, open the door to the side of the main stairs and follow the hallway to return outside. Pass the sundial and go to the other side of the garden where the machine that handles the water supply is. Use the Wrench to position it on its place. Then press the Interact button again to turn the valve and activate the machine. This will turn on the water supply to the entire Manor. Approach any falling water and use the Empty Bucket. Lara will fill the bucket with water and your inventory will now include the Bucket of Water. Back inside/ Fireplace - Make your way back inside the Manor. Approach the fireplace and use the Bucket. Lara will pour the water and extinguish the fire. Now you can get the Decorative Arrow from the back. You have pushed the movable crate on the pressure plate as described at the beginning of the walkthrough, haven't you? This will make the panel to remain open, so you can get the item. (This is the item that the "ARROW" clue described.) Pool house - Open the door on the right of the fireplace. Follow the hallway and open the next door to reach the area with the pool. As Winston said, the pool is under construction; that's why you see the scaffoldings around. (Note: You can also complete the pool house before turning on the water supply.) As you enter, locate the red dump box on the left. Pull it until the wooden boards on the floor stop you. Do not move it further, because it is not necessary. Go to the other side of the room and locate the half-turned platfrom. A chain holds it to this position, so shoot the chain to release the platform (as shown in this screenshot). Climb up the stack of crates in the far right corner and jump to grab the horizontal pole. Swing and jump to grab the small circular balcony. Traverse to the other side and jump to grab the wooden boards behind you. Traverse around the corner and jump to grab the scaffolding behind you; pull up. Balcony with Athena statue - The nearby statue holds a pole with a kind of handle (as shown here). Jump to grab it and Lara's weight will lower the pole. When you reach the ground, make your way back to the last scaffolding (just before jumping for the handle). This time, jump to grab the pole you lowered, swing and jump to grab the balcony with the Athena statue. Pull up and grab the red box with the LUG letters written on it. Push/ pull it on the circular plate at the other side of the balcony. Once there, rotate the box and the Athena statue, so their poles create an X (as the floor shows). When you do that, a panel at the back rotates, which reveals a button. Shoot it to open one of the two gates in the pool. Go to the end of the balcony, behind the boxes, and pick up the Large Medipack. Also, shoot the base of the nearby rope. As you can see, the rope holds the statue above the pool, but there two more ropes. Go back to the other side of the balcony and jump to grab the pole that the statue holds. Swing and jump to grab the wooden boards ahead. Traverse around the corner, jump to grab the scaffolding behind you and pull up. Since you have moved the red dump box on the floor, the vertical pole should be accessible from here. Jump on it and, before losing your balance, jump to the opposite scaffolding. Go to the other side and take a look on the right above to spot the architectural ring (as shown in this screenshot). Jump off the ledge and use the Grapple to catch the ring. Perform the wall run to reach the scaffolding on the right. Locate the movable crate and push it to throw it to the ground. That way, if you accidentally fall down, you will not have to take the long route back. Balcony with Atlas statue - Go to the balcony with Atlas statue. Use the Grapple to catch the ring at the front of the statue and pull it. This will make the ball fall down and it will roll to the circular pressure plate. When this is done, the second gate in the pool opens. Go to the other side of the balcony, behind the boxes, and pick up the Small Medipack. Also, shoot the base of the second rope that holds the statue above the pool. Go back to the scaffolding you came from and turn left (where the crate initially was). Remember the half-turned platform you released? Jump there and quickly jump to grab the wooden boards ahead. Traverse to the right and around the corner and jump to grab the boards behind you. Shimmy left and jump to the small sircular balcony behind. Shoot the third rope that holds the statue. The latter will fall down and break the boards on the floor, revealing the pool below. Go down and jump into the pool. Swim down and get the Decorative Bow from the broken statue. Surface if you want and swim through the opening. Halfway the tunnel you will find the Silver Elephant #8. There is a lever at the end of the tunnel that opens the nearby door which leads to the gym. You can either go there or return back to the pool house. Whichever way you choose, return back to the Main Hall of the Manor. Outside the Manor (3rd visit)/ Maze again - Once again, exit the Manor by opening the door to the side of the main stairs. Enter the maze and go to the statue in the area in the middle. Use the Decorative Bow and Arrow, by standing on the corresponding paintings on the floor. Go to the front side of the statue and use the Grapple to catch the panel (as shown in this screenshot). Pull it to reveal some gears behind. Place the missing Sculpture Gear and use the lever. The statue will use its bow and throw the arrow to the other statue on the right. The latter will lower its hand and the Music Box Cylinder will fall to the ground. Go and pick it up. Inside the Manor/ Music room - Make your way back inside the Masion. Go up the stairs to reach the right hand balcony. Open the second door and follow the hallway to the next door. Place the Music Box Cylinder to the receptacle. It will play the correct music which will unlock the door. Open it to enter the Music room and end the exploration. Lara can play to the various instruments and if you use the stereo, you can select one of the various themes you have unlocked until now.
|
||
| Index | ||
| Last update: 29 June 2007: Mainly cosmetic changes. | ||
Tomb Raider: Anniversary Walkthrough & Game Guide © 2000-2007 www.tombraiderhub.com |
||