Tomb Raider 1: Atlantean Scion Walkthrough & Game Guide
Level 2: City of Vilcabamba
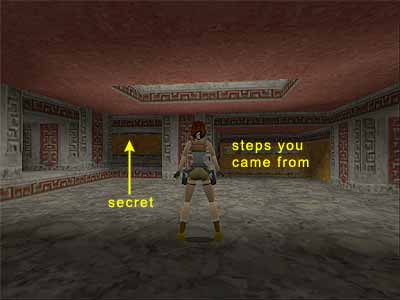
As soon as the level begins, the stone doors ahead open. Draw weapons and enter the room beyond. Four wolves will attack: the first will come from the far left, the other two from behind and the last one from the far right. You may have troubles with them, as they attack all together. One way to deal with them is to run to the left and jump or dive into the pool. When the area around is clear, climb out of the water and shoot. If they approach, drop back into the pool. Once you kill them all, go through the passage the last wolf came from (far right if the entrance of the level is to your back). In the next room, you will have to deal with one more wolf. Here you can see two openings. As you face them, go through the right hand one to reach a narrow passage. Kill the three bats and continue to the end of the passage. Stay sharp because a wolf may attack before you get the Small Medi Pack from the greenery. Once the wolf is history and you have retrieved the Medi Pack, continue through the passage until Lara comes across a closed door with a keyhole on the right hand wall. Beyond you will have to kill five more bats and once they are dead, go up the two steps and around the corner on the left. Take the first left (the area ahead leads to the beginning of the level) and kill one more bat. When you reach the end of the passage, turn around and kill yet another bat. Area with pool - Exit to the area with the pool. There is a room on the right hand side, which has two openings. Between the openings you can see a wooden trough. Go through the right hand opening and quickly run diagonally to the right to climb on the wooden ledge. Kill the bear from above and pick up the Small Medi Pack. Then drop back down and exit to the area with the pool. 1st Secret - Jump into the water and swim through the tunnel. On the T-junction, go right. You reach an underwater room with several pillars. Swim to the far right corner, where you will find an underwater lever. Pull it to open a trapdoor exactly above you. Surface to get some air, but before climbing out, swim back down and diagonally to the other side of the room, where you will find another underwater lever. This opens a door elsewhere, which gains you access to the level's second Secret that you will get in just a bit (this image shows the location of the two levers). Swim back to the trapdoor and climb out of the water. Pick up the Small Medi Pack and use the switch to open the door. Exit to the area with the pool. 2nd Secret - Jump into the pool again and this time go left at the T-junction. Follow the tunnel until you can surface. Climb out of the water and go through the door you opened by using the second lever before. Inside, you will find a Small Medi Pack and some Magnum Clips. Make your way back outside the same way you came. With the wooden trough to your back, locate the switch on the far right. Use it to open the nearby door. Go through it and up the steps. Take a running jump to the opposite opening, pressing Action to lower Lara's arc if necessary. Drop to the decrepit floor below and run. Jump at the edge to land on the ledge with the Large Medi Pack in the alcove. If you miss the jump, pull the movable block once, climb on it, then climb to the ledge with the Medi Pack. Push the movable block through the passage until you reveal the room beyond. Kill the bat and continue to the other side. You will find a Silver Key and a Gold Idol in the two back alcoves. When you get them, climb on the movable block, then onto the ledge above. (The PS players will find a Save Crystal here.) As you move around to the left, you will have to deal with two more bats. Pick up the Large Medi Pack from the dark corner on the left of the opening. Then climb into the opening and drop down. Return to the area with the pool. Go through the passage where two stone idols flank the entrance. Use the Key you just got to open the door. Enter carefully. A dart trap has been set up here. If you use the Walk button, you will be able to first trigger the darts, then carefully pass them. Before entering the next area, draw weapons. Again, enter slowly. As you pass through the opening, turn right and kill the first wolf. Continue slowly and Lara will aim at a wolf on the left. Kill it and proceed ahead. Kill the third wolf that wakes up from the left and the final two that come from beyond. Go up the steps. Left hand opening - The only accessible opening for now is the left one. Go through it and follow the passage to reach a room with a pool. Go up the steps on the left hand side and jump to grab the ledge. Pull up and jump to the ledge in front of the opening. Go through it and up the steps. When you come to the next opening, a bat will attack. Kill it and take a running jump to the opposite ledge. Go through the opening and up the steps. When you enter the next room, a second bat will attack. Kill it and pick up the Small Medi Pack from the corner. Then use the switch to open the right hand door below. Exit, hang from the edge and drop to the rocks below. Pick up the Shotgun Shells and carefully drop to the red\ orange platform. Pick up the Small Medi Pack and drop to the ground. Right hand opening - Go through the right hand opening to reach another room with a pool. Go left and jump to grab the square ledge. Pull up and take a standing jump with Action to grab the next ledge. That way, you will not have to deal with the decrepit crumbling floor ahead. Pull up and turn around. Jump up to grab the ledge above and pull up. Draw weapons and kill the bat that comes from the opening on the right. Go up the steps and use the switch to open the middle door. Exit (the PS players will find a Save Crystal here), hang from the edge and drop to the rocks below. Drop to the red\ orange platform and then to the ground. Middle door - Go through the middle door and continue cautiously. There are three moving blades in the hallway. Stand on either side and when the blade moves to the other side, run past it. At the end you will see a closed gate and a switch. Use the switch and a trapdoor beneath Lara will open, dropping her into a pool. Swim down and forwards, where you will find a place to surface. Do not climb out of the water. Instead, swim through the opening to find another place to climb out. Do that and go up the steps. Exit to a ledge above the pool and use the switch to open a gate with an Idol symbol. Walk up to the edge of the ledge and kill the bear from here. Drop down, but before placing the Idol to the receptacle, let's go for the level's final Secret. 3rd Secret - Facing the Idol symbol, go left and up the steps. Here you will find a switch that stops the moving blades, but obviously there is no reason to go back. Facing the steps you came from, enter the passage on the left (as shown here) and climb down the blocks. Pick up the Uzi Clips and return back to the pool the same way you came. Place the Gold Idol to the receptacle. This opens the Idol door that you can go through and progress to the next level.
|
||
| « Level 1: Caves | Index | Level 3: Lost Valley » |
| We would like to thank Nicky for her help. Many parts of this walkthrough would not have been written without her participation. Special thanks to George Maciver for proofing the text. Last update: 16 Dec. 2006 |
||
Tomb Raider: Atlantean Scion Walkthrough & Game Guide © 2000-2007 www.tombraiderhub.com |
||