Tomb Raider 1: Atlantean Scion Walkthrough & Game Guide
Level 4: Tomb of Qualopec
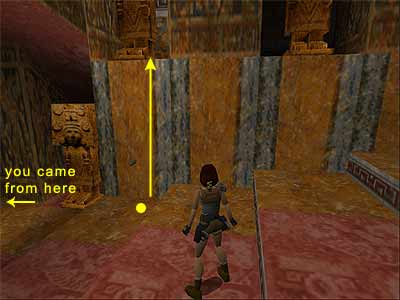
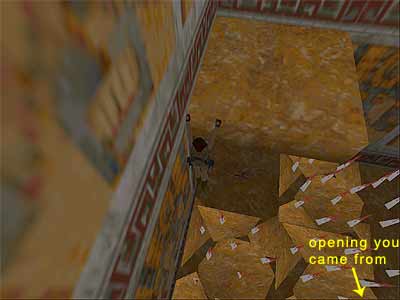
Follow the tunnel until you reach an impressive room with two visible passages and one closed door on the right hand side. Walk forwards and go up the ramp to trigger a boulder. Immediately roll and run-jump, cutting to either side in order to avoid the boulder which ends up in the tunnel you just came from. Now face the tunnel and locate the switch on the left. Use it to open the closed door and release two raptors. The Shotgun may help your job here. If you examine the other two passages, you will see that the left one (if the tunnel you came from is behind you) has three closed gates. You need to find and use three switches to raise these gates, something that you will do now. Go through the door you just opened. (The PS players will find a Save Crystal here.) This gets you to a square room with a crossed intersection. Excluding the opening you came from, each one leads to one of the switches you are looking for. You can complete each part in any order you like. We will start from the left hand one and move clockwise. Left hand opening (bird symbol) – Go through the left hand opening to reach a room with a switch. Do NOT use it yet. Drop into the room below, which has two tall blocks and spikes in the corner. Go through the opening on the ground and up the steps. You will reach the top of one of the blocks. Turn right and jump to grab the edge of the opening; pull up. Then and climb up the several blocks. Follow the passage and climb down, hearing a door opening as you do so. Here you have two ways to follow. Go to the tall block (west - the other way leads to the door you heard opening), turn right and jump into the opening. Go around to the left and use the switch to move the first block. Drop down into the room and climb into the opening you came from. Now use the switch you ignored before to move the second tall block. The door you heard opening before is on the right side of the switch. Go through it and climb up the blocks. Drop down on the other side and take a running jump to the first block. Take another running jump to the second, which is now next to the spikes, and another running jump to the opening on the right. Use the switch to open the first gate. Be careful as you exit and do not forget the spikes below. Jump over them, cross the room and climb into the opening you came from. Draw weapons and be prepared for the raptor that will attack. Stay inside the passage that leads back to the crossed intersection and start shooting when the raptor appears. Middle opening (sun symbol) – Go through the middle opening to reach a room with a switch in an alcove. Beneath the switch, you can see the decrepit crumbling floor. Do not bother with the switch, because it does not do anything. Step on the decrepit floor and hop back before it collapses. If you wait for a bit, you will hear some growlings. These come from the three wolves in the room below. For a quick "take out", equip the Shotgun. Hang from the edge, drop down and kill them. Go up either of the ramps and pull the movable block, then push it to the side. Go up the steps and drop into the pit, where you will find a Small Medi Pack. Climb up and go up the steps. Pick up another Small Medi Pack from the room's corner and use the switch to open the second gate. Hang from the edge of the opening and drop down. Turn around to return to the crossed intersection. Right hand opening (face symbol) – Go through the right hand opening, which leads you to a small room with a low block and a movable one. Push the movable block twice. Then push the second movable block that you meet on your left. Run over the decrepit floor (that reveals a spiked pit below) and use the switch to open the third gate. Jump over the pit and return back to the crossed intersection. (Note - If you are a new TR player and are having problems with the last jump, make sure you press the Up direction key until Lara reaches the opposite side. You can take a running or standing jump. If you still have problems, press Action after you take off in order to grab the edge. Then pull up.) Once the three gates are open - Return back to the room where you started the level and go through the passage that was previously blocked by the three gates. (The PS players will get a Save Crystal on their way.) The next room contains dart traps so be careful. Walk to first trigger them and then pass them carefully. There is also a dart trap on the first step of the stairs. 1st Secret - When you reach the second step, stop and turn left. Take a look in the alcove above the dart trap (to the side where the dart comes out from the wall). Carefully stand on the right hand side of the dart and jump up to grab the edge of the alcove (see this screenshot to get oriented). Pull up and go behind the statue. The door will open automatically. Be careful as you enter. There are decrepit crumbling floors with spikes below everywhere, apart from the far left corner, where the Shotgun Shells are laying (or the Shotgun if you do not have it). 2nd Secret - Do not leave yet. Turn having the opening you came from to your back and hang from the edge of the ledge. Shimmy to the very left, where there are no spikes below (as shown here). Drop down and pick up the Magnum Clips. Walk through the spikes and climb through the opening you came from. If you do not want to lose health at all, pull up from the right hand side of the opening. Return back to the stairs. Throne room - Go up the steps and enter the throne room with your weapons drawn. Lara will aim at a mummy. It will not attack Lara, but if you want all the kills, you have to shoot it until it falls. If you approach it, the mummy will fall down, but it will not count as a kill in the level's statistics. Get the Scion from the pedestal. This causes a quick earthquake, blocking the way you came from. (Bug note - If after getting the Scion you save the game and load it, the Scion will re-appear on the pedestal. You can get it again, and re-load the game as many times as you want, getting multiple Scions at the same time and increasing the number of pick-ups.) Approach the gate and it will open automatically. Go down the ramp and proceed carefully. Rocks will fall from the ceiling in the room you started the level, so Walk and they will fall in front of Lara. Enter the tunnel where you started the level and go through the now open door to return back to the pool of Lost Valley. (The PS players will find a Save Crystal in the tunnel.) 3rd Secret - Before climbing out of the water, swim through the opening on the right hand side of the pool that has opened up due to the earthquake and through the tunnel. Surface and climb out of the water. Pick up the Small Medi Pack and the Magnum Clips. Jump into the water and swim back to the pool. Climb out of the water, avoiding Larson, and quickly enter the cave opposite the pool and follow the twisted passage. Climb up the tall rocks (the way to the Valley is now blocked) and pick up the Large Medi Pack. Return back to the entrance of the cave and shoot Larson from there. When he falls, the level ends. In the cut scene that follows, Lara approaches Larson (since she disarmed him). She makes a comment and says that he has her attention now. Larson does not reply and Lara points her gun at his head. After having a small conversation about the Scion, Lara asks him where everyone else is. He tells her that Natla has sent Pierre on business and Lara asks for the location. He tells her that he does not know and that she has to ask Natla. He then spots his gun on the ground. He tries to get it, but Lara does not let him and kicks him, leaving him unconscious. "Thank you, I will!" she says, then leaves Peru.
|
||
| « Level 3: Lost Valley | Index | Level 5: St. Francis' Folly » |
| We would like to thank Nicky for her help. Many parts of this walkthrough would not have been written without her participation. Special thanks to George Maciver for proofing the text. Last update: 16 Dec. 2006 |
||
Tomb Raider: Atlantean Scion Walkthrough & Game Guide © 2000-2007 www.tombraiderhub.com |
||