Tomb Raider 1: Atlantean Scion Walkthrough & Game Guide
Level 7: Palace Midas
* Plus 1 Large Medi Pack that you can get by performing the "corner bug".
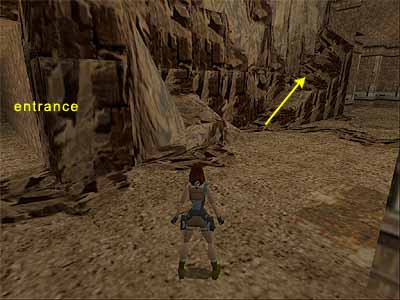
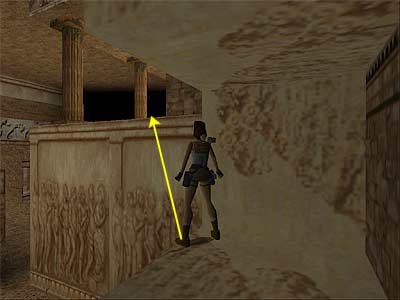
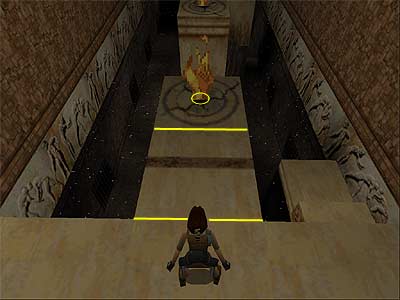
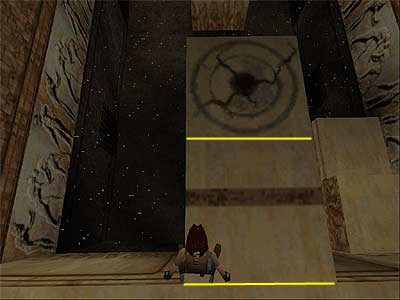
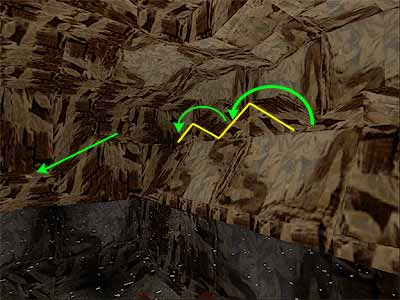
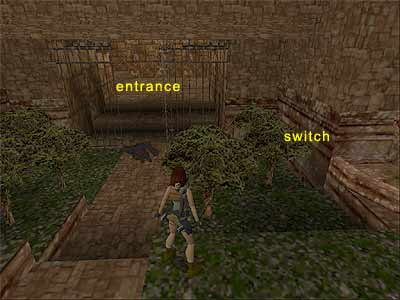
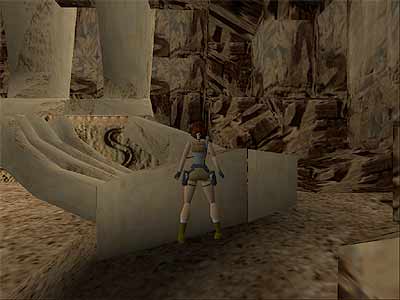
The level begins with Lara swimming through the tunnel of the previous level. The gate opens as you approach and you reach a pool which is decorated with dolphin tiles. Climb out the water. Area with rocks and alcoves - There are three openings you can follow here, but for now go through the one which is on the same side as the gate you just swam through. Draw weapons and kill the crocodile. Beyond you can see the stairs, but do not go up them yet. Follow the tunnel on the side, then the passage to emerge in an area with alcoves. Draw weapons and go to the left. Run up the rocks on the left hand wall (as shown here) and kill the two lions that attack. It is possible only one of them will attack while the other will remain frozen in the alcove. In that case, you need to approach it cautiously and jump back to the rocks. Go to the leftmost alcove and kill the four bats. Then pick up the Small Medi Pack from the left and return to the entrance of the area. There is a passage on the right hand side, which includes two sets of Magnum Clips guarded by a gorilla. If you start shooting immediately, you will not have a problem. Once you get the Clips, return back to the stairs you bypassed before. Room with pillars and door puzzle - Go up the stairs and through the tunnel. Just before entering the next room, three gorillas will appear. Usually two of them attack together and the third one stays on the right. Staying at the entrance and shooting whilst jumping backwards may prove effective in dealing with them. Now enter the room. Understanding the puzzle - If you take a look on the doors, you will see two Greek letters above: omega and ypsilon. In a while you will have to re-arrange some switches and open one door at a time. The omega letter corresponds to the switch up and the ypsilon down. With the entrance to your back, go to the far right corner and climb on the stone block. Turn around and take a running jump to grab the first pillar. Pull up and take another running jump for the second pillar. Turn left, jump to grab the ledge and pull up. Walk up to right hand edge and take a running jump to grab the opposite ledge. Pull up and pick up the Small Medi Pack and Magnum Clips. Jump to grab the previous ledge and pull up. Run off the ledge to land on the second pillar you came from. Turn left and take a running jump to the third pillar. Take another running jump to grab the fourth pillar and pull up. Jump to the fifth pillar and take a running jump to land on the sixth one. Then jump to the switches. (Note - If you accidentally fall down and/ or do not wish to take the long route, you can climb on the stone blocks in the far right - northeast - corner and take a diagonal running jump to the platform with the switches. To do that, face the way the platform is and walk to the front left corner. Turn 45 degrees to the left and perform the running jump with NO Action, turning right in midair if necessary to land on the platform. This screenshot shows the correct position.) The unreachable Large Medi Pack - When the level was built, the designer thought that this Medi Pack would be reachable, but it was found un-reachable from the level testers. Then they decided to leave it there as a joke. You can find the Medi Pack on a stone block on the left hand side of the five switches (as you face them). The location is shown in this screenshot. If you know how to perform the "corner bug", which was originally found by Jason McAllister, you can apply it and get the Medi Pack. If not, check this page. Re-arranging the switches - You can go through the doors in any order you like. We start from the one on the north wall and move clockwise. Before using the switches, go down the steps and use the switch there to open the nearby gate. That way, you will be able to reach the five switches quicker. In case you do not have the Greek font installed on your PC, we have included a small image in the brackets, which shows the letters for each door. ΥΩΩΩΩ - Door on the south wall\ 5 burners (letters) - Facing the five switches, use the leftmost only. That way, you will have Down - Up - Up - Up - Up. Go down the steps and then through the door you opened. Here you can see the burners on the pillars, but before trying anything, go down the steps and kill the three rats in the pool. The following sequence includes a timed run and you will most probably fall into the water the first couple of times. (The PS players will find a Save Crystal here.) Then go back to the top. You can see five burners. The first is on the starting ledge, the next three on the pillars and the fifth on the last ledge beyond. When you step on the tile with the brown line, the burners shut off. Once you step off, the countdown starts and you have about 12 seconds to make it across and get the Lead Bar #1. Saving during the process (whilst in midair) does not help, because on loading the game, the burners are on (at least on the PC version). You will probably find your own way across, but here are two methods: • Stand outside the tile that turns off the burners and position Lara in the middle, facing the black hole of the burner (as shown in this screenshot). Start running. On passing above the tile with the brown line, the burners shut off. When you pass the brown line, press Jump and Lara will jump, starting from the black hole. Do not let go of the Jump and Up buttons. Have these two keys compressed and press the right and left arrows to maneuver Lara and make her land on the second and third pillars (which have the third and fourth burners). With the Jump and Up buttons still compressed, turn Lara so as to face the last ledge with the fifth burner. She will jump off the pillar, but because the distance is wider, you will need to press Action and grab the ledge. Then pull up and jump forwards to pass the burner. • (Health loss) Stand in the back left corner of the tile with the brown line (as shown in this screenshot). The burners will shut off, but the countdown does not start if you do not step off. Now run and when you reach the black hole, jump letting go of the Up button whilst in midair. Lara will land on the back left corner of the first pillar (second burner), and by letting go of the Up button you will make sure Lara will not run at all. Turn her right and run-jump to the second pillar (third burner), turning right in midair and letting go of the Up button in order to land in the back right corner. Turn left and run-jump to the third pillar (fourth burner). You will land in the middle of the pillar, but you do not have time to step backwards for the final running jump, so drop backwards and grab the edge of the pillar. Now shimmy to the either left or right. Pull up and take a running jump to grab the last ledge. As you run next to the fire, you will lose some health, but you will not be burnt. Again, shimmy to the either left or right, pull up and run\ jump forwards. Pick up the Bar (and a Save Crystal for the PS players), jump into the water and use the steps to climb out. Exit the room and kill the gorilla that is now running around. Then go back to the switches. ΩΩΥYΩ - Left hand door on the west wall\ room with tall pillar (letters) - Re-arrange the switches and use the third and fourth ones. That way, you will have Up - Up - Down - Down - Up. Go down the steps and then through the door you opened. You enter a room with a tall pillar in the middle. Go through the opening on the other side and then down the steps on the right. Pull the movable block once. This will make the room with the pillar shake and the ceiling will collapse. Go up the steps you came from and then the next ones on the other side. Vault onto the low ledge that overlooks the room with the now broken tall pillar. Take a look on the right below to spot the flat stone block. Aim for it, step back once and take a standing jump there. Move a bit to the right and jump to the next flat ledge, which is next to you. You cannot reach the opposite one, so take a running jump to the broken pillar, then to the ledge on the other side. Jump to the platform and take a diagonal standing jump into the opening. Climb up the stone ledges to reach an opening opposite an aqueduct (which has a Save Crystal for the PS players). Two gorillas lurk over there and you will probably aim at a third one below. Stay here and kill the two on the opposite walkways, plus the two bats that join them. Then take a running jump to the aqueduct. Two crocodiles are swimming in the water, so get rid of them too. 1st Secret - Jump into the water and swim through the tunnel to reach a cave. Climb out of the water, using the right hand ledge. Climb up the rocks on the left and proceed forwards until you reach a slide. Stand against it and jump over it. Keep pressing the Jump button and Lara will jump over a second slide. Go to the left and pick up the Small Medi Pack and Magnum Clips (see this screenshot if you are not sure where to jump). Jump into the water and swim back through the tunnel. Climb out of the water and go to the part of the walkways opposite the opening you came from. 2nd Secret - Facing the opening, take a look below on the left to spot the pick-ups. Hang from the walkway and drop down (as shown here). Pick up the Small Medi Pack, Shotgun Shells and Uzi Clips. If you did not kill the gorilla before, do it from here by shooting whilst jumping up and down. Then take a standing jump to exit. Pass the openings on the right and check the second alcove for a Small Medi Pack. Pick it up and return to the openings. Use the left hand one to jump to the ledge. Draw weapons and kill the gorilla that attacks. Stay sharp, because a second gorilla will emerge as you proceed. At the end, turn right and notice the Large Medi Pack in the alcove. Take a running jump to grab the edge and pull up. Pick up the Medi Pack and drop backwards to hang from the edge. Shimmy to the left and drop onto the ledge. Two bats will fly from above, so kill them. Be careful not to accidentally slide down. You will have to either load a saved game or take the long route back. Back at the beginning/ ledges above - Take a running jump to the opening on the opposite side. Go through the passage and up the ramps. Climb up the two ledges to reach a room with crumbling floors and a Large Medi Pack. If you fall through the floors, you will land into the pool where you found the 1st Secret. Take a standing jump to the Medi Pack, pick it up and jump to the other side. Slide down the ramp and drop into the cave below. Go down the rocks to reach the walkway above the pool at the beginning of the level. A lion will charge from the opposite opening, so start shooting before it reaches you. Go around the walkway and through the opening the lion came from. The way will lead you to a pillar, so be careful not to fall down, because this area is at the beginning of the level and you surely do not want to go there. Turn right and take a running jump to the next pillar. Do not hesitate to kill the two gorillas that run around on the ground. Enter the cave, but before dropping into the water, draw weapons for a crocodile. Once it is dead, jump into the water and swim through the tunnel. Climb out of the water and go up the ramp to an opening. Kill the two bats and jump to the roof of the building. Go to the other side and pick up the Lead Bar #2. (There is a Save Crystal for the PS players here). Two lions and two gorillas are waiting on the ground. Kill them from above or jump to the rocks on the right hand side and kill them from safety. Pick up the Large Medi Pack from the entrance of the building. The door opens as you approach, so go through it and use the switch to open the gate of a Garden you have not been in yet. (The PS players will find a Save Crystal here). Exit and go down either of the steps. Three gorillas are running around here, so kill them all. Exit to the room with the pool and go to the left through the tunnel. Then go up the steps to return to the room with the five switches. ΩΩΥΩΥ - Right hand door on the west wall\ room with spikes (letters) - Re-arrange the switches and use the third and fifth ones. That way, you will have Up - Up- Down - Up - Down. Go down the steps and through the door you opened. Be careful with the spikes. Walk, if necessary, through them and enter the opening on the right hand side. There is a movable block on the right of the ramp. Pull it twice to reveal a passage with a switch. Use it to raise six pillars in the room with the spikes. Go up the ramp and up the steps to reach an opening that overlooks the spiked room. (The PS players will find a Save Crystal here.) Take a standing jump to the first pillar and use running jumps until you reach the last pillar. Take a standing jump with Action to land into the opening. A gorilla will attack, so back-flip to the pillar and kill it. Then jump into the opening again and pick up the Lead Bar #3. Jump to the pillar and then towards the exit where there are no spikes. Exit. Garden - Exit the room with the doors and follow the tunnel. Go down the steps and return to the room with the pool (where you started the level). Pass the room on the right hand side and go down the steps on the other side (north). As you enter the Garden, a gorilla will attack from the left. Shoot it whilst jumping backwards. A second gorilla lurks here, so stay sharp. 3rd Secret - Facing the entrance, locate the switch among the plants on the right hand wall (see this screenshot if you cannot find it). Use it to open one of the two gates. Go through it and follow the passage. Be careful as you turn around the corner. There are two jaw traps that open and close at the same time and with a crumbling floor between them. Stand two steps away from the first jaw and when they are ready to open, take a standing jump. Pick up the Magnum Clips (or a pair of Magnums if you do not have them), the Small Medi Pack and the Shotgun Shells. Then deal with the jaws once more in order to exit. Midas room - With the entrance to your back, vault onto the ledge in the far right corner and jump to grab the roof. Pull up and pick up the Large Medi Pack. Go through the opening to reach the room with Midas' pieces. According to the Greek mythology, Midas was a king of Phrygia, who had the power to transform whatever he touched into gold. So, the hand in this room has its meaning. If Lara jumps on the hand, she will be transformed into gold and die. So, save your game before attempting to do so. (The PS players will find a Save Crystal here.) Now stand on the side of the hand (as shown in this screenshot) and press Action. Lara will take the Lead Bars and transform them into gold. You have three Bars, so make sure you press Action three times. Once you are done, exit to the Garden and make your way back to the room with the five switches. ΥΩΩΩΥ - Door to the side of the south wall (letters) - Re-arrange the switches and use the first and fifth ones. That way, you will have Down - Up - Up - Up - Down (very special thanks to Marie Pierre-Louis for notifying us about this). Go down the steps and through the door you opened. Have your weapons drawn, because a lion will charge out. Kill it and enter the room. Go up the steps and pass the first opening on the left. Exit to the small balcony and pick up the Shotgun Shells. (The PS players will also find a Save Crystal here). Return back and go through the opening you bypassed. Place the three Gold Bars in the receptacles to open the door. Go through it and slide down the ramp to end the level.
|
||
| « Level 6: Colosseum | Index | Level 8: The Cistern » |
| We would like to thank Nicky for her help. Many parts of this walkthrough would not have been written without her participation. Special thanks to George Maciver for proofing the text. Last update: 16 Dec. 2006 |
||
Tomb Raider: Atlantean Scion Walkthrough & Game Guide © 2000-2007 www.tombraiderhub.com |
||