Tomb Raider 1: Atlantean Scion Walkthrough & Game Guide
Level 9: Tomb of Tihocan
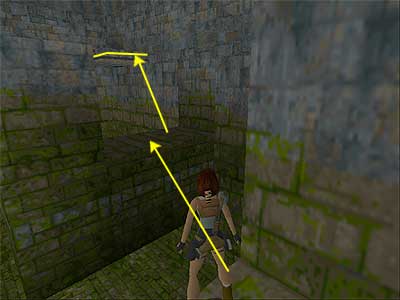
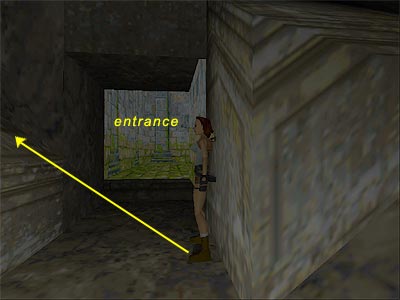
Swim down and through the long tunnel to reach a room with a ledge on each side, a switch (that you can use only on land) and a passage that leads to a closed gate. Swim between the two ledges and into the depression beyond. Turn around and pull the underwater lever to lower the water level of the room above. Return back, climb out of the water and use the switch to open the gate. Draw weapons and go through the gate. Kill the crocodile, whilst jumping backwards if necessary. Or, enter with jumps and head to the far left, where you can jump on a gray block and kill the crocodile from safety. Keep this gray block in your mind, as you will need it later. Go up the greenish steps and climb on the first block. Turn left to face the walkway in the middle of the room and take a running jump there. Go to the right and take a standing jump to grab the square ledge and pull up (see this screenshot). Then take a running jump to the platform. (Note - If you climb on the second block at the top of the steps and jump on the block in the middle of the rooms, darts will start coming from the walls, making your job more difficult.) Climb into the opening and throw the switch to raise the water level. This makes the gray square float. Jump into the water, but before climbing on the block, swim beneath it and through the opening it used to cover. Get the Small Medi Pack and return back to the surface. Climb on the gray block and enter the tunnel. Jump into the water and swim down and forwards. Pay attention to the floor, where you will find an opening that will lead you to an underwater lever. Pull it to lower the water level again and change the direction of the current. Return back to the surface and swim through the tunnel. The current will drag Lara and she will be able to pass the long (really long) tunnel without drowning. Room with still blade at the top - Climb out of the water and kill the rat. Facing north, pull the movable block once. Climb on the block, then onto the ledge. Turn left and jump to grab the square ledge. Then climb on the platform above. (The PS players will find a Save Crystal here). You can see two openings here and Pierre may or may not appear from the right hand opening at this point. Jump to the block next to that opening and wait for Pierre. If he does not appear, do not waste your time waiting for him. Jump into the opening and carefully go down the steps. Pierre will be waiting just around the corner. Again, you cannot kill him, so do not use a powerful weapon. Shoot him until he leaves. Go down the rest of the steps, but do not run. Soon you will come across a saw trap. When it is ready to open, run past it (or take a standing jump). Continue down the steps and drop through the opening. A crocodile is running around in the next room, so kill it. Then pick up the two sets of Shotgun Shells and Magnum Clips. 1st Secret - Take a look on the floor and notice the three tiles that differ from the rest. One next to the steps, the other in the southeast corner and the third in the northwest corner. Step on them in any order you like and you will open a door in the southwest corner. As you enter, you will see two slopes alongside the entrance: a high and a lower one. Stand with your back touching the high slope (as shown in this screenshot) and jump on the lower one. Keep pressing the Jump button and Lara will do the rest: she will back-flip on the high slope, jump to another slope in the corner and as soon as you jump off, press Action to grab the square ledge. Pull up and pick up the Large Medi Pack and Shotgun Shells. Back to the room with the still blade - Drop down and exit to the room. Go up the steps, carefully passing through the saw trap. Return to the opening you came from and run off the ledge to land on the block below. Turn right and take a running jump to the alcove with the still blade. Pick up the Shotgun Shells. You now need to go through the left hand opening. Walk to the front left corner of the alcove and side-step to the right once. Turn to face the opening, but turn something little more than 45 degrees (as shown in this screenshot). Take a standing jump to grab the opening and pull up. If you cannot do that, jump to the platform on Lara's right. The blade will start moving and you will need to time your running jump. Note though that you cannot walk to the edge of the platform because the blade will cut you. Left hand opening - Once inside the opening, go down the steps to reach an alcove above the room with the tiles you stepped on in order to get the 1st Secret. Turn around and drop backwards to grab the edge. Shimmy across the crevice and pull up. Go around the corner and throw the switch to flood the room below. Jump into the water and surface. As you swim to the other side, you will see an opening on the right side. Climb there and kill the rat. Then jump into the water beyond and swim through the tunnel until you can surface. Room with spikes, ledges and gorillas - Climb out of the water and draw weapons. Lara will aim at a lion that is sitting in the far left corner. Start shooting immediately and you will kill it before it reaches you. Go through either of the two openings to reach a passage with a switch. Throw it to open a gate in the room above. Return to the room with the spikes and climb on the ledge that overlooks a gold keyhole. Then vault onto the right hand ledge. (The PS players will find a Save Crystal here.) Two gorillas are running around on the ledge above, so kill them from here. Jumping up whilst shooting may help you. Once they are dead, jump to grab the ledge and pull up. Proceed forwards and take a standing jump to grab the crevice. Shimmy to the right and pull into the opening (where the gate opened before). Inside you will find a Large Medi Pack and a Gold Key. Walk back to the edge of the opening and take a standing jump to land on the ledge below, avoiding the opening that drops you in the spikes. Drop down and use the Key in the keyhole to raise the blocks in the pool. Take running jumps from block to block and a standing jump to reach the opening. Pick up the Large Medi Pack on the right hand side. (Note - In the PC version, when you use the Gold Key, you hear the chime signaling the Secret. However, this is not a Secret and it will not count as one.) Room with movable block and six closed gates - When you enter the room, you can see a closed gate with two keyholes straight ahead and two more on the right hand wall. There are two more closed gates in the left room and one more high above. Also, you can see the four tiles with letters on the ground. Locate the movable block between two pillars and, facing south, push it twice to position it on the nearest tile. This will open one of the gates and release a gorilla. Hop back, jump on the block and kill the gorilla from safety. Then go through the gate it came from and pick up the Shotgun Shells and Magnum Clips. Return to the block and push it towards the south wall to position it on the second tile. This opens the gate high above on Lara’s right and the gate behind her, releasing a gorilla. Jump on the block again and kill it from there. Since you are here, go for the gate high above. Jump to grab the edge and pull up. Proceed carefully, as there is a saw trap. Pass it and pick up the Large Medi Pack and Rusty Key #1. Pass the saw trap once more and drop back down. Go through the door the gorilla came from and pick up the Shotgun Shells. Return to the block and push it towards the west wall to position it on the third tile. This will open the gate next to the one with the saw trap. Again, jump on the block and kill the four rats that emerge from inside. Enter the room they came from and pick up the Small Medi Pack. Push\ pull the block on the last tile to open the remaining gate. Nothing comes from inside, but be careful as you enter. When you drop into the room, two boulders will roll: one from each side. So, drop down and jump into the alcove with the Rusty Key #2. Then pick up the Small Medi Pack and exit. Use the two Keys to unlock the gate. (The PS players will find a Save Crystal here.) There is a long ramp behind the gate, so do not rush to enter. 2nd Secret - If you want to get the Secret, save your game in case you do not succeed the first time. Walk up to the edge of the opening and stand somewhere in the middle. Turn a bit to the right and take a standing jump to the rocks (as shown in this screenshot). Keep pressing the Jump button and Lara will start jumping off the various slides. After three jumps, she will jump above the ramp and land on the rocks on the left hand side. When she does this, release Jump and she will land in front of an opening. There are five decrepit crumbling tiles that you need to pass in order to reach the opposite alcove. Note, that you will have to use standing jumps, so do not run on the squares. Also note that you have only one chance to use the decrepit floors, so if it is possible save your game. Here are two possible ways: • Walk up to the edge of the opening and take a standing jump to the first square. Now side-flip to the left, jump forwards to the next one, again jump forwards, then side-flip to the right. Run\ jump into the alcove. • Walk up to the edge of the opening and hop back once. Take a standing jump with Action to grab the first square. As long as you hang from it, it does not collapse. Pull up and side-flip to the left square, landing at the back-side. Start running and take a running jump, passing over the next square. Press Action to grab the square in the corner. Pull up, side-flip to the right and jump into the alcove. Pick up the Uzi and Magnum Clips. If you fall down during the process, you will have to load your game and try again. Once you get the pick-ups, drop back down, climb into the entrance and continue sliding to land in the pool. Area with pool and curved face - As soon as you drop into the water, swim forwards to the other part of the pool and climb on the gray square ledge. Kill the crocodile that was chasing Lara and enter the passage. Start climbing the rocky ledges until you reach the sandy one above the pool. Up to the left you will see a switch. Stand on the left of the sandy ledge (next to the rocky slide) and take a running jump to the block beneath the switch. Climb to the switch and use it to open a gate in an underwater tunnel. Outside the Temple - Jump into the water and swim through the twisted passage, which gets you back to the wider pool and in front of the Temple door. The door is closed, so before climbing out, you need to find the switch that opens it. Facing the door, swim down and to the right, beneath the part where the right hand centaur is. Try to locate an overhanging block with blue tiles (this screenshot shows the location of the block). Once you find it, swim beneath it and you will see an underwater tunnel, which leads to the gate you opened before. Pass it and surface. Climb out of the water and use the switch to open the temple door. (The PS players will find a Save Crystal here.) Then swim back. Inside the Temple - Climb on the ledge in front of the entrance. The left hand centaur will come to life when you approach the door. Do not hesitate and run-jump to the entrance, completely bypassing the centaur. Even if you want all the kills, you can kill him from safety (wait until later). Enter the Temple. Pierre is waiting for you here and obviously he has already retrieved from the pedestal what you are looking for. This time Pierre is vulnerable and you can kill him. He is not a big boss who is hard to kill; he can fall down without too much trouble. If you stay away from him (climbing on one of the two ledges alongside may do the trick), he will start running around and for some strange reason he will get stuck in front of the door on the north side, pretending he wants to go through it. Shoot his back until he falls down. Once he is dead, pick up his Gold Key, second Scion and pair of Magnums (if you already have the Magnums, you will receive nothing - not even Clips - and it will count as a pick-up in your statistics). If you want all the kills, do not forget the two centaurs outside. Luckily for you, they cannot come inside the Temple, so stay in front of the entrance and shoot them, side-flipping if necessary in front of the walls as a cover in over to avoid their bolts. Note that if you use the Pistols, it will take some time. Once you have killed everything that moves, enter the main part of the Temple and climb on both ledges alongside, where you will find Magnum Clips on each one. Then jump to the balcony with the railings and pick up the Large Medi Pack from the left. Use the Gold Key to open the door, drop down and go through it to enter the tomb of Tihocan and end the level. The cut scene shows Lara entering the Tomb. She looks at the hieroglyphics on the left hand wall and whilst translating she starts reading. "Here lies Tihocan. One of the two just rulers of Atlantis, who, even after the curse of the continent, had tried to keep rule here in these barren other lands. He died without child, and his knowledge has no heritage. Look over us kindly... Tihocan" whilst she turns her gaze to the grave.
|
||
| « Level 8: The Cistern | Index | Level 10: City of Khamoon » |
| We would like to thank Nicky for her help. Many parts of this walkthrough would not have been written without her participation. Special thanks to George Maciver for proofing the text. Last update: 16 Dec. 2006 |
||
Tomb Raider: Atlantean Scion Walkthrough & Game Guide © 2000-2007 www.tombraiderhub.com |
||