Tomb Raider 2 Gold: Golden Mask Walkthrough & Game Guide
Level 1: The Cold War
(*We do not count the 5 friendly icemen)
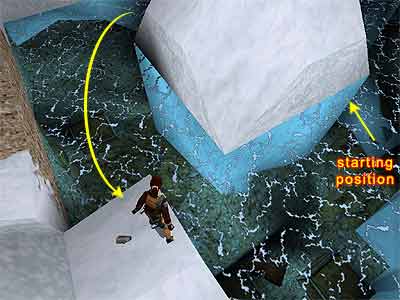
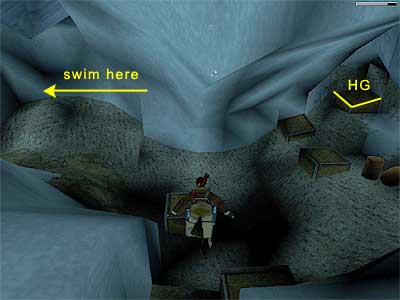
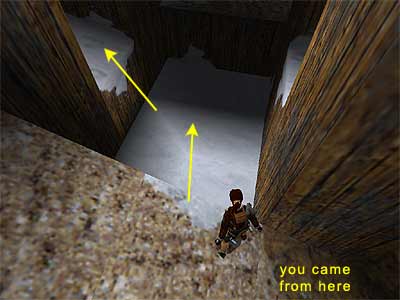
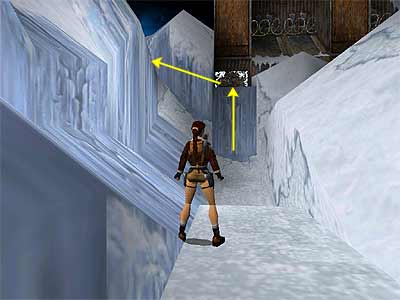
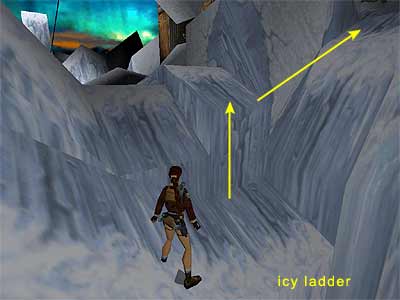
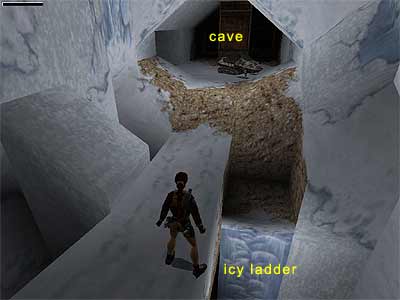
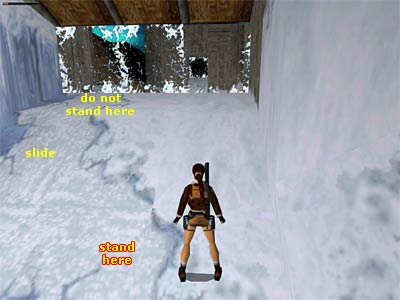
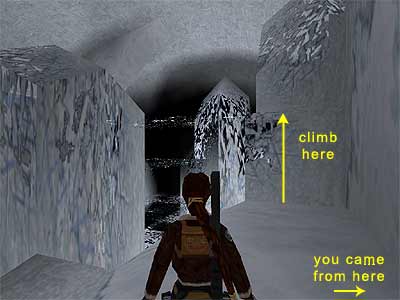
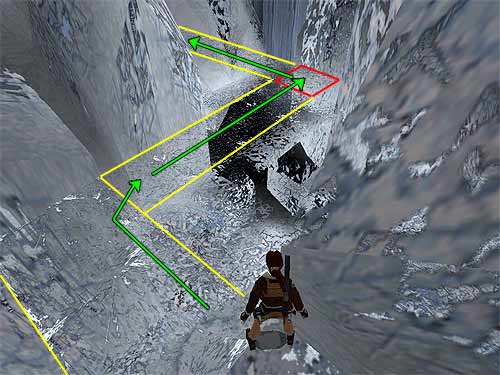
The level begins with Lara dropping into the icy water. Just to the right you will see three sets of Harpoons, but do not get them yet. Turn around and you will see two more, plus the Harpoon Gun (loaded with three Harpoons) on a crate in the far right corner. Get these and return for the other pick-ups. When you pass above the Harpoons that are on the crate, a shark appears, so do not hesitate at all and swim forwards, turn left and again left going around the iceberg, where you will find a low ledge that you can climb out (as shown here). Here you will find some Flares and you will see a helicopter flying from above (the one that obviously dropped Lara in the water). Get them and take care of the shark. Then drop into the water again and get the rest of the pick-ups. 1st Secret - From the starting position, and assuming the Harpoon Gun is at the far right, swim to the left past the two barrels at the bottom (as shown here). You will find a small underwater tunnel that contains the Gold Coins. Get them and exit the tunnel. Surface and climb on the low ledge, as you did before. Dark cave - If you have not done so, kill the leopard and jump into the cave. You can clearly see two sets of Shotgun Shells on the slide. Once you get the second, quickly back-flip because a boulder rolls from the right hand passage. Push the movable crate to reveal a Small Medi Pack beneath. As you face the two passages at the top of the slide, go through the right hand one with your weapons drawn. A leopard attacks, so start shooting whilst jumping backwards. Then pick up the Shotgun Shells at the end. Back track close to the crate and vault onto the ledge that separates the cave. There is another leopard on the other side that you can kill from here. Turn around to face the entrance of the cave and drop backwards. Two boulders start rolling from the passage on the right, so quickly vault onto the ledge to avoid them. Stay sharp, because another leopard is lurking into the lighted part of the cave. Kill it and pick up the Flares and the two sets of Shotgun Shells. Go through the wide passage the two boulders rolled from. The pit is not deep, so do not be afraid. You can either jump over it or use the left hand ledge. Go up the ramp, passing from the left hand side. That way you will avoid the two boulders that roll from the right and ahead. Pick up the Shotgun Shells at the top, then back track and go through the opening from where one of the two boulders rolled from. Climb up the icy ladder. When you reach the top, Lara looks up at the door beyond. Ignore the Large Medi Pack for now and run up the left hand ramp. When you do that, a thug in white appears, opening the door. Quickly drop into the first big pit on the right and climb on the block to the left (as shown here). This makes a second thug appear, but they both have a difficulty aiming at you. Kill them whilst they go up and down the ramps. If they exit through the door, exit the pit in order to lure them back. Once they are dead, pick up their two sets of M16 Clips and do not forget the Medi Pack from the lower part of the cavern. Go through the door at the top and take a standing jump over the slide. Here you can see two movable crates. Pull the first one once, go to the back and push it once more. That way, you position it in front of the column and beneath the opening in the ceiling. Then pull the second crate to reveal a passage with a Small Medi Pack and Shotgun Shells. Climb on the first crate and up the icy ladder. Proceed forwards and through the opening in the rocks, where you will find some Flares. The camera changes view, indicating that this is a long drop down. Turn around and pick up the Small Medi Pack from the far left. Then climb on the block beneath the handle of the zip line. When you do that, you hear the voice of a falcon. Draw weapons and kill it when it appears (you may have to wait for some seconds until it reaches you). Outside the building - Grab the handle of the zip line and ride it. A slide prevents you from going to the end and you end up in a passage outside of a building. Two more falcons will attack here and a leopard from the right. If you stay in the passage, you will not have a problem with the leopard. Kill them all and go to the other side of the passage, away from the windows. Jump over the slide and pick up the Shotgun Shells. Facing the two windows, climb on the block in front of the left hand one (as shown in this screenshot). Turn around and jump on the right hand ledge. Proceed carefully into the passage. When you hear a boulder rolling, hop backwards to avoid it. It will pass over Lara's head. Drop down at the end and pick up the M16 Gun (loaded with 116 clips). Then return back. 2nd Secret - Follow the passage next to the buliding (parallel to it). At the end, you can see the bars on the left. Before going there, slide down the slope on the right to reach a ledge above the pit you passed over before. With the pit to your back, drop backwards to grab the edge and climb down the icy ladder. Go through the opening with your weapons drawn and kill the leopard. Climb up the block and pick up the three sets of Shotgun Shells and the Gold Bars. The opening beyond the Bars leads back to area close to the dark cave, almost at the beginning of the level. So, be careful not to accidentally fall through it, because you will have to either load a previous saved game or take the long route back. Return back and climb up the icy ladder. Once at the top of the icy ladder, climb on the block ahead. Turn right and take a standing jump at the top of the slide (as shown here). Drop into the passage that leads to the bars you saw before. Turn right and kill the thug that comes down the ramp. Pick up his M16 Clips and enter the room at the end. Behind the barrels you will find the Guardroom Key. Exit and go down the ramp. Use the switch in the alcove to open a door behind the bars. Return back, where you came from, and climb on the ledge to the right in order to reach the passage next to the building. Shoot the windows and enter. Inside the building - Before using the Key, go to the left and push the movable block to reveal a passage on the right. Go through it and take a standing jump over the slide. Be careful of the deep pit here! Take a running over it and grab the opposite ledge. Pull up and vault onto the low ledge ahead. You hear a door opening. Turn right and jump over the slide. Pick up a pair of Automatic Pistols (loaded with one round) and climb through the doorway (this is the door you heard opening). Just to the left and onto the ledge, you will find some Automatic Pistol Clips. Exit through the opening. Now use the Key to unlock the door. Kill the thug and pick up the Shotgun Shells and Automatic Pistol Clips from inside. Exit through the doorway on the other side and follow the passage to the end, where you will find a Small Medi Pack. Back track until halfway and vault onto the snow ledge. If you have your weapons holstered, the camera will change view, giving you a glance of the area below. Down into the shaft - From here you can see the two thugs that lurk below - one on each side. It is probably difficult to aim at them from above. If you take a look below, you will see a small slope pointing the long ramp. Use this slope to slide to the ramp. Kill the thug on the left and stay sharp because a leopard is lurking into the cave. A falcon may have already reached you, so kill it too. Pick up the M16 Clips the thug dropped and the Small Medi Pack from beyond. Then use the switch to open a wooden door on the other side, where the second thug is patrolling. To take care of him, exit the cave, walk up to the end of the ramp and once Lara aims at him, start shooting and do not let go of Action. That way you will lock the target and even if the thug enters the room, Lara will be aiming at him whilst exiting. Close to the entrance of the cave you will find an icy ladder that leads down (see this screenshot if you cannot locate the ladder). Down there you will find some Flares and Shotgun Shells guarded by a leopard. To kill the leopard without damage, climb almost to the bottom of the ladder and let the leopard approach. Press the Jump button to back-flip and draw wepons whilst in mid-air. Start shooting and jump back if necessary. Now you can do either: • (With the bike) Climb back up and use the snowmobile you surerly did not miss inside the cave. Jump over gap in order to land on the other side, where the other thug was patrolling. If you did not kill him before, you can run over him. Dismount and pick up his M16 Clips. Then exit through the door you opened before to reach an area with three wooden blocks. • (Without the bike) Find the icy ladder on the other side of the pit. This will get you at the top where another thug is patrolling. Take care of him and pick up his Automatic Pistol Clips. Go down the ramps in order to reach an area with three wooden blocks. Area with three wooden blocks - A thug on a snowmobile appears when you approach the left hand block. Jump on it and kill him from above. Then pick up the two M16 Clips and the Large Medi Pack from the blocks, plus the Automatic Pistol Clips from the snow ledge next to the right hand door (as you face them). If you did not use the snowmobile before and came from the top, enter the small room on the right, kill the thug if you did not do it before and pick up his M16 Clips. Get the thug's snowmobile and drive through the left hand opening. If you have not been here before, run over the thug and pick up his Automatic Pistol Clips. Drive the snowmobile through the icy windows. You can do that by either jumping over the gap or going around the snow ledge on the right. If you do not have the snowmobile, just shoot the windows*. Here you can see another small icy window ahead and an opening on the left (notice the icy wall on the right hand side). If you ride the snowmobile through the icy window, you will encounter a thug on a snowmobile. If you have gotten the thug's snowmobile from before, you can have some fun here. If you climb through the opening on the left, the guy will come out and you will have to kill him by using your guns. (*Note - The icy windows may not shatter if you shoot them by standing in front of them. In that case, slide down the slope and shoot them from there by jumping up and down. See this screenshot to get oriented.) Area with frozen pool and building - Climb into this opening anyway to reach an area with a frozen pool. There is a switch in the back (pretty dark) left corner which makes the boulders roll, thus breaking the surface of the pool. The noise alerts a thug who comes from inside the room. Kill him and pick the M16 Clips and Small Medi Pack he drops. The switch you used also opened the icy wall outside. The switch inside the room just verifies it. (Note - The following part of the level includes the retrieval of the level's final Secret. You will return back here in order to continue with the level. If you are not interested, skip to the part of the walkthrough Area with ramps.) 3rd Secret - Exit the room and drop into the shallow pool. The water in the back right corner is deeper and you can dive down and swim through the opening. Continue through the next opening and surface. Climb out of the water and go to the left, where a passage goes alongside the left hand wall of the cave. Halfway the passage, notice the block on the right hand side, where an icy platform begins. Climb on that block (see this screenshot to get oriented). This icy platform collapses as you run above it, same for the next platforms you are going to run over. Start running on the platform, then drop off to land on the next one on the right. Keep running, turning left in order to reach a block with a Large Medi Pack. If you need a breather, you can stop on the solid block in the corner. (This screenshot shows the procedure and indicates the solid block.) On passing above the solid block, you trigger the appearance of an iceman, who is standing on the block above the Medi Pack. Do NOT kill him. He is friendly and the ones you are going to meet will help your job. Once you get the Medi Pack, the two boulders from above fall down, breaking the ice below. Taking the Medi Pack, the pool you came from freezes. Facing that pool, turn right and take a running jump to the ledge. Then jump on the one on the left and use the path alongside the wall (as you did before) in order to reach the frozen pool. Climb on the ledge at the back and pick up the Uzi Clips and Grenades. Go to the other side of the frozen pool and slide down the icy slope. There are more icemen down there, so be careful not to accidentally shoot them. Beyond you can see the Gold Skull, behind an icy window. Shoot the window and pick up the Skull. On doing the latter, three thugs emerge. Stay back and let the icemen deal with them. Assist if you want and once the thugs are dead, pick up their two sets of Uzi Clips, Small Medi Pack and Shotgun Shells. Close to the icy slope you slid before, you can find an icy window that you can shoot out. Go though the tunnel and kill the leopard that attacks. At the end, you can find an icy ladder. Climb to the top to return back to the room next to the pool you came from. Area with ramps - Climb through the wide opening you came from and continue straight ahead to an area that was previously blocked by an icy wall. Two thugs lurk here - one on each side. Staying close to the entrance and entering cautiously with your weapons drawn may help your job. Once they are dead, pick up their M16 and Automatic Pistol Clips. You may have noticed the pick-ups at the bottom of the pit, close to the left hand thug. Wait and you will get them in just a few minutes. Also, pick up the Flares from the crate close to the gate. Getting the pick-ups at the bottom of the pit - If you are up for a challenge, let's go for some "tricky-to-get" pick-ups. The sequence is shown in this page. Facing the gate, climb on the left hand ramp and turn to face the ice on the left. You are going to jump behind the ice, so save your game because it is a"blind" jump. Also, make sure you have 100% of health, because a long drop follows and you will be left with just 10%. Lighting a Flare will definitely help you see clearly in the dark. Facing the ice, stick to the right hand wall and take a running jump over the ice. Keep pressing the Jump button along with the right direction key. This will make you jump off the back slippery side of the ice and land on another slide just to the right. Let go of Jump and press Action to grab the edge. Shimmy to the very left and drop down. Pick up the Uzi Clips, the Large Medi Pack and a pair of Uzis. Close to the pick-ups you can find an icy ladder. Climb to the top and, although you see nothing blocking your way, you will enter the area where you fought the snowmobiler, passing through an icy wall that is visible only from the one side. Back to the area with the ramps - Return back to the area with the ramps and use the switch in the back right corner to open the gate. A thug patrols on a ledge behind the gate, so take care of him and pick up his Small Medi Pack. Go up the ramp and if you are on foot, use either ledge alongside. Jump\ pass the pit and continue cautiously. The ramp beyond hides a boulder trap. Drop from the left hand side of the ledge, walk up to the middle of the ramp and go down. The boulders will roll from the left and right sides and miss you. Enter the next room and kill the thug that appears. Pick-up his Automatic Pistol Clips and the Large Medi Pack beyond. Turn around and kill another thug that appears. He leaves some Grenades and the Shaft 'B' Key. Continue almost to the end and use the Key to open the door (you will come back for the door at the top). Draw weapons and go through. A leopard attacks, so take care of it. Be careful not to fall down!! Even if you survive from the drop, the area beneath is close where the zip line got you! So, you may want to step backwards and kill the leopard from inside. Cross the walkway and use the switch to open the other door, so go there. A thug is waiting for you there. When he is history, pick up the Grenades he drops. In the next room you can see the Shotgun Shells. As you approach them, two thugs start shooting from outside. First kill them and then get the Shells. Exit, kill the falcon and pick up the Small Medi Pack and Shotgun Shells from the dead bodies. There is a switch inside the middle structure of the area. When you approach it, two snipers appear on a high ledge just opposite. The switch opens the trapdoor behind the block (as the camera indicates), so you can either kill them or totally igore them by quickly dropping through the trapdoor. You drop into a pool. Swim through the tunnel, where an iceman is waiting on a ledge, to end the level.
|
||
| Index | Level 2: Fool's Gold » | |
| We would like to thank Nicky for her help. Many parts of this walkthrough would not have been written without her participation. Last Update: 04 Feb. 2007 |
||
Tomb Raider 2 Gold: Golden Mask Walkthrough & Game Guide © 2000-2007 www.tombraiderhub.com |
||