Tomb Raider 2 Gold: Golden Mask Walkthrough & Game Guide
Bonus Level: Nightmare in Vegas
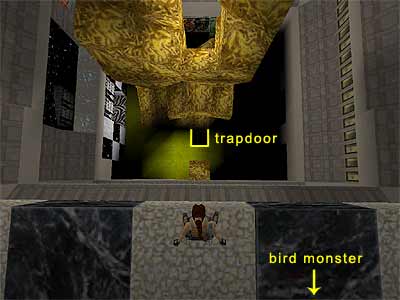
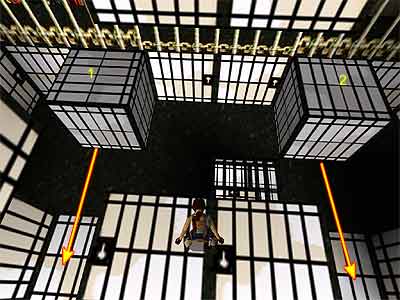
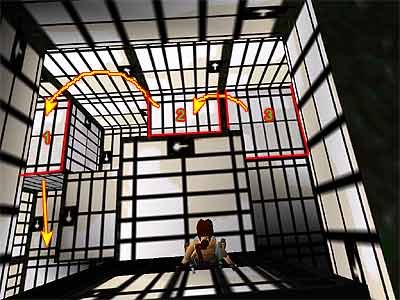
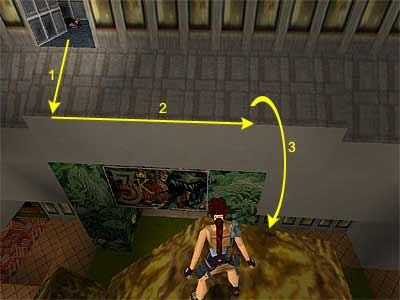
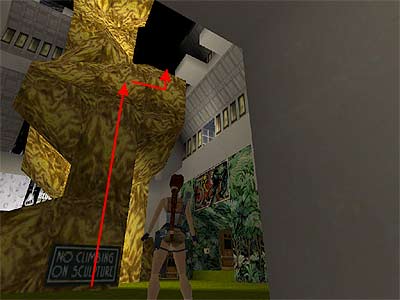
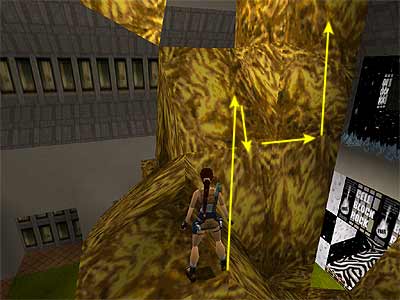
(Note - This is the Bonus Level that you can play if you found all 12 Secrets of the game. When the credits roll and the game prompts you again to the passport, instead of loading, turn one page and you will have the option of choosing any of the four Gold levels, plus the Bonus one.) You begin the level in the bathroom of a hotel's room. Your inventory is empty and you carry only the Pistols with unlimited ammo. Push the button on the right hand wall to open the door and exit to the bedroom. Push the button on the left to open the closet and enter. Pick up the four sets of Shotgun Shells, the Flares, the Small and the Large Medi Packs. Exit and push the button on the left (close to the telly) to open the balcony's door. There is nothing interesting to do out there, apart from taking a look on the opposite building, where two thugs are patrolling. Re-enter the room and go to the left. Pick up the Shotgun and two sets of Shells for it. The button beneath the screen will show you Winston wandering around in a bathroom elsewhere. Approach the last door and it will open automatically. Cross the hallway and halfway down shoot the window on the left hand side (you will come back for the keyhole beyond in a bit). Exit carefully. There is only one square where you can walk on. Turn right, jump to grab the crevice and traverse to the left. When you see the ladder beneath Lara, climb down a bit, then left. Pull up in front of the window. Go to the left and jump to the balcony. The two thugs will shatter the windows and come after you. Start shooting and jump backwards and onto the previous ledge. The thugs cannot hurt you much that way. Once they are dead, pick up their Shotgun Shells and Small Medi Pack. Enter their room and pick up the two sets of Shotgun Shells between the two beds and some more from the back left corner of the room. Push the nearby button to open the door of the bathroom. Here you can see Winston. Climb on the cupboard and pick up the Small Medi Pack. Then go to the far right corner, where you will find the Hotel Key in the shower. Exit to the bedroom, go straight ahead and approach the door on the left. It will open automatically, so exit to the hallway and use the Key to open the double door. Atrium with huge gold sculpture/ Room with cage - Go through the doors to enter an atrium with a huge gold sculpture in the middle. Follow the left hand walkway until you see an opening that leads to an area with a bird moster (Guardian) locked in a cage. Go to the left and climb on the left hand block. Pick up the Flares and turn to face the way you came. A thug will soon come, so take care of him. Then pick up the Shotgun Shells in front of the cage with the leopards at the far left. Back track to the entrance and climb on either block alongside. This will get you above the cage, where you can find two sets of Shotgun Shells and a Small Medi Pack at the back. Carefully make your way down and exit the room. (Bug warning and SPOILER - Make sure you enter this room so as to trigger the Guardian. You will have to deal with him at the end of the level, so if you do not trigger his appearance, you will not be able to kill him and end the level.) Going down - Go to the right, towards the entrance of the atrium. Turn left and take a look at the top of the sculpture to spot the Large Medi Pack. Take a running jump to grab the climbable front surface and climb to the top. Pick up the Medi Pack, then take a running jump back to the walkway. Return to the entrance that leads to the Guardian and turn to face the gold sculpture. You may not be able to see it straight away, but if you light a Flare and throw it to the ground, you will see a trapdoor at the very bottom (as shown in this screenhot). Walk up to the edge of the walkway and take a standing jump. The trapdoor will open as you fall down and Lara will drop into a pool. (Note - You can also go down by climbing down the sculpture. After taking the Medi Pack, turn left to face the room with the bird monster and hop back to grab the side of the sculpture. Start climbing down and release to drop on the various slides and finally land on the ground. The thugs as decribed below will appear with a different way. We prefer to jump through the trapdoor in order to get the Uzis now.) Get a pair of Uzis and four sets of Clips for it, then swim through the tunnel. The door opens as you approach and you find yourself into a pool. Get the Hotel Key and climb out of the water. A thug shoots at you from the left, so kill him. Exit to the area with the gold sculpture. When you approach it from the right hand side (close to the greenish entrance), two thugs will come from the area with the pool. Kill them and pick up their two sets of Shotgun Shells and Small Medi Pack. Jungle area - Use the Key you just got to the keyhole of the greenish entrance. Enter and proceed ahead past the two T-Rex heads. Go through the opening ahead, having your weapons drawn. Kill the thug that attacks and pick up his Small Medi Pack, plus the Shotgun Shells from the left. Exit and go through the other opening. A second thug will attack here. He drops nothing, but you can pick up the Shotgun Shells next to the bars, plus some more from the back left. Exit to the main area with the gold sculpture. Cell Block Rock - Turn right and go around to the left, passing in front of a double closed door that you will open in just a bit. Enter the black and white area with the "Cell Block Rock" sign. When you go down the first step, you can see the two buttons - one on each side. Push both to raise the curtains of the stage and open the double door you saw outside. When you approach the stage, four guys with bats will attack. Immediately start shooting at them. When they are dead, pick up the Shotgun Shells one of them dropped. Then pick up the Small Medi Pack from the left hand side of the area and some Flares from the right (in front of the pillar). Climb on the stage and pick up the Shotgun Shells. This alerts two more guys, so start shooting whilst jumping backwards. Once they are dead, go to either side of the stage and climb on the block, then climb on the upper one. Be careful as you climb on the higher block. There is a swinging crate above, so climb standing on the edge and towards the inner part of the stage. Then jump to the blocks with the two sets of Shotgun Shells. Pick them up and carefully drop down. 1st Secret - There are two movable blocks exactly beneath the ledge you got the Shells. You have to pull both towards the centre of the stage and position them between the rest of the blocks, where they are missing (as shown here). By doing this, you open the trapdoor at the back; fall through it. There are three movable blocks here. The one is alone in the far left corner (assuming the main area is to your back) and the other two are next to each other on the right. First pull the alone block once. Now go for the other two. Pull the first once, climb on it and drop to the other side. Pick up the two sets of Uzi Clips and push the same block in the corner. Now pull the second block and pick up the Gold Coins from beneath (see this screenshot to get oriented). Elevator (from ground to middle level) - Climb out of this room and back on the stage. Return to the atrium, but be alerted for the thug, who is waiting there now. Kill him and pick up his Uzi Clips and Small Medi Pack. Turn left and enter the small room in front of the elevator shaft. Use the switch to call the elevator. When it comes down, use the switch again and enter the elevator to ride up. Exit and proceed towards the opening. Drop to the flat ledge below and turn right. Jump on the flat ledge of the gold sculpture. Walk through the sharp glasses and pick up the two sets of Uzi Clips. Turn right and jump on the black ledge. Pick up the Door Circuit and the Large Medi Pack. Walk up to the edge of the black ledge, facing the sharp glasses. Take two steps backwards and hop back once. Take a running jump and you will jump over the glasses and land on the flat ledge of the gold sculpture. Turn left and jump back to the flat ledge in front of the passage to the elevator. (If you accidentally slide down the gold sculpture, call the elevator again and ride up as before). Use the switch to send the elevator down. Approach the shaft and take a standing jump to grab the ladder. Pull up at the top and go to the right and around the corner. Carefully drop to the lower ledge, draw weapons and take a running jump over the sharp glasses. Kill the guy with the bat and pick up the Shotgun Shells. Then walk up to the edge of the opening. Turn around and slide down backwards, pressing Action to grab the edge of the slope. Traverse to the right and stop to the second from the end square. Pull up and press Jump+Roll+Action to twist in midair and grab the climbable side of the gold sculpture. Pull up to the top and pick up the Uzi Clips (see this screenshot to get oriented). Then slide down to the ground. T-Rex area - Go to the room with the pool and use the Circuit to open the doors. You have definitely noticed the T-Rex who is running around over there. To kill it from safety, either shoot it from the room with the pool or climb into the stone opening just to the left of the entrance. When it is dead, pick up the Flares from the left and enter the main area. Go straight ahead and when you reach the building, go right and to the back. Vault on the ledge and pick up a pair of Automatic Pistols and three sets of Clips for it. A guy with a bat will soon arrive, so kill him. Go back and towards the entrance. Turn right and pick up the Elevator Junction from the depression close to the c|net van. Then enter the room with the televisions at the back and pick up the Large Medi Pack and the Flares. A guy with a bat and a second T-Rex will join you. Stay in the room and kill both from here. 2nd Secret - Exit the room and go to the right and down the ramp. Enter the T-Rex cage and pick up the Gold Bars. Then make your way back to the atrium via the pool room. Going back at the top of the atrium - All the sides of the sculpture are climbable, so as soon as you enter the atrium, grab the side ahead and climb up. Then traverse a bit to the right, then to the flat ledge above, where you got the Uzi Clips before (see here to get oriented). Now turn with the jungle area to your back and jump on the slide of the gold sculpture, making sure you jump on the right hand side of the slide. Press Action to grab the edge (see this screenshot if you are not sure where to jump). If you jump on the left, you will not have enough space below in order to grab the edge. Traverse to the right and start climbing up. When you reach the sloped part, shimmy left and pull up at the top of the sculpture, where you got the Medi Pack at the beginning. Turn left and take a running jump to the walkway. Back at the top of the atrium - Go left and you will see the gates open. Go down the redish ramp and turn around to kill a guy with a bat that comes from behind. Pick up the two sets of Uzi Clips from the alcove and continue to the bottom of the ramp. Get the two sets of Automatic Pistol Clips and be alerted for a second fellow that will soon come down. Get rid of him and go up the ramps to return back to the top of the atrium. Go around the walkway and use the Elevator Junction to repair the elevator. Use the switch to call the elevator. When it comes down, use the switch again and enter to ride up. Dealing with the Guardian - Once again, you have to deal with the Guardian. As before, you have to be quick if you want all the pick-ups. When the elevator reaches the top, quickly exit and go to the left (the monster comes from the right). Jump over the sharp glasses and turn left. Walk through the glasses in the corner and pick up the Large Medi Pack. You do not have time for the two sets of Uzi Clips, so quickly escape from the Guardian that surely have already reached you. Jump back over the glasses and go down the ramps, jumping over the rest of the glasses until you reach the cage. 3rd Secret - Quickly pick up the Gold Skull. The Guardian probably have already reached the cage. Slip past him and go back to the roof, jumping over the glasses. Pick up the first Uzi Clips, go down to the cage and return back for the second ones. If you want the maximum amount of pick-ups, you need to go back to the elevator, use the switch to send it down and grab the ladder. This time, and in order to avoid a possible hit by the Guardian, you may have to drop to the elevator and run to grab the ladder. Then back-flip into the opening behind and pick up the Large Medi Pack and the four sets of Shotgun Shells. To end the level, you have to kill the Guardian. Wait fom him to leave and climb down the ladder, then dismount into the hallway. Use the switch to bring the elevator up. At this point you can do either: • Drop onto the elevator's roof to avoid the Guardian's hit, but walk off before it reaches the opening, then hop back to enter the elevator and kill the Guardian from safety. • Take the advantage of a bug here. Grab the ladder and climb down. As the elevator comes up, Lara will pass through the elevator's roof. That way, you will find yourself inside the elevator without having to deal with the Guardian outside at all. Once he is dead, the level ends.
|
||
| « Level 4: Kingdom | Index | |
| We would like to thank Nicky for her help. Many parts of this walkthrough would not have been written without her participation. Last Update: 04 Feb. 2007 |
||
Tomb Raider 2 Gold: Golden Mask Walkthrough & Game Guide © 2000-2007 www.tombraiderhub.com |
||