Tomb Raider 2: Dagger of Xian Walkthrough & Game Guide
Level 10: The Deck
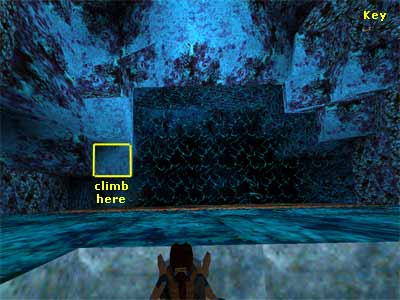
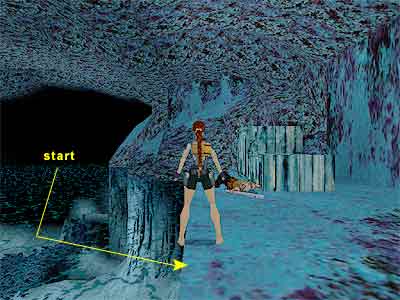
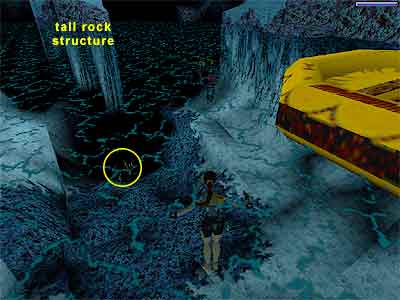
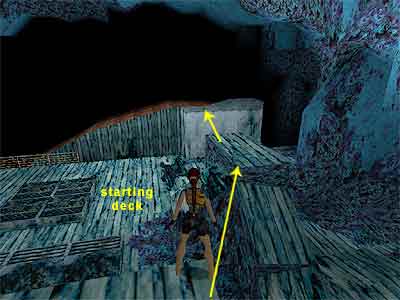
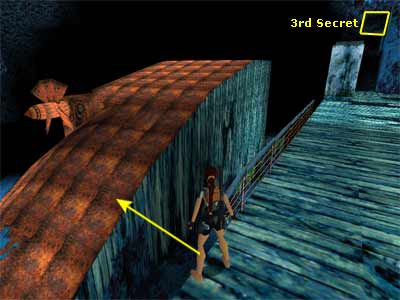
Bottom Deck – You begin the level on the bottom deck of the sunken ship, Maria Doria. Proceed to the right with your weapons drawn and kill a baddie and a flamethrower. If you keep a distance, the flames will not catch you. Pick up the Small Medi Pack the baddie dropped and go around to the other side of the deck to find two pairs of Grenades (or the Grenade Launcher instead of one of the pairs if you do not have it). If you take a look above, you will see more decks. You cannot reach them from here and you need to find another way. Return back where you started the level and climb in one of the two openings. Jump into the water and quickly locate the flat ledge on your left (if you dropped forwards - see this screenshot). Climb on the ledge and shoot the two barracudas. Continue climbing\ jumping on the rest of the rocks around the perimeter of the cave to reach the Stern Key. Get it and jump into the water. Swim through the opening at the bottom and follow it around to the right, then to the left. Surface and climb out of the water. Do not move and draw your weapons. A baddie will show up from the left. Start shooting as soon as he appears and he will drop dead before he reaches you. Drop to the ground and cautiously continue to the right. A guy with a flamethrower is lurking in the alcove on the right. Keep a distance and kill him. There is a trapdoor in this alcove, but do not go there yet. Locate the movable crates just around the corner. (The following sequence is shown in this page.) Push the single crate against the others. Climb on it and push the topmost crate. Drop down and pull the first (single) crate once. Go to the backside of it and push it once more. Turn around and pull the crate (the one that the topmost crate initially was on) to reveal a door that leads to the stern. Pick up the Flares and use the Key to open the door. Stern area – Go down the ramp and jump into the water. Swim forward, sticking to the top. Just around the corner, locate the lever on the right. Pull it to open a trapdoor elsewhere. Return back and climb out of the water. Make your way back to the alcove where you killed the guy with the flamethrower and take care of the thug that is waiting for you there now (if you opened the trapdoor before, he may be down). Pick up his Shotgun Shells (or the Shotgun if you do not have it) and drop through the trapdoor. Follow the passage and climb up the ladder, passing through the trapdoor you opened by pulling the lever. Dismount on the right and use the switch to drain the stern area. Return to the door that leads to the stern area and go through it. Go down the ramp, but be careful not to fall down. Jump to the blue platform on the right and drop to the block below, then to the ground. Follow the passage around to the right and locate the movable crate on the left at the end. Pull it twice to reveal a passage behind. Follow it to the end and climb on the upper ledge. Pass the propeller until you reach a huge lake. Huge lake – Notice the inflated raft with the crate at the top beyond. You cannot reach it from the water, so do not bother with it now. Two scuba divers will start harpooning you as soon as you jump into the water. You can harpoon them too or get past the raft and locate the flat ledge on the left where you can climb out (as shown in this screenshot). A baddie will attack here, so take of him along with the divers if you did not kill them before. To the right of the crates, you will find two sets of Uzi Clips (or a pair of Uzis instead of one of the Clips if you do not have them). 1st Secret – There is a tall rock structure opposite the raft. Notice the greenery at the bottom and something that is shinning. This is the Silver Dragon, so jump into the water and get it (see this screenshot to get oriented). Continue swimming to the other side (behind the tall rock structure), until you reach an underwater opening at the bottom left. Swim through it and then upwards where you can climb out. A barracuda shows up when you pass through the opening, so kill it from above (if you want to avoid the barracuda, after getting the Secret climb back up to the ledge where the crates are and follow the rocks opposite the crates). [Alternative way - As soon as you approach the huge lake for the first time, immediately wade in the water sticking to the right and when Lara reaches the deep waters, dive in and swim underwater, keeping more close to the bottom than the surface. When you reach the boat on your left, go on swimming and as soon as you have left it behind, swim towards the surface. A bit further down, there is a small flat ledge on the right. Climb out and pull up to it. Kill the scuba divers from there (if you were fast all the while, they should not have been able to harpoon you). Then dive in the water, get the Silver Dragon and climb on the ledge on the other side to kill the thug and get the Uzi Clips. This way, you will not have to deal with the divers and the baddie at the same time. From the ledge where the baddie was follow the rocks to reach the cave.] Into the cave – Enter the cave and follow it upwards. Just after the second corner, a thug is patrolling beyond. Kill him, take a standing jump over the slide and pick up his Shotgun Shells. There are two ways you can follow here: the left way leads to some rocky blocks and the way ahead takes you deeper into the alcove. For now, ignore the left way and continue ahead through the cave until you reach an opening in the floor with a Large Medi Pack nearby. If you take a look through the opening, you will see the raft below. This is a long drop and you need 90% of health to make it. Make sure you have enough health, hang from the edge of the opening and drop down. Back to the huge lake\ getting into the cave again – Pick up the Cabin Key and two sets of Harpoons. Two sharks are in the water now. Take care of them from above and jump into the water. A third shark is waiting at the end of the lake, but if you want to avoid it, climb on the flat ledge with the crates and follow the rocks. Enter the cave again and follow it until you reach the T-junction. This time, go to the left. Start climbing up the rocky blocks until you reach the top of the cave and finally the opening that overlooks the topmost deck. Topmost deck (4th) & deck with swimming pool (3rd) – Drop down. There is passage beyond that leads to two closed doors. Go to the left until you reach another closed door. Stay sharp because a thug will emerge from the nearby passage. Kill him and go around the perimeter of the deck to reach the other side. There is a pit behind the gold seat. Drop down and pick up two pairs of Grenades. If you approach the backside of the deck, a baddie will attack that carries some Flares. (Note: At this point, you can take a shortcut and completely skip the 3rd deck with the swimming pool, the hull and the cave that leads you to the top of the decks. If you want the 2nd Secret, you can drop to the 3rd deck to get it and use the movable crate to climb back up. If you want to take this shortcut, see this page and skip the next five paragraphs.) Now go to the front side of the deck. Two baddies and a guy with a flamethrower are patrolling on the lower deck, where the swimming pool is. The baddies will come up to catch you if they notice you, from the left side where the steps and the ramp are. Be alerted and have your weapons drawn. Take care of them and be careful of the flamethrower. Once the coast is clear, drop to the deck with the swimming pool and pick up some Uzi Clips and two sets of M-16 Clips from the two back corners of the deck (the M-16 Clips are behind the movable crate). 2nd Secret – Approach the swimming pool and kill the barracuda. Drop into the water and a scuba diver will open a door and come out. Harpoon him or climb out of the water and kill him from above. Drop back down and get the Gold Dragon from the opening. Climb out of the pool. Go to the front left side of the deck and kill the thug below. Do not drop down there. If you accidentally do, you can use the movable crate and climb back up. 2nd deck/ Going to the hull - Now go to the right and drop to the lower deck. This is the 2nd deck, exactly above the deck where you started the level. Go to the front side and take a running jump to the rock structure and another running jump to grab the horizontal part of the ledge ahead (as shown here). Notice the Jade Dragon into the cave on the right. Do not go and get it now, because you will need to drop to the bottom deck and take the long route back. Move to the right where the higher part of the ledge is and take a running jump over the gap to land on the hull. Go to the other side of the hull, close to the propeller. There is a flat L-shaped ledge here, so drop backwards to grab the edge. Shimmy to the left and when you see the crevice below, release and press Action again and grab the crevice. Keep shimming to the left until you can pull up. Into the cave – Turn left and take a running jump to land into the cave. Follow it until you reach an area with a steep slope and some blocks. Start with the block in the back left corner and take running jumps to get past the rest of the blocks. When you reach the topmost block, take a standing jump over the slide. Two baddies emerge from above, so take care of them and pick the Large Medi Pack one of them drops. Continue up the cave to return outside again and onto a ledge that overlooks the topmost deck. At the top of the decks - Take a running jump to grab the roof that is closest to you. Go to the other side and jump to the ledge with the trapdoor (the right ledge as you face the hull). Drop through the trapdoor and draw your guns. Wait for a bit and a baddie will come from around the corner. You have the time to kill him before he approaches. Or, as soon as he appears, climb back up from the trapdoor and kill him from above, although you may need to hang from the trapdoor's edge to lure him again in case he goes hiding. Pick up the two sets of Automatic Pistol Clips from the alcove (or a pair of Automatic Pistols instead of one of the Clips if you do not have them) and continue through the passage. The exit door opens as you approach, but before going through it, locate the movable crate on the right. Pull it once, go to the right side of it and pull it once more to reveal an alcove with a switch. Use it to open a door at the front side of the topmost deck. When you exit, a thug is waiting on the left. Kill him and pick up his two sets of Automatic Pistol Clips. Return past the door you just exited and go to the end of the passage. Turn right to reach the door you just opened. Enter the room and pick up the two sets of M-16 Clips from the back left corner (or the M-16 Gun instead of one of the Clips if you do not have it). Use the Cabin Key to open the door and enter. The decrepit floor here hides sharp glasses. Run over the one side to reach the ledge in the far left corner. Push the button to open a door at the backside of the deck (opposite the one you exited before). Now run over the remaining floor to return back. If you have used all the tiles on your way to the button, simply take a running jump over the pit to grab the opposite ledge. Exit to the deck and kill a baddie if he has already reached you. Go to the backside of the deck to reach the door you just opened. Go through it. Alcove that gets to the top of the hull - Go up the steps and climb up the two blocks. Enter the cave on the left and follow it until you reach a high wall. Vault on the low ledge in front of it and turn around. Take a standing jump to grab the high block, turn around and take a running jump to the wall. Approach the opening in the floor and drop to the hull below. Pick up the Storage Key and slide down the hull to get to the roof above the topmost deck. Drop to the topmost deck and make your way down to the deck with the swimming pool. Go to the front right side and drop to the lower deck (the one above the deck you started the level). Again, take a running jump to the rock structure and another running jump to grab the horizontal part of the duct. Pull up. 3rd Secret – Now you can get the Jade Dragon. Take a running jump to grab the crevice and shimmy to the right where you can pull up. Walk through the sharp glasses and pick up the Dragon (plus four sets of Grenades as a reward for finding all the Secrets). Drop to the bottom deck. If you take a look on the ground, you will see two guys with flamethrower. Kill them from here or leave them for later. You now need to go down, so do either: • Go to the part where you started the level. Jump into the water where you got the Stern Key, swim through the opening and follow the cave until you can surface. Climb out of the water and drop to the ground. • Run straight ahead and you will reach a part of the deck that has an orange/ gold banister on the right. Parallel to this and on the right is the hull of the ship. Proceed a bit further to reach the spot where the banister ends. Turn to face the hull of the ship, position Lara at the edge close to the banister, angled very slightly to the right and take a running jump to land on the slopy part of the hull (as shown in this screenshot). Lara will slide all the way down to the ground. Go to the right and if you did not do it before, kill the two guys with flamethrower just around the corner, where the movable crates are. Then continue to the other side of the hull until you reach the closed door. Use the Storage Key to open the door and enter. Pick up the Seraph from the far left corner to end the level.
|
||
| « Level 9: Living Quarters | Index | Level 11: Tibetan Foothills » |
| We would like to thank Nicky for her help. Many parts of this walkthrough would not have been written without her participation. Last update: 15 September 2007: Text has been proofed, screenshots and shortcut for skipping a part of the decks have been added. |
||
Tomb Raider 2: Dagger of Xian Walkthrough & Game Guide © 2000-2007 www.tombraiderhub.com |
||