Tomb Raider 3: Adventures of Lara Croft Walkthrough & Game Guide
NEVADA: Nevada Desert
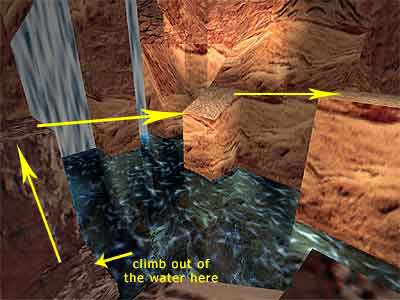
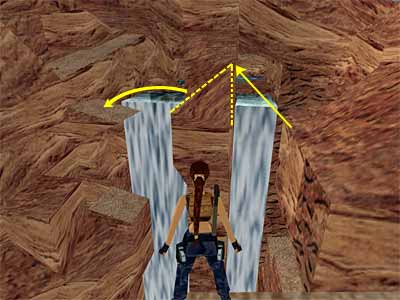
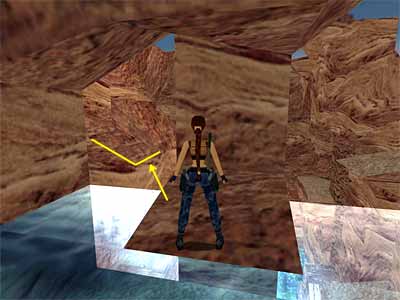
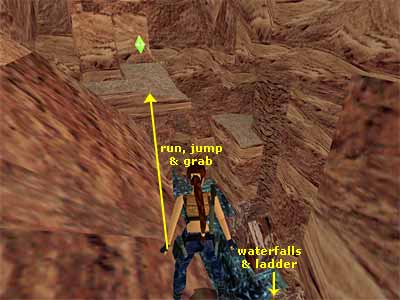
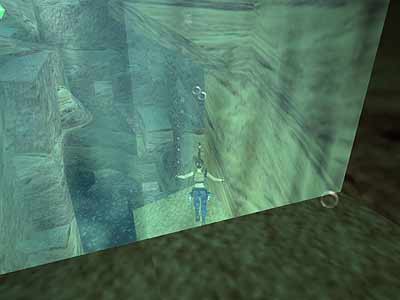
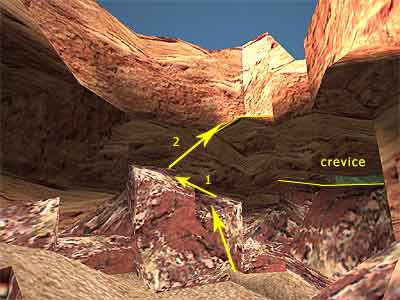
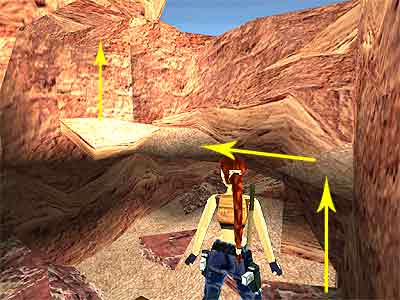
(Note about the rattlesnakes - Like the cobras in the India part, if a rattlesnake bites you, you need to get a Medi Pack (or a Crystal) in order to be healed. Do not waste precious ammo on them. A couple of shots with your Pistols are enough. They will not have the time to attack you, even if you are too close.) Lara reaches Nevada, one of the three places that Willard told her at the end of the India part. After sliding down the cliff, draw your weapons and head forwards. Two vultures appear above the rock arch ahead. Kill them and continue to the right, avoiding the left hand part, as it is filled with quicksand. Kill the poisonous rattlesnake that is lurking among the bushes and head beneath the rock arch. There is another rattlesnake to the right hand side of the pool where the cactus is. Kill it and pick up the Rocket. Go between the rocks beyond the pool and follow the tunnel as it turns right. Climb up the blocks at the end until you reach a slope above a hole. 1st Secret - Turn around and slide down pressing Action to grab the edge of the slope. Shimmy to the very right and drop down just next to the barbwire. Kill the rattlesnake and head to the back side of the cave. Kill two more rattlesnakes and pick up the Small Medi Pack, the Flares and the Crystal. Locate the movable block to the left of the raised ledge (next to the alone rattlesnake you killed). Push it once and pick up the Shotgun Shells. Climb onto the block and then continue to the left to reach again the slope above the hole. This time take a running jump over the slope to grab the opposite ledge. Pull up and take another running jump to the next ledge. Climb to the ledge above and follow the passage to exit to a ledge, above where you started the level. Area with metal structure - Go to the right hand side of the metal structure and follow the sandy ledge to the end. An aircraft flies above Lara's head and passes the valley. From the end of the ledge, take a running jump to the triangular part of the opposite ledge. Then go to the left. Kill the rattlesnake that is lurking inside the bush and take another running jump to the next ledge. Then jump onto the next ledge and go to the end. From the edge, take a standing jump to land to the ledge below. Or, if you do not want to lose any health, take a diagonal standing jump to the sloped wall on the right hand side, pressing Action to grab its edge, shimmy a bit to the left and drop down. Go to the end and drop to the lower ledge. Pick up the Large Medi Pack and climb onto the previous ledge. Turn to face the rock structure opposite where you are standing. Take a running jump to grab the left (lower) angled ledge and pull up. Climb onto the next block ahead and kill the rattlesnake on the right. Continue ahead to reach the top of the metal structure. Drop through the opening in the middle of the structure to land into the water below. Follow the tunnel as it turns left, surface at the end and climb out of the water from the left hand side. Head forwards to reach a canyon. Canyon with waterfalls - (The following jumps and the retrieval of the Secret are shown in this page.) Turn right and take a running jump to the triangular ledge. Carefully walk to the front corner and take a standing jump to grab the block ahead. Pull up and kill the vulture that flies from above. Take a running jump to the next ledge below and head to the end. Climb onto the low block, then onto the next one. Turn around and take a running jump to grab the opposite ledge. Pick up the Uzi Clips and take a running jump back to the previous ledge. 2nd Secret - Notice the climbable wall on the other side (the black markings). Take a running jump to grab the wall and start climbing down. When you reach the crevice, let Lara hang from the bottom part, release Action and press is again to grab the wall beneath the crevice. Keep climbing down and do the same for the next crevice. Make sure that Lara's hands are at the edge of the crevice. Climb to the right and when Lara is not able to continue more (half of her body will be in front of the markings and the other half beneath the crawlspace), release Action and press it again to grab the edge so that Lara is hanging only with her hands. Now shimmy to the right and pull up. Drop down on the other side and pick up the Desert Eagle and MP5 Clips. Climb onto the block and drop into the water below. Making your way back up again - Swim around and get the Uzi Clips, as the pool turns right. There are some Shotgun Shells at the bottom of the pool and more Uzi Clips almost at the end. Notice the two caves beneath the waterfalls - search inside to get some Flares and Shotgun Shells. Surface and turn having the waterfalls to your back (see this screenshot to locate the ledge and see the next jumps). Locate the small rock ledge on the right hand side where you can climb out. Do that and climb onto the next higher one. Take a running jump across the pool, to the angled ledge without pressing Action. Lara does not seem able to grab the edge. So you need to land her directly on it. Turn right and take another running jump to the opposite ledge. Drop off the ledge to the left and pick up the Shotgun Shells. Take a standing jump back to the previous ledge. (If you cannot do it, drop into the water and reach that ledge as you did before). Now take a running jump across the pool to grab the ledge beneath the climbable wall. Pull up and start climbing up the wall, then to the left to reach the ledge where you entered this area. Once again, take a running jump to the triangular ledge and jump to grab the next block. Pull up, turn left and take a running jump to the ledge below. Follow it to the end, climb onto the lower block, then onto the next higher one. Again, take a running jump to grab the wall, but this time do not climb down as you did to get the 2nd Secret. Instead, climb to the top. Carefully walk onto the angled ledge on the left hand side and jump to the small triangular ledge ahead. Draw Pistols and Lara will aim at a rattlesnake that is lurking behind the bush. Kill it, vault onto the ledge and walk to the end. Turn right and jump over the slope and onto the flat ledge on the left (be careful not to fall through the hole next to it). Two aircrafts fly above Lara's head. Use the Look button to spot the Crystal behind the slope. To reach it, stand having the slope on your left, side-step to reach the bottom of the slope and side-flip over it. Lara will land on a slide, so press Action to grab the edge. Shimmy to the left and pull up. (Alternative method - Having the slope to your left, drop backwards to grab the edge. Release Action and press it again to grab the crevice below. Shimmy to the left and pull up onto the ledge beneath the Crystal. Turn left and jump up to grab the bars above. Monkey swing towards the climbable wall. Stand against the wall, release Action and press it again to grab the wall. Climb to the right, then up to the top.) TNT cave - Inside the TNT cave, get the Small Medi Pack from the far left corner. Slide down the small ramp on the right hand side, where the wires lead you, and enter the alcove behind the box to get some Flares. Return back outside ignoring the detonator plunger, because you need the Switch. Going behind the waterfalls - Turn having the TNT cave on your right (and the pool on your left). Take a running jump to the angled block on the right (next to the cave) and press Action to grab the edge. Shimmy to the left and pull up onto the flat ledge (see this screenshot to get oriented). Turn around. The part of the ledge you are facing at is flat, but the other side is angled. Take a standing jump to grab it and pull up. Lara starts sliding, so jump to land on the opposite ledge. Climb onto the block ahead and pick up the Small Medi Pack (see this screenshot if you do not know where you need to jump). Drop onto the previous ledge and turn having waterfall on your right. Stand in the back right corner of the ledge and turn slightly right. Jump to grab the crevice and shimmy to the right. When you hang above a ledge, the camera helps you see that this ledge is angled. So, release and whilst Lara slides down, press Jump to back-flip onto the flat ledge behind. If you fall into the water, it will push you downstream and you will have to make your way back. Once you make it, turn right. You can see a flat ledge on the left hand side and an angled one on the right. Ignore the flat one and take a running jump to the angled ledge. Then take another running jump to the next angled ledge. Walk around it to reach the ground. 3rd Secret - Crawl under the rock and Lara will stand when you reach the corner. Climb up the ladder and dismount on the left (or as soon as you reach the opening, climb a little more and back flip to land just behind). Turn around and kill the rattlesnake. Pick up a pair of Uzis (or Clips if you already have the gun) and the Uzi Clips from the alcove. Safely drop onto the ground and crawl back out. (Note - The alcove on the right side of the area is your way back. It includes a Rocket, but you will get it on your way back. You can get it now if you want, jumping on the blocks in front of the cave. If you are interested in trying this, check the Note at the end of the page.) Water wheel area - Run forwards to the left of the rock column and kill the rattlesnake. Continue ahead ignoring the cave on your left. If you are low in health (PC) or you need an extra save (PS), follow the cave to get a Crystal. Go behind the water wheel around to the right and kill the worker that appears. This and all the other workers that you will meet will try to hit you with their fists. So, do not let them get too near, and use your pistols to take them down. Climb up the two ladders to reach the top of the water wheel. Go to the right to exit again and kill the vulture that flies above. A second vulture appears when you climb on the left yellow tank as soon as you exit the cave. Head to the left of the area, killing a rattlesnake as you go. Jump over the two gaps next to the waterfalls to reach the back side of the area. Kill a second rattlesnake that is lurking inside the bush and pick up the Grenades. Head to the right beneath the rock arch and jump into the pool. Pull the underwater lever to open the gate behind you. Swim inside and get the Desert Eagle Clips. Now swim to the other side of the pool and notice the trapdoor between the two yellow footings. Continue to the end of the pool and locate the underwater lever behind the rock in the far right corner. Pull it to open the trapdoor between the two yellow footings and swim through it. There is an underwater lever at the beginning of the tunnel (look above), which opens the exit trapdoor at the end of the tunnel. Pull it and continue through the tunnel. When you turn right, use the second lever to open a door just outside the tunnel. Continue upwards to surface and climb out of the water. Go through the door you just opened and follow the hallway to the end. Use the switch to raise an elevator in a room you have not been in yet (unless you got the Crystal before). Back track and slide down through the opening, jumping to the left to land into the water again. Climb out of the water before the current pushes you into the channel. Notice the pool: one part is now blocked and a door has opened letting the water roll into the channel, which launches the water wheel (this happened using the last switch). Go to the part that is now blocked and dry (where you pulled the first lever) and jump into the cave. Pick up the Large Medi Pack at the end around to the left and take a running jump to grab the ledge with the Small Medi Pack. Pull up, get the Medi Pack and carefully drop onto the block below. Take a standing jump into the alcove and pick up the Rocket. Jump back to the block, then follow the ledges around to get back to the area with the water wheel. [Note - If you have already taken the Rocket by following the route, which is described at end of the page, there is no reason to get into the area with the Rocket. As soon as you get the Small Medi Pack from the ledge, turn around and walk carefully to its left part and to the edge. Take a running jump to the opposite side and make your way back to the ladders that lead to the shore. Or, after getting the Medi Pack, drop onto the block, then take a standing jump to the low ledge ahead and follow the ledges back to the shore.] Go around the water wheel to the passageway that leads to the elevator you just raised. Kill the worker and go around. Get the Crystal and pick up the Detonator Switch from inside the elevator. Exit to the water wheel area and go to the right. Heading back to the TNT cave - Use the ledges again to get past the pool. From the first ledge, take a running jump to the next one in the corner and another running jump to the ledge opposite the slope you slid before. From here take a standing jump to the ledge between the two waterfalls, pressing Action to avoid hitting on the lower ceiling. Take a running jump to the ledge on the left hand side, passing through the opening and above the left waterfall (as shown here). Here you have three options in order to reach the TNT cave: 1. Turn having the ladder and the waterfalls to your back. Approach the edge of slope (to the right side) and take a running jump to grab the ledge beyond. Pull up and enter the TNT cave (see this screenshot - thanks to Anubis_AF for this tip). 2. Jump to grab the ladder next to the waterfall. Start climbing down. If you do not press the Look button to break the camera, it will help you to see where you need to back-flip. Do that, turn around and head to the end of the ledge. Take a diagonal standing jump to grab the climbable wall and climb to the top. 3. Instead of bothering with all the ledges, jump in the pool and try to keep on the right side. Do not press the direction arrows too much, just make sure Lara is on the right hand way. When she reaches the waterfall from the right hand side, press slightly the down direction key to make her swim upwards, so that she "jumps" up a bit. Instead of falling all the way down to the pool at the bottom of the waterfall, she will land on a high column ahead (as shown in this screenshot). Walk to the edge of the column facing the opposite wall and sidestep to the right corner. Angle Lara slightly to the right to face the ledge between the two climbable walls. Take a running jump to grab this ledge just where it forms an angle (if you aim more to the left, Lara will not make it). Pull up and from the right edge of this ledge, face the wall and jump to grab the handholds. Pull up and you are in the TNT cave. Inside the TNT cave - Use the Detonator Switch to the plunger to detonate the explosives. Immediately side-jump to the left to avoid the rolling boulder. Go down the small ramp on the right hand side and you will see that that ceiling has been collapsed. Climb onto the blocks in the far left corner and then jump to grab the ledge in the corner above the horizontal crevice (as shown in this screenshot). Pull up and turn around. Take a running jump to the triangular ledge and carefully jump to the next ledge. Follow it to the end and climb through the crawlspace to reach a ledge above the High Security Compound (see this screenshot). Outside the High Security Compound - Drop to the ground and avoid the electric fence on the left. Head forwards and pick up the Grenades near the bushes. Go around the fence to reach an opening in the wall. Climb on it and crawl through the opening. When you are able to stand, go up the ramp. Before dropping down, notice the ledge above. Jump to grab it and pull up. Climb on the ledge above on the right hand side and drop into the pool. Pull the two underwater levers. The one behind the central support column opens a door outside and the second one inside the passage opens a door in a water tank. Climb out of the water and return back to the electric fence area the same way you came. Enter the tunnel on the left hand side and slide down the ramp. Kill the two rattlesnakes and go through the door you just opened on the right hand side (if you explore near the fence, an aircraft will fly above). Use the switch inside to flood the water tank. Exit and go to the left towards the ramp you slid. Climb onto the block on the right side of the ramp and take a standing jump to the upper ledge. Again follow the opening in the wall and crawl into. This time drop down and follow the passage. Crawl through the opening to reach the water tank area. Water tank area - Kill the two guys out there and climb up the ladder to reach the top of the tank. Drop into the water and climb out on the other side (if the door is closed, use the underwater lever in the passage). Take a running jump over the fence to land onto the block behind the fence. Behind the fence - Draw your weapons, drop down and go around the building, killing two guys on your way. There is a third guy in the room with the billiards table. Continue outside around the buildings, taking a mental note of the fallen grate on the left hand building, whilst passing between them (you may need it). Do NOT even think to use the switch on the fence or you will get toasted. Enter the store room where the quad bike is and kill the two guys inside. One of them drops a Small Medi Pack and you will find some Uzi Clips in the back right corner behind the tall boxes. Get the bike and drive outside. Go to the left and drive up the ramp to reach the roof of the building. You do not need a run up. Just drive up and break on the roof to avoid falling down on the other side (press Break before reaching the even part of the roof, so as to give Lara time and space to break). If you cannot make it, you can use the grate that is on the same building. It rises after you pass once above the roof. Go between the two buildings and climb onto the brown block, then take a diagonal running jump to grab the grate. Pick up the Generator Access (Card), get the bike and drive down. Go around the same building, dismount and get inside. If you did not do it before, kill the guy now. Go into the next room and use the Generator Access to open the nearby gate. Kill the guy that is lurking inside and throw the switch to deactivate the electricity on the fence. Now you can use the switch on the fence and open the gates. Mount the bike, exit and drive to the left, then through the tunnel down the slope. Take a good run up and drive over the ramp to jump the fence and end the level. The cut scene shows the quad bike hitting on the fence, throwing Lara forwards. Lara lands on the shore of the stream and the bike crashes onto the ground. Two military police officers find her and one of them tries to see if Lara is conscious. Finally the one MP says to the other "Let's take her in". We then see them dragging Lara into the High Security Compound. Note about getting the Rocket earlier - If you want, you can get that Rocket earlier. After you get the 3rd Secret and run behind the water wheel where you kill the worker, instead of climbing the ladders proceed on the shore until you can see a small waterfall on the left. Jump over the water to land on the opposite shore. Go left towards the rocks and jump on the highest slanted rock on the right of the waterfall (if you position Lara with her back against the rocky wall facing diagonally the edge of this rock, she can get on there with a simple jump). Follow the rocks as they turn to the right and when you reach the pool over the waterfall take a running jump to the ledge ahead. Turn around and take a running jump to the ledge opposite and on the right. From there, take a running jump to grab the high block against the big waterfall. Turn around, jump in the alcove and get the Rocket. From the alcove, take a standing jump with Action to land safely on the low ledge on the right. Get back to the shore the same way you came.
|
||
| Index | High Security Compound » | |
| We would like to thank Nicky for her help. Many parts of this walkthrough would not have been written without her participation. | ||
Tomb Raider 3: Adventures of Lara Croft Walkthrough & Game Guide © 2000-2007 www.tombraiderhub.com |
||