Tomb Raider 3: Adventures of Lara Croft Walkthrough & Game Guide
SOUTH PACIFIC: Madubu Gorge
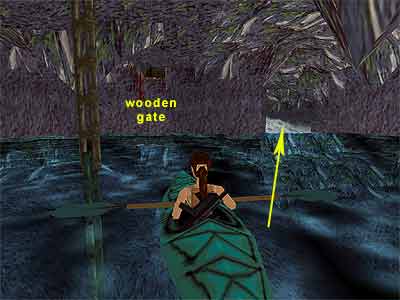
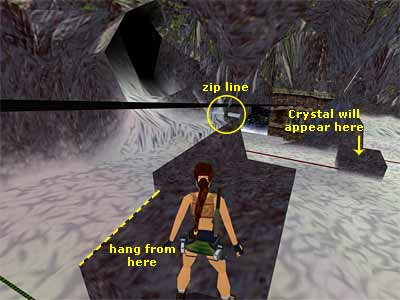
[Note about the lizards - You will encounter lizards in this level. They do not attack, but they breathe a poisonous liquid. If it gets you, you need to take a Medi Pack (or a Crystal) in order to be healed. Be careful because if you get too close they may bite you. Back-flipping and/ or side-jumping whilst shooting keeps you from getting hit by their lethal poison.] Proceed forwards and go to the left side, towards the two columns. A flock of bats fly out, but it does not hurt Lara. Locate the opening in the ceiling between the two columns and pull yourself into the room above. Pick up the Uzi Clips, the Grenades and the Small Medi Pack. You can also see a closed trapdoor in the corner. You will decide in a while whether you want to open it and follow it. For now, drop back down and kill the lizard that climbs down the rocks on the right hand side. A second lizard emerges from the blocks beneath the edge of the stream. Drop to the block where the second lizard came from. Drop to the next one on the left (if you face the stream) and then onto the next one. From here you need to jump to the block in the middle of the stream. To get there, take a standing jump, jumping from the middle of the block. Or, hop back so that Lara's back touches the wall. Start running and do not press anything. Lara will run off the ledge and land directly on the block in the river. Choice of path - The deal is to find a kayak and paddle down the river. You need to decide now if you want to take the short or the long route. If you decide to take the short route, you will miss two Secrets. Make your choice and follow the Common Route below. Short route - (The following procedure is shown in this page.) From the block in the middle of the stream, take a running jump to grab the angled rocks on the other side. Shimmy to the right, pull up onto the flat ledge and climb on the block on the right hand side. Having the stream on your right, take a running jump to the angled ledge ahead. Use the triangular ledges to the right to reach the back-side of the slide. Push the button to open the trapdoor back where you started the level. Make your way back to the flat ledge you pulled up before (it is No3 on this page). Drop backwards, grab the edge and start shimming to the left. Keep shimming until you reach a greenish flat ledge. Continue shimming to the left until you see an opening below. Release Action and press it again to grab the opening. Pull into and crawl forwards. Stand and carefully jump to the ledge on the left hand side. Get the Crystal and push the button to open the trapdoor behind. Carefully jump back to the previous ledge, climb through the trapdoor you just opened and onto the greenish ledge. Walk to the edge and towards the slide on the left. Take a running jump to the block in the middle of the stream and another (diagonal) running jump to grab the ledge on the other side. Pull up and climb up the blocks to reach the part where you started the level. Climb through the opening between the two columns and drop through the trapdoor to land on a slide and splash into the pool with the kayak. Do not try to climb on the ledge of the waterfall or you will die. Climb into the kayak and paddle out of the room (check at the bottom of the page how you can control the kayak). The current of the stream will guide you on where you need to go. Try to face forwards in order to see the upcoming areas. There is a Crystal just after the second turn. Try to stay in the middle so you can get it. After passing beneath the bridge, stick to the right hand wall and stay to the right in the next turn to avoid the red wire (bad one). If you pass over it, back paddle to avoid the falling rocks ahead (skip to the Common Route below). Long Route - From the block in the middle of the stream, take a running jump to grab the angled rocks on the other side. Shimmy to the left until you reach a greenish flat ledge. Continue shimming to the left until you see an opening below. Release Action and press it again to grab the opening. Pull into and crawl forwards. Stand and carefully jump to the ledge on the left. Get the Crystal and push the button to open the trapdoor behind. Carefully jump back to the previous ledge, climb through the trapdoor you just opened and onto the greenish ledge. (The following sequence is shown in this page.) Jump up to grab the handholds and traverse across the river. Drop to the ledge below and then drop backwards to grab the edge. Shimmy to the right beneath the rock and pull up on the greenish ledge. Turn around and take a diagonal running jump to the greenish ledge on the left hand side. Press Action to grab the edge, shimmy to the right and pull up onto the flat ledge. From here, take a standing jump over the slide to enter the cave. Inside the cave - Pass the closed gate and slide through the opening on the right hand side. To clear the spikes below, hang from the edge of the block, release to drop onto the slide and press Jump to back-flip over the spikes. Turn around and drop down into the dark area. Before going through the passage, notice the crawlspace on the right? For your information, a lizard will attack as soon as you crawl through. To save health, ammo and Medi Packs, crawl just a little bit in the crawlspace. When you hear the lizard roaring (which means it has spotted you and is about to attack), immediately back out, stand up and start shooting it with your Pistols, whilst constantly moving around. Jumping straight up can save you from a poison breath attack. When the lizard is dead, crawl through the opening. Climb up the blocks and cross the bridge to enter a small cave. Drop down on the other side and jump to the bridge on the right hand side to get the Crystal. Draw your weapons and kill the lizard that is now lurking in the doorway you came from. Then jump back and return to the dark area in front of the crawlspace and spikes. Continue through the passage and go up the steps, taking a standing jump to clear the slide. Just before the second corner, draw your weapons because a lizard hops from around. When you see it popping out from the corner, immediately jump back and then to the left, shooting all the while. This way, you will not lose any health. Once you are done with it, continue up the steps and drop down at the end. Push the button to open the gate back where you first entered the cave. Make your way back to the dark area and climb up the ledge to reach the spikes. Walk through the spikes and use the handholds on the left hand wall to reach the upper block and pass over the second slide. 1st Secret - Go through the gate you just opened and walk to the edge of the opening that overlooks the stream. Safely drop to the block below and turn around. Take a standing jump to the waterfall on the left and enter the cave. Kill the lizard that is lurking below and drop down. Pick up the MP5 Clips on the left and climb back up to the entrance of the cave. (Note - From the entrance of the cave, if you turn to face the stream and look directly below, you will see two white underwater rocks. These two rocks are safe spots, but they do not lead anywhere and there is no way to come back. If you decide to visit those, make sure you save your game first. Turn around on the ledge, jump back to grab the edge and shimmy either to the left or right. Release Action and let Lara slide backwards two slides and finally land on one of the two rocks, as shown here. Now you can marvel at the river and the waterfalls, but do not even think of jumping in the water!) Room with pool, pillars and burners - Turn to face inside the cave and take a standing jump to grab the handholds above. Press Action as soon as you take off. If you press Action at the end (when Lara is ready to reach the handholds), you will not make it. Monkey swing to the other side and drop down. Take a notice of the burners below. Slide down the ramp and jump to grab the pillar ahead; pull up. There is a Crystal on the second pillar, but do not jump on it because it ignites. From the first pillar, take a running jump to grab the third one and you will get the Crystal in the air. Pull up and kill the lizard that is lurking below. Take a running jump to the doorway ahead. [If you drop into the burner, load a saved game instead of jumping into the pool to extinguish Lara. There are angled ledges to the left and right, which means that you need to turn Lara 45 degrees to the right and jump between the angled ledge and the pillar (the left angled ledge is high). If you decide to do that or you accidentally drop into the pool, you can climb out from the other side, but you cannot climb through the doorway, because it is high. You need to climb on the first pillar (from the left if the exit doorway is to your back) and follow the way as described above in order to reach the exit.] Climb to the hallway above and pick up the Small Medi Pack from the left. To reach the other side of the hallway, start crawling in order to avoid the poisonous darts. Slide down the ramp to reach a block above the water. Jump up to grab the handholds and traverse downwards to the left. Drop to the ledge below and get the Crystal from the bridge. Return back and take a running jump to grab the block above the water. Pull up, grab the handholds again and traverse upwards to the other side. Drop down at the end, climb on the next block and crawl through the opening to reach a ledge that overlooks the stream. Turn left and take a running jump to grab the handholds on the rock. Climb to the top. The opening on the left hand side leads to the kayak. Ignore it for now and let's go for a Secret. 2nd Secret - Stand against the wall having the opening that leads to the kayak on your right and take two steps backwards (as shown in this screenshot). Jump backwards to land on the slide and press Action to grab the edge. Shimmy to the right and drop to the wooden ledge below. Jump to the next ledge and then jump over the stream to land next to the hut. Take a running jump to the block at the bottom of the steps and go up them to enter the hut. Pick up the Large Medi Pack and the Rocket. Exit the hut and carefully make your way back to the wooden ledge. The way back is quite tricky and the following jump is shown in this page. You need to jump to the angled block beneath the ledge you were standing before, after crawling through the opening and before jumping to grab the handholds on the rock. Having the hut to your back, walk to the back left corner of the wooden ledge. Turn 45 degrees to the right in order to aim the angled block. Notice the overhanging rock above. You need to be careful not to bump Lara's head on it. Angle Lara so that her head is just to the left of the overhanging rock. Take a running jump WITHOUT pressing Action or you will not reach the block. Lara will pass just to the left of the overhanging rock and you need to turn her right whilst in midair. Pool with kayak - Once you make it, climb to the ledge above, take a running jump to grab the handholds on the rock and climb to the top. Go through the opening on the left to reach the pool with the kayak. Kill the two crocodiles in the pool and jump into the water (once you drop in the water, you cannot climb back up, so make sure you have killed the crocodiles before jumping in!). There is an underwater lever exactly below the corner of the ledge. Pull it to open the gate and climb into the kayak (see the Controls of kayak at the end of the page). Paddle out of the room and back paddle as you pass the steep part. There is a Crystal in an alcove on the right hand side. It is not easy to get, as you need to try hard and fight against the current. If you badly need the Crystal, see this page which includes screenshots and instructions on how you can get it. Otherwise, go down the falls, sticking to the right to avoid passing over the red wire (bad one). If you do that, back paddle to avoid the falling rocks ahead (continue with the Common Route exactly below). Common Route - You enter a cave where the water is calmer. The current pushes you to the right towards the moving blades. Immediately go against the current and paddle to the left to pass over the green wire (good one) next to the waterfall. This will stop the blades and you can pass freely. After passing the blades, back paddle to softly pass the steep part. Choice of path - There is another high fall with a red wire on the left and a vine-covered cave on the right. You can choose whichever path you want without missing the final Secret of the level. Note though that both paths are trapped (although the left one is easier to get past) but the vine covered cave gives you two more Crystals that are important for the PS players. We follow the vine-covered cave in order to get the pick-ups. If you want to follow the left way with the red wire, check the Alternative path to the plug pool below. Through the vine-covered cave - After passing the fall, allow the current to push you to the pool. When you reach the pool, immediately start back paddling because the current pushes you to the left. Keep back paddling and if you touch a rock behind you, release to move a bit forwards and start back paddling again. Because of the current, the kayak will start turning, leading you into the cave. Quickly decide if you want to go to the left or right. Right path - You pass over two red wires that activate some spikes in front of them. If you do not want to lose a lot of health, paddle forward to quickly get past them, instead of just letting the current push you. There are three more sets of spikes beyond. You can avoid the third one if you take an open turn. You finally end up in a pool with a big plug (now check on how you can get the 3rd Secret below). Left path - You first pass over a red wire that activates a poisonous dart trap. Then over a green wire that makes a Crystal appear on a block beyond in the middle of the stream (you will get it later on foot). The second red wire causes some spikes to pop out, so paddle forward to immediately pass through them. After passing the building (that you will visit later) and when you reach the next pool, try to stay in the middle in order to get the Crystal in the middle of the next fall. This fall is very steep, so make sure you back paddle a lot. Or, if you happen to go down this fall backwards, press hard the up direction arrow. You finally end up in a pool with a closed gate ahead and a fall that goes upwards to the left. You need to go up that fall in order to reach the pool with the big plug. It is quite frustrating, but do not give up and keep paddling (now check on how you can get the 3rd Secret below). (Alternative path to the plug pool - If you decide not to go through the vine-covered cave, the current will push you to the left and towards a red wire. You do not have another choice but to pass over it. There are spikes and a blade trap below. Lara loses health when you pass through them, so take a Medi Pack if you need it. Once you make it, back paddle to softly pass the steep fall. The water is calmer here, so you can go against the current and to the left into the cave in order to get the Crystal, which is the level's 3rd Secret. Then let the current push you towards the pool with the big plug. If for some reason you cannot get the Secret, you can earn it later. You will not be able to get the Crystal, but you will hear the sound signaling the Secret and add it in your summary.) 3rd Secret - Once you are in the pool with the big plug, steer to the cave with the platforms alongside. Go to the right around the corner and paddle behind the waterfall to get the Crystal at the end of the cave. Let the current push you back to the pool with the big plug. (If for some reason you cannot get the Secret, you can earn it later. You will not be able to get the Crystal, but you will hear the sound signaling the Secret and add it in your summary.) Pool with the big plug - Take a look around and locate the doorway with the open wooden gate. Go through the tunnel on the right hand side (as shown here) to enter a small cave with a pool. The current is stong and it may push you back and towards the plug. In that case and if you cannot go up the tunnel, back paddle. A crocodile is swimming around. Jump into the water and quickly climb on the ledge. Kill the lizard that is climbing down the steps and then the crocodile into the water. To avoid getting hit by the lizard's poison, start shooting as soon as you get out of the pool. Wait for the lizard to get down the steps, but before it gets too close to you, jump over it or forwards and to the right to land on the steps. Quickly turn around and shoot it again. Side-jump if necessary, but be careful not to fall in the water where the crocodile is still alive. If you jump upwards whilst the lizard is breathing towards you, you will not get poisoned, but you need to be exact at timing your jump. Pool with fire-breathing blocks - Go up the steps and drop on the ledge in front of the doorway. Take a standing jump to grab the handholds above and traverse across the pool being careful of the two fire-breathing blocks. To get past each fire, stop at the end of the previous tile and start traversing when the fire goes away (use the Look button to locate the partition of the tiles). At the end and once you have passed both fires, stick to the left and drop to the platform below. Turn around and take a running jump to the opposite platform, pressing Action if necessary to avoid hitting on the rock that is hanging from the ceiling. Enter the opening and pick up the Rocket Launcher (or a Rocket if you already have it). Climb up the blocks to reach an opening that overlooks the pool close where you got the last Secret. Climb down the ladder (or safely drop down) and go to the end of the ledge. Carefully jump to the next ledges to reach the Large Medi Pack. Turn to face across the pool and take a running jump to grab the opposite ledge. Pull up and pick up the MP5 Clips. If you did not get the Secret before, you should hear the sound whilst in midair, which indicates that you just got it. Check the statistics to verify this. The jump back is quite tricky and many people have mentioned problems here. Turn to face across the pool and stand on the right side of the ledge. Take a running jump turning a bit to the left in midair to grab the opposite ledge where you got the Medi Pack (it seems that Lara cannot grab the right hand part of the ledge). Jump to the ledge on the right and then to the next one. Do not jump to the third ledge where you dropped (or climbed) down before. Instead, climb up the block on the left and pull onto the ledge above (or use the handholds on the wall). Jump up to grab the bars and traverse across the pool being careful of the fire-breathing block. At the end, traverse to the left and drop to the ledge below. Enter the cave and pick up the Flares and the Shotgun Shells. Exit the cave, grab the bars again and traverse to the other side (that is, to the right after the fire-breathing block). Drop down at the end and go to the left. Climbing up the wall above the steep river and spikes - Take a diagonal running jump to the ledge on the right above the blade and spikes. Turn around and take another running jump to grab the handholds on the wall (not the ones above the slide!). Follow the climbable wall as it goes: to the left, upwards, then left again. Drop to the flat ledge and turn around. Beyond you can see the vine-covered cave. For now go through the opening on the right hand side and climb down the ladder. Turn around. Hallway and walkway with boulders - You can see the boulder at the end of the hallway. Run and crouch in front of the step and the boulder will pass over Lara's head. Vault onto the step and do the same for the second boulder. Before continuing, notice a third boulder just inside the next room. This rolls on the walkway, towards the other side of the room, but (for your information) flames are getting activated alongside. There is an easy way though to get past them without losing health. Climb on the walkway and take about six or seven steps forward. That is, until the end of the second block. No more or the boulder will roll. Turn left or right and drop backwards to hang from the edge of the walkway. Shimmy to the other side and pull up. That way you do not activate the boulder and the flames. From the end of the walkway, jump to the doorway and take a standing jump over the flames, jumping from the middle of the block. Run forwards and crouch in front of the step to avoid another rolling boulder. Climb on the block to reach a ledge above the water (if you followed the vine-covered cave before, you should recognize this place). Take a running jump to the ledge on the right hand side and use the handholds on the wall to reach the next ledge. Crawl through the opening and follow the passage to stand above the water again. Take a standing jump to the block in the middle of the stream and from there take a running jump to the rocks on the opposite side (make sure you jump to the right of the overhanging rock). Now take a standing jump to the rock with the zip line. If you followed the vine-covered cave before, reached this place and followed the left path, there should be a Crystal on a block beyond, which was triggered by passing over the green wire. Drop onto the lower rocks and run to the end. Take a running jump to the block where the Crystal is and take a running jump, without pressing Action, back to the rocks below the zip line. [Note - If you did not follow the vine-covered cave before (which means that this is the first time you visit this place) or you did but prefered the right hand way, the Crystal is not here. However, you can make it appear by passing above the trigger zone. To do that, go to the block beneath the zip line. Facing the zip line, hang from the left edge of the block (as shown in this screenshot). This part of the water is exactly after the green wire that activates the Crystal. Pull up and take a look on the left. The Crystal is now there.] Ride the zip line to reach the entrance of the building. Drop to the block below and take a running jump to grab the climbable wall (curved face part). Or, drop to the bottom of the chain and climb up the wall. When you reach the top, draw your weapons because a lizard appears from the right (you can turn right and hop backwards to avoid its poisonous breath). Go to the left side of the room and throw the switch to open a trapdoor beyond and pull the plug in the pool below. Go through the passage having your weapons drawn and kill a second lizard that climbs through the trapdoor. Drop down and slide down the ramps to reach the pool where you left the kayak. (Note - If the first lizard hit you, do not heal yourself. Deal with the second lizard and keep watching your health bar. If you health was 100% when the lizard hit you, you may not need to take a Medi Pack, as you are about to finish the level.) Climb into the kayak and paddle downstream to reach the plug room. There is a long drop where the plug was and Lara needs at least 50% of health to make it (even if you are poisoned by the lizards, you can still make it, as long as the poisoned health bar is more than 50%). There is a crocodile swimming around. Jump into the water and climb out on either of the ledges. Take care of the crocodile (you could also harpoon it whilst in the water). Swim under the ledge where the red wooden gate is and pull the underwater lever to open the gate. Two more crocodiles are coming from the other side. Quickly roll and climb onto the ledge. Kill the crocodiles if you are interested in all kills and go through the gate to end the level. Controls of kayak - To climb into the kayak, stand close to it and press Action. Use the up or down cursor key to paddle forwards or backwards. To climb out, make sure that the water is calm and press Roll along with the left or right direction key. The current along the river is very strong and if you reach a point where you need to go against the current, prefer to back paddle than trying to move forwards, because Lara seems to be stronger that way.
|
||
| « Crash Site | Index | Temple of Puna » |
| We would like to thank Nicky for her help. Many parts of this walkthrough would not have been written without her participation. | ||
Tomb Raider 3: Adventures of Lara Croft Walkthrough & Game Guide © 2000-2007 www.tombraiderhub.com |
||