Tomb Raider 3: Adventures of Lara Croft Walkthrough & Game Guide
LONDON: Lud's gate
(*Plus 3 friendly thugs if you decide to kill them.)
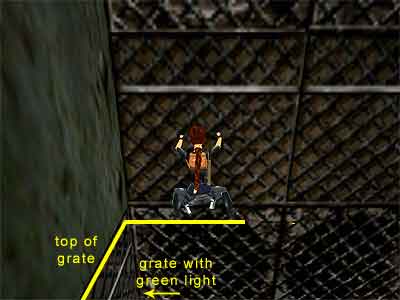
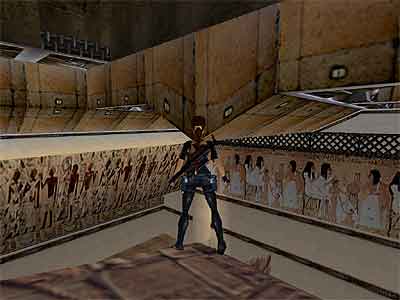
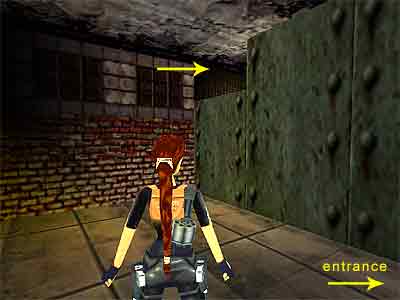
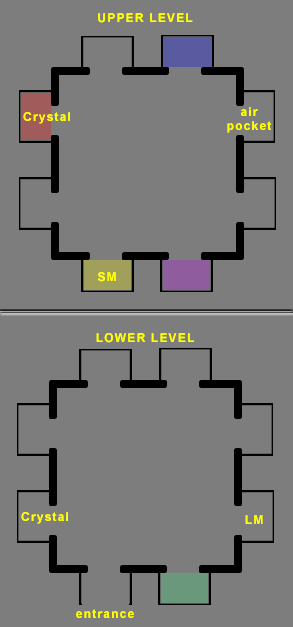
(Note - In the cut scene at the end of the previous level, the leader of the Damned was offered to help Lara and asked her to bring him the embalming fluid. Since Lara agreed, the thugs in this level are friendly. So, do not shoot them, unless you are interested in all kills.) Turn left and follow the thug through the cave, passing two alcoves with two more thugs. You end up in a room with two shallow pools. 1st Secret - From the two openings, follow the left hand one (the right leads you to the same place, but you will miss the 1st Secret). Slide down the ramp forwards and immediately pull into the opening at the far right before the spiked ceiling hurts you whilst it descents. After sliding down, drop down and push the button on the right to open a trapdoor above. Do not go there now. Instead, exit through the doorway and drop to the rocks. Go to the right hand side, where you will find a flat ledge. Hang and drop down to a safe spot next to the barbwires. Carefully Walk to the other side and pull into the crevice. Drop down on the right and pick up the Large Medi Pack and the Flares. To get out, you need to use the ledge above where you got the Medi Pack. Jump up to grab it and pull up. Then climb on the ledge on the right. Turn around and take a diagonal running jump to the slope on the left (or jump and grab it). Drop down back to the rocks and enter the opening you came from on the right. Push the button if you did not do it before and climb on the block to the left. Stand against the grating and press Action and the up direction key to grab it. Without moving at all, back-flip on the ledge behind. Turn around and pick up the Large Medi Pack. (This would have been your entrance if you had followed the right hand opening in the room with the two shallow pools. 2nd Secret - Jump to grab the crating and climb to the left (be careful of the barbwires at the bottom). Start climbing upwards until you see a vent on your left. There is a grated window with a purple\ red light above the vent. Line Lara's head at the bottom of the grated window (as shown in this screenshot) and press Jump and Roll at the same time to twist in midair. Keep pressing Action to grab the grate behind. Pull into the crawlspace and get the Rocket (or the Rocket Launcher if you do not have it). (Note - Because of the grate, Lara will not pull herself into the crawlspace by pressing just the up direction key. Press the Crouch button at the same time and if this does not work, try this: release Action and press it again immediately. Lara will hang from the crawlspace only with her hands. Quickly press the up direction key to pull into before Lara takes the "climbing position" again.) Crawl backwards and climb down, almost above the slide. Back-flip and roll to grab the grate behind (make sure you are close to the slide or Lara will bump on the ceiling above). Start climbing up until you see a grated window with a green light on your left. Position Lara with her legs at the top of the grated window (as shown here) and simply back-flip to the alcove behind. Do not twist because you will not make it. Get the Crystal and the Shotgun Shells (or the Shotgun if you do not have it) and take a running jump back to grab the grate. Climb to the top and pull into the opening on the right hand side. Getting inside the Museum - Crawl into the grated duct, pass the opening (which is above halfway through) and go to the end around to the right. Get the Shotgun Shells and return back to the opening, where you can stand. Climb to the ledge on the left hand side and pick up the Small Medi Pack. Drop into the control room and kill the guard. A second guard is running towards the door. Since you will do it in a few minutes anyway, press the button now to open the door and kill the guard. Pull the movable block once, go to the other side and push it on the gray square. What you hear is a pillar lowering. This pillar was blocking the entrance of the next area. So, exit to the hallway and turn right. (The crawlspace at the end of the hallway is the one where you got the Shotgun Shells before.) Room with blocks and ledges - Enter the room. The goal is to reach the top part of the room in the back left corner (assuming you have the entrance to the back of you). For now go to the other side and pick up the Small Medi Pack from the ledge behind the tall blocks. All the procedure inside this room until the exit is shown in this page. Climb up the blocks in the middle of the room and then climb into the opening above the ladder. Follow the passage to the next room and push the movable block to block the entrance of this room. This raises the pillar back to the entrance, lowers one of the blocks you climbed up before in the middle of the room and raises a wooden platform that you (probably) have not seen\ noticed yet. Climb on the block and then climb into the crawlspace. Drop down on the other side and return to the room with the blocks and ledges. Stand on the topmost step (the blocks you climbed up before. Also notice that the higher block is not here). Facing the entrance, turn 45 degrees to the left. Take a standing jump to grab the wooden bars and traverse forwards. Turn left, hang from the edge of the bars, release and grab the ledge below. Pull up and get the Crystal. Safely drop to the ground, climb up the blocks in the middle of the room and jump to grab the wooden bars again. This time traverse to the right, passing beneath the wooden platform you raised before. Release and grab the ledge below. Pull up and use the switch to open a door elsewhere (the exit door). Crouch and crawl backwards to drop to the ground. Climb on the pillar in front of the entrance, using the angled greenish ledge on the left of the pillar. Jump up to grab the ledge above. Pull up and climb into the crawlspace on the right. Drop down on the other side, turn around and climb on the ledge ahead. Follow the passage and drop down to the hallway, next to the crawlspace you got the Shells before. Enter the control room again and pull the movable block once to lower the pillar that blocks the entrance of the room with the blocks and ledges and raise again the tallest block in the middle of the room. Enter again the room with the blocks and ledges and climb up the blocks in the middle of the room. Stand on the topmost block and having the entrance on your left, jump up to grab the ledge above. Pull up and turn right. Take a standing jump to the ledge with the switch, pressing Action to avoid hitting on the upper part. Use the switch to close the door of the passage you went through before. Carefully jump back to the ledge and drop down. Climb up this ladder and drop on the ledge to the left. Turn around and take a standing jump to the block on the left, pressing Action to grab it. Or, do not press Action and you will land on it. Just release the Up direction key when you land in case you accidentally fall down. Jump to the next ledge. Be careful at the end because there is an opening below. Jump into the alcove on the left and pick up the Flares and the Shotgun Shells. Turn around and jump to the next ledge. Go to the right around the corner until you reach a slope. Slide down and jump on the edge to grab the ledge ahead. Or, slide backwards to grab the edge, pull up and press Jump and Roll and Action at the same time in order to back-flip, twist in midair and grab the ledge. Pull up and follow the passage to reach another slope with a decrepit ledge at the bottom. Slide down and as soon as you land on the decrepit floor, jump forwards to grab the ledge with the two mummy cases. Pull up and pick up the Embalming Fluid. [Note - You can now either crawl through the opening or drop down taking a shortcut. Note though that by dropping down you will miss several pick-ups (including two Secrets) and kills and you will never return the Fluid to the Damned. If you are not interested, turn around and jump on the decrepit ledge to the left below. Allow it to collapse and press Action to grab one of the slopes below. Traverse a bit to the left and drop on the ledge with the Rocket. Drop into the pool below and let the current push you until you can surface. Now pick up the walkthrough at the Circular pool with rocks and crates below. If you follow the normal walkthrough by crawling through the opening, you will not miss this Rocket. See the Note about the Rocket below.] Inside the Museum - Crawl through the opening and get the Uzi Clips. Drop down at the end and turn around. There is a guard patrolling on the left hand side. If you wait for a bit, he will come and you can kill him easier. There is a closed door at the end of the hallway, so crawl through the opening, opposite the one you just dropped down. Crawl to the end and kill the guard in the next room. Push the button to open two doors that lead back to the hallway and pick up the Rocket. Go behind the blocks and drop to the ledge below. Sphinx's room - Take a standing jump to grab the grates above and traverse to the others side following the grates. Drop on the ledge and get the Crystal. Turn around to face the way you came and stand in the front left corner of the ledge you are standing on. Take a standing jump forwards to land on Sphinx's head. Or, go to the left side of the ledge and jump forwards to grab the grates on the ceiling. When you reach the second metallic horizontal line, release Action to land on the Sphinx's head. [Note - There is a Crystal on a ledge on the other side and this is the 3rd Secret. To the left and below is a ledge with a Rocket (or the Rocket Launcher if you do not have it). If you drop and get the Rocket, you will not be able to get the Secret, as you will need to slide down to the ground.] There is a pillar below to the right. There is a ledge opposite the pillar (on Sphinx's body) with a Small Medi Pack. You cannot see the ledge from here, but you MUST go there if you want the next Secret. You need to somehow perform a "blind" jump. Turn to face the side where the pillar is and walk to the front left corner of the ledge. Turn left to aim the part of the ceiling that bends downwards and take a standing jump, pressing Action to land on the ledge with the Medi Pack. Pick it up and take a standing jump to the pillar. (This screenshot shows Lara's correct position. Position her as the screenshot shows and take a standing jump with Action.) 3rd Secret - Turn left and take a running jump to grab the back side of the white slope. Pull up, slide down a bit and jump to the ledge ahead. Go to the end and pick up the two Rockets and the Crystal. From the middle of the ledge, take a running jump to the Sphinx's shoulder. You start sliding down, ending either on the ground or on one of the ledges at the front side of the Sphinx. If you approach the back-side of the Sphinx, beneath the ledge you got the Secret, a guard will appear so take care of him. Now go around the Sphinx, heading to the exact opposite side. Pass the stairs (from the raised ledge next to the Sphinx) and pick up the Shotgun Shells at the end. Back-track to the stairs, kill the guard that appears and pick up the Small Medi Pack he drops. Go up the stairs. Jump up to grab the ledge above and pull up. There is a movable block here, but wait until you get a Secret first. 4th Secret - Having the movable block on your right, take a standing jump to grab the crawlspace ahead (above the entrance). Pull up and pick up the Rocket and the Large Medi Pack. Crawl back out and drop down. Again, jump up to grab the ledge and pull up. Pull the movable block once, hang from the edge of the ledge and shimmy to the left towards the movable block. Use its side as a ladder and climb up, then to the right to drop into the alcove. Pull up on the upper ledge, follow the passage and drop down. Now drop to the next ledge below and forwards. The movable block in front of you is another one that you can only pull. The first movable block is behind you. Push the first block once and then pull the second movable block twice. Again, use the first movable block as a ladder to reach the alcove above. Follow the passage and drop down to reach the back-side of the second movable block. Back to the lair of the Damned - You are back in the lair of the damned, so drop down into the room with the two shallow pools. Go up the ramp on the right hand side to reach the room where you started the level. You need to place the Embalming Fluid into the alcove with the blue lights above. Do not climb into the alcove. Just stand in front of it and use the Fluid. This opens a door on the left in the same room. (Note about the Rocket - If you want to get the Rocket close where you got the Embalming Fluid, you need to take a tour. From the room with the two shallow pools, go through the right hand opening and climb up the grate to the top to reach the Room with the blocks and ledges. Climb to the top to reach the slope opposite the two mummy cases. Slide down backwards, release and grab the slope below. Traverse to the right and drop down to slide on the ledge with the Rocket. Drop into the pool below and let the current push you until you can surface. Note though that you will miss the underwater area where you get the UPV. If you decide to do that, skip to the Circular pool with rocks and crates below.) Underwater area\ getting the UPV - Go through the door you opened by placing the Embalming Fluid and fall through the trapdoor and into the pool below. Swim down to find the UPV (Underwater Propulsion Vehicle). To get it, press Action. Press Jump to move and the direction keys to steer. To leave it, press the Roll button. The UPV is not free of charge. Pressing Action you shoot the Harpoons you have got so far. So, be careful whilst shooting because the auto-aim does not work. You can either decide if you want to use it. It is quite difficult to maneuver, but you must get it if you do not have the Harpoon Gun. Also, the crocodiles may swim around you, but they do not attack you if you ride the UPV. If you can handle it, go ahead and get it, but do not forget that there is no auto-aim. When you swim through the opening, you reach a cave and you cannot go back. A crocodile is coming from the far right of the area, so quickly take care of it. There are two openings on each side of the cave. The first on the right hand side includes an air pocket. Once you are done with the crocodile, get some goodies: two trines of Harpoons and a Crystal from the first opening on the left, two trines of Harpoons and a Large Medi Pack from the second opening on the left and finally some Uzi Clips from the second opening on the right. Once you get them, swim to the far right and get the Harpoons from the block. There is also a Small Medi Pack beyond in the corner. Quickly grab it, because a second crocodile is swimming towards you. Swim to the far left and the current will push you where you can surface. (Bug note - Some people have mentioned an invisible wall that blocks the entrance of the 6th Secret. Do not save and load until you get it because this seems to activate the bug. Besides, the Secret is not too far away.) Circular pool with rocks and crates - Climb on the ledge and pick up the two trines of Harpoons. Jump into the water on the other side and follow the tunnel passing a closed door on your right and a trapdoor on the left above. You reach an area where you can surface, next to a glassed room with a Crystal and a UPV (this is the 6th Secret). Pull the underwater lever to open the trapdoor and swim through it. Climb out of the water and then climb on the upper ledge next to a window. The camera shows Lara from outside and you can see the frogman and the guard. Do NOT accidentally shoot here or you will activate the alarm and the frogman will dive into the water and seal the passage to the 6th Secret. Push the button to open the door, down in the underwater tunnel. (The following sequence until you get the 6th Secret is shown in this page.) Drop into the water and swim through the door you just opened. Follow the passage, but do NOT surface when you reach the next area. The frogman will dive into the water and you will miss the 6th Secret. Swim to the right until you reach an underwater wooden platform with two openings. Here you can surface in the corner between the openings. 5th Secret - Swim through the opening on the left and get the Desert Eagle Clips from the bottom. Swim back outside. (You may not hear the chime signaling the Secret, but if you check the statistics, you will see that it has been added.) Now swim through the opening in the corner, get the Small Medi Pack and pull the underwater lever to open a trapdoor elsewhere. Swim back outside and head underwater to the left, passing in front of the opening you came from. At the end of the channel, climb out of the water (on the ledge to the right) and then climb on the next ledge. Crawl to the right around the corner to reach the trapdoor you just opened. Crawl backwards to drop into the water, get the Crystal and climb out of the water on the other side (opposite the underwater wooden platform with the two openings). 6th Secret - Crawl to the left around the corner until you reach the rocks, where you can stand. Go to the end of the passage and turn right. Jump over the slope if necessary and climb into the doorway on the left. Follow the hallway ignoring the guard that turns on the alarm and jump to the metal ledge below. The frogman jumps into the water and harpoons Lara. Kill him and also kill the guard that was with him. Jump into the water and swim beneath the metal ledge. Claim the Secret: four trines of Harpoons, a Large Medi Pack, a Crystal and a second UPV (again, you may not hear the chime signaling the Secret). Climb out of the water and get some pick-ups around. The guard who was with the frogman dropped the Boiler Room Key. Close to him and behind the crates next to the metal door, you will find three trines of Harpoons (one of them will be the Harpoon Gun if you do not have it). Go behind the stack of crates opposite where the frogman was standing to get a Large Medi Pack. On the crate where the frogman was you will find some Harpoons and some more exactly behind it. Go to the rocks where you crawled behind before, climb on the blocks to the left and crawl to drop into a hole where you will find a Small Medi Pack (see this screenshot if you are not sure where the Medi Pack is, as well as the next Harpoons). On the ledge opposite the blocks, you will find some Harpoons. Enter the hallway with the guard you ignored before, kill him if you did not do it before and crawl through the opening on the right of the entrance. Drop down on the other side and get the Crystal and the Flares (this screenshot shows the opening you need to crawl through). Crawl back out, head to the end of the hallway and jump to the metal ledge below. (Bug warning - Make sure you collect the Boiler Room Key now and do NOT leave this area without the Key. You may encounter a bug in which when you return to the circular pool with rocks and crates, the guard who holds the Key has been disappeared. You will not be able to find him and therefore kill him and get his Key, making unable to finish the level.) (Note about the UPV - If you did not manage to get the 6th Secret and therefore the UPV, you will find another one in the next area with the 16 openings. The UPV is located in the same opening with the air pocket as it will be described below. If you have got the 6th Secret, you will not be able to see the UPV in the area with the 16 openings. Even if you cannot handle it, we strongly suggest you to get it and park it somewhere, because you may need it in a long swim that follows, as you can swim faster with that.) Underwater large area with 16 openings - Drop into the water (get the UPV if you want) and swim through the tunnel. Halfway you will meet a scuba diver. Kill him and return to get some air. Swim down again and through the tunnel to reach an area with 16 openings (including the one you came through). A crocodile is lurking here, so take care of it and return back to get some air. Again, swim back down to reach the large area with the openings. This is quite complicated and the colors inside the openings are supposed to help you. There are two levels in this area, each one includes 8 openings. Set this area in your mind as a square. Each side of this square has two openings that makes 4x2=8 openings. There are two levels (up and down), so 8x2=16 openings. To get some help, see this diagram. The entrance is at the bottom level. There is an opening with a Crystal oo the left (if the entrance is to your back) and a Large Medi Pack on the right (it is easy to locate both pick-ups). If you are a PC player and your health is not low, you can leave the Crystal for later. There is an air pocket on the upper level and you can find it by swimming through the left opening on the right hand wall (as you face it). What follows is a series of levers and doors, so you need to come back here frequently and get some air. First, swim through the green opening on the left of the entrance (as you face it\ lower level) to find a lever on the right hand side. Pull it to open a door in the yellow opening exactly above the entrance (upper level). Before going there, get some air because it is a long swim. Now swim through the yellow opening (it goes left then downwards) and go through the door you opened. There is a Small Medi Pack here and a lever that opens a door in the red opening (upper level) exactly opposite the air pocket. You may want to get the Medi Pack after getting some air. Swim through the red opening and the door you opened, get the Crystal in the entrance and cut to the left to find a lever that opens a trapdoor in the blue opening (next to the air pocket, to the left if you face the air pocket). This also releases two scuba divers: one is close to you and the other is waiting close to the air pocket. Ignore both now and go to get some air that you probably need. The divers will not follow when you surface, so you can then swim down and either harpoon them or ignore them (for now). Get the UPV and as you exit the opening with the air pocket, cut to the right to enter the blue opening. Swim through the trapdoor and then upwards to surface. If you came here without the UPV, we suggest you to go back, get it and bring it here. Boiler room - Climb out of the water (on the low ledge) and drop into the pool on the other side beneath the burners. Get the Harpoons and pull the underwater lever to turn off the burners. Climb out of the water and jump to the first burner, then to the second. Turn left and take a standing jump to clear the slide. Pick up the Large Medi Pack and the Uzi Clips and slide back down. Now jump to the ledge in front of the doorway and enter the duct ahead. Follow the duct to the right around the corner and watch out for the three plugs. To get past them, stand in front of them as close as you can and just run forwards when they go up without sprinting or you may get squished by the next one. Once you make it, climb on the ledge and go almost to the end of the walkway. Turn right and take a running jump, pressing Action to grab the grates above. Traverse forward to reach the opposite side (ignore the crawlspace on the left for now) and drop down at the end. Pick up the Flares and the Desert Eagle Clips and climb on the duct (that leads to a shaft from where you cannot go anywhere). Jump to grab the grates again and traverse towards the crawlspace. Stand against it, release and grab the edge of the crawlspace. Pull into. Drop down on the other side and use the Boiler Room Key to open the nearby door. Get in, get the Crystal and press the button to open a door in the purple opening back in the area with the 16 openings. Crawl back out and drop into the water. Back to the underwater area with the 16 openings - You now need to swim back to the area with the 16 openings. For your information, there is not any air pocket this time, so do not look for it and be fast (you brought the UPV here, didn't you?). If you do not have the UPV, you may lose some health until you surface. Swim down making your way back to the 16 openings. A crocodile is waiting for you now, but do not waste time with it, unless you want all the kills. If you decide to kill it, make sure you return back to get some air. When you exit the blue opening, the purple one is exactly ahead. Swim through it and then swim to the left, then through the door you opened. Swim upwards to surface. Climb out of the water and onto the ledge with the Large Medi Pack. Drop into the water again and climb out on the other side. To get past the swinging blades, walk to the edge of the ledge and stick to the left wall. Take two steps backwards and jump to grab the ledge with the second swinging blade. Alternatively, take one step backwards and jump to land directly on it. Stick to the left and move forwards when the blade moves to the right. Do the same until you reach the third ledge. Then jump to the doorway. There is a guard at the end of the passage that you can avoid if you are not interested in all kills. Besides, the passage leads to a shaft from where you cannot go anywhere. Anyway, climb to the ledge on the left of the entrance and slide down the ramp. Climb on the next ledge and follow the duct to reach the shaft. Take a running jump to grab the upper crevice, release and grab the crawlspace below. Pull into and crawl until you can stand. Take another running jump to grab the opposite crawlspace and pull into. Crawl and when Lara stops, turn around and drop down. Turn around, grab the backside of the slope, pull up and slide down. Crawl through the opening to end the level. In the cut scene Lara reaches Sophia's office, who is sitting behind her desk. Sophia, like she was expecting Lara, tells her "I take it you're ready to sign on". Lara asks to what and Sophia says to her books, as with her lifestyle Lara would be the perfect campaign for Sophia's products. Lara denies and says that she (Lara) may have an unsightly face, judging from Sophia's past experiments. Sophia seems surprised and Lara informs her that they are still alive (the people that Sophia made the experiments on). Lara then tries to get the scepter from Sophia's desk, saying that all that she wants is the artifact (which is at the top of the scepter). Sophia laughs and says "In your next life". She grabs the scepter and runs out of her office. Lara draws her weapons and says "We'll see".
|
||
| « Aldwych | Index | City » |
| We would like to thank Nicky for her help. Many parts of this walkthrough would not have been written without her participation. | ||
Tomb Raider 3: Adventures of Lara Croft Walkthrough & Game Guide © 2000-2007 www.tombraiderhub.com |
||