Tomb Raider 4: The Last Revelation Walkthrough & Game Guide
Level 4: Burial Chambers
* 7 mummies also appear in the level, but we do not count them as kills, because Lara cannot kill them with the weapons she carries. The only mummies that can actually get killed are those (2 in number) that appear from the cases in the room with the movable Statue. To 'destroy' them, you will need to use the Shotgun and shoot them until they fall into one of the water pits. Then you can add them in your summary, making the number of the kills 9.
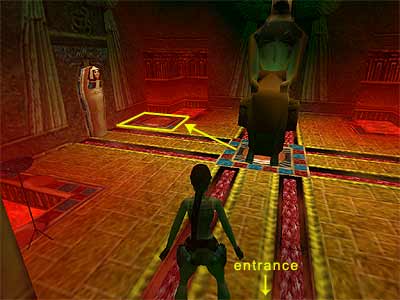
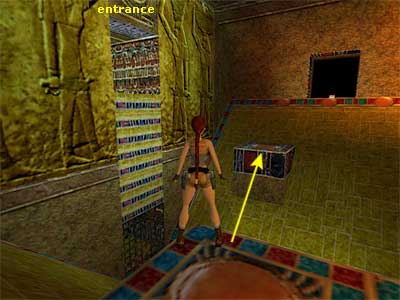
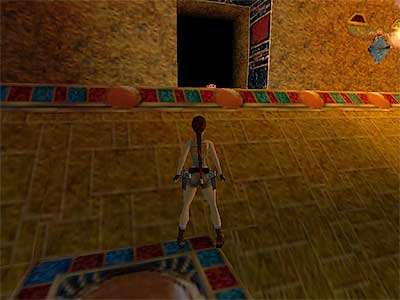
You begin the level in mid-slide, and since the 1st Secret is quite tricky, you might want to save your game after loading the level in case you miss it. 1st Secret (1-5\ total: 14-70) - When sliding, you need to leap forwards when about halfway down (look for the lighted part of the slope) and grab the ledge above. Hoist yourself up and retrieve the Large Medipack. Drop and hang from the edge again, and continue sliding. Pull the lever inside the room you drop into to open the gate at the other side. Approach it and slide down. A time-trap is now set into motion, meaning you have just a few seconds to complete the next part: pick up The Hand Of Orion and leap to safety. If you are too slow then prepare for a nasty death at the hands of a spike trap! 2nd Secret (2-5\ total: 15-70) - When leaping out of the spike trap, be sure to jump 45 degrees to the left (when facing away from the room you just came from) rather than the right. You can then pick up the Shotgun Normal Ammo and claim the level's 2nd secret. Continue through the hallway but watch out for the huge spikes. To get past them, stand as close as you can and take a standing jump when they are not in view (or roll). Shoot the left vase in the next hallway to get a Small Medipack and pass the next set of huge spikes by once again jumping over them or by doing a roll. Beyond this peril, slide down into the next section. Rotating Blades - From the entrance to this room, drop to the ground and get the Small Medipack from the bottom left corner. Return back to where you began and place the Hand Of Orion in the slot on the left wall. This will remove the spikes from the platforms but will make the blades begin to rotate. Notice the Shotgun and the Normal Ammo for it on the platforms. You can decide whether or not you want to risk making a play for them. If you are not interested, skip the next paragraph. Getting the two pickups - You may want to save your game before attempting to get them. Walk to the edge and tap back once. When a blade has just passed the Shotgun Normal ammo, take a running jump and you will land exactly above it. Immediately pick it up and jump to the right (or jump forward) to avoid the next blade. Return back to the ledge you start off on. Facing the platform once more, walk to the front left corner. Take one step to the right and turn left to face the platform with the Shotgun. Tap back once. When you see one blade above the Shotgun, take a running jump and you will land exactly above it. Immediately pick it up and run/ jump forward to avoid the next blade that is coming from behind. Make your way back to the starter ledge. (Note - If you have already picked up the Shotgun prior to this room, it will count as Normal Ammo.) Walk to the edge and tap back once. When a blade passes, take a standing jump to grab the platform. Start shimmying to the right around the two corners. Keep shimmying but stop just before the third corner. When a blade passes above you, pull up and side-jump to the right to land in the hallway. Alternatively, you can turn around the third corner, wait for a blade to pass over you, pull up and jump backwards to land in the hallway. Head up the ramps to reach the next room. The cut scene shows a Statue in one of the next rooms and lastly focuses on Horus' chest. Room with Horus - Do NOT approach the feet of Horus or you will miss a Secret. For now, pick up the Small Medipack from the bottom left corner of the room and the Shotgun Normal Ammo from the far right corner. 3rd Secret (3-5\ total: 16-70) - Go through the passageway at the other side to reach the room with the Statue. Pick up the Small Medipack from the left (this is not the Secret) and drop into the pit in the far left corner. Enter the alcove and get the Shotgun Normal Ammo and Small Medipack. Return to the room with the Horus statue and approach his feet. The cut scene shows Lara climbing onto Horus and getting the Amulet from his chest. After the cut scene you will have the Amulet Of Horus in your inventory, and blood will flow from Horus' casket, filling the pits around the corner in the room with the 3rd Secret. Go to that room again now. When you approach the statue in the middle, the three cases on the outer walls will open. Two will contain mummies. You had better avoid walking close by them or they will awake, and this will make the next part more difficult to complete. Push\ pull the movable Statue to the red-blue square that is located in front of the far left pit (as shown in this screenshot). This will trigger the opening of the exit in the upright casket furthest away from you. If you did not awake the mummies before, you now need to awake the one in front of the exit in order to leave. Just approach it and make it step out towards you. Now roll and run to the opposite side. Roll again and when you see the mummy stepping out of its case, run through the exit and continue down the passage to the left. Dark cave - If you stay at the entrance of the large cave area, you should be able to see an opening far ahead and a bridge up to the right. Head to the middle of the caves and kill the two dogs that attack - one from the left ahead and the second from the right. Go towards the opening, but do not enter just yet because you need to collect a couple of things first. Instead, make your way up to the stairs on the left of the opening to reach the upper part of the area. Light a flare if you are having trouble making things out. 4th Secret (4-5\ total: 17-70) - Notice the closed gate on the right of the stairs. Stick to the wall underneath and drop into the pit (as shown in this screenshot). Pick up the Large Medipack and climb back out. Continue up the stairs. You can see the bridge on your left and a ladder far ahead. It does not matter which way you follow first, since you have to go to both areas anyway. Following the bridge\ rotating spiked room - Go to the left and cross the bridge. Go up the stairs and kill the two dogs that awake. Continue up and turn left in the hallway. Safely drop down and approach the edge of the opening. 5th Secret (5-5\ total: 18-70) - Notice the Shotgun Normal Ammo in the alcove on the left. Take a diagonal standing jump to the ledge beneath the alcove. If you miss the jump and slide down, climb on the right hand block and then on the walkway. Turn around and take a running jump to grab the block beneath the alcove (as shown in this screenshot). Position Lara in front of the slope and take a couple of steps to the right to reach the edge. Turn 45 degrees to the right to face the alcove and take a standing jump. (This screenshot shows the correct starting position.) Keep pressing forward until Lara steps on even ground, so that she will not slide back. Pick up the Ammo and slide down. Do not try to cross the spikes or you will get skewered. You need to open the gate underneath the entrance. Climb onto the block on the right (as you face the spikes) and then climb onto the walkway. Go to the left and jump to the next block. Turn left and take a running jump to the opposite ledge. You do not have the artifact for the receptacle here, so climb up the ladder above the receptacle to reach the alcove. Pull the lever to open the gate underneath the entrance. Make you way back the same way you came, go through the gate and climb up the ladder. Notice the two levers - one in front you and one on the wall to the right. Also, notice their handles - the one that is in front you has the handle towards you and the one on the wall has the handle to the opposite side. Pull the lever that is in front of you. The cut scene shows the Talisman behind some spikes and as the camera draws away, you can see the room to rotate 45 degrees to the left. After the cut scene, you are in front of the lever that was previously on the wall, since the whole place has been rotated. This lever does not do anything, so do not wonder what happened if you used it. Return to the spiked room taking a standing jump to clear the slope. Before sliding down, you may want to take a moment to familiarize yourself with the subtle differences in your surroundings. The hole in the floor (in front of the fire) is the cave you got the Secret from before. What you cannot see now is the block you stood on before jumping into the alcove. Slide down and safely drop through the hole. Pick up The Hand Of Sirius and follow the hallway. You can hear a gate opening above. Climb up the ladder and then negotiate the next two blocks. You are back in the Spiked room. The block you are standing on is the ladder you climbed before that was above the receptacle. You cannot see the receptacle, though. Take a standing jump to grab the upper block and pull yourself up. Crawl underneath the spikes and head to the left. You need to reach the alcove on the slope to the right. Walk to the front left corner and turn slightly to the right - not too much because you might end up sliding down the slope and into the spikes. Take a standing jump pressing Action to cut Lara's momentum. Proceed walking, so as not to fall from the hole, because it is a long way down. The back wall is climbable, so take a standing jump to grab it and climb down. The two mummies in the next room awaken when you pull the chain. The cut scene shows the Talisman again and the spikes in front of it being disabled. This action also rotates the room 45 degrees to the right, bringing it back to its original state. Go through the gate you just opened (avoid the mummies) and scale the ladder. Turn left and jump to the block ahead. Climb up the next block and place The Hand Of Sirius inside the receptacle to lower a rope from the ceiling behind you. Jump to grab the rope and turn to face the alcove. Swing and jump towards the alcove. Get the Scarab Talisman from the pedestal and continue to the hallway behind the pedestal. Draw your weapons because two dogs are coming from the bottom of the ramp. Take care of them by backtracking to the ledge where the spikes were and where the dogs will not follow you. Continue down the ramp having your weapons drawn because a third dog attacks in the next room. Kill it and go down the second ramp. Drop down to the cave where you started and head up the stairs again. Following the ladder - Continue ahead and climb up the ladder to the top. Shoot the vases and get the Small Medipack and Shotgun Normal Ammo. Follow either opening and take note of the closed gate on the right wall because this will be your way out. Get the Golden Serpent from the pedestal. The two mummies awaken after a few seconds, the two openings close, and the closed gate opens. Go through the latter before the mummies have time to gang up on you. Save your game and slide forwards down the ramp. The room beyond is filling with sand, and when you land inside it, Lara will suddenly find herself seconds away from a messy death at the hands of the spiked ceiling. Sprint to the far left corner of the room. Do not panic. You are safe after doing this. Climb out and follow the passage to the end. Be careful of the hole, though. In order to get the Large Medipack you had better go around the hole to the right. Drop to the lower block, opposite the Medipack, and then down to the cave where you started. Go down the stairs to the bottom of the cave and enter the opening on the left. Climb the block and enter the next room. Place the Scarab Talisman and the Golden Serpent inside the receptacles. This will start filling the room with sand raising you to the ceiling. The mummy awakes here, and until you reach the top, run around the room to avoid it. Climb through the opening and follow the passage to end the level. The FMV shows Lara exiting the Chambers through a tunnel. When she realizes she is alone, she drops onto the sand and takes the Amulet of Horus from her backpack. She then starts reading the inscription. "I, Semerkhet, high priest of Horus, forewarn that he who removes the amulet shall have released Seth". As she reads out loud, we begin to hear Semerkhet's voice. "He who walked at the dawn of man shall once again violate the earth". We then see Horus (the creature with the head of a falcon), Seth (with the head of a jackal), and Semerkhet (the priest) back in ancient Egyptian times. Horus kneels before Seth, and Semerkhet rotates a handle to the side of a stone grave that raises its cover. Seth then steps inside the grave and lies down. Horus raises his hand, and Semerkhet puts the handle into the grave and the cover lowers. Once the grave is closed, blood starts flowing because the underside of the cover has spikes. Semerkhet continues "Seth, ruler of evil, will again be free to return in a distant millennia. At his heel, plagues of locusts. Harvests fail under the broken skies." Then the blood becomes sand and ceases to flow. Back in the present, the guide returns. He points his gun at Lara and she says "My trusty companion returns". "The Amulet, woman!" the guard demands, but Lara continues to read the inscription. "Once called forth shall the heavens split asunder, and the light of the sun god Horus shall banish the lord of darkness, Seth". The sky becomes darker and the earth begins to shake, throwing the guard to the ground. Lara then grabs her weapons and whilst pointing them at the guard, says "I wouldn't advise it". Then a van arrives.
|
||
| « Level 3: The Tomb of Seth | Index | Level 5: Valley of the Kings » |
| We would like to thank TR-Player and Nicky for their help. Many parts of this walkthrough would not have been written without their participation. Special thanks go to Scottlee for proofing the text. Last update: 07 October 2007: Text has been proofed and screenshots have been added. |
||
Tomb Raider 4: The Last Revelation Walkthrough & Game Guide © 2000-2007 www.tombraiderhub.com |
||