Level 14: Coastal Ruins
* Actually, there is a Secret in this level that you get after finishing the Hall Of Demetrius one. However, because the trip back to the Coastal Ruins is short, we have included it to the Hall Of Demetrius level.
** Plus 2 if you backtrack to Alexandria level.
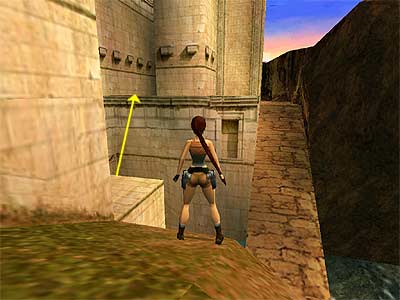
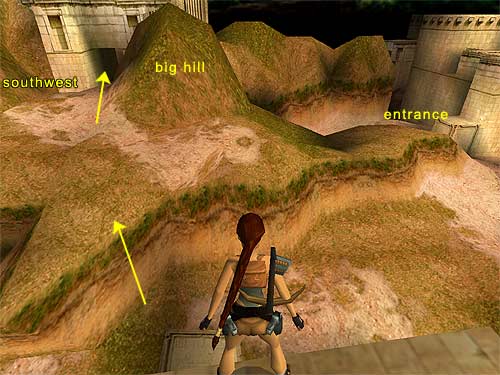
(Note - For the segment of the level after Hall Of Demetrius, pick up the walkthrough from the Hall Of Demetrius level.) This level is linked to the previous one (Alexandria) through the passageway you are standing in at the beginning. If you are ever low of health and do not have enough Medipacks, you can always backtrack to here and enter Alexandria again to restore your health. Pick up the Small Medipack from the dark part of the stairs at the beginning of the level, and go down the stairs to reach the outside area with the two palm trees. Follow the arched passage on the right until you reach the wooden boards with the Egyptian Adventure sign above. (Note - If, before shooting the boards you backtrack to the Alexandria level, you will encounter two black scorpions in the area with the fountain, assuming you did not kill them at the end. If you re-visit Jean Yves as well, he will tell you that "A local collector had an exhibition. He then vanished leaving the exhibition boarded up. If Von Croy hasn't got to it, perhaps this would be the place to begin". You get this dialogue in case you became stuck and did not know you were supposed to shoot the boards. Return to the Coastal Ruins level, killing two more black scorpions in the area with the fountain as you do so.) Egyptian Adventure - Shoot the boards and enter. Follow either the right or left opening next to the cage until you reach a room with a small pyramid in the middle. If you approach the sarcophagus, a mummy hops out. Do not worry, it is not dangerous. It will just cackle and spin its head around, suggesting it is either broken or just an incredibly unfunny exhibition attraction. Go up the stairs behind the mummy and shoot the boards that cover the doorway. Mirror room - When you step onto the stairs, Lara will look to the right. She is looking through a mirror that reveals the pits on the floor contain deadly spikes. To disable the annoying "looking" of Lara, just step out of the room and enter again. Use the mirror as a guide to reach the far-left corner of the room. Collect the Crossbow that you can see only in the mirror. Then make your way back to the stairs to exit. Just be careful when you jump over the pits. Make sure you jump from the middle of each square, as if you do not, the spikes will kill you. Targets and spikes - Go back to the room with the small pyramid. There is a slope in the far right corner. When you slide down, a ledge rises up at the bottom of the slope. The cage ahead reveals some targets. You have about 20 seconds to shoot them all. Otherwise, the ledge falls down (you as well) and deadly spikes pop out from the floor (oops!). The easiest way to complete this task is to equip the Crossbow with the Explosive arrows, and after sliding down to just shoot in the general direction of the targets. One shot is enough to destroy them all. Incidentally, getting all the targets down with just the Pistols is an enjoyable challenge if you are not pushed for time. Alternative methods - Combine the Crossbow with the LaserSight and use Normal arrows to destroy the targets one by one. This is also a challenge. Or, use the LaserSight bug and destroy the targets one by one (this bug is tested for the PC version. You get some info on this at the bottom of the page). With both ways, you need to be quick. An infallible method is to drop to the left or right side (not in front) and stick to the corner. As long as you do not move, the spikes will not pop out even if the ledge has fallen down. Take your time and destroy the targets. When you are done, all the spikes pop out but recede straight away again, which means that you have disabled them. Drop down and go to the other side to pick up the Token. Climb through the opening on the left hand wall and return to the room with the small pyramid. Once again, go up the stairs, pass the mirror room and enter the next one on the right. Stand in front of the coin slot and place the Token. The cut scene shows the charmer in the glassed case playing Egyptian music, revealing a rope from the basket behind you. Climb up the rope and back flip at the top. Pick up the Broken Handle from the Southwest corner and use the Crowbar to pry out the Wall Hook from the alcove (it is the left Hook as you face the alcove). Safely drop down, exit the room with the charmer and go to the right of the hallway. Go up the short stairs and stand in front of the cage where the bluish box is. If you have not already done so, combine the Broken Handle with the Wall Hook to get the Hook and Pole. Then press Action to use it right in front of the cage. In the cut scene, Lara uses the Hook and Pole to get the Gate Key. Make sure you pick up the Gate Key after the cut scene. At first, Lara just scoops it out from the cage. She does not immediately place it in her inventory. Follow the passage next to the cage and make your way back to the area with the two palm trees. [Note - If you want you can return to the Alexandria level now and visit Jean Yves again. Save your game first, because some people have mentioned a bug that is activated after returning to the Coastal Ruins where they are missing the Gate Key. In that case, you will need to load a previous save-game and avoid going back to Alexandria. If you did not visit Jean before entering the Egyptian Adventure, you will encounter two black scorpions in the area with the fountain (and assuming that you did not kill them at the end of Alexandria). You find Jean in front of one of the bookshelves. He tells you that "he's been doing some reading, and some of the Armour is hidden in the Catacombs. Von Croy's men have reached him, and you must hurry and find the Library". The aforementioned place is where you will gain access to Cleopatra's lost Palaces, supposedly. Return to the Coastal Ruins level, killing two more black scorpions in the area with the fountain, assuming you did not visit Jean before entering the Egyptian Adventure.] Follow the East Side of the palm tree area and go through the right arched opening until you reach a room with a pool. Jump to the opposite ledge (or drop into the pool and climb out) and take a diagonal standing jump to the left to grab the edge of the opening. Crawl through it and drop down on the other side. Climb up the ladder and go down the stairs to reach the outside area. When you walk outside, you trigger a cut scene that shows a panoramic view of the area. (Wow!!) Main area of the Coastal Ruins - This part of the level is linked with the next four levels (Catacombs, Temple Of Poseidon, The Lost Library, and the Hall Of Demetrius) and a small part of the fifth (Pharos, Temple Of Isis). You need to visit those four levels once, return back here, and then visit the next one (Temple of Isis). As you explore though, you will open new gates and doors that help you to go back and forth in these levels if you forget anything. [Note about the skeletons - From now on you will encounter many skeletons. You can totally avoid them, or blow them up using the Crossbow with the Explosive arrows. You can also use the LaserSight bug (you can get some info on this at the bottom of the page) and shoot their head. When you destroy their head, they run around but they cannot cause you any damage. You should do the latter at least once because it is very funny!] After the cut scene, head to the left (north) side of the area. You will soon reach a ledge that is almost going downhill. If you drop down and follow the ramp, the camera will change view but you will still have control of the Look button. You will reach a closed gate that you cannot open for now. Instead of dwelling on that, climb onto the block that is at the bottom of the ramp and turn so that the ramp is on your right. Take a diagonal running jump to grab the opposite ledge (as shown here). Pull up and pick up the Crossbow Normal ammo. Safely drop to the ground. The small pool between the ledge you are standing on and the ramp is linked with the bigger pool beyond. If you drop into this pool, the current will push you towards the bigger one. As you are swept along you will notice an alcove on your right. In there, you can find some Grenadegun Normal ammo. It is easy to get in there, but quite difficult to get out because of the current and the angled ledges in the water. If you want the pickup, go and get it. As you exit the alcove, let the current push you out into the bigger pool (east side), and if you get stuck (Lara may look at the surface but cannot reach it), simply press the Roll button. Do not attempt to go back to the small pool because the ledge is too high and you will not be able to climb out. Getting the Crossbow ammo, you trigger a skeleton back near where you first entered the area. Kill it whichever way you prefer, although the LaserSight bug works well here because the skeleton cannot go downhill and drop onto the ramp. So, you can stand on the green ledge close to where you triggered the cut scene and shoot its head. Be quick though, because if you shoot at it and miss, it will run away. Once you are done, make your way back to almost where you first entered the area (close to where you triggered the cut scene). Go to the Southwest part of the area to reach the doorway of the building that has a big hill on the right. To clear the angled ledges, stand against them and take a standing jump. (See this screenshot to get oriented.) When you enter, a cut scene shows two skeletons coming from the upper part of the area (sometimes one of them falls down at the first jump and dies). Take care of the two skeletons whichever way you like. If you decide to use Explosive ammo you can use one bit of ammo for both skeletons, so long as they are close to each other. You can also stand on the higher block opposite the entrance of this area and kill them from there, because they move slowly when you are on there. Go up the stairs from where the skeletons came, take a running jump to clear the first gap, and then another one for the second to land on a ledge that makes a turn to the left. Before jumping to the last ledge, take a diagonal standing jump to grab the ledge above the entrance. Pick up the Shotgun Wideshot ammo and the Small Medipack, and drop down again. Now leap to the last ledge, use the Gate Key to open the gate, and go through the hallway. (Missing the Gate Key - If you missed the Gate Key because you did not get it earlier, it means that you have skipped\ forgotten a crucial part of the game. Make your way back outside to where the big pool is and go to the west side of the area to return back almost to the beginning of the level. Follow the Egyptian Adventure guide above and see how you can get the Key. If you got it but no longer have it, check the walkthrough above in case you have activated a bug brought on by backtracking to the Alexandria level.) Small part of the "Catacombs" level (1) - You just entered the next level (Catacombs), but you will not stay here for long. Continue onwards to enter a room with some broken pillars. You can see the closed door ahead, so go through the opening on the right. When you step into the small room, its floor sinks a bit. The big pillar is movable, but you cannot move it now because of the sinking floor. Step onto the lower block and push the big button with the face. The cut scene shows a brown block rising up in a room beneath the one you are standing in. Make your way back to the Coastal Ruins level the same way you came. Back to the Coastal Ruins - When you exit from the door, hang from the ledge and drop down. Approach the pit and climb down the ladder (or hang and drop down). You need to go through the crawlspace, but when you step on the block below, the boulder drops down. You can either jump onto the block and immediately side jump to avoid it, or pick up the Torch, light it from the burner (be careful not to catch fire) and burn the rope that holds the boulder up by standing underneath it and leaping straight up a few times. Once you are done, crawl through the opening and drop down on the other side. Do not bother taking the Torch with you. You do not need it anymore. Use the Crowbar to open the gate and crawl through the next opening. Drop down at the other side and follow the hallway to the end. Small part of the "Catacombs" level (2) - You again enter the next level (Catacombs), but you will have to return back to Coastal Ruins in a minute. Keep going down the hallway until you reach a small room with a pillar at the end. Notice the brown tile on the floor? It is the block you raised by pressing the big button with the face in the room above. Drag the movable pillar onto the brown tile to support the floor above. Make your way back to the Coastal Ruins level the same way you came. Back to the Coastal Ruins - Crawl through the opening, then the next one as you did before to return to the area where the boulder dropped down. Climb up the ladder and make your way up, once again using the stairs and the ledges to enter the Catacombs level through the gate. Pick up the walkthrough for the Catacombs level. LaserSight bug (tested for the PC version) - Combine the Crossbow with the LaserSight and equip the gun. Press the Look button to use the LaserSight, and having this button compressed, press the number '1', the hot key for Pistols. You will hear the sound of Lara drawing the Pistols. Shoot the targets with unlimited ammo. You will not be able to hear the shots, but this works fine.
|
||
| « Level 13: Alexandria | Index | Level 15: Catacombs » |
| We would like to thank TR-Player and Nicky for their help. Many parts of this walkthrough would not have been written without their participation. Special thanks go to Scottlee for proofing the text. | ||
Tomb Raider 4: The Last Revelation Walkthrough & Game Guide © 2000-2007 www.tombraiderhub.com |
||