Level 2: Trajan's Markets
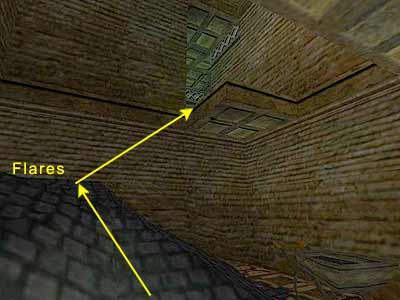
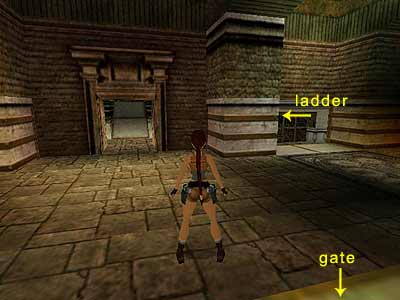
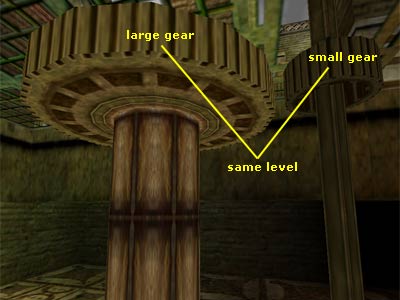
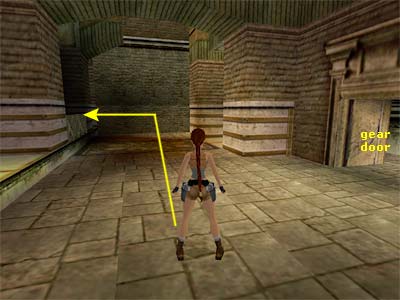
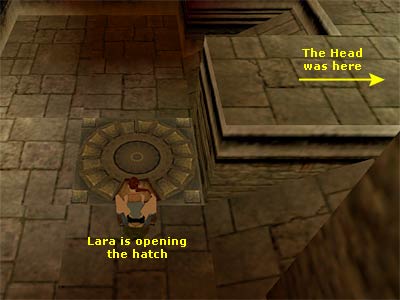
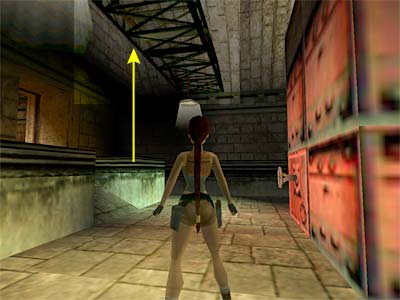
There is a room on either side of the street. Enter the left one and shoot the box to get a Crowbar. Then enter the right hand room and shoot another box to get a LaserSight. You have already collected two of them in the previous level, though. It is highly unlikely you will not already have it by now, but anyway... You cannot reach any of the ledges that hang from both rooms, so continue on down the street outside. Use the Crowbar to open the metal door on the right hand side of the street, just before the T-junction. The gate has a danger sign with "Pericolo" written on it. Enter the room and shoot the box to get a Small Medipack. Climb onto the scaffolding and then to the ledge ahead. Climb up the blocks to the top and halt in front of the tightrope. Before using it, turn so you have the tightrope to your back. There is a barred window on your left. Facing the window, stand in the corner of the ledge and take a diagonal standing jump to grab the sill. Pull up, get the Small Medipack, and return back to the tightrope. Use the tightrope to get across and jump the next gap. Climb onto the sill on your right and cross the metal walkway to the end. Turn right and jump to the stone arch. From there, jump to the metal ledge ahead. Turn right and take a running jump to grab the opening at the other side. Pull up and pick up the Shotgun Normal Ammo. Jump back to grab the metal ledge you came from and enter the small room. Safely drop to the ledge below. Before jumping to the next ledge, drop to the ground and get the Revolver Ammo and Flares. To return back up, jump on the coal and walk to the edge, having the entrance from where you entered this room on your right. Jump forward, pressing Action to grab the ledge (see this screenshot to get oriented). Pull up and head to the left. The brief cut scene shows some giant gears. Area with gears - Walk to the edge and safely drop to the ground. Notice the trapdoor on your left. You will return back here for a Secret. Go outside from the left of the room, passing the doorway on your left and the closed gate on your right. The pillar next the doorway is climbable from the other side (see this screenshot if you cannot find it). Climb to the top of the pillar and then continue around to the left. Release Action to slide backwards down the curvy stone arch. Turn right and take a running jump to the opposite stone arch. From there, jump to the square ledge on your left, or hang from the edge and shimmy to the right, pulling up at the end. Enter the small room and pull the chain three times. Every time you pull the chain, a brief cut scene will show the gears in motion. On the third attempt, the larger gear grinds to a halt next to a smaller one (as shown in this screenshot). Return back to the square ledge and jump to the stone arch on your right, or hang and shimmy to the left to avoid falling down. From there, take a running jump to the middle arch (the one after climbing up the pillar) and then another running jump to grab the edge of the arch ahead. Pull up and jump to the doorway on the right. Enter the small room and pull the chain once. If the two gears are on the same level, a cut scene will play which shows which gears have been activated. The mechanism makes a huge door below to slide to the right, revealing an opening that leads to a room with a statue. Go back to the ledge and jump to the stone arch on your left. You can see the Uzi Ammo in the opening on the left. To get it, walk to the left corner and take a step backwards. Take one step to the right and turn left to face the opening. Take a standing jump to land directly in the opening and pick up the Ammo. You can hang from the edge and drop to the ground, (you will lose a small percentage of your health) or, facing the gear door, run off the ledge to the right or left in order to land on one of the raised sides in front of the gear door. 1st Secret (1-3\ total 4-36) - Before going through the huge gear door, turn around and head to the right where you first dropped through to reach this area (see this screnshot to get oriented). In pulling the second chain you opened a trapdoor. Drop through it and pick up the Golden Rose and Shotgun Normal and Wideshot Ammo's. Then return back up. Go through the doorway opposite the closed gate. Go up the ramp, and before entering the room with the statue, climb up the two blocks on the left to reach a room with two lit torches. Use the Crowbar to pry out the Gold Coin. Some rats appear through the grate, and since you cannot kill them, make your way back the same way you came, running any which way you choose until they fade away. Room with statue - Enter the room with the statue and pick up the Revolver Ammo and Small Medipack close by. Place the Golden Coin in the receptacle underneath the statue. The brief cut scene shows a gate opening elsewhere. At the same time, the exit gate outside opens. Area with palm tree and pool - Exit to the streets and follow the gate you just opened on the left. Pass the palm tree and follow the alleyway around to the right until you see a pool on your left. Before dropping into the pool, go to the far end of the alley and pick up the Revolver Ammo. Return to the pool, jump into the water and swim to the left to get the Small Medipack. You will open the gate down that end in a short while. Surface and climb out of the water at the ledge. Enter the doorway and head around to the right. The cut scene shows a Mechanical Head being revealed. Destroying the Mechanical Head - Pick up the Revolver Ammo. In order to destroy the Head, you have to shoot both of its emerald eyes. You do not need to go down into the main area, since you can do it from the doorway. Combine the Revolver with the LaserSight and equip the gun. Turn to face the wall next to the entrance and press the Look button to peer around the corner. If you see the wall, take a step to the right. Press the Look button again to peer around the corner. Lara will finally be half (her left part) in front of the wall and half (her right part) in front of the entrance (see this screenshot to get oriented). The Head has not noticed you, so it turns around. Silly Head!! Press the Duck button to zoom in, and shoot the first eye when the Head faces you. Then shoot the second eye to destroy it. A Mars Symbol is then revealed in the middle of the room. Go down and pick it up. Head to the part of the room beneath the entrance and pick up the Revolver Ammo from the left corner. Open the hatch that is located in front of the block in the middle of the area. If you are having trouble finding the handle, stand in front of the hatch having the area where the Head was on your right, and press Action to open it (this screenshot will help you locate it). Drop through the opening and follow the ledge until you reach the T-junction of the pool. Sewers - Check out the water. There is an opening at the bottom of the pool with a fan at the very bottom, and another opening not far above it. Jump into the water and swim through the upper opening to get a Small Medipack. Avoid the right and left parts of the T-junction, as rats will come through the grates. Swim through the opening at the bottom of the pool. The fan and water current prevent you from swimming too far down, so enter the small opening at the top. Follow the tunnel to the end and climb out of the water. Pick up the Shotgun Normal Ammo and use the Crowbar to pry the Valve wheel off the big pipe. Return through the tunnel and climb out of the water, heading back to the trapdoor you opened before. Climb up the ladder and go to the room where the huge red machine is. Stand in front of the screw and press Action to place the Valve wheel. Press Action a second time to turn it and stop the fan spinning around back in the sewer. 2nd Secret (2-3\ total: 5-36) - Before going there, climb onto either of the two blocks next to the entrance and jump up to grab the scaffolding above (as shown here). Pull up and jump to the top of the red machine. Pick up the Golden Rose and drop back down. Back to the sewers\ Water maze - Return to the sewer via the trapdoor. Save your game here in case you do not manage to do this first time. Jump into the water and swim towards the fan. Reach the bottom and swim through the small opening. Follow the tunnel until you reach a T-junction. There is an opening on the left-hand side. Follow it and climb out of the water to get a Large Medipack. Jump into the water again and this time follow the other side of the T-junction, passing the opening from whence you came. Swim through the tunnel until you see two moving fans. There is an opening next to the fans you cannot reach. If you stand in front of the fans, the current will push you to the right, in the direction of a wall. This is beneficial, so let it do this to you and then swim upwards to surface. Climb out of the water and turn the valve wheel to stop the fans. Jump into the water again and swim through the opening next to the fans. Follow the twisted tunnel and then swim upwards to surface. Climb out of the water and pick up the Shotgun and the Normal Ammo for it. The door closes behind you, so the only thing to do now is proceed forwards. (Note for the PC version - Save your game before triggering the cut scene. The game has a tendency to crash.) The cut scene shows a Statue coming to life. Killing the Statue - The Statue monster fires green energy bolts out of its sword. If one bolt hits you, you lose a considerable amount of health. You can kill the enemy easily enough, though. Equip the Shotgun and shoot at it whilst jumping around the room. Another way to kill it is to climb onto the ledge with the window where the Statue began. Stand against the wall beneath the window, turn around, and take one step forward. You can kill it from here, as it cannot hit you and will not start shooting bolts at you. It needs just a few shots to be destroyed. The experienced players can do it using just the Pistols. They know however that this way it will take more time. Once you kill it, a cut scene shows the window above the ledge shattering and the gate back at the first pool swinging open. Climb onto the ledge below the window, and if you have not already done so, pick up the Small Medipack and Uzi Ammo. Climb through the window, pick up the Small Medipack from the left-hand side of the ledge and drop to the ground. The gate you just opened is located ahead. By killing the Statue though, you opened another gate back on the streets, which leads to the third Secret. 3rd Secret (3-3\ total: 6-36) - Go back to the streets via the alley. Turn left (on your right is the street where you began the level) and go to the far end of the street. The opened gate is on your left. Enter the courtyard and pick up the Golden Rose from the far right corner. Return to the pool. Jump into the water and swim down to the left. Pass the gate you opened by killing the Statue to get the Venus Symbol on the other side. Swim upwards to surface and climb out of the water. The cut scene shows Lara back at the Garden with the gargoyles. Larson is here too. He asks for the Stone and Lara opens fire. He hides behind the building and says "That ain't supposed to happen". You are now back in control of Lara. Larson is running in front of the building again and starts shooting at you. Save your game here because there are two ways to complete the next part. The first way is as normal (as programmed by Core Design). Alternatively, we provide a second way, but you will miss five pick-ups (two Shotgun Normal Ammo's, two Shotgun Wideshot Ammo's and a Large Medipack). So, make your choice. First way (normal gameplay) - Shoot Larson until he falls. The second cut scene shows Lara warning Larson to watch out behind him. He does not hear her. The gargoyles come to life and one of them grabs him and throws him across the Garden. Now you have to destroy the three gargoyles. The area around has some Shotgun Ammo, which means that the Shotgun should be your first choice. Again, the experienced players can do it using just the Pistols. They know however that it will take more time. Ignore the ammo for now, because the gargoyles throw fireballs, something that takes up a lot of health until you can extinguish Lara in the pool. An easy way to destroy them is to stand in front of them (not too close, though) and jump from side to side shooting at the same time. If you run out of ammo, Lara will equip the Pistols automatically, so keep shooting at them. If you want to take a breath, hide behind the building, or pause the game. Save your game periodically. Again, in the case that the gargoyles set Lara on fire, you will be able to save her by immediately jumping into the pool on the right. Shoot only when the gargoyles appear to be recharging themselves. Shooting whilst they are breathing fire causes them no damage. As soon as you destroy them, pick up the two Shotgun Normal Ammo's and two Shotgun Wideshot Ammo's from the Garden, and the Large Medipack from behind the building. Go towards the gargoyles' last position and place the Mars and Venus Symbols in the receptacles to open the door. Go through it and take a running jump over the spiked pit to grab the opposite ledge. Pull up and take another jump to land on the ledge ahead. The floor collapses and Lara slides through a tunnel. Second way (cheating slightly) - Do not shoot Larson. Go immediately to the door and place the Mars and Venus Symbols in the receptacles. Larson will keep shooting at you, so you may need to replenish your health with a Medipack at some point. When you have placed both Symbols, the door opens. This means that you will not have to deal with the three gargoyles. Go through the door and take a running jump over the spiked pit to grab the opposite ledge. Pull up and take another jump to land on the ledge ahead. The floor collapses and Lara slides through a tunnel.
|
||
| « Level 1: Streets of Rome | Index | Level 3: Colosseum » |
| We would like to thank TR-Player and Nicky for their help. Many parts of this walkthrough would not have been written without their participation. Special thanks go to Scottlee for proofing the text. Last update: 21 October 2007: Text has been proofed and screenshots have been added. |
||
Tomb Raider 5: Chronicles Walkthrough & Game Guide © 2000-2007 www.tombraiderhub.com |
||