Level 11: 13th Floor
* Plus 1 worker in the room with the Access Code Disk if you decide to kill him. We have also included the worker, who gives the access to the 3rd Secret.
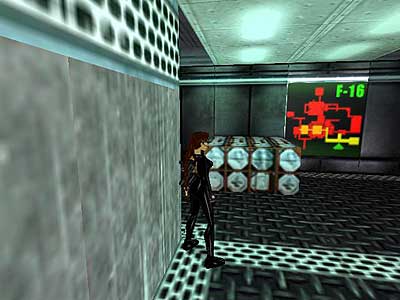
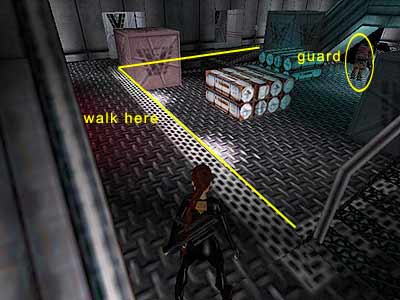
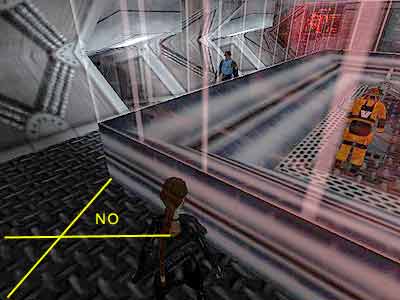
[Note - In these three VCI (Von Croy's Industries) levels, you do not have the Pistols with unlimited ammo, so you had better be careful with the ammo you acquire for the gun in your possession. Also, the guards and enemies use powerful weapons that can take away a lot of your health. We will try though to explain ways you can kill those enemies without getting damaged a lot. So, similarly make sure you save a few Medipacks during your time here. Make sure you save in a different slot each time you save, in case you activate a bug, and we assure you there are plenty of them in the final few levels! Lastly, get used to the weapon you start off with. It is called the "HK Gun" and it can shoot in three different modes: Sniper, Burst and Rapid. The Sniper shoots one bullet each time, the Burst two, and the Rapid three. So, in soft cases there is no need to use the Burst or Rapid mode.] After entering the building using a hang glider (Lara is incapable of using the front door like a normal person!), you will slide down a slope. The cut scene shows Lara talking to Zip (her assistant), who tells her that she has come to the thirteenth floor and needs to follow the vent to get to the main corridor. He also tells her not to attract too much attention as she goes along (a rather obvious suggestion we would have thought, but there you go). You can follow either the left or right hand part of the vent. You can totally skip the left part, as it does not include anything essential for the level, but you will miss some pick-ups along with a Secret. If you are not interested in these things, climb up the ladder on the right and follow the Common Route below. (Important: Ignoring ammo and Medipacks may make you unable to finish the game. See the Note above.) Ventilation ducts - Follow the left hand part of the vent. Equip the only gun you have, and using the Look button, shoot the grate. Crawl through the vent and get the Large Medipack. Halfway through, and whilst passing in front of the green bars, Zip starts talking to Lara. He tells her about the suits and the weapons that the guards use. They have only a short range, but are very powerful. You also see a guard picking up one of his weapons, and of course, you cannot miss the Golden Rose on the floor. Continue forward, crawling through the next vent. As you approach the end, you will notice the lasers moving to the left and right. Keep pressing the Duck button, and at the T-junction crawl to the right and get a Large Medipack. Not letting go of the Duck button, continue on to the other side of the vent, passing the opening you came from on the left. You reach a hole in the floor containing some more lasers. When the moving lasers go to the other side, get up and take a standing jump over the lasers in the hole. Continue to the end of the vent. Storeroom - Crawl through the vent on your right and enter the dark storeroom. In entering this room you activate two moving lasers back at the beginning of the level, but do not worry about it yet. Search the shelves in the far right corner to get some HK Clips, the shelves underneath the vent to get a Small Medipack, and the ones on the left-hand side to get a Hammer. Climb into the vent again and crawl back to where the moving lasers are. 1st Secret (1-3\ total: 28-36) - Before going back, shoot the grate opposite the vent you just crawled out of. Crawl through the next vent to reach another set of lasers below. Wait for them to move to the left and then somersault forward. Immediately duck. Turn to face the ramp and crawl to the edge. Wait for the lasers to move to the other side (behind you), stand and run towards the opening, and crawl through it. The grate opens as you approach. Enter the small room where you saw the guard in the previous cut scene and pick up the Golden Rose. Return to the vent. To get past the lasers, wait for them to come towards you. When they start leaving again to go the other way, crawl out and start running ahead. Halfway across the ramp, press the Duck button and crawl beneath the opening on the right hand wall. Wait for the lasers to leave, stand, and jump up to grab the opening. Pull up and crawl to the T-junction. The vent ahead leads to the storeroom where you got the Hammer. You need to go right now and return to the beginning of the level. Walk to the edge of the hole that has lasers, and when the moving lasers leave, jump over the hole and crouch. Some people have mentioned that after reaching the edge, Lara gets stuck when she tries to jump and falls into the hole. To avoid that, twist her either left or right, or crawl to the edge and stand. Then you can jump. Crawl through the vent on the right and stand at the end. Back at the beginning - You are now back at the beginning of the level. This time though, there are two sets of moving lasers present that were activated when you entered the dark storeroom - one above the other, moving in opposite directions from each other when adjacent. Press the Look button to see how they are moving at any particular moment. The lowest laser comes towards you but does not quite reach the far side of the vent where the ladder is. The highest laser does the opposite. It does not come towards you, but it does reach the far side of the vent where the ladder is. To get past them both, wait for the highest laser to leave and the lowest one to start coming towards you. When they meet each other halfway (one is underneath the other), start running and jump over the lowest one. The highest has already reached the far side in the aftermath of this action, and is ready to come towards you. So, crouch and crawl to the ladder. Once you are in front of the ladder you can take a breath. The lowest cannot reach the spot where you now are, and the highest once cannot hurt you unless you stand up. When the highest laser leaves again, stand and climb up the ladder. Common Route - Continue forward. In the cut scene, Lara asks Zip to deactivate the lasers that protect the Iris. He tells her he is "on it". Room with armored guard - Pick up the HK Clips at the end and continue to the right. When you are about to reach the gate, the camera shows a guard in the room below the duct you are in. The gate is locked, but you can use the Hammer and open the gate, thus avoiding the guard below and missing a pick-up, a Small Medipack. If you are not interested in the pick-up, skip the next paragraph. If you want the Medipack, or do not have the Hammer, or want to see everything, equip the gun and shoot the lock. The closer you are to the gate when shooting the lock, the better chance you have the guard will not notice you when you slide down. The duct breaks and you slide backwards. Here you can kill the guard by aiming at his head, the only sensitive part of his body. Alternatively you can just totally avoid him. To do that, then after sliding down, immediately roll and stand against the wall. Jump backwards to land on the vent you slid through before, tap back once, and take a standing jump to land in the duct above. This is the same way you leave this room if you decide to kill the guard, but at least you can do it without rushing. Drop through the hole in the duct, pick up the Small Medipack, and climb up the ladder. Climb into the opening behind the ladder and get the HK Clips. Start climbing up the ladder. Pressing Action and Up together from the bottom is enough to take you to the correct height. Climb to the right as much as you can, and when the lasers move to the left, climb to the top. Shoot the part of the wall on the left that has holes on it, and climb into the duct. Pick up the HK Clips from the left and head to the other side of the duct. You are about to enter the main building (enough with the ducts!). There is a guard patrolling the corridor below. If he notices you, he will activate the gun turrets in the duct you are standing in. They can take away a lot of your health, so better avoid it. Stand two blocks away from the opening that leads to the corridor, that is stop when you hear the dramatic music, and shoot the guard from there, making sure you shoot him at his head so he will die instantly. If you do not step forward, he will not notice you. Once you are done with him, drop to the ground. 13th floor - The horizontal lasers prevent you from going right, to the other side. Shoot the grate opposite the can machine and crawl through the opening. When you are able to stand, back up and shoot the next grate. Then crawl outside. The cut scene focuses on the sleeping guard's access card whilst Zip tells Lara to be careful not to wake him up (another suggestion we would have thought was blatantly obvious!). So, pressing the Walk button, enter the glassed room where the guard is sleeping and get the High Level Access Card from his desk. If you wake him up, another guard will show up and the gun turrets above his desk will start shooting at you. Once you get the card, kill the sleeping guard (one shot to his head is enough), otherwise you will encounter two more guards later on (him and his friend). [Note: To get the maximum amount of kills, you need to either wake the guard in order to call his friend (2 kills) or not not wake him at all, that is do not kill him while he is sleeping (in order to get the two kills later). The first way will cause the gun turrets shoot at you, so you probably want to leave unnoticed.] Use the Access Card in the socket opposite the guard's desk to open the next door and deactivate the lasers back in the corridor. Enter the storeroom and retrieve the two sets of HK Clips from the left-hand shelves, plus a Small Medipack from the right hand shelves. Exit to the corridor and head to the elevator. Press the button to call it, and press the buttons inside to ride up to the 16th floor. 16th floor - When you try to exit, the camera shows two guards outside having a small Chitchat. Just to let you know there is a third guard beyond the other two and around the corner to the right. He is made aware of your presence if the first two guards notice you. To kill those two guards spending just two clips, walk to the exit and stand on the left-hand side (as shown here). Equip your gun and use the scope. You will be able to see only the upper part of their heads, but this is enough. Shoot the first one, and until the second realizes what has happened, you will have time to take care of him as well. Once you are done with them, head to the right of the hallway to finish off the third guard. Stand against the wall having the opening on your left. Turn slightly right so you can see this third guard. He is just patrolling around, heading up the ramp and going back down again. When he has his back to you, shoot his head. Lab with workers - Go to the back of the crates close to the elevator and use the Access Card to open the red triangular door. Enter the lab, but do not kill the workers in the orange uniforms. They cannot hurt you, and if you attempt to draw your gun, they will activate the gun turrets above the entrance. Press the button to bring up the Iris symbol, and open a door close to where the third guard was. So, exit the lab, head to the other side of the hallway, go down the ramp, and enter the room with the metal structure in the middle. The next door opens as you approach it. There is another worker in the next room. There are no gun turrets here, but since he cannot hurt you, there is no need to bother with him (unless you want all the kills). Press the button in the far-left corner of the room to bring a suit out that drops an Access Code Disk. Pick it up and return to the elevator. Push the buttons to ride back down to the 13th Floor. Back on the 13th Floor - Exit the elevator. If you did not kill the sleeping guard before, you will encounter two guards here (the sleeping guard and the one that was supposed to appear when killing the sleeping one). Take them out and head to the right and around the corner. Use the Code Disk in the panel at the end to open the grate above. Climb into the duct. A cut scene shows a series of explosions in a shaft with a pole. If you were observant when watching this, you might have noticed an opening halfway down. To get past the explosions, stand in the middle of the duct, but do not go closer or the fire will catch you. Aim for the pole and watch the explosions. After the fourth explosion that originates from the upper part of the pole, run and grab the pole. 2nd Secret (2-3\ total: 29-36) - Slide down and back flip when halfway. You will land in a duct. Get the Golden Rose at the end and drop to the ground. Crawl through the opening until you reach the next room. As you walk on the catwalk, Lara will look at the guard below. In the ct scene, Zip alerts Lara to the guard and tells her not to attract his attention (Doh!). He also mentions the only sensitive part of his body, his head (our comment: Thanks for that crucial information that we did not already know, Zip!). Continue on. You can move freely on the catwalk because the guard will not notice you. Enter the small storeroom and get a Small Medipack and a Cloth from the two shelves. Exit and head to the right. Again, cross the second catwalk freely and head down the stairs. As long as you do not move close to the guard, he will not notice you. Here you have two options. You can either kill the guard with your weapon by shooting his face (but this will make a second guard come that you will also have to kill) or complete the next part by virtue of killing the guard more stealthily. (That way the second guard will not appear, but if you want all the kills, you will have a second chance later.) To do the latter, go to other side of the room. If you move on the raised, left-hand part of the room, and cross the perimeter (as shown here), the guard will not notice you. Otherwise you need to press the Walk button. Use the Access Card in the socket to open the nearby door. Room with glass cases and bugs - Enter the room with the bugs in the glass cases and open the right metal locker to get a Large Medipack and a Bottle of Chloroform. Do not open the left metal locker, as this shatters one of the cases and the bugs will come out. Until you get the goodies from there, the bugs will make it their life pursuit to lower your health. Leaving the room also makes the case shatter, but until you kill the guard the bugs will have disappeared. If you have already killed the two guards and just want all the pick-ups, run around outside the bug room and they will disappear. So, exit the room pressing the Walk button and head towards the guard. Stand behind him (but not too close), combine the Cloth with the Chloroform to get the Chloroform Soaked Cloth, and use it on the guard. The brief cut scene shows Lara using the Chloroform on the guard. Return to the room with the glass cases. Get the Small Medipack and the Bottle of Chloroform from the left metal locker and shoot the second case to release the bugs and alert the second guard from outside (assuming you killed the first guard stealthily). Use the Access Card to open the door. Pick up the HK Clips from the entrance of the hallway (you really have to strain your eyes to see them on the floor) and draw your gun. The door closes behind you, and after taking not many steps at all, another guard appears. Shoot his head to kill him and pick up the Iris Lab Access item he drops. Use it in the panel at the end of the hallway to open the door. Laser testing area - You just entered an area where laser testing is being doing. Notice the closed blue door? Well, this will be your access to the next Secret. For now, cross the hallway without going around the corner. There is a guard patrolling who comes towards you, but does not come around the corner. He then leaves by going to the other side of the hallway. Of course, you need to kill him, but you can decide if you want to do it now or later. If you decide to kill him now, the gun turrets on the ceiling will activate. This also happens if the guard notices you, as he runs to the other side of the hallway and activates the gun turrets via a switch. If you want to kill him now, you need to be quick in your next steps. Approach the corner (NOT the last square - see here) and stand against the glass wall surrounding the laser room. Wait for the guard to come, and when he leaves and has got halfway down the hallway, take some steps to the left and stand at the beginning of the hallway he was patrolling. When you see him turning right and around the corner of the hallway, run towards the end of the hallway drawing your gun at the same time. Stand just before the corner. The guard is already on his way back. Use the scope and wait for him to pass in front of you. When his head crosses your line of sight, blow a hole in his head! Bang! Immediately turn right and around the corner because you just activated the gun turrets. Phew! Save your game and enter the next room. If you want to avoid him for now, approach the corner and wait for the guard to come. When he leaves and has got halfway down the hallway, run to the first alcove on the left and stand hugging the left corner (assuming you have the laser room to the back of you). Wait for the guard, and when you see him leaving again, exit to the hallway and enter the second alcove on the left. This time though, stand hugging the right corner. You have a second chance to kill the guard now when he passes in front of you, but you would then need to sprint to the left to avoid the gun turrets. When you see him passing to the right (as you face the laser room), exit and head to the left to enter the next room. In the cut scene, Zip advises Lara not to kill the worker because the door needs two Access Cards to open (our comment: The first even remotely piece of useful information he has given you). If you did not kill the guard before, he appears now after the cut scene. So, you do not have a choice but to kill him. If you killed him before you are free now. Make your choice and decide if you want to be helped by the worker and enter the next area without trouble, but losing a Secret, or kill him in order to get it. Getting the help - If you want to be helped by the worker, equip your gun and approach him with the intention of threatening the guy (one cold glare from Lara should do it :-p). Normally, you trigger a cut scene when doing this. With the opposite choice, use your scope to aim at his head. The cut scene shows Lara forcing the worker to use his card. They both use their cards at the same time and the door opens. When you enter the stairwell the door behind you will close. Go to the top. The door opens automatically (skip to the part Getting the Iris). 3rd Secret (3-3\ total: 30-36) - If you want the Secret you will have to kill the worker. Do not try to kill him using the scope because this will trigger the cut scene where Lara forces the worker to help her. Instead, stand behind him and shoot. Make sure you are not very close to him or again, you will trigger the cut scene. Better select the Burst mode to take him out quickly. If you cannot make it and keep triggering the cut scene, try shooting at him from outside the room. The brief cut scene shows two more guards exiting from a door beyond the laser room. As long as you do not exit the room, the two guards do not come. Switch to Sniper mode, exit the room, and stand before the corner. Use the scope and wait for the guards to come. When they pass in front you, shoot their heads. Do not forget the gun turrets in the next hallway. You need to sprint in order to get past them. If you are lucky you will not get damaged. If you are too low on health, you can use the alcoves on the right for temporary shelter. Go to the end, but wait before passing through the door from where the two guards came. There is another guard standing in the next hallway. If you do not want to get damaged at all, just show yourself at the entrance and jump backwards to lure the guard. He will exit sneakily, so equip your gun, and using the scope, wait for him to come. When he shows himself, shoot him in the head to take him out. Now go through the door, but wait just before the second corner because yet another guard is patrolling around. Do the same thing as before to take him out without getting damaged. At the T-junction you need to go to the left in order to get the Secret. To get past the moving lasers, just crouch and run towards the Golden Rose when the lasers move to the other side. Pick it up and head to other side of the hallway, avoiding the lasers the same way as you did before. When you enter the stairwell the door behind you will close. Go to the top; the door opens automatically. Getting the Iris - You are in a room above the Iris, which is protected by lasers. You need to throw the switch in the room to deactivate the lasers and get the Iris. This is not easy though, as it is timed, and you will only have about 20 seconds before the lasers come back on. If you want to complete this part as Core intended, and thus prove you are a true raider, you need to really test your skills here and get the Iris before the time is out. What makes the situation difficult is the angle of the camera whilst running down the stairs. You temporarily lose control of the Look button, which makes it more difficult to maneuver Lara. If you cannot get orientated at the bottom of the stairs when the correct door needs to be passed through, it is because you lost your sense of direction whilst heading down the stairs. Throw the switch and side-jump to the right (you lose time if you turn in a more orthodox fashion). Exit the room and decide now if you want to go to the left or the right. If you follow the right hand way, you need to turn left in all the corners of the staircase. Turn left again at the bottom to reach the door that opens. If you follow the left part, you need to turn right in all the corners of the staircase. Turn right again at the bottom to reach the door that opens. So, keep turning right or keep turning left depending on which way you went after throwing the switch. Avoid sprinting when heading down the staircase. There is not enough space for Lara to turn whilst doing this. Once in the Iris room, and if everything went well and you did not hit any of the walls and railings, sprint towards the Iris and grab it. Alternative method - Throw the switch and jump to the right. Jump forward over the railing pressing Roll. You will land on the lower ledge. Decide if you want to go to the left or the right. If you decide to go to the right, keep turning right in all the corners of the staircase. If you decide to go to the left, keep turning left in all the corners of the staircase. Get the Iris by cheating - If you do not mind cheating, take advantage of a bug here. Throw the switch and sidestep to the left. Jump backwards to stand in front of the window (you might need to jump back twice). Crouch and crawl backward pressing Action, like you do when you want to hang from an edge. Lara will pass through the window and grab the edge. Release and roll. Sprint towards the Iris and grab it. Once you get the Iris, go through the opening on the other side of the room to end the level.
|
||
| « Level 10: Old Mill | Index | Level 12: Escape with the Iris » |
| We would like to thank TR-Player and Nicky for their help. Many parts of this walkthrough would not have been written without their participation. Special thanks go to Scottlee for proofing the text. | ||
Tomb Raider 5: Chronicles Walkthrough & Game Guide © 2000-2007 www.tombraiderhub.com |
||