The 4 midlevels that can be accessed by Parisian Ghetto
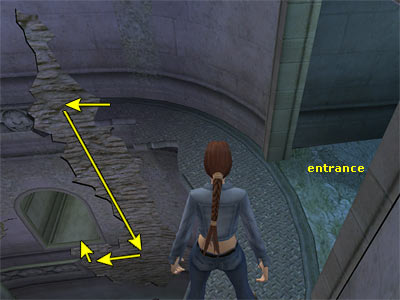
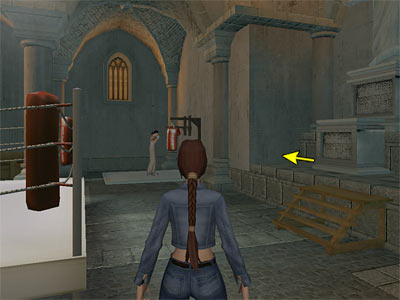
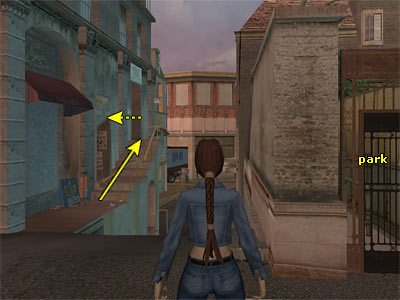
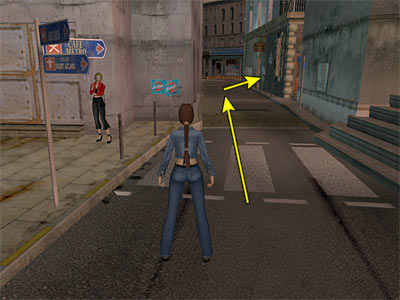
Small part of "Bouchard's Hideout" level Kills: 0 When you return from the level The Serpent Rouge and drop down to the street (Rue De Clef), you can see a manhole close to the stage door (as shown in this screenshot). This leads to a part of Bouchard's Hideout level that you can access only from Parisian Ghetto. You will play the Bouchard's Hideout level later, but you will not be able to access this part from the level itself. There is another manhole close to Janice from where you can also enter (as shown in this screenshot). Following either way, go up the tunnel to reach a crossed intersection. If you entered from the manhole next to the garage door, follow the right hand tunnel. If you entered from the manhole close to Janice, follow the tunnel straight ahead. Room with deep pit - The tunnel gets you to a deep pit. Notice the climbable wall on the right hand side and the alcove below (as shown in this screenshot). Hang from the edge of the metal ledge close to the wall and traverse to the left to grab the wall. Climb down, the left. Pull into the alcove and pick up the Diamond Ring at the end. Then climb back up to the entrance. Take a running jump across the pit to grab the opposite ledge and pull up. Pick up the Vector-R35 Clip and climb up the ladder. Either dismount or back flip. Follow the passage to the next room and kick open the door. (Note: You cannot open this door if you have not gotten the upgrade from The Serpent Rouge.) Pick up the Large Health Pack and go around the walkway where you will find a wad of 80€. Make your way back to the crossed intersection the same way you came. Alternatively, after getting the money, take some steps back and take a running jump above the railing to land on the ledge in front of the entrance (as shown in this screenshot). If you press Action in midair, Lara will lose less health. Back to the crossed intersection - Go through the tunnel on the right. Climb on the box in the right hand corner and jump up to grab the wall. Traverse to the right and pull up on the wooden platform. If Lara does not traverse to the wooden platform, slightly press the up cursor key. Turn around and jump to the opposite platform. Then jump up to grab the sill on the right hand wall. Shimmy to the right and pull into the opening. Crawl into the next room and climb into the duct. The game loads the Parisian Ghetto level . This place is behind the Park, where Bernard is. Pick up the Vector-R35 and Desert Ranger Clips, V-Packer Cartridges and two wads of 160€. Open the gate to return to the Park where Bernard is. Then exit the Park. St. Aicard's Church Kills: 0 Exactly opposite the Park you can find St. Aicard's Church. Open the door and enter. Follow either doorway and head to the other side of the church, behind the ring. Push the movable stone block that is in front of the statue (as shown in this screenshot) to get an upgrade in leg strength. Climb on it and jump up to grab the ledge above; pull up. Take a look on the left to spot a Small Medipack on a small ledge. Take a running jump to the first ledge and another running jump to the one with the Medipack. If you keep falling down, grab the sill above and traverse to the left (as shown in this screenshot). Release to drop on the first ledge where you can regain your strength and jump to grab the sill again. Traverse to the left and drop to the ledge with the Medipack. Traverse back to the ledge close to the statue. (The following sequence is shown in this page.) Climb up the wall and pull up on the ledge in front of the stained-glass window. Carefully, hop on the rafters ahead (Walk+Jump) and carefully walk to the other side, avoiding the left hand part that collapses. Jump the gap and drop down at the end. Enter the small room with the organ and pick up the Diamond Ring. Exit the room and climb back on the rafters you came from. Jump the gap and turn right to face the decrepit rafters. Take a look below to spot two Clips on a small ledge. Stand in front of the decrepit rafters and take a standing jump over them, holding Action in midair to grab the sill beyond. The rafters collapse whilst jumping over them and that way you can easily grab the sill. Release and press Action again to grab the small ledge below. Pull up and pick up the M-V9 and Vector-R35 Clips. Hang from the ledge and drop to the ground. Save your game and approach the trainer. Lara is willing to place a wager on the boxers. Although she wants to bet all of her money, they finally decide that she will give him 200€ if she loses. In the opposite case, the trainer will have to give Lara his Gold Watch. You may want to save your game before trying, because the odds are 50/50. When you are done, exit the Church. Willowtree Herbalist – When you exit the Church, turn left and head to the stairway on the left hand side (as shown in this screenshot). At the top of it is the Willowtree Herbalist. There is nothing to collect in there, but the Herbalist gives some information about the Doorman. He is Bouchard's bodyguard and you have to find him in order to find Bouchard. He finally tells you that the Doorman needs money and a password. When you finish, exit to the streets. [ Notebook Reference ] Rennes' Pawnshop – When you exit the Willowtree Herbalist, go to the left, where the big truck is. Head close to Janice and continue straight ahead. The road leads to Rennes' Pawnshop (as shown in this screenshot). Open the door to get inside. Talking to Rennes, he asks "Are you are selling or buying?". Lara asks "How much for these?" and you automatically enter the inventory having the Items as the only option. Pawn everything since you are not going to use them later in the game (they are useless items in your inventory) and once you enter the next level (St. Aicard's Graveyard), there is NO way to come back. Do not be afraid to pawn what you have on you. Rennes will not buy something that it is useful for the game later.
|
||
| Back to Parisian Ghetto | ||
| Last update: 18 February 2009: Text has been improved and all screenshots have been replaced. Also, new screenshots have been added. |
||
Tomb Raider 6: The Angel of Darkness Walkthrough & Game Guide © 2000-2009 www.tombraiderhub.com |
||