Tomb Raider 6: The Angel Of Darkness Walkthrough & Game Guide
Level 7: St. Aicard's Graveyard
Kills: 2
Pick-ups: 9 via Pierre's help/ 7 via Bernard's help
Upgrades: YES (arms)
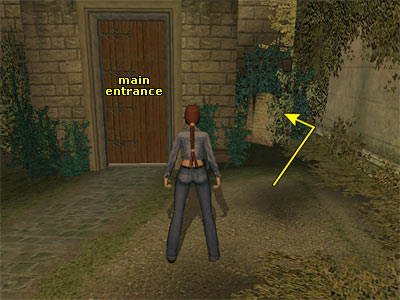
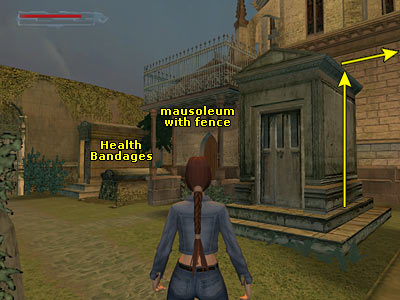
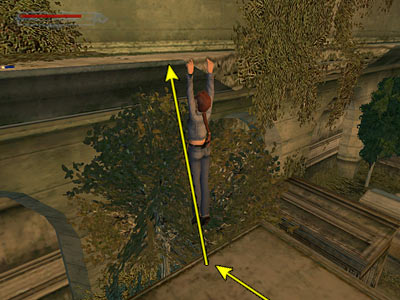
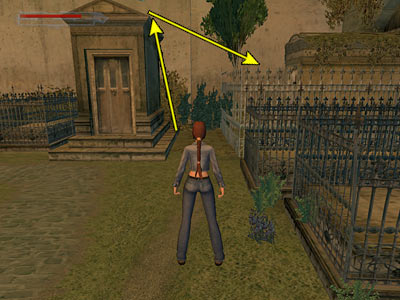
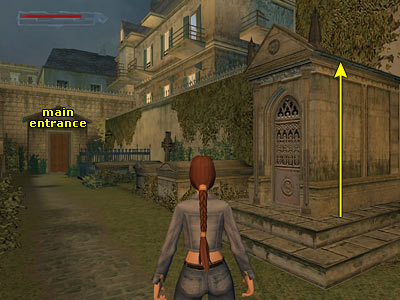
In this level, you need to find the secret passage that leads to Bouchard's Hideout. The entrance differs, depending on the help you got. If you entered through Francine's apartment (Pierre's help), there are some things you have to do first. If you entered through the Doorman (with or without Bernard's help), follow the Common Route below. Francine's apartment - Talk to Francine. She tells you that Bouchard is in the old church and you need to find the mausoleum in the churchyard which leads down into the basement. Although it is tough, it is the only way past the Doorman. She also warns you to be careful with the ledges (yes, she has her reasons for saying that). Francine will not try to stop you, so get the Health Pills from the right hand drawer of the furniture behind her and the Sport Watch from the left one. Then open the door on the right to exit to the balcony. Making your way to the Graveyard - (The entire process is shown in this page.) Turn right and take a running jump to next balcony. Vault over the railing ahead and climb up the pipe. When you reach the top, traverse to the right and pull up on the ledge. Start running forward without stopping, because the ledge below you collapses. If you don not hesitate during the process, you will reach the other side with no problems. Turn around and press Action to hang from the edge. Shimmy to the right and drop to the ledge below. The pipe next to the ledge leads down to a courtyard. There is a closed door there, but you need a strength upgrade to open it. So, for now jump up to grab the red rope. Press forward to swing across and drop down when you reach the opposite ledge. If you cannot get past the railings on the other side, press the Duck button to pull Lara's legs up. Follow the way around the corner and hand from the edge. Drop to the mausoleum below, then to the ground. Approach the brown door at the end of the pathway. This is the main entrance of the Craveyard that the Doorman guards (he is behind it). Common Route\ St. Aicard's Graveyard - Facing the main entrance, go behind the gravestone on the right where you will find a Small Medipack among the plants (as shown in this screenshot). Go to the other side of the graveyard and follow the path around to the right. You may encounter a dog here, so stay sharp. There are two dogs in total, so keep your eyes open. Depending on the way you entered the level, you trigger the dogs in a different way. Take them out anyway. At the end of the pathway, where the locked gates are, turn right and pick up the Health Bandages behind the mausoleum (as shown in this screenshot). Make your way back to the corner of the pathway. As you return back, notice the mausoleum with the fence at the top. There is a tomb next to it (as shown in this screenshot) that you have to climb on top. Do that and jump to the nearby mausoleum. Turn right and take a running jump to land on the opposite mausoleum. At this point, you lose the control of the Look button here, so carefully proceed forward until you reach the edge in front of a tree. Take a standing jump to grab the ledge ahead and pull up (as shown in this screenshot). Pick up the Chocolate Bar and drop back onto the mausoleum. To avod falling down, just hop (Walk+Jump). Fenced area with statue - Hang from the edge on the left (facing the pathway) and drop down to enter the fenced area with the statue. Open the door of the tomb to gain a strength upgrade. Get inside and pick up the Desert Ranger Clip. Now that you have got the upgrade, you can go for a couple of pick-ups. (If you are not interested, you can end the level now. Skip to the part of the walkthrough Pushing the statue.) Climb on the tomb and jump back to the mausoleum. Drop to the ground and turn left. From the corner of the path, locate the fenced area in the corner. Climb on the nearby tomb and jump in the fenced area (see this screenshot to get oriented). Open the door and pick up the Health Bandages and Desert Ranger Clip from inside. (You cannot open the door if you have not got the upgrade). Exit, climb on the tomb and jump out of the fenced area. Francine's courtyard - Go close to the main entrance of the Graveyard (the brown door) and climb on the first tomb to the right (as shown in this screenshot ). From here you can side-jump over the sharp wires and land in Francine's courtyard. If you land on them, you die instantly, so side-jumping seems to do the trick. Make sure you position Lara diagonally to the wires (as shown in this screenshot ). Once in Francine's courtyard, open the door and pick up the V-Packer Cartridges from the floor of the passage. Exit and turn left. Climb up the pipe, shimmy to the left and pull onto the ledge. If you came through Francine, you know how to leave. If not, jump up to grab the red rope and swing across. If you cannot get past the railings at the other side, press the Duck button to pull Lara's legs up. Follow the way around the corner and safely drop down to the Graveyard. Although there is nothing interesting, you can go until Francine's balcony door if you want to see everything. Before grabbing the rope, grab the sill above, shimmy to the left and pull up. Head to the other side of the ledge, but do not stop at all as the ledge collapses. Climb down the pipe, vault over the railing and jump to the opposite ledge. You can see Francine's balcony door, but unfortunately it opens from inside. Once you are done, make your way back to the area with the statue, by climbing on the two identical mausoleums. Pushing the statue - Climb on the ledge behind the statue and push it to break the cover of the grave (you cannot push it if you have not got the upgrade). Drop inside the grave to enter Bouchard's Hideout.
|
||
| « Level 5: Parisian Ghetto (Second Time) | Index | Level 8: Bouchard's Hideout » |
| Last update: 20 February 2009: Text has been improved and all screenshots have been replaced. Also, new screenshots have been added. |
||
Tomb Raider 6: The Angel of Darkness Walkthrough & Game Guide © 2000-2009 www.tombraiderhub.com |
||