Tomb Raider 6: The Angel Of Darkness Walkthrough & Game Guide
Level 9: Louvre Storm Drains
Kills: 4
Pick-ups: 6
Upgrades: YES (arms)
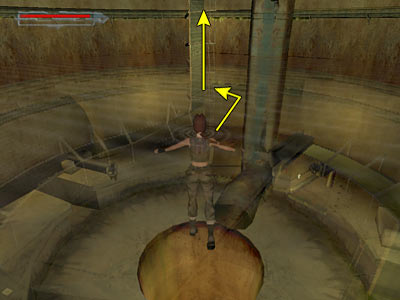
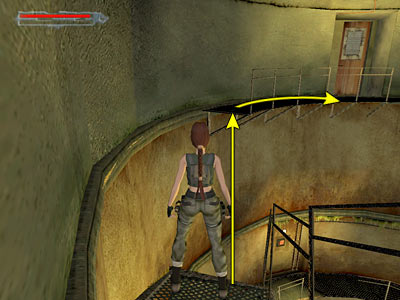
Important Bug warning for the MAC users - Before starting the level, disable the option "Display distance fog" from graphic settings when the startup dialog box appears. Many MAC users have encountered a bug, where after turning the first four valves, the hole at the bottom of the room does not get filled with water, which makes you unable to complete the level. If this is the case for you, you can do either: 1. Make sure that you disable the above option from the previous level (Renne's Pawnshop) and enter the current level with the new settings, or at least before turning the third valve (the bugged one) that triggers the cut scene of the water. 2. Download and install the patch that Aspyr released for this bug. Bouchard was clear enough that Werner wanted access to recent archeological diggings inside the Louvre. So, in this level, you need to find your way to the Louvre (this task has been added to your Notebook) through its Drains. Follow the tunnel to a shallow pool and kill the rat. Pick up the Chocolate Bar from the left and go through the opening ahead. Head up the stairs and pick up the Large Health Pack. You cannot open the door here, so return to the pool and follow the tunnel on the left killing one more rat on your way. Circular room with control panel and falling water - You reach a room with a hole in the middle. It is a long drop down, so be careful not to fall through. There is also a control panel on the left with six red lights. Your task is to turn on the lights (make then glow green), by using six valves in total. This will shut off the water falling from above. At this point, you cannot turn any of the valves, because you need to get a strength upgrade. Getting the strength upgrade - As soon as you enter the room, go around to the left to reach the opposite side (as shown in this screenshot). Climb up the pipe, shimmy to the left and pull up on the walkway. Cross it to the end and use the switch to turn off a fan elsewhere. Return back and climb down the pipe. Go around the room and enter the tunnel opposite the control canel (it is the right hand tunnel if the entrance is to your back). Kill the rat and go through the opening on the right. Climb up the short ladder to reach the fan you turned off before. Stand in front of it and press Action to turn the blades of the fan and gain a strength upgrade. Turning the first valve - Crawl beneath the fan and pick up the V-Packer Cartridges. Follow the passage to the next small room where you will find the first valve. The opening on the left leads to a dead end, so return back to the control panel the same way you came. Turning the second valve - Follow the tunnel to the right of the control panel. Go through the doorway on the left and pick up the Vector-R35 Clip. The steam above the Clip is harmful, so crawl if you do not want to lose health. In the next room, kill the rat and turn the second valve. Return back to the room with the control panel the same way you came. Alternatively, after turning the valve, climb down the nearby ladder. Drop into the water and swim to the left. Head up the tunnel and turn left. Turning the third valve - Climb up the pipe again and go to the end of the walkway. This time, walk on the beam and make your way across. Turn the third valve which also fills the hole below with water. Go to the right and pick up the Desert Ranger Clip. Jump up to grab the ladder and climb to the top. Dismount on the walkway to the left and climb up the next ladder. Dismount on the left. Turning the fourth valve - Walk on the beam and stop when you reach almost the middle of it. Turn right and jump up to grab the pipe above. Traverse to the other side and drop onto the ledge. Alternatively, take a standing jump from the beam and grab the ledge. Then pull up. Turn fourth valve and jump\ shimmy back to the beam. The opening at the end of the beam leads to a passage with a M-V9 Clip and a door that opens from the other side. You now have to go down where the control Panel is and drop into the hole. You can either climb down the ladders you came from or hang from the beam, shimmy above the hole and drop down (as shown in this screenshot). Inside the flooded hole - Swim down the tunnel and follow it as it goes. It makes some turns but it is one way nad there are no juctions. Room with pool - When you surface, locate the broken catwalk. Approach the right hand side of it and Lara will grab onto it. Use it as a ladder to climb up (as shown in this screenshot). Turning the fifth valve - Follow the walkway around and jump up to grab the pipe. Traverse to the other side and halfway across drop onto the beam. Walk to the left of the beam and turn fifth valve. Return to the beam and jump up to grab the pipe again. Shimmy to the other side and drop on the walkway. To climb up the bent catwalk on the left, approach it and Lara will grab onto it. Press Up and Lara will do the rest. One you pull up, go to the other side. Turning the sixth valve - You can crawl beneath the bars of the tunnel on the right, but there is nothing interesting. Be careful of the slide though, because it takes you back where you got the strength upgrade. Jump to the opposite catwalk and turn the sixth valve. Going back to the room with the control panel - When you use all six valves, the water back in the room with the control panel shuts off. You now have to return there, so jump back to the previous catwalk and go to the other side (where you pulled up earlier). Jump to grab the opposite catwalk and pull up (as shown in this screenshot). Open the door and if you did not do it before, pick up the M-V9 Clip. Follow the passage to return back at the top of the room with the control panel. Walk on the beam and jump into the huge pipe. Climb into the smaller one and open the door to the next area. Area with pool and two tanks - Walk to the edge of the pipe and you will hear Lara saying that she smells oil and she should be careful. Do not worry for now, so hang from the edge of the pipe and drop to the walkway below; turn around. There are two tanks on the right hand side of the room and you have to explode one of them (you cannot do both). If you want to explode the left hand tank, jump into the pool and swim to the other side. To climb out of the water, use the ladder. Turn right and climb on the platform with the tank. Alternatively, you can go left and around the walkway. If you want to explode the right hand tank, follow the walkway around to the left. (This screenshot shows the location of both tanks.) In both cases, Lara thinks that this is the place and better checks the map. Press Action when the hand icon appears to use the Explosives. Follow Lara's instructions and immediately jump backwards to drop into the pool and avoid getting toasted by the explosion. Do not surface or you will die!! This place is full of oil, as Lara said before, and the surface of the water is in flames as a result. Both underwater tunnels lead to the same place, but the left way is the quickest one. Follow it until Lara surfaces and steps out of the water. Run up the tunnel to reach the top, looking the flaming pool from above. If you exploded the left hand tank - (This page shows the following sequence.) Hang from the edge and drop down. Turn left and climb up the ledge. Vault on the broken duct ahead and jump up to grab the thick cable above. Traverse to the other side and drop onto the broken walkway. Go to the end, vault on the duct and carefully walk on it. At the end, drop through the opening in the wall. If you exploded the right hand tank - (This page shows the following sequence.) Hang from the edge and drop down. Turn left and climb up the ladder. Go to the other side, but do not use the ladder. Instead, jump to the walkway below, jumping over the first fire at the same time. If you climb down the ladder, you may catch fire while trying to jump over the fire. Jump over the next fire and follow the walkway around to the left. Then enter the opening in the wall. Turn left and follow the hallway to a closed door.
|
||
| « Level 8: Bouchard's Hideout | Index | Level 10: Louvre Galleries » |
| Last update: 20 February 2009: Text has been improved and all screenshots have been replaced. Also, new screenshots have been added. |
||
Tomb Raider 6: The Angel of Darkness Walkthrough & Game Guide © 2000-2009 www.tombraiderhub.com |
||