Tomb Raider 6: The Angel Of Darkness Walkthrough & Game Guide
Level 10: Louvre Galleries
Kills: 13
Pick-ups: 11
Upgrades: YES (arms\ legs)
|
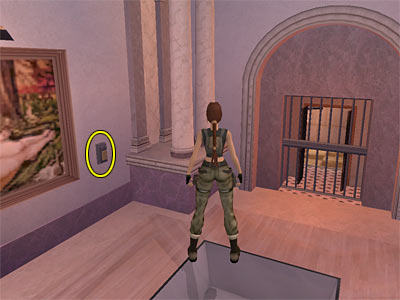
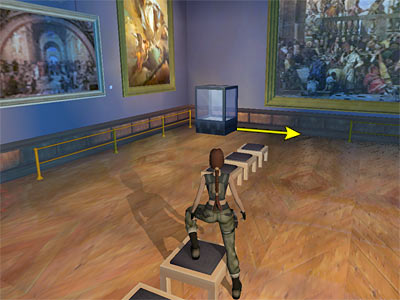
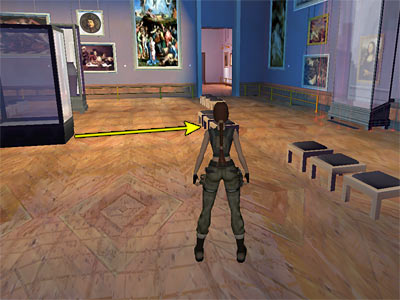
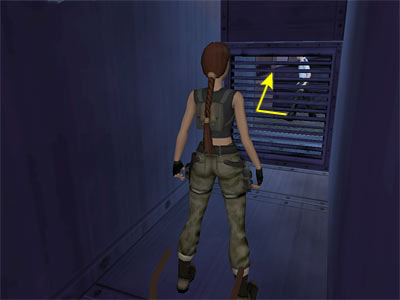
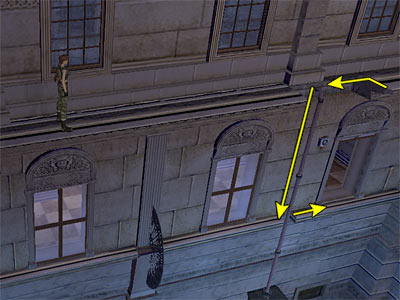
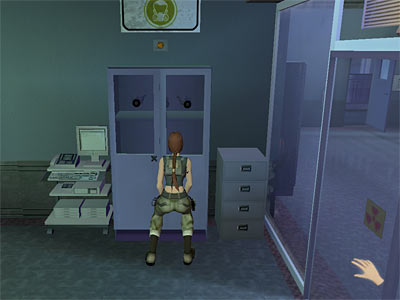
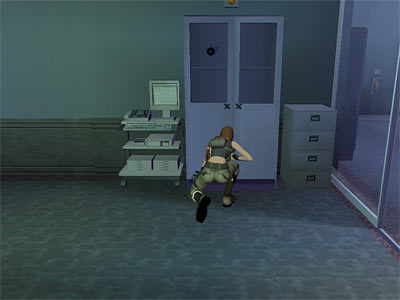
Lara needs to reach the archaeological digs that Werner was interested in. One of Werner's original notes is that Carvier keeps a security pass for the digs in her ofice. This is what Lara wants in order to access the digs and that's why this task has been added to your Notebook. So, you need to find Carvier's office and get her Security Pass, because it is the only thing that can give you access to the Archaeological Dig. [Note about the guards - The guards of this level are armed with K2 Impactor Batteries. Killing these guards hand to hand (kick/ punch) is useless because this weapon takes a lot of your health. We suggest you use the K2 Impactor gun, because one shot is enough. The first guard drops his Batteries, giving you ten more shots. There are also some cameras with a red light that activate the alarm and alert a guard each time. Be careful, because these guards do not leave anything and it is a waste of your time, ammo, and health.] Go up the stairs until you see a closed door. You cannot open it now because you need to get a strength upgrade. Kill the guard on the right and pick up the Impactor Batteries he drops. If the red light catches you, a second guard will show up, but he drops nothing. Continue up the stairs and go through the doorway. Follow the hallway around to the left and open the door. (Bug note - If you cannot see the Impactor Batteries that the first guard dropped, go up the next flight of stairs and then return back. They should be there now.) First Gallery with lasers - You enter a galery which is protected by laser beams. If one of them catches you, they do not harm you, but they activate the alarm and both the entrance and exit doors close. They are also sealed by metal gates, the laser beams turn off and a guard enters the gallery. In this case, kill the guard and press the button near the entrance (as shown in this screenshot) to open the doors and activate the laser beams again. The guard appears only once, so do that if you are interested in all kills. The deal here is to reach the opposite side, avoiding the laser beams that lock the exit. Getting across - (The following sequence is shown in this page.) Climb on the first low glass case and turn left. Jump to grab the archaeological relic and pull up. Pick up the Large Health Pack and turn right. Take a running jump over the lasers to land on the next case. Then jump to the one on your right and turn left. To reach the next case, take a running jump when the moving lasers are at the lowest point. Once you make it, walk to the other edge of the case and take a standing jump when the upper two laser beams turn off. Now hang from the right hand side of the glass case and shimmy to the right, passing beneath the lasers. Either pull up or keep shimming until the ground is clear and drop down. Climb on the right hand case and jump through the gap to pass the crossed lasers. If, for some reason, you keep activating the alarm here, grab the sill above, shimmy to the left and drop down. Open the door and exit the gallery. The cut scene shows the place around; more laser beams that block your way and three guards patrolling around (one inside and two outside). Second Gallery with lasers - You cannot open the door at the far left, so crawl beneath the crossed lasers on the right. If you pass through them and activate the alarm, a guard appears running from the other side of the room, but he does not leave anything. If you keep activating the alarm, commando crawl (Crouch+Stealth) beneath the lasers. Another guard is standing in front of a door on the right. You cannot kill him from here, even if you use a weapon with a long range. So, you need to pass through the lasers, assuming you have not disabled them yet. To do that, go to the right and stand against the wall (as shown in this screenshot). Side-step to the left to pass between the vertical laser and the wall. Alternatively, you can pass through the lasers, but the guard will spot you easier. If you want to proceed unnoticed, do the first. Kill the guard and pick up his Louvre Low Security Pass. In case you activate the alarm by passing through the lasers, do not hesitate and run towards the guard. The other one, who will come from the alarm, may accidentally kill the first one, making your job easier. Before opening the door, go to the end of the gallery and pick up a Large Health Pack from the right. If the red light from the camera catches you, another guard comes from the other side, but he does not leave anything, so do not waste your time. The sign that reads "Archaeological Dig Site" on the left is the way that leads to the digs. Press Action when the Hand icon appears and your Notebook will be updated: "Get access to the archaeological dig at the second buttress". Lara also says that Werner's Notebook mentioned a security pass kept in Carvier's office. [ Notebook Reference ] Gallery with Mona Lisa - Return back where you killed the security guard and open the door. Again, there is a red light in the hallway. If you activate the alarm, a guard comes from behind, but he does not leave anything. Wait a bit before entering the next room. You will see another guard patrolling inside. Wait for him to make his round until he start walking in the middle of the room, having his back to you (as shown in this screenshot). Activate the Stealth mode and start walking behind him. When he stops in front of the big painting, press Action to break his neck. (Note - The guard in this room patrols around. Depending on how long it took you to get to this room, the guard may NOT walk in the middle of the room. He may be coming over you or coming from another way. You can stand at the entrance and wait for him to make a round and start walking in the middle of the room.) Mona Lisa is protected by some laser beams. If you run through them, they will not harm you, but the steam that comes out from the vent in the floor can damage you. Pull the glass case in the far left corner of the room to gain an upgrade in leg strength (as shown in this screenshot). There is a socket behind the case, where you can use the Low Security Pass and turn off the lasers and steam that protect Mona Lisa. However, this is timed so you have to prepare the area for the running. First, push the middle tall case close to the stools until you cannot push it further (as shown in this screenshot). Note that you cannot push it if you have not got the strength upgrade. Now you can use the Security Pass to deactivate the lasers. As mentioned above, this is timed and you have 15 seconds to complete the next part. As soon as you use the card, press the Look button to break the camera (if this is your first try). Roll on the spot and turn slightly to the left. Run and jump above the stools, heading to the back of the back of the tall case. Jump up to grab it and pull up. Take a running jump to grab the case that Mona Lisa is locked inside and pull up. As soon as you reach the top, do not panic to crawl. Nothing can hurt you now. Ducts above Mona Lisa - Crawl through the duct until you can stand up. Continue through the duct and crawl through the next opening (there is nothing on the left). When you reach the small room with the fan at the top, climb up the ladder. As soon as you reach the top, do not walk at all, as you have a better view of the outside area. There is a guard patrolling outside. He stands in front of the grate for about 30 seconds. If you want, you can kick the grate and shoot him. However, you can kill him stealthily. Wait for him to leave and go to the left side of the roof (as shown in this screenshot). When you see him drawing away, kick the grate, activate the Stealth mode and start following him. When he stops, stand behind him and press Action to break his neck. Roof with domes - There is a dome on each side of the roof with a closed gate that opens from the other side. There are also two blue doors close to each dome and only the left set opens, but you first need to get a strength upgrade. Getting the strength upgrade - (The entire process is shown in this page.) There is a metal box beneath the air-conditioner unit to the left of the opening you came from (as you face it). Climb on the box and vault onto the pipe. Turn right and jump up to grab the sill above the air-condition. Traverse to the right past the semicircular railing. Pull up and go to the other side. Hang from the sill and traverse to the right past the second railing (notice the guard through the window here). Again, go to the other side of the sill and hang from the edge. Traverse to the right around the two corners and pull up on the small ledge. Notice the cable above Lara. Jump up to grab it and traverse across. You could grab the cable from the spot in front of the window, but Lara would have just enough strength to make it across. When you reach the other side, you gain the strength upgrade. Drop down and turn right. Continue to the end of the ledge and jump the gap. (Note - The following part of the walkthrough describes the retrieval of a Key that opens a door where the Crowbar is hidden. You should have it, however, from the training level. If you want to see everything, continue with the walkthrough. Otherwise, skip to the part of the walkthrough Entering the Louvre again. Also, SYS mentioned that the aforementioned guard sometimes passes through the window and falls down. Until now, we have never activated this bug. If he says so, we believe him. Since Lara cannot actually kill him, as he falls to his death by himself, we do not count him as a kill.) Hang from the edge and traverse to the left around the corner (as shown in this screenshot). Grab the pipe and climb down. Dismount to the sill on the right. Lara gets the 'side-stepping' position, so press the right direction key to side-step. When you reach the open window, you get an inside view. If you cannot stand in front of the window whilst side-stepping, grab the pipe again and climb down until Lara's hand are on the same level with the windowsill. Grab the sill, shimmy to the right and pull up in front of the window. If you wait for a bit, you will see a guard coming to the window. He wants to get Lara, but he cannot climb on the sill; he is close to her though. Simply stand on the windowsill facing the guard and press Action to kick his head. Do this a few more times until he falls down. Pick up the Louvre Guard's Key he drops and, since you cannot open any of the doors here, exit though the window. Drop to the ground and open the gate on the dome. Open the blue door on the right and get the Health Bandages. You can also open the left door, but there is nothing to collect in there. Return to the pipe, climb to the top, shimmy right and pull up onto the ledge. Entering the Louvre again - Jump over the railings and follow the balcony to the end. You need the Crowbar to open the gate and you should have it from the training level. If you have got the Guard's Key and want to see everything, climb down the ladder and open the door on the right. Get the Crowbar and return back up to the gate. Use the Crowbar to break the padlock and open the gate. Climb on the metal ledge and crawl though the duct. Climb down the ladder and follow the duct. At the end, hang from the edge of the opening and drop down at the end. Small storage room and hallway outside - There is nothing interesting in the storage room, but do not rush to open the door. There is a guard patrolling in the hallway, but the camera does not help you locate his position. If you want, open the door and shoot him. If you want to kill him stealthily, wait until he goes to the left. Then open the door and start following him in Stealth mode. When he stops at the end of the hallway, stand behind him and press Action to break his neck. The door near the storage room is the exit, but the Low Security Pass you have will not open it. The door at the other end of the hallway leads to Cravier's office, but you need a code to open it. Maintainance of work of art office - The first blue door in the hallway leads to a maintainance of work of art office that does not include anything. If you enter the next room behind the glass door, you will see a cabinet with three Respirators. You are not supposed to get them now as Lara says "It won't open" (the cabinet). You will come back here again later and get one Respirator. [Note - In fact, you CAN get the Respirators now by doing a small trick. Stand in front of the cabinet and press the Crouch button. You will notice that when Lara is halfway down, the Hand icon appears (as shown in this screesnhot). As soon as you see the hand icon, quickly press Action and Lara will grab a Respirator from the bottom of the cabinet. This screenshot shows Lara grabbing a Respirator and if you take a closer look, you will see that two of them are missing. If this does not work for you, press Action immediately after pressing Crouch. You can get all three Respirators and this will not affect the rest of the gameplay. Note though that when you come back later, the Respirators will still be here. We do not count the Respirators as normal pick-ups in the statistics.] Control room - Open the second blue door next to Carvier's Office to enter a control room. There is a guard behind the glass door, so enter and shoot him. You cannot kill him stealthily, because he stops in front of a pick-up and Lara instead of breaking his neck she tries to get the pick-up. Once you are done, get the Vector-R35 Gun from the shelf on the right (Clip if you already have it). There are four security monitors opposite the entrance. Use the leftmost to check Carvier's Office. To move the camera use the cursor keys, to zoom in and out use the Jump and Action keys. To return back to normal, press the Duck button. Zoom in on Carvier's PC to get the access code for her office (as shown in this screenshot). The second monitor shows the hallway just outside and the third one shows the exit at the end of the hallway but from behind the door. The rightmost camera shows a gallery with a guard patrolling inside, but you have not been there yet. Carvier's office - Exit to the hallway, turn right and enter the code to open the door (14639). Carvier's Security Pass is in the right hand cabinet of her desk. [ Notebook Reference if you did not get it in the second gallery]. If you check the PC, the painting on the wall and the sketches next to the door, you will learn more things about the Obscura Paintings. There were five images painted on thick wooden bases and they were created by Black Alchemist Peter Van Eckhard in the 13 or 1400's. Together the five paintings hide something called the Sanglyph or The Blood Sign. Lux Veritatis seized the Paintings from Eckhard and painted over with religious imagery. Each Painting has a metallic symbol of power built into it and that's why Eckhard wants the Paintings. Brother Obscura is the artist who painted over the original images. He was ordered to disguise the Paintings with religious imagery. The Paintings were hidden, but he made secret copies of them, sketches, and hid them too. These copies became known as Obscura Engravings. These Engravings contain encrypted maps of a Painting secret location. Third gallery - Exit the office and go to the other side of the hallway. Use Carvier's card to the socket to unlock the door. Open it and go through it. Head down the stairs to reach a small hall with two doors. Only the right hand one opens, so do that and enter the gallery that the rightmost security monitor showed you before. There is a guard patrolling in here, so kill him. Unlock the door at the other side of the gallery using one of the Passes you have. Open the door and go through it to return back to Second Gallery with lasers. Back to the second room with lasers - If you did not activate the alarm from the red light of the camera before and you do it now, a guard will come from the left side of the gallery. You can kill him, but he does not leave anything, so do not bother. Before exiting from the right hand door (using Carvier's Pass), you can backtrack for a couple of pick-ups at the beginning of the level. There was a door that you could not previously open because you did not have enough strength, remember?. If you are not interested (Health Bandages and Small Medipack) skip the next paragraph. Back to the start - Enter the gallery on your left. If you did not pass through the lasers before and did not activate the alarm, carefully pass them again: the first set from the left hand side of the room by side-stepping close to the wall, and the crossed lasers by crawling beneath them. If you activate the alarm, a guard will come from behind you. Open the door on the left using one of the cards and cross the First Gallery that has no lasers anymore. Head down the stairs and open the door on your right. Again, if you did not activate the alarm by the red light of the camera before and you do it now, a guard will come, but he does not leave anything. Get the Health Bandages and the Small Medipack at the end of the room and return back the same way you came. Exiting Louvre Galleries - Use Carvier's Security Pass to open the door. Follow the hallway and head down the stairs. There is a guard in the gallery on the right, but there is nothing to collect in there. Moreover, the guard does not leave anything, so you can continue down. If you are interested in all kills, go ahead and shoot him. If you want to kill him stealthily, let him make one round until he has his back to you. Activate the Stealth mode, stand behind him and press Action when he stops to break his neck. Exit, go down the stairs and open the door at the bottom. Enter the hallway and turn left. Go down the stairs on the right and use either blue metal door to enter the Archaeological Dig.
|
||
| « Level 9: Louvre Storm Drains | Index | Level 11: The Archaeological Dig » |
| Last update: 22 February 2009: Text has been improved and all screenshots have been replaced. Also, new screenshots have been added. |
||
Tomb Raider 6: The Angel of Darkness Walkthrough & Game Guide © 2000-2009 www.tombraiderhub.com |
||