Tomb Raider 6: The Angel Of Darkness Walkthrough & Game Guide
Level 12: Tomb of Ancients
Kills: 3
Pick-ups: 4
Upgrades: YES (legs)
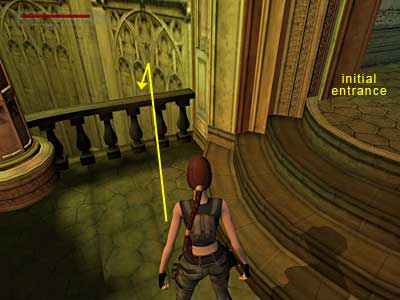
Follow the tunnel and hang from the edge of the opening. Drop to the wooden beam below, hang from the edge and drop down. Approach the opening at the end of the tunnel. A cut scene shows the area below along with a knight that is waiting for you at the bottom. Making your way down to the broken bridge - As you noticed from the cut scene, this is a long drop down. Turn around and hang from the edge of the opening. Climb down the wall to reach the ledge below. The bats here are not friendly. More than that, they do not leave you alone. They have to bite you at least once and then go away. The ones with the yellow wings are harmless. Kill an annoying bat here and turn left. Take a standing jump to the wooden beam ahead or grab it if necessary and pull up. Jump into the tunnel on the right and climb down the three ledges. Broken bridge - Exit to the broken bridge and walk to the edge. Draw your weapons and Lara will aim at a bat just below. Kill it now or it will surprise you in just a bit. Take a running jump to land on the opposite side (or grab if necessary and pull up) and enter the small room ahead. Pick up the Health Bandages and if you did not do it before, kill the bat that attacks now. Return to the edge of the bridge. If you are interested in all kills, draw your weapons and Lara will aim at a third bat from the upper right of the area (as shown in this screenshot - thanks to SYS for bringing the third bat to our attention). Making your way to the ground - Take a look at the ledges with the gargoyles around. The middle one on the right hand side is empty (as shown in this screenshot). Stand in the front right corner of the bridge and take a running jump to grab the empty ledge. Pull up and turn left. Walk to the edge and take a standing jump to grab the ledge with the gargoyle. You cannot traverse around the corner, so pull up. Turn right and hang from the edge behind you. Traverse to the left, past the gargoyle above and keep shimming around the corner. Release to drop to the sandy area below. Turn around and proceed until the middle of the ledge. Hang from the edge on the left and climb down the wall. Drop into the alcove and grab the wall on the left. Climb around to the left to the other side and drop onto the next ledge. Turn around and walk to the edge. Take a standing jump to the wooden beam ahead or grab it if necessary and pull up. Pull the lever to extend some ledges off the wall. Now you have to make your way more down. Jumping on the ledges - The jumps here may be quite frustrating, so better save your game frequently. (The following sequence is shown in this page.) Press Walk and Jump at the same time to hop to the first ledge. Take a standing jump to the next one. Again, take a standing jump to grab the ledge above and pull up. Hop to the next ledge below. Step backwards, hang from the edge and drop to the ledge below. Turn around and take a running jump to the last ledge. Safely drop to the ground. Ground level - You cannot kill the knight here. You may shoot and stun him, but he awakens after a few seconds, so this is a waste of ammo. Simply ignore him, because he is slow. Head to the other side and crawl through the opening. Pull the lever to rearrange the ledges on the wall. The knight may be standing just outside the opening, but do not pay much attention to him. Just crawl back out and go to the left. Climbing to the alcove with the lever - (The following sequence is shown in this page.) Climb on the lowest ledge. Take a standing jump to the opposite ledge. Jump and grab the next one. Jump up to grab the ledge above and pull up. Now take a standing jump to grab the next ledge and pull up. Do the same thing for the next one and turn around. Jump to grab the ledge above and pull up. Walk to the front right corner, make one step backwards and jump up to grab the ledge above; pull up. For the next three ledges, take standing jumps. Turn left and climb in the alcove above. Pull the lever to open the trapdoor at the bottom of the room. Making your way down (again!) - You now have to make your way down jumping on the same ledges. Hang from the edge of the alcove and drop to the ledge below. Turn left and hop to the next one. Take a standing jump for the next two ledges. Turn around, hang from the edge and drop to the ledge below. Step backwards, hang again from the edge and release to drop to the next ledge below (you just bypassed a ledge). Take a standing jump to the next one and finally drop down to the next ledge. Safely drop to the ground. Basement - Ignore the knight again and drop through the trapdoor. The knight may drop down in his try to follow you, but do not bother with him. In the case he becomes annoying, shoot or kick\ punch him until you stun him. The next part is just beyond and you will not have to deal with him again. Follow the tunnel to reach a T-junction. First, go to the right and kick open the door to gain an upgrade in leg strength. Pick up the V-Packer (the famous Shotgun) and two sets of Cartridges for it. Exit the room and follow the tunnel to the other side. Area with darts and spikes\ Timed run - Kick open the next door and cross the first room (you cannot open the door if you have not got the upgrade). As soon as you enter the second room, the gate behind you closes. There is a lever on your right, which opens a gate at the far end of the room. This is timed and you have about 10 seconds to make it. The area seems quiet, but if you move a bit you will see that you have to pass through darts and horizontal spikes. Save your game here because you will most probably not make it the first time. If the darts get you, you not only lose health, but they also cut your momentum. To avoid that, keep moving left and right whilst running. If the spikes even touch you, you die instantly. To avoid the death, jump over the spikes just before reaching them. Do not hesitate at all throughout the process, because you have just enough time to make it across. When you finally make it, pass the hallway and enter the next room. Turn left and open the door ahead. [ Notebook Reference ] The Notebook gives you an idea of the following level: The wrathful sentinels guard the hall within. Open the next door to end the level and enter the hall that was mentioned in your Notebook. (Note - You are coming back to this level after completing The Hall Of Seasons. For this part of the level, check the walkthrough at the end of The Hall Of Seasons.)
|
||
| « Level 11: The Archaeological Dig | Index | Level 13: The Hall of Seasons » |
| Last update: 23 February 2009: Text has been improved and all screenshots have been replaced. Also, new screenshots have been added. |
||
Tomb Raider 6: The Angel of Darkness Walkthrough & Game Guide © 2000-2009 www.tombraiderhub.com |
||