Tomb Raider 6: The Angel Of Darkness Walkthrough & Game Guide
Level 13: The Hall Of Seasons
* You can force the knights fall off the balconies, but since Lara cannot actually kill them, we do not count them as kills.
** Including the Health Bandages from the brief visit in Tomb of Ancients.
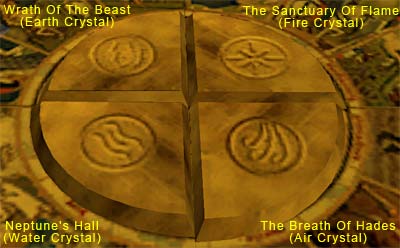
Open the door to enter a hallway with four receptacles; two on each side. There is a symbol above each receptacle, which represents one physical element: Water, Air, Earth and Fire. The deal here is to get four Crystals and place them into the receptacles to unlock a door in the basement. Then you can get on to the next part of the level. Getting Oriented - Enter the Main Hall. There is a knight here, but do not bother with him because you cannot kill him. Moreover, he moves slowly. There are four buttons in the middle of the Hall with symbols same like the ones you saw earlier in the hallway. If you take a look around, you will see several doors in the room (20 in total), but only 12 of them have a symbol hanging above the door. As you can see, these doors are divided in four trines. To open a trine, you have to step on a button. Each door leads to a lever and a trapdoor in the floor. The middle door also leads to a closed big gate that you have to open, using one of the three levers, so as to get access to one side level and get a Crystal. If you pull the "wrong" lever, the trapdoor beneath you opens and you fall into the basement. Although it is necessary to go there, avoid it for now. It is full of traps, but moreover you are missing the Crystals. So, you first have to use the "correct" lever and visit the side level (four in total). The "correct" lever you have to use in order to visit a side level is the one by following the hallway where the inner symbol is the same as the one you stepped onto. Every time you get a Crystal, you have to come back here and step on a button in order to access another side level and get the next Crystal. You can complete each of the four side levels in any order you like. We start from the bottom left button as you enter the Hall and move clockwise. (This screenshot may help you.) Neptune's Hall (Water Crystal) - Step on the bottom left button to open the three doors next to the entrance on the left. Pull the lever in the left hallway to open the gate. Wrath Of The Beast (Earth Crystal) - Step on the upper left button to open the three doors at the far left side of the Hall. Pull the lever in the middle hallway to open the gate. The Sanctuary Of Flame (Fire Crystal) - Step on the upper right button to open the three doors at the far right side of the Hall. Pull the lever in the right hand hallway to open the gate. The Breath Of Hades (Air Crystal) - Step on the bottom right button to open the three doors next to the entrance on the right. Pull the lever in the right hand hallway to open the gate.
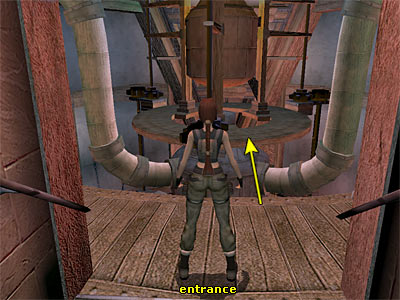
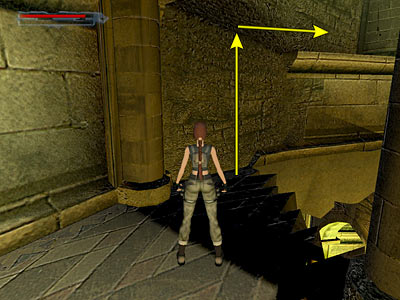
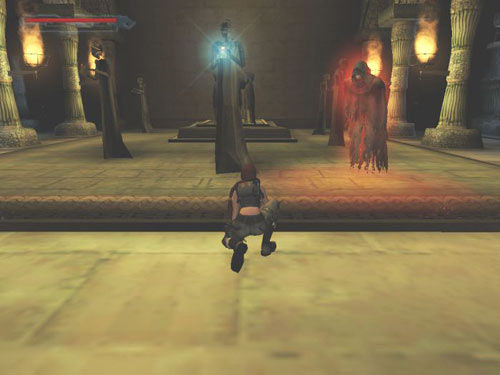
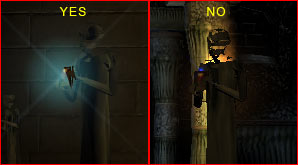
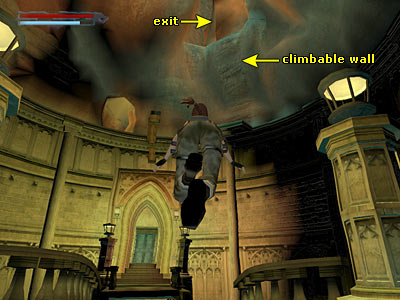
After collecting all four Crystals - Return to the hallway where you started the level and place the four Crystals in the receptacles to unlock a door in the Basement. Every time you place a Crystal, you remove a lock off the door. To enter the basement, you have to step on any button in the middle of the Hall. The basement is full of traps. The main reason for going down there is to enter the door you unlocked by using the four Crystals, and activate a huge machine which will help you exit the Hall. After stepping on a button, follow one of the three doors and pull a "wrong" lever to open the trapdoor beneath you. Each trapdoor leads you to a hallway which ends to a slide. After sliding down, you can return back using an elevator down there. The basement is a circular hallway. Regardless of the button you have used, you can find the door following the either right or left way of the hallway. If you are interested in all pick-ups, you have to step on the Earth button, which is the upper left as you enter the Hall (otherwise step on the Fire button which gives you a direct access to the door). You get a Viper SMG Clip after dropping though the Earth trapdoor. Other than that, there are five more pick-ups that you can get by stepping on any of the three buttons and following either side of the circular hallway. If you want the extra pick-up, you can use the elevator to return to the Hall and step on the Earth button. The quickest way for all the pick-ups, avoiding some of the traps - Step on the Earth button and pull the lever following the either left or right door. The trapdoor opens and you fall into a hallway. Pick up the Viper SMG Clip and slide down the slope. Pick up the V-Packer Cartridges and head to the circular hallway. The next pick-ups are beyond on the right. The long spiked rim is triggered when you come from the other side, so do not be afraid to step out. Jump over\ crawl under it from the right hand side and then jump over the lava pit to grab the ledge. Pull up and continue ahead, watching out for the next trap. Run when the blades are in a horizontal position. Enter the elevator on the right and pull the chain once. Turn around and pick up the Health Bandages and the V-Packer Cartridges from the alcove. Pull the chain again and follow the hallway to return to the Hall. Step on the Air button (the bottom right if the main entrance of the Hall is to your back) and pull the lever following the either middle or left door. Slide down the slope and get the Large Health Pack. Head to the circular hallway and turn right. Jump over the lava pit and do not stop running. Depending on the time it took you to get here, a long spiked rim may be coming from behind you. Pass the door on your left (the one you are looking for) and jump over the next two lava pits. Enter the dark opening on your right and pick up the Viper SMG Clip at the end. Return to the circular hallway and make sure that the spiked rim has passed. Turn left, jump back the two lava pits and open the door on your right (skip the next paragraph). Directly to the basement door ignoring the pick-ups - Step on the Fire Button (the upper right if the main entrance of the Hall is to your back) and pull the lever following the either middle or left door. Slide down the slope and pick up the Viper SMG Clip. Head to the circular hallway and turn left. Take a running jump for each lava pit and open the door on your right. The door in the basement\ room with central machine - Head down the stairs. The door at the bottom opens when you approach. Pull the lever to open the next door and close the one you just went through. Go down the next set of stairs to enter a room with a huge machine. You have to activate the machine by turning four valves. However, one of the valves is locked in a cage on the machine and you first have to turn the other three first. The Air Valve is just on your left as you enter the room, at the end of the wooden ledge. Turn it and return to the entrance. Take a running jump to the circular wooden ledge in the middle of the room (as shown in this screenshot). There is a chain on the other side that you can use and traverse across to an upper ledge. Once you do that, turn left. Climb up the ladder and turn the Water Valve. Climb down the ladder and use the chain again to return to the circular ledge in the middle of the room. There is a wooden platform on your left with a ladder on the left side of it and a dark opening on the right. Take a running jump to grab the platform and pull up (see this screenshot to get oriented). Climb up the ladder and turn the Earth Valve. Climb down the ladder and head to the dark opening. Jump to grab the ladder ahead and climb all the way down. Turn around and jump up to grab the chain. Traverse to a lower circular wooden ledge. Head to the other side to locate the fourth valve. This valve is locked in the cage until you turn the other three. Before turning it, climb down the ladder and pick up the Viper SMG Clip next to the big black round thing. A knight is lurking around; just ignore him. Return to the circular ledge by climbing up the ladder and turn the Fire Valve. When all physical elements drop into the machine's tank, the latter is activated. Are you wondering what just happened? You will find out in a while. Do not move, because blades are spinning on your left and right side. To avoid them and exit this room, step backwards, hang from the edge and drop to the ground. Again, there are spinning blades to your left and right side. Either turn around and walk forward, or jump backwards to get away from them. Climb up the nearby ladder, then the next one. Go through the exit and up the stairs. Push the lever to open the gate and go up the stairs to return to the circular hallway. Back to the circular hallway - You now have to return back to the main Hall. Turn right and quickly enter the dark opening on the left, because a long spiked rim may be coming towards you. If you did not follow the walkthrough getting all the pick-ups, there should be a Large Health Pack at the end. Once the rim has passed, continue through the circular hallway, because you have to reach the elevator. Take a standing jump to grab the ledge with the huge boulder and pull up. When the boulder is down, approach it and run against it. You will not get hurt that way. You just make sure that you are as close to it as you can. When the boulder moves up, run beneath it before it comes down. Taking a standing jump may help your job. Just make sure to take a diagonal jump in order to avoid the traps ahead. Crawl beneath the trapwith three blades and carefully pass through the next four opening blades. Keep going, watching out of the vertical blades, and enter the elevator on the left hand side. Pull the chain twice and enter the Hall. If you did not follow the walkthrough getting all the pick-ups, pull the chain once and turn around to get the Health Bandages and V-Packer Cartridges from the alcove. Back to the Hall (after activating the machine) - When you come back to the Hall, you will see four pillars moving up and down. This is what happened by activating the machine. Climbing up the four moving pillars - Approach the pillar on the right and stand next to it. Wait for it to come to the lowest point and jump up to grab its edge. Pull up and jump to the next one. Go the anti-clockwise way to jump on the next two. Once you are on the tallest pillar, turn to face the center of the room. When the pillar reaches the highest point, jump up to grab the circular metal ledge above; pull up. There are four rungs but only one of them is flat. Cross it to the other side and jump\ vault over the railing. First floor - There are two dark areas on the wall: one on your left and one on your right. When you pass in front of them, a knight breaks this part of the wall and comes out. Since there is nothing interesting on the left, avoid going there and triggering the knight. Head to the right side, ignore the knight that breaks the wall and jumps out. Follow the balcony to the end and go up the stairs to the second floor. Second floor - Take a mental note of the door at the top of the stairs, as you will come back here in just a while. Exit to the balcony and follow it to the end. Again, ignore the two knights by jumping/ running past them. Climb up the wall and dismount on the small ledge to the right (as shown in this screenshot). Pull the lever to open the door you saw earlier at the top of the stairs. The wall next to the lever is climbable, but you need a strength upgrade in order to reach the end. Jump down to the balcony and go back to the start to reach the door you just opened. Pick up the V-Packer Cartridges at the end of the hallway and push the movable part of the wall on your right to get a strength upgrade. Pick up the Large Health Pack from the floor and return to the ledge where you pulled the lever. Climbing to the top of the Hall - Start climbing up the wall and keep pressing forward. When Lara turns around, traverse forward and then left. There is a small ledge where you can regain your strength. Once you drop down, turn around. The wall you just climbed up is on your right. The next climbing is quite tricky and may end up in frustrating moments. First of all, save your game. (See this page for the following sequence.) Now check out the ceiling. You have to traverse forward and then left. So, jump up to grab the ceiling and start traversing forwards. As soon as you turn left, stick to the right hand side of the climbable ceiling, because the ledge Lara is heading to is on this side. When you run out of ceiling, Lara will turn around and grab the wall behind, so keep pressing forward to make her climb up the rest of the wall. When you reach the ledge, climb to the left and drop down. Do not hesitate during the process, because Lara has just enough strength to make it. The door opens as you approach. Follow the hallway around to the left and head up the stairs. The cut scene shows Lara entering a tomb and reading an inscription "Ultra Vigilis Umbram, Ecce Veritas" (Through the Spirit of the Keeper behold the truth). Dealing with Brother Obscura and getting the painting (procedure by Nicky) - Once the cut scene ends, you find yourself locked in the spooky attic. As the imposing music starts to play, you come face to face with a creepy red ghost (the infamous Brother Obscura), which starts floating about, wanting to protect its precious First Obscura Painting by all means. It has every right to do that, but we need that painting, so we have to snatch it. Once you find your ideal spot, draw your Shotgun, but do not stand up. The ghost will be floating above you, but if you remain in the duck position, it will not harm you at all. It will be floating back and forth; so everytime it floats in front of you, do not waste time and shoot at it. You have to blast the ghost about 21 to 23 times with your Shotgun* in order to stun it. The number of bullets may vary slightly, depending on the distance from where you shoot it. For examle, if you shoot it while it is still far away, some bullets may not get it, so you may need to shoot it more times, but it is approximately 21 to 23 bullets that you need to spare. So as soon as you start shooting, start counting the bullets you fire. (* You can use other weapons as well, but the number of bullet shots will vary because each gun has different fire power. If you want to use other guns, you can still follow the method described above. Just save your game at the right moment and practice a bit to find how many bullet shots you need to fire with your weapon of choice. Then reload and follow the same steps. (Bug note - The painting is a circular blue light and it is straightly visible. Sometimes, after the cut scene, the painting may look like a small blinking dot. This will make you unable to grab the painting, because the hand icon will not appear next to the blue dot when the ghost gets stunned. Make sure you can clearly see the painting. If you see a dot, run towards it and make it move to another statue. This will bring the blue light back to normal. This screenshot shows the difference.) Back to Tomb Of Ancients - Continue to the flooded hallway. After some steps it fills with water, so swim through the opening in the ceiling. Keep swimming to the top of the room where you can surface. Behind the rock is a ledge with some Health Bandages. Get them, dive in the water and swim through the opening from where you first entered the Tomb of Ancients level. Swim forward and then upwards. (Note - Many people cannot find the exit. It is the opening of the cave you first entered when you played the Tomb of Ancients level. This opening has a climbable wall exactly below. As you come from the Hall of Seasons level, take a look at the opposite side and a little bit above in order to locate the climbable wall and the opening of the cave. This screenshot shows Lara looking above, as soon as she comes from Hall of Seasons.) Archaeological Dig - Turn around, run forward and climb on the box. Jump up to grab the fence and press forward to vault over it. Approach the blue metal doors to end the level.
|
||||||
| Index | Level 18: Galleries Under Siege » | |||||
| Last update: 03 March 2009: Text has been improved and all screenshots have been replaced. Also, new screenshots have been added. |
||||||
Tomb Raider 6: The Angel of Darkness Walkthrough & Game Guide © 2000-2009 www.tombraiderhub.com |
||||||