Level 19: Von Croy's Apartment
* Counting only once the unlimited Rigg 09 Clip.
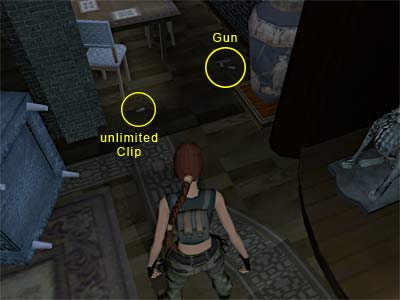
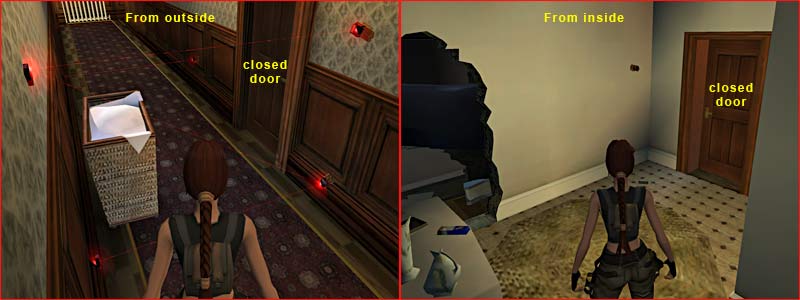
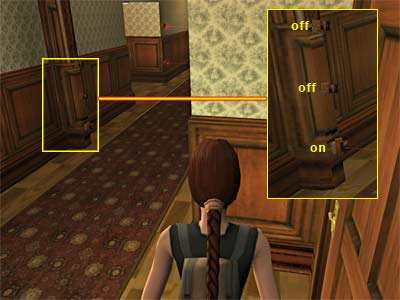
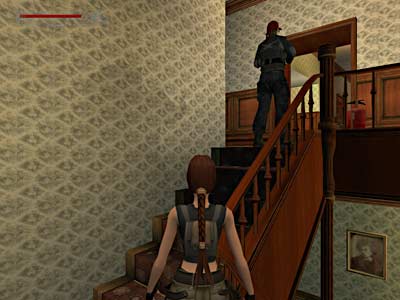
The FMV shows Lara entering Von Croy's apartment. After examining a photo, she approaches a mirror. She has a flash back on Von Croy's murder and now she can remember more things. Whilst talking to Von Croy, a man pushes her away and kills Von Croy. [In fact, if you watch this FMV carefully, you will see something really interesting at the end, like who really killed Von Croy ;-) ] (Bug note - You may want to save your game here, and in general save frequently until the Cleaner appears, in case you activate a bug later, where the Cleaner does not appear or freezes or acts strangely throughout the process. In most cases, these are minor bugs, which do not prevent you from finishing the level. Sometimes, however, they may develop into frustrating bugs, which will make you unable to finish the level.) Ground floor - [ Notebook Reference ] You begin the level weaponless, as this familiar man disarmed Lara and she did not have time to get the guns back. You still have all your pick-ups though, including the ammo and the health items. As it is obvious, Von Croy's apartment is rummaged, but there are quite few pick-ups around you can collect before the Cleaner appears. The Cleaner appears a few seconds after you have collected both of the Jackal Walking Stick (on your right as the level begins) and the Rigg 09 Gun (beyond, in front of the table). You can decide which one to collect first, but since the Jackal Walking Stick in next to you, pick it up. Head to the table and notice the Clip in front of the chair (the one that it is alone, as shown in this screenshot). It is unlimited, which means that a new Clip appear every time you run out of ammo in the battle that follows. Take the advantage of a friendly bug here and get as many Rigg 09 Clips as you like, as long as you do NOT pick up the Rigg 09 Gun. Once you pick up the Gun, the Clip becomes 'normal' and re-appears ONLY when you run out of ammo. After getting the amount of ammo you like, leave the Rigg 09 Gun and the two Clips for it for later and pick up another Rigg 09 Clip from the other side of the table. Go to the kitchen and get three more Rigg 09 Clips: two from the counters and one from the floor. Go behind the stairs and pick up the Health Bandages. There is another opening in the drawing room which leads to the exit, but you cannot go further, as there are some lasers that the Cleaner has set up in order to prevent you from leaving. If you try to approach them, Lara says she has a really bad feeling about this. The PC and the notebook on the desks on the left, contain some info about the Lux Veritatis and the Sanglyph. The facts about the Lux Veritatis were a 12th century offshoot of the Knights Templar and dedicated to suppressing evil. It is responsible for destroying the Black Alchemist (Eckhardt) in 1445. Lara first learned about the Sanglyph in Cravier's office. She does not read something new now. The notebook says that the Sanglyph is an artifact of alchemic power that was created by the Black Alchemist. It was made in five metallic parts and hidden. Bathroom and bedroom - Kick the door open behind the stairs to get an upgrade in leg strength. Pick up the Rigg 09 Clip from the floor and one more Clip from the furniture along with a Viper SMG Clip. Go up the stairs on your left to enter the bathroom. Pick up a Rigg 09 Clip from from the back left corner and a Small Medipack from the wall on the right. Head up the stairs and kick the door open to reach the bedroom. (You cannot open this door from the other side. If you came to the bedroom following the stairs in the drawing room, you need to go back and kick the door down to get to the bathroom.) Pick up a Rigg 09 Clip in front of the commode next to the bed and enter the closet to get a Viper SMG Clip, a Large Health Pack and a Rigg 09 Clip. There is one more Rigg 09 Clip in front of the desk and a Viper SMG Clip in the corner around the stairs. The notebook on the desk has some info about the Cabal. Five alchemists and sorcerers were the members of this powerful alliance in the 13 and 1400's. Eckhardt betrayed and murdered almost all of them to control their secrets. Although Eckhardt disappeared in 1445, the Cabal and the Lux Veritatis kept battling constantly. Ground floor - Go down the stairs to the drawing room and go around the table to get your last pick-ups. This is your last chance to get the amount of ammo you like for the gun. Save your game and pick up the Rigg 09 Gun and the two Clips for it. Dealing with the Cleaner - The Cleaner is about to enter the apartment. The first thing you need to know is that you cannot kill him. The deal is to make the Cleaner leave, so that he will disable the lasers at the exit. To do this, you have to keep shooting at him. If you do not mind spending a Medipack, go ahead and shoot him uncovered. Sooner or later, the Cleaner will leave through the opening where the bookcases are, disabling the lasers at the entrance. If you do not want to lose health, you have to shoot him a little at a time. As soon as he appears, immediately go up to the bedroom. The Cleaner will follow you in a while. You can hide behind the circular column close to the stairs and shoot him from there when he approaches. He then leaves and comes back again. Follow the same procedure until he leaves and disables the lasers at the entrance. Or, crouch behind the dinner table, equip your gun, stand up, shoot him once and crouch again. Do not try to shoot him more than once or the Cleaner will hit you. Follow the same procedure until he leaves. Bug waring #1 - The Cleaner is supposed to enter the apartment, go to the kitchen and stand behind the counter. Depending on where you are, he will approach you and start shooting. This is the pattern but the worst thing can happen here. Many people have encountered a bug where the Cleaner disappears and never shows himself back, without disabling the lasers at the entrance. Load a saved game before Cleaner's appearance and try again. Bug warning #2 - Some other people have mentioned that the Cleaner "freezes" on the stairs or in the bedroom or in various points of the apartment and Lara can approach him without injury. This is not so bad though. If you activate this bug, ignore the Cleaner and go towards the exit. In most cases, the lasers are no longer in front of the exit and you can continue with the level. As far as we know, this does not affect the rest of the gameplay. As soon as you trigger the next appearance of the Cleaner as described below, the "other Cleaner" back in the apartment disappears. Bug warning #3 - Another bug that can be activated is the one where Lara cannot aim at the Cleaner, whilst he is able to shoot and hurt her. In this case, go towards the exit. The lasers will most probably not be there and you can continue with the level. On triggering the next appearance of the Cleaner, the "other one" in the apartment disappears. Exiting the apartment - Once the Cleaner has disabled the lasers, exit the apartment. You cannot go to the left, because there are some lasers that prevent you from doing so (you will get to the other side in a while). So, turn right and follow the hallway to the end. Kick the red door and pick up the Rigg 09 Clip from the floor and the Small Medipack from the wall on your right. (You cannot open this door if you have not got the strength upgrade. Check above how you can get it). Return to the hallway and go though the open door. Pick up the Rigg 09 Clip among the newspapers and one more Clip in front of the sofa. As soon as you pick up the second Clip, the cut scene shows the Cleaner blasting in through the wall. He throws his empty gun and start shooting at you with some twin guns. Second round - Immediately crouch behind the sofa. Again, you have to make him leave, so start shooting, using the sofa for cover. As soon as the Cleaner leaves, go through the opening in the wall. Get the Chocolate Bar from the table and the Viper SMG Gun he threw before, along with two Clips for it from the floor. Exit to the hallway. On the left is the entrance of the apartment. Commando crawl beneath the lasers on the right hand side and follow the hallway around the corner. (Note: To commando crawl, press the Crouch button. Whilst having this button compressed, press Stealth once.) Bug warning #4 (related to #3) - If the above bug was activated and you now backtrack to the apartment and return back to the second Cleaner's appearance, you may notice that the Cleaner is not behind the opening in the wall. Moreover, it seems that he never passed from there, as the door is closed (as shown in this screenshot). In that case, open the door and continue with the level. Everything will come back to normal when the Cleaner uses his explosives in the next part. When you turn around the corner, the cut scene shows two bombs exploding, destroying the stairs and setting fires around. Be careful with the fires. If one gets you, you need to go down and extinguish Lara using the falling water. The fire ahead prevents you from continuing, so jump down to the right side of the broken stairs. Turn left and take a running jump to grab the railings of the floor, where the fires are. Vault over the railings and carefully get past the fires to reach the end of the hallway where a Small MediPack is (see this screenshot to get oriented). Get it and jump back over the railings. Drop to the floor and get the Large Health Pack from the small table. There is a Rigg 09 Clip and a Viper SMG Clip beneath the stairs. Go up the stairs and jump over the broken parts. Turn around the corner on the left and the Cleaner will set up more lasers. You can see him at the far end of the hallway, but do not bother with him now. (Bug note - Many people have mentioned that the Cleaner is not waiting at the end of the hallway. In that case, you need to load a previous saved game.) Hallway with lasers - Pick up the Viper SMG Clip from the second corner and run to hide in the first alcove on the left. Pick up the Rigg 09 Clip from there, run to the second alcove on the right hand side and get the Viper SMG Clip. To get past the next two set of lasers that go on and off, stand at the back side of the alcove having the door on your right. Side-step to the left, but not too much though or the Cleaner will spot you and start shooting at you. Take a look at the lasers' sequence. As they go on and off, the first one turns off entirely and from the second one only the bottom laser stays on. This is the best time to leave. Run and jump over this laser and hide to the alcove on the left (this screenshot shows when you need to jump). Hide to the last alcove on the right when the lasers are off. (Bug note - If the lasers do not go and off, you have just activated a bug. Load a previous saved game and try again.) Now you have to shoot the Cleaner. He only needs a few shots, so finish him off. Be careful though because Lara may step backwards and toasts herself to the lasers behind. When you kill the Cleaner, the cut scene shows Lara walking down the stairs. His cell phone rings and Lara answers. She hears Bouchard who asks if she is dead because they have to go back to Prague. Lara says she is not, but his little friend is and she will take care of Bouchard later. Searching the Cleaner, Lara finds Mathias Valiley's card and says that is time for a trip to Prague. So she does. What's the deal behind the Cleaner? - When you kill the Cleaner, the last lasers in front of him are disabled, but they are about to come back on in just a few seconds. In about three seconds the cut scene plays. Just for fan, you can try this: after killing the Cleaner and disabling the lasers, immediately either 1) run and jump over him to avoid triggering the cut scene. You will get at the bottom of the apartment having a chance to see his(?) car outside or 2) run and turn left to the corridor. There is nothing interesting there too. This screenshot was taken behind the Cleaner. (Thanks to Sparky about this hint.) Of course, when you approach him, the cut scene will run.
|
||
| « Level 18: Galleries Under Siege | Index | Level 20: The Monstrum Crime Scene » |
Tomb Raider 6: The Angel of Darkness Walkthrough & Game Guide © 2000-2007 www.tombraiderhub.com |
||