Level 22: Bio-Research Facility
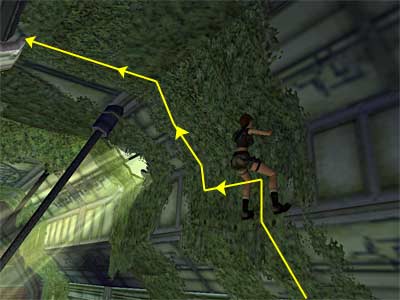
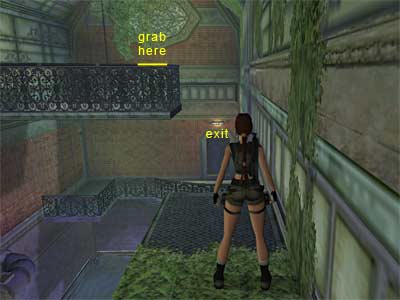
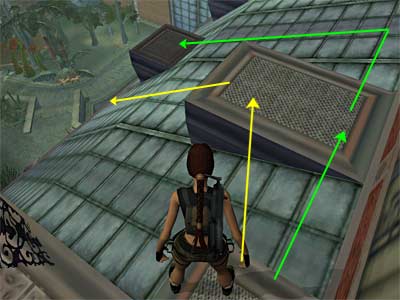
Area with fountain - Lara magically begins this level with a new outfit. Head forwards and through the door. Go down the two sets of stairs. There is man standing near the fountain, so go and talk to him. Lara asks him who he is and what he and his buddies are up to in here. Muller says that the Cabal (the new order of line on earth) controls everything in Prague and Eckhardt has the last element from Turkey to create the pure Nephilim; the Cubiculum Nephilim - The Sleeper. Everybody in there helps Eckhardt and in return for their help, he promised them immortality. Boaz (one of the Cabal's member) created Proto-Nephilim but that was an abomination. Muller then sprinkles Lara with pesticide and disappears. Step on the fountain and pull the gargoyle to reveal an opening on the right side of the entrance (or the left side as you enter). Go through it and climb up the ladder. Pick up the two Vector-R35 Clips and use the switch to open the exit at the other side of the fountain area. Return to the greenhouse, but before exiting, get some pick-ups. There is a Viper SMG Clip at the end of the walkway on the left (be careful of the plants) and Vector-R35 and Mag Vega Clips in the plants behind the rock in the far left corner. Head to the exit and press the yellow button to open the door for the next area. The cut scene shows the area around. A mutant breaks its tank and (what else?) goes out. Area with green filled tanks - If you kill the mutant, up to nine bugs will show up. They need a lot of health and ammo to get killed, so do not bother and just avoid the first mutant. Besides, it is too slow and funny to watch moving around. Go down the left set of stairs and either jump over the railing or follow them to the end and turn left to get the Health Bandages among the plants. Head to the far right corner of the area and go up the stairs. At the other side of the walkway you will find a Mag Vega Clip. Slide down to the ground. Go to the far left corner of the area and head up the stairs. Get the Mag Vega Clip at the end of the walkway and backtrack to the middle of it. Pick up another Mag Vega Clip and jump up to grab the pipe. Traverse across and drop to the metal ledge. Go to the right hand side and turn valve #1. Go to the other side where the broken ledge is. Walk up to the edge and take a standing jump. That way you will clear both gaps. Follow the metal ledge and turn valve #2. A trapdoor in mutant's tank opens. You can use the ladder next to the valve and drop to the ground, but Lara will lose a lot of health or die if you have lost some. The safest way is to go down the same way you came, by using the pipe (if you have missed shattering the glasses, shoot the filled tanks). When you reach the ground, drop through the trapdoor. Second part - You drop into a pool. Climb out and enter the hallway to a room with a slope. Walk to the edge and stand in the middle of the ramp, where the blue line is. Slide forwards and jump at the end to grab the ladder ahead. Climb to the top and pick up the Small Medipack. Open the door, follow the hallway and head up the stairs to open the next door for Bio-dome. If you miss the ladder, you end in a pool. Follow the opening in the grating and swim to the middle of the pool to climb up a ladder. Do not stay in the water too much as there is a giant mutant fish swimming around. Area with walkways and pool - There is a guard patrolling around and, depending from where you entered, he may be above or below you. Shoot him, as you cannot kill him stealthily. You can kill the fish as well, but you will need a lot of ammo. Do it if you are insterested in all kills. Go down the two set of stairs on the left side and jump on the thick pipe (if you entered through the pool, the thick pipe is just on your right). Pick up the Mag Vega Clip and turn the valve to shut off the steam from a pipe on the wall. Locate the vine-covered wall next to the doorway you came from. It is on the left as you face the doorway (see this screnshot). It is climbable, so either jump over the railing to grab the wall, or start climbing up from the bottom of the wall. When you reach the top, climb up the ladder. Use the switch at the end of the metal walkway to move a platform next to another metal walkway on the other side of the room. Climb down the ladder you came from and drop to the walkway in front of the doorway. Go down the steps and approach the broken part of the bridge. Take a standing jump to land on the other side. Before going to the narrow ledge on the right hand side, head up the stairs on the left and climb up the ladder. Go around the circular walkway and pick up the Viper SMG and Mag Vega Clips and the Health Pills. Return to the broken part of the bridge. Approach the narrow ledge and side-step to the right. Climb up the pipe and before reaching the top, and whilst keep climbing up, press the left direction key to grab the left part of the ledge. If you press only the Up button, Lara will grab the right hand part. Shimmy left and pull up. You now need to climb up the vine-covered wall, monkey swing and drop to the square ledge you moved before. Jump up and grab the vines on the wall. It is better if you jump to grab the vines instead of pressing forward to start climbing from the bottom. That way you will have more strength. Keep pressing forward and when Lara clears the bent part of the wall and reaches the next flat part, shimmy left and then continue upwards, by pressing the Up direction key (as shown in this screenshot). Lara will turn around and when she reaches the metal beam on the ceiling, press Action to drop on the square ledge. Follow the metal walkway, climb down the next two ladders and push the button to open the door. (Alternative method - You can skip the part of using the switch and climbing the vine-covered wall as decribed above. All you have to do is a tricky running jump that will take you close to the exit of the area. When you reach the ledge at the bottom of the vine-covered wall, you can see the balcony with the exit door ahead below. There is another balcony above. You have to grab its railing (as shown here). Facing this balcony, walk to the front left corner of the ledge you are standing on. Turn Lara in order to face the right hand part of the railing, close to the corner of it (as shown in this screenshot). Take some steps backwards and perform a running jump to grab the railing. You may not make it the first time, but it IS possible. Press forward to vault over the railing. Climb down the ladder and push the button to open the door.) Area with huge vine - Press the second button to open the door for the next area. Follow the walkway. The brief cut scene shows a huge vine pulling the exit door and holding it. Climb down the ladder and head to the right under the balcony to get a Mag Vega Clip. Go up the stairs. Puzzle with valves - You can see five valves with a symbol above and a metal tank with a lever on your right. There is a board on the left of the valves showing some mixtures you can make by turning three valves each time. Push the movable table to reveal another mixture that it is bad for the plants. This corresponds to the first, second and fourth valves. Every time you turn a valve, the tank is filled with more mixture. Once you turn them all, pull the lever. In case you have used a wrong valve, the puzzle resets after using the lever. The latter, however, becomes accessible after using three valves (any valves will do). The cut scene shows the mixture traveling through a pipe and feeding the huge vine. That was a bad mixture which kills the vine and opens the exit door. Go through that door and open the next one at the end of the hallway. The cut scene shows you the area around. Area with plants, catwalks and central platfrom - There is a guard patrolling at the far right corner. You cannot kill him stealthily, because he is moving all the time. So, shoot him and pick up his Botanical Low Access Pass. There is a hallway at the far right with three card readers. You need three cards and you just got the first one. Make your way up to the raised garden at the middle of the area and climb up the ladder. Another guard is patrolling on the opposite walkway and you can kill him now if you want. Go to the left hand side of the walkway and up the stairs. The door here opens from the other side. Vault on the low block and hop to the next one. Turn left and slide down the roof, pressing Action to grab the edge (see this screenshot - refer to the yellow arrows). Shimmy to the left and climb down the pipe. Head to the left side of the narrow ledge and pick up the Health Bandages. To return back, dive in the water and climb out from the left side. Then make your way back up, as you did before. Again, vault on the low block and hop to the next one. This time jump on the roof beyond the second block and slide on the square ledge below to the left (see this screnshot - refer to the green arrows). Turn right and jump to the opposite ledge. Walk to the front left corner and take a standing jump to grab the edge of the walkway where there are no railings; pull up. Head to the left and kill the guard. When you reach the circular plot, Lara says that this ledge looks too far and she does not think she will make it yet. She refers to the gap between the two walkways and you need to get an upgrade. [Note - You can jump the gap now if you want, by taking a running jump and grabbing the opposite walkway (without the upgrade). Then, complete the next part of the level and, if you want, return back to get the Large Health Pack that is given to you by getting the upgrade. If you do not care, you can skip this part. If you want the Health Pack, get it now so you will not have to back-track later. Note though that the strength upgrade is NOT essential to finish the level.] Getting the upgrade - Go to left side of the walkway and if you want you can open the blue door on the left. It is not necessary, unless you accidentally fall down and want a quick access. Follow the walkway to the right and then around the corner to the left. Take a running jump to grab the opposite ledge. As you pull up, Lara gains an upgrade in leg strength. Pick up the Large Health Pack and jump back the gap. Return to the broken part of the walkway close to the circular plot. Take a running jump to land on the opposite walkway, or grab the edge if necessary and pull up. Go up the stairs on the left hand side and follow the walkway to the end. Climb up the vine covered pipe and shimmy right. Pull up and head forward. The cut scene shows Muller working on a PC. The power is down and Eckhardt who comes with Gunderson asks him what the problem is. Muller says it is not his fault and soon Gunderson sets everything under control. Boaz arrives telling Eckhardt that there is a problem in the Sanitarium: she confesses she did not destroy Proto Nephilim. Gunderson says he has to supervise this personally and leaves. Ekchardt says that this experiment was to be eradicated and it is far too dangerous to keep alive. Boaz says that she could not kill Proto, as it is half Nephilim and needed Eckhardt's Periapt Shard. Eckhardt says she ignored his order, but that was for the last time. He orders Muller to use one of his creations. An ugly creature comes down from the ceiling. Boaz says it was not her fault and begs Eckhardt for a second chance (poor girl). He has already made his mind; he pushes Boaz towards the creature that does not hesitate and opens its mouth. Eckhardt orders one of his men (Karel) to sort this mess out. Continue forward and pick up the Botanical High Access Pass from the dead guard and a Viper SMG Clip at the end of the walkway. Climb down the pipe, or simply vault over the railing, close where to you got the Clip in order to drop to walkway below. Follow the walkway to the stairs and go down them. Do not jump the gap. Kill the guard below if you did not do it before, hang from the edge where the broken railing is and shimmy to the right. Climb down the vines and drop to the stairs. Pick up the Botanical Medium Access Pass the guard dropped, plus a Mag Vega Clip from the end of the walkway. Safely drop to the ground and go to the far right corner of the area. Enter the hallway and use the three cards to open the doors. Area with green gash\ Airlocks - Go down the stairs. You enter a room with a greenish area below and a metal walkway with steams ahead. Go down the stairs on the left to the greenish area. Move quickly as the poisonous gas takes off your health. Pick up two Vector-R35 Clips: one from the left hand side behind a column and a second one on the right just before the opening in the floor. Dive through the opening and follow the tunnel. Climb up the ladder and pull the movable crate from the corner beneath the opening of the metal ledge. Climb on the box and jump up to grab the ledge. Pull up and get the Health Bandages and Health Pills from the metal lockers. You cannot open the door, as it is jammed, so make your way back to the greenish area and then above to the metal walkway. Go to the far end and enter the airlock. Push the button to open the door and head to the left door to enter another airlock. The cut scene shows Lara trapped in the airlock. Suddenly this familiar man appears telling her that she has made a mess around, but Lara reminds him that HE was the one who stole her Painting in the Louvre. She asks why but the man says he will explain later because now he needs to go and turn the power back on, leaving Lara locked in there, because she has caused enough problems over the last two days. Lara shows him the Periapt Shard she took from him at the Louvre after he took her Painting. All this can wait; the man knows where Lara will be.
|
||
| « Level 21: The Strahov Fortress | Index | Level 23: The Sanitarium » |
Tomb Raider 6: The Angel of Darkness Walkthrough & Game Guide © 2000-2007 www.tombraiderhub.com |
||