CROFT MANOR
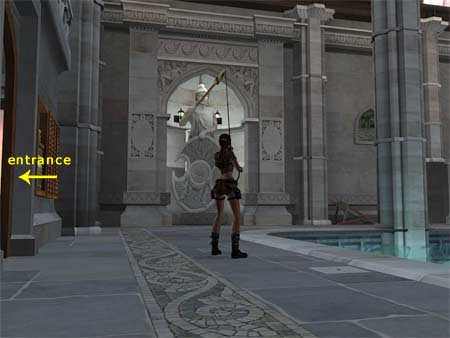
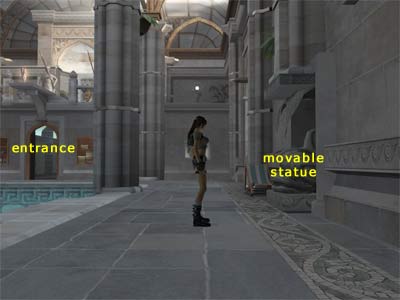
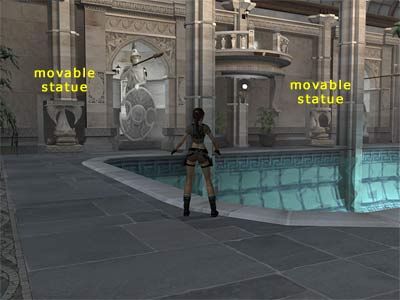
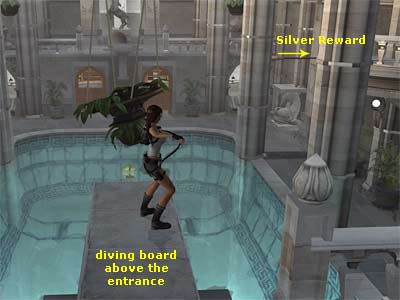
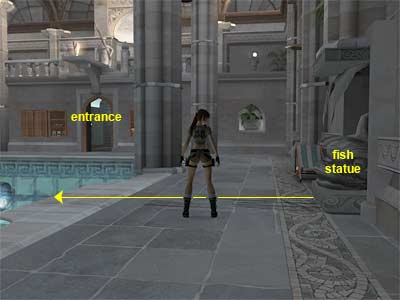
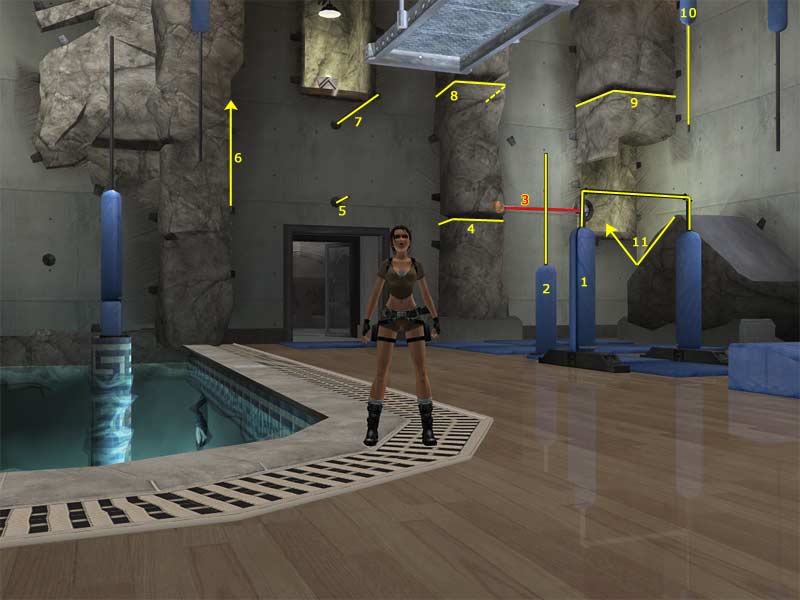
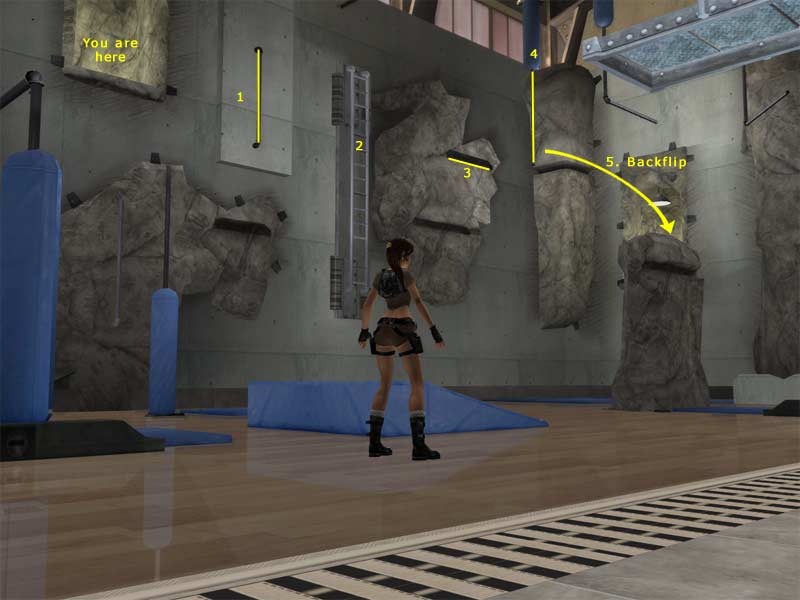
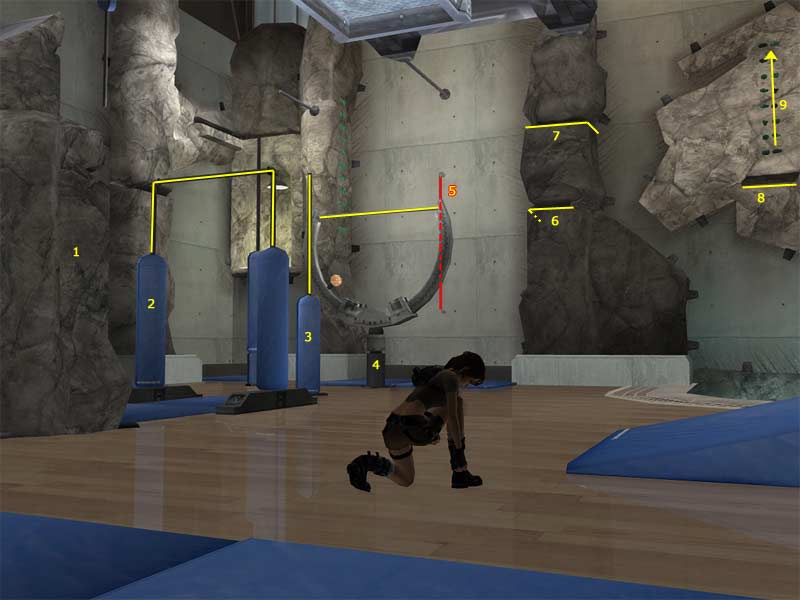
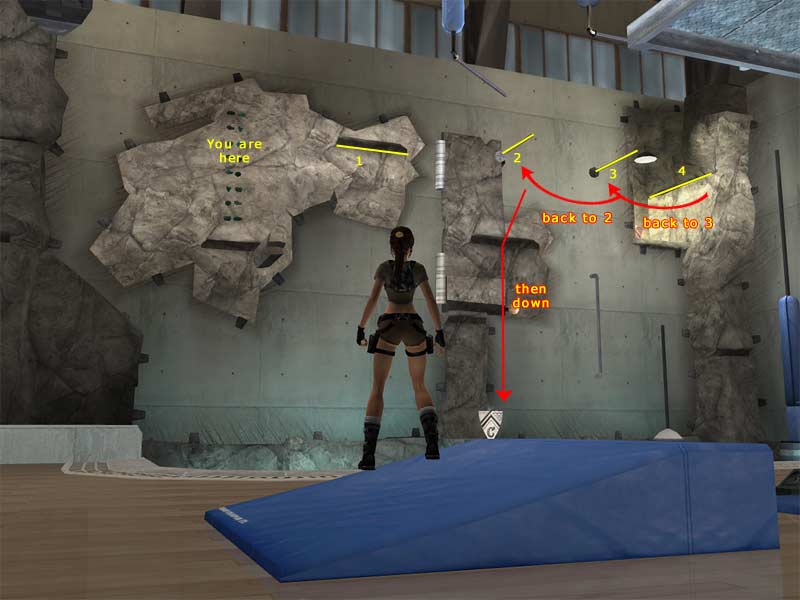
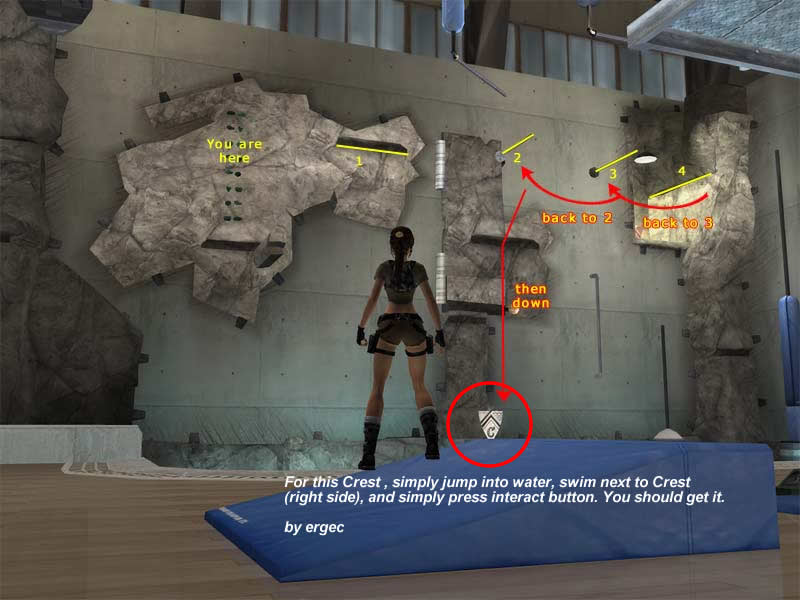
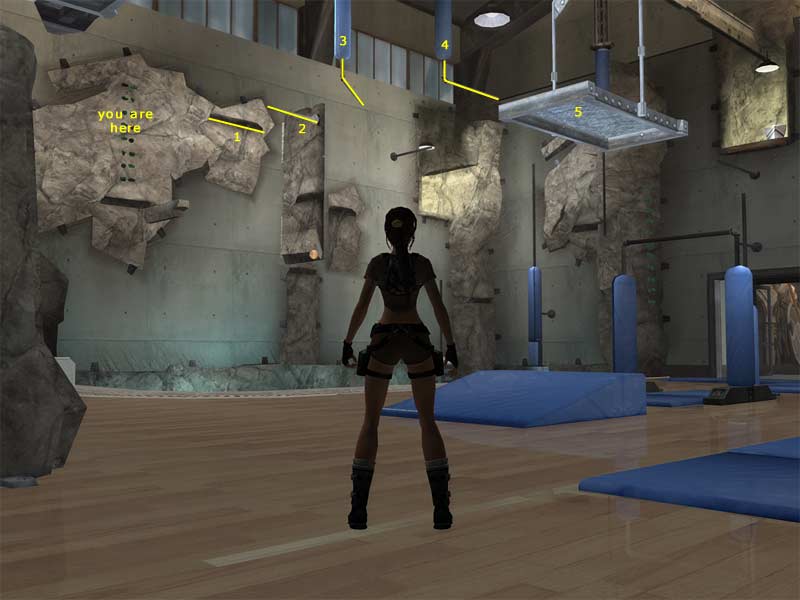
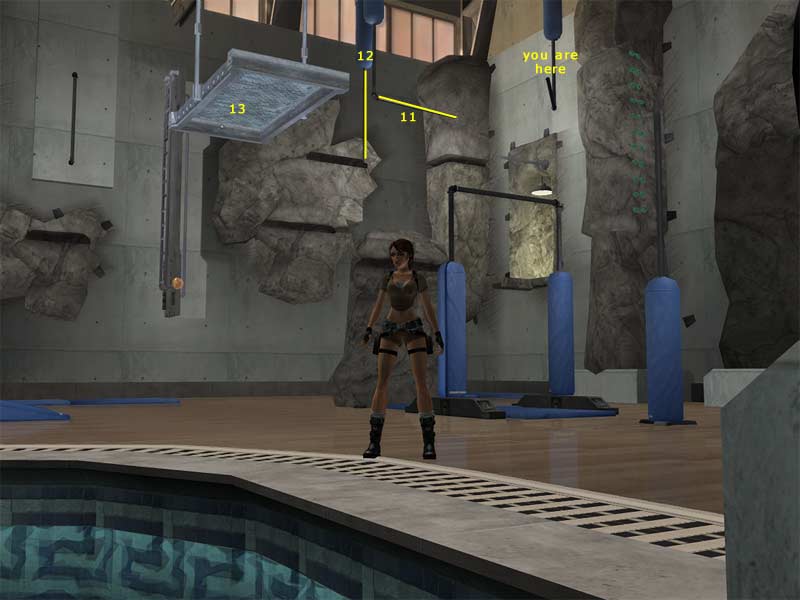
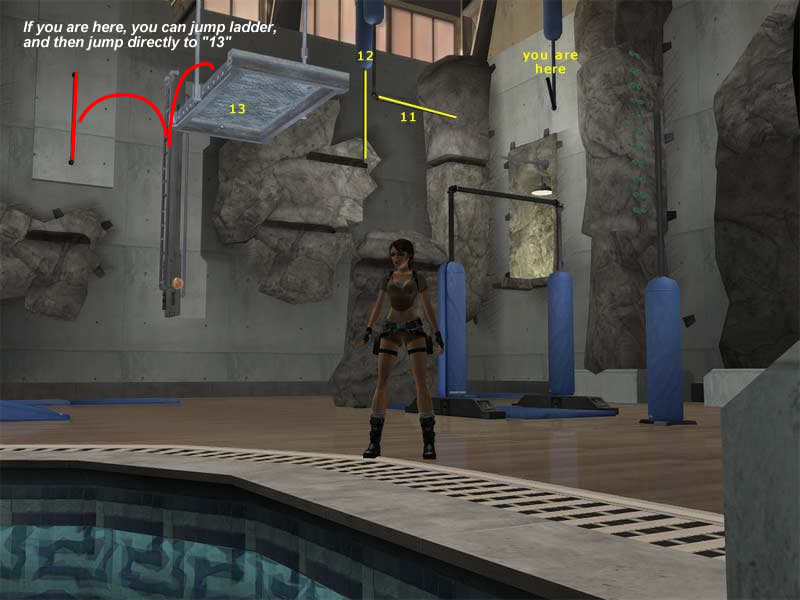
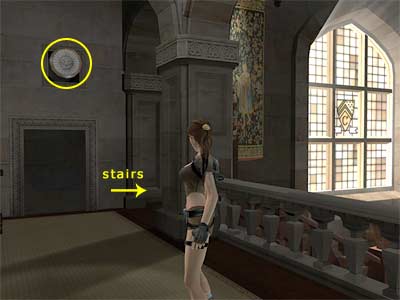
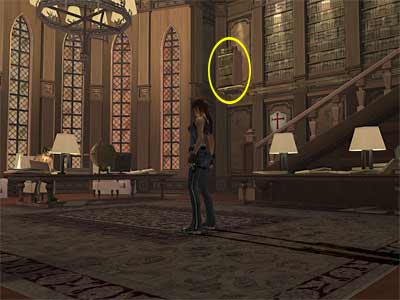
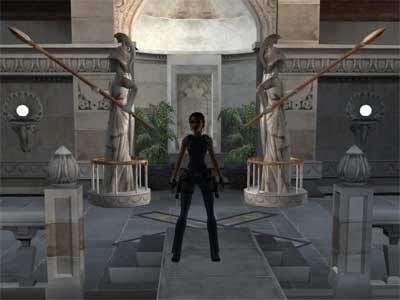
(Note: You can enter the Manor when you first play the game, but you have to complete Bolivia in order to open the doors. Also, the Manor can be explored in any way you like, but the walkthrough covers the rooms without backtracking.) (Note about the Silver Crests: If you miss one or more Silver Crests and the walkthrough does not help you find it, check the list at the bottom of the page.) As soon as you start, look to the left for a Bronze Crest (1/16) . Pick it up and enter Zip's office. Use the laptop on the floor to open the safe that will reveal the Grapple. Get it and exit to the living room. Pool - As you exit, open the door on the right (close to Zip's office). Follow the hallway to the pool. Jump into the water and get the Bronze Crest (2/16). Swim to the other side and use the lever to open one of the two gates of the pool. Climb out of the water close to the entrance. With the entrance to your back, go to the left and notice the big statue that holds a pole (as shown here). Use the Grapple to pull it out. There is another same statue on the other side, but its pole was pulled out along with the first one. Between these statues, you will find a small movable fish statue (as shown in this screenshot). Pull it and pick up the Bronze Crest (3/16) from the alcove behind. Do not leave the statue in the middle of the ledge. Push it back in the alcove. Continue around the perimeter of the pool until you reach the deck chairs in the corner, where you will find a Bronze Crest (4/16). Go to the other side of the pool and locate the two movable statues (as shown here). Pull both statues out and climb on the lowest one (opposite the entrance). Jump to grab the pole, then the lower part of the small circular balcony. Traverse around and jump to the second statue. Jump to grab the pole and then the balcony. Pull up and pick up the Bronze Crest (5/16) from the diving board. Take a look at the floor to see the X. You need to rotate the statues so that their swords will create an X. So, turn the right hand statue clockwise and the left one anticlockwise. This will rotate a stone in the wall, revealing a switch (the tongue is the switch). Use it to open the second gate of the pool. Do not jump into the water. Go to the other side of the balcony and jump to grab the pole of the statue you pulled before (if you have not done this, check the third paragraph above). Jump to grab it, swing and when you jump, press Jump again in midair to use the Grapple to catch the shimmering ball above. Swing, and jump to grab the next pole. Then jump to grab the balcony and pull up. Get the Binoculars from the horse statue. Then use the Grapple to catch the blue shimmering ball above the fish statue. Push it to the circular plate to lower a big plant above the pool. Go behind the second fish statue and pick up the Silver Crest (1/10). Go back to the side of the balcony you came from and jump to grab the pole. Again, jump and use the Grapple to catch the shimmering ball above. Turn left, swing and jump to grab the plant above the water. Use the Grapple to catch the lower part of the small circular balcony and pull. The plant will start swinging, so jump when it reaches the balcony. Pick up the Silver Crest (2/10)*. Jump into the water and swim through the opening. Get the Silver Crest (3/10) and swim through the tunnel. The gate will open automatically as you approach and you will find yourself to a small pool in the gym. [*Note: If you cannot reach the swinging plant by following the above method, you can do the following (thanks to chiQ for the tip): Climb on the balcony above the entrance and step on the diving board. Use the Grapple to catch the plant (as shown in this screenshot) and pull it close to you. Release the Grapple and let the plant swing once. When you see it coming to your side, jump to grab it. You need to jump while the plant is swinging towards you. While in midair, the plant will have reached you. If you jump when it has already reached you, you will most probably not grab it, because the plant will have moved to the other side. Then pull up, turn right and use the Grapple to catch the small circular balcony. Alternatively, you can use the movable fish statue on the left if the entrance is to your back (as shown in this screenshot). Pull the statue out and then push it towards the pool until you cannot push it further. Climb on it and jump to grab the plant. Then use the Grapple to catch the small circular balcony ahead. Thanks to Nicky for the tip.] Gym - Get the Bronze Crest (6/16) from the pool and climb out of the water. There are many Crests in the alcoves here, so we will show screenshots for each one. Bronze Crest (7/16) to the right of the entrance (as you face it) - Screenshot Bronze Crest (8/16) to the left of the entrance (if the entrance is to your back) - Screenshot Bronze Crest (9/16) opposite the entrance - Screenshot Bronze Crest (10/16) in the far right corner (if the entrance is to your back) - Screenshot Bronze Crest (11/16) in the back right corner (if the entrance is to your back) and Silver Crest (4/10) on the ledge above the pool - You can get those two in one round. First, check this screenshot on how you can reach the green handholds on the right wall. When you reach them, follow this screenshot for the Bronze and Silver Crests. The yellow marks show the way to the Bronze and the red ones show the way back for the Silver. If you are on the ground and want to get the Silver Crest above the pool, you first need to reach the handholds on the wall (as shown here) and then proceed until the 2nd step of this screenshot and then drop down. (Althernative method for the Silver Crest above the pool by ergec.) Silver Crest (5/10) above the entrance - First, pull out the wall on the right side (if the entrance is to your back). You need to reach the handholds of the right wall, as shown in this screenshot. Then follow this procedure until you reach the ledge. From there, you will have to use the Grapple and move the ledge close to the alcove. Then jump to get the Crest. Press and hold the Jump button to jump higher and farther. Otherwise, Lara will grab the pole beneath the alcove. Silver Crest (6/10) on the metal ledge - First, you have to rotate the ladder on the left hand wall. On doing that, a ledge moves towards the ladder. Screenshot 1, Screenshot 2. When you jump on the ledge (step No 13), it will move back to its original position. Then simply jump to the ledge with the Crest. (Alternative method by ergec.) Exit the pool through the door. Pass the small courtyard and enter the hallway. Follow it to return back to the living room. Go up the stairs and then left and up the next stairs. Locate the shimmery circular button at the top (as shown in this screenshot). Use the Grapple and pull it out to open a small door below. Pick up the Bronze Crest (12/16). The first door leads to the Study, but before going there, open the second door that leads to Lara's bedroom. Lara's bedroom - As soon as you enter the small living room, locate the two swords on the left. Pull them to open the small circular door between them. Get the Pistols and enter the bedroom. Go behind the bed and pick up the Bronze Crest (13/16). Exit the bedroom and return back to the hallway. Now that you have got the Pistols, go down the stairs and up the next ones and locate the other shimmering button at the top. Enable the Accurate Aim and shoot the button to open the door below. Pick up the Silver Crest (7/10) and go down the stairs, then up the next ones. Open the first door and follow the hallway to reach the Study. Study - You will find the PLS on the table. Get it and go back to the entrance. Locate the wooden boards on the left (as you face the entrance). Shoot them to reveal a small room behind. Pick up the Silver Crest (8/10) and pull the small bookcase out. Push it on one of the two plates close to Alister. The other bookcase is above the stairs (as shown in this screenshot). Use the Grapple to throw it down and push it to the second plate. Make sure that the bookcases are positioned correctly on the plates (they move a bit downwards). When you do that, a door at the botton of the stairs opens. Go through the door and pick up the Silver Crest (9/10). Continue around to the right and search for a tongue switch on the right, behind the crates. Use it to rotate a part of the wall. First riddle for the Gold Crest: Above the Waters, Twin Sisters turn their backs upon the other to leave the Ambages unguarded. Shoot the crates in the corner and pick up the Bronze Crest (14/16). The tunnel leads to a stone door that opens with the nearby tongue switch. This gives you a direct access to Lara's bedroom. Back to the pool - Go back to the pool. You need to make your way to the balcony above the entrance, as you did before. You have to once again turn the statues, but this time their backs must face each other (as shown in this screenshot). Approach the wall that rotated to get the second riddle for the Gold Crest: Within the Hall of Knowledge, Tomes of Cerulean, Topaz, Viridian, and Crimson in turn reveal their Arcanum. (Note: You cannot turn the statues if you have not got the first clue.) Back to the Study - You need to make your way back to the Study. You have probably noticed some books that come out from the bookcases (as shown here). There are four in total. First use the blue book to the left of the entrance (as you face it). Go up the steps to the room above. Use the yellow book and pick up the Bronze Crest (15/16) from the corner. The last Bronze Crest (17/16) is hidden behind the bookcase that opens with the sword switch close to the desk. Exit and cross back the hallway. Use the green book and go down the steps. Lastly, use the pink book. A bookcase will open revealing the last Silver Crest (10/10) and the third riddle for the Gold Crest: Above the Hearth, revealed visage and countenance touched in haste raise up the Steward. (Note: You cannot use the books if you have not got the second clue.) Exit the Study and make your way back to the hallway at the top of the stairs. You will notice that a tongue switch has been revealed at the end of each hallway. First, use the Grapple to throw down the three poles from the glass of Zip's office. When you use the first tone switch, it will start rotating. You have to jump and grab the three poles and make your way to the other switch and use it, before the first one completely rotates. On doing this correctly, Athena's statue rises up in the living room. Read the inscription for the fourth and final riddle for the Gold Crest: The risen Athena turns to face the Sun, whose burden then reveals the Golden Laurel. Go down and turn the statue so as it faces the big windows above the stairs. Then step on the pressure plate. Athena's statue will go down and a tall pillar with the Gold Crest (1/1) will rise up. Go up the steps and around either hallway. Jump to grab the first pole, then the second. Release to drop on the pillar. When you pick up the Crest, the pillar goes down. List for the Silver Crests
|
||||||||||||
| Index | ||||||||||||
Tomb Raider: Legend Walkthrough & Game Guide © 2000-2007 www.tombraiderhub.com |
||||||||||||