Level 3: JAPAN - Meeting with Takamoto
(If you are looking for Time Trial Tips, see our dedicated section.)
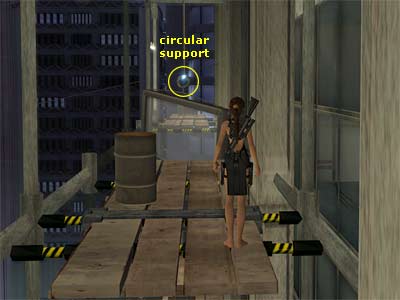
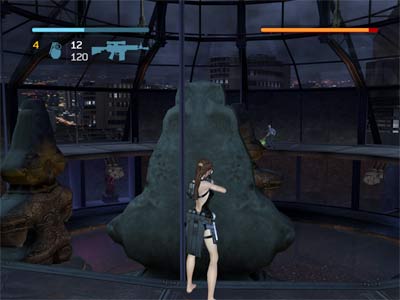
In the cut scene, Lara exits the elevator and reaches Nishimura's party, wearing a beautiful dress. Zips asks her what happened the last time she met with Takamoto and Lara says that he was trying to pass off forged relics from the Asuka period. Lara let him go though, so that's why now they are going to have a useful conversation. Lara has not seen Takamoto in a long time, but he probably does not miss her after what happened the last time they spoke. So, acquiring his sword fragment will not be easy. [Checkpoint] Zips tells Lara that he got a call from Nishimura. He is in his office and she first needs to talk to the bartender. Head forwards and down either of the stairs to reach the main area of the party. As you have noticed by now, Lara does not jog. She walks like a real lady and she cannot jump (for now). You can see the bartender on the left, and you can also see two hallways: one next to each set of stairs. The left hand hallway leads to an elevator that you cannot use now and the right one to Nishimura's office. You cannot enter, as you need to talk to the bartender first. Talk to the bartender. Lara says that Nishimura is expecting her and the bartender says that she can find him in his office, which is at the end of the hall behind her. He will let Nishimura know that Lara has arrived. You now have to meet Nishimura in his office and meet Takamoto at the party. Go to the right hand hallway (if the entrance is to your back) and open the door to Nishimura's office. In the cut scene Nishimura welcomes Lara and he hopes that she is enjoying his party. Lara replies in Japanese, meaning that she is enjoying it very much, although when Takamoto arrives, it may cause him inconvenience. Nishimura asks her to take care, because he is a dangerous man when his interests differ from someone esle's. Lara replies that she can be really persuasive, even with dangerous men. Nishimura is convinced, since he is dangerous too. He then asks her to enjoy the party while she can and wishes her luck. Lara then exits the office. Head forwards. When Lara returns back to the main area of the party, the cut scene shows the guests leaving. Mercenaries are everywhere. Lara looks around and spots Takamoto, who immediately talks to her and asks her to be brief, because he has many demands on his time. Lara gets straight into the point and he tells him she is looking for a piece - a sword fragment - that he stole from the Wesada University. Takamoto says he is not a thief and she should avoid these kind of accusations. Lara suggests to skip to the negotiations. Takamoto insists that he has no idea of what she is talking about, but Lara asks him to just name a price. Takamoto gets angry "Miss Croft! Are you deaf?", "I don't know. Let's see", she replies. She then asks him to beg for his life, like he did the last time they spoke. Takamoto orders his men to kill her. They start firing, but Lara jumps behind the bar. She takes off her pumps and tears a part of her dress, revealing the holsters. She pulls out the gun and as a mercenary approaches, she kills him. [Checkpoint] Immediately draw weapons (you have only the Pistols with unlimited ammo) and shoot the three mercenaries. Try to pick up one of the Health Packs and Assault Rifle they drop. Take a Health Pack if you need it and use one of their gun. Four more mercenaries will come from the side hallway, so take care of them too. When all are dead, the cut scene shows Nishimura appearing from his office. Zip asks Lara where she found the weapons and she replies that they are basic etiquette and she could never go to a party with empty hands. Nishimura tells Lara that Takamoto has most probably returned to his penthouse, but he advices her not to follow him, because his men will be waiting. Zip tells her that his lobby is a death trap and although Lara likes it, it is not a winning option. Lara, forever the adventurer, replies "If I can't go down, I'll go up". She asks Nishimura how she can get to the roof. He says from the elevator and gives her a pass card. Although Zip does not like the idea, Lara tells him she in on her way, as Nishimura gave her the pass to the elevator. You have to get to the roof of Nishimura's building, find a way over to Takamoto's building and catch up with him. Pick up the goodies the mercenaries dropped: Grenedes, Health Packs, and ammo (if you managed to pick up the gun during the battle). Now you have available all moves. Follow the left hand hallway (if the entrance is to your back) and use the pass to enter the elevator. In the cut scene, Lara enters the elevator. We then see her (from an outside view) going up. On the roof - As soon as you exit the elevator, head fowards and approach the glass door. Lara and Zip talk about a bike that is locked in the room. Go to the left and through the doorway to exit to the roof of Nishimura's building. [Checkpoint] Go to the right to hear Zip talking. He says that the building across is Takamoto's. Lara says that he is likely on the top floor and that this requires some creativity. So, apart from reaching Takamoto's building, you also need to get to the top floor of it. Draw weapons and shoot the barrel behind the grates. It will explode them and you can use the metalic pole behind. Climb up it and jump to the ledge on the right. Climb to the roof above and go to the left. Walk on the glassed part of the roof and jump to grab the topmost ledge. Enable the Accurate Aim and shoot the crate. Pick up the Bronze Buddha (1/6) and jump back down. [Note: The Accurate Aim allows you manually aim at various objects. On the PC version it is the Z button (by default). The PS2 players need to press the right analog stick. Press it down (not move it down) and you will feel a "click". We are not aware of the other versions, but you can check the Control Configuration of the game. You will see it as either Accurate Aim or Manual Aim.] Notice the small shimmering raised part of the glass roof. Use the Grapple to pull it back and drop through the opening. Go down the steps to reach the room with the bike. There are two more crates. The one is beneath the stairs that contains a Bronze Buddha (2/6). The other one that contains a Silver Buddha (1/4) is located exactly opposite, between the boxes that you need to move. [Checkpoint] Get the bike (DUCATI again) and drive outside to the roof. [Checkpoint] Go to the right around the corner, where the huge blue pipes are. You need to use the ramp between the pipes and jump the bike across the road to land on the ledge. Accelerate!! The jump will be done in a movie, but you need to be prepared and press the correct buttons to save Lara. She will need to grab a rope, safely drop on the ledge and finally avoid the flaming barrels that are ready to explode. Going to Takamoto's penthouse passing from the constructions - [Checkpoint] There are two levels of scaffolding. First go to the bottom one and jump the gap. There is a crate at the end that hides a Bronze Buddha (3/6), so use the Accurate Aim (check the Note above) and shoot it. Go back and climb to the topmost ledge (the one you started from after the cut scene). Jump to grab the horizontal pole and then jump to the scaffolding ahead. It will bend if you move to the other side, so run and quickly jump to grab the next scaffolding. Pull up. Enable the Accurate Aim (check the Note above) and shoot the circular metalic support (as shown in this screenshot). It will break and throw the obstacle down, releasing a rope. Jump to grab the rope, swing and jump to the opposite scaffolding. Go to the end. [Checkpoint] Jump to grab the wire and Lara will slide to the ledge of the opposite building. [Checkpoint] Turn left and use the Grapple to catch the metalic hanging ledge ahead. Pull it and release the Grabble. The scaffolding will start swinging. When it comes towards you, jump to grab it (or land on it). You can either wait for it to stop or complete the next part whlist the ledge is swinging. Run, jump at the edge and press Jump again to use the Grapple and catch the shimmering lamp above. Turn right, swing and jump to the square metal ledge. [Checkpoint] Again, you need to use the Grapple, catch the metallic hanging ledge and make it swing. Jump on it and whilst the ledge is swinging, jump to the opposite one. Use the Grapple again to catch the shimmering lamp whilst in mid-air. Turn right, swing and jump to Takamoto's building. [Checkpoint] Takamoto's building - Three guards and two dogs will appear from the other side of the area. You can jump on the ledge with the plants in the middle. That way you will avoid the annoying bite from the dogs and if a guard approaches a flaming lamp, you can explode it and kill him. When you have killed everything that moves, pick up the goodies: Health Packs, Grenades and guns (which will count as ammo) the guards dropped. Inside the building - Go around the corner and open the door. You can see steps that go up and down. First go down. Kick the boxes and shoot the crate that reveals a Bronze Buddha (4/6). Go back and up the next stairs. The hallway leads to a door, but wait until you get the next Buddha. Continue up the steps to reach the top ledge. Drop to the pipes and carefully walk to the left. Jump to grab the top ledge on the left. Shimmy to the very right and jump to the pipes behind. Shoot the crate and pick up the Silver Buddha (2/4). Make your way down to the hallway. Stock Market offices - Follow the hallway and open the door to reach a room with offices, which seems to work as a stock market. [Checkpoint] Five guards will attack: three on the ground and two on the ledge next to the doorway. A sixth guard may attack a bit later if not together with the other five, so stay sharp. Pick up the Health Packs, Grenades and guns they drop if you need them. A couple of them will drop their Shotgun, but if you decide to get it, you will need to leave your gun. Go up the short stairs to reach the ledge next to the doorway. Open the left metal locker to get a Silver Buddha (3/4). Go to the office in the far left corner (if the entrance is to your back) and shoot the crate to get the Bronze Buddha (5/6). Use the Grapple to catch the huge TV screen; pull it. Enable the Accurate Aim (see the Note above) and shoot the two metal supports that hold the screen (as shown in this screenshot). If you cannot catch the screen or shoot the metal supports, jump on the office in front of the screen. The latter will fall down, revealing a room behind. Draw weapons and kill the two guards. You may be able to kill one of them from here. Otherwise, grab the screen, pull up and finish them off. They leave a Grenade, a Health Pack and two guns (which will count as ammo). Open the door at the back. The cut scene shows the building you just exited and it focus on a ledge at the top. Climbing up the building - [Checkpoint] You need to reach that ledge, climbing up the building. Grab the pole on the left (if the entrance is to your back) and climb up. Jump to grab the ledge with the air condition, shimmy to the right around the corner and jump to grab the ledge above. Pull up. Turn left and use the Grapple to catch the support of the sign; pull it down. Jump to grab it and pull up. Go to the other side and jump to grab the next ledge; pull up. Climb up the ladder to reach the ledge above. [Checkpoint] Again, use the Grapple to rotate the next support of the sign. Jump to grab the pole, then the ledge ahead; pull up. Grab the vertical pole, climb up it and jump to the topmost ledge behind you. Jump to grab the thin pole on the right. Climb up and jump to grab the horizontal pole of the ledge above the one you were standing on before. Lara's weight will rotate it. Turn around, swing and jump to grab the previous pole. Climb up and jump to the ledge that you rotated before. This ledge will bend backwards (to its initial position) if you stand on the other side. So, run and quickly jump to the square ledge ahead. [Checkpoint] You will need to grab the pole ahead, climb to the top and use some horizontal poles. They collapse after a few seconds, so you need to be quick. Jump to grab the pole and climb up. It will start falling when you reach the top. Quickly jump to grab the horizontal pole. Swing and use the other three poles quickly to reach the balcony which is the top of Takamoto's building. Waiting room - Open the door to the waiting room (?) and draw weapons. [Checkpoint] Three guards are waiting at the bottom of the stairs, so kill them from here. A fourth one appears in a while, so wait and kill him too. Do not go down before killing those. There are two more guards that shoot from a balcony on the right, which makes your job harder. Be careful, however, because the last pair may come from behind you. You can also shoot the chandelier as you enter the area. It will fall down, hopefully killing some of the threats. Once you are done with everyone, pick up whatever you need. They leave Health Packs, Grenades and guns (which will count as ammo). One of them drops a Shotgun. Go up the steps and enter the lounge on the left. This way gets you to the balcony, where the pair of guards were shooting from before. Shoot the crate and pick up the Bronze Buddha (6/6). Go back down the stairs and enter the room in the back left corner. Open the middle metal locker on the left to get a Silver Buddha (4/4). Exit, and go through the door at the far left. [Checkpoint] Hallway with turret - Halfway through the hallway, Zip tells you about the turret at the end of the other hall. So, do not go there yet. Enter the control panel on the left and go to the other side. Use the button (next to fire extinguisher) to activate the sprinkler in the hall with the turret. As you can see, moving lasers that enable the turret protects the hall, so good thinking, as Zip says. You can explode the extinguisher, but it damages Lara if you are close. There is also a yellow button on the left that you can press and use the security camera which will show you a room with a hanging dragon, the waiting room you passed before and a room with three guns on a table. Exit the office and grab the ball on the left. The deal here is to push the ball in the hallway with lasers. The turret will be activated, but if you push the ball and are behind it, the turret will hit the ball. Keep pushing the ball until you reach the end, where there are no lasers. Wait a bit and the turret will stop. Continue to the hallway with the green walls. [Checkpoint] Approach the door on the left and it will open automatically. Go through it. In the cut scene, Takamoto appears in his office, which is located behind a glass above. He tells Lara that she should not have come here. Lara asks him to tell her about the sword. He is very upset and asks Lara why it is so fascinating about her. Lara will tell him if she takes a look at it. Takamoto replies that her persistence will be death for her. When the cut scene ends, two doors slide and three guards start shooting. Takamoto of course left. Draw weapons and kill them. Then pick up whatever you need among the Health Packs, guns and Grenades they drop. Use the Grapple to catch the shimmering circle at the front side of the dragon that is hanging above. Back up as much as you can and pull it. The farther, the higher momentum it gets. Eventually, it will break the windows oposite. Draw weapons, beacause two guards will start shooting. Kill them both. Climb on the box beneath the window, jump to grab the edge and pull up. [Checkpoint] Go to the right, where Takamoto appeared. Get the three Assault Rifles from the desk (they will count as ammo if you carry this gun). Pull the redish movale box out of the office and push it through the broken windows. It will fall down and break. Drop down and pick up the Gold Buddha (1/1). Climb back up and push the button to call the elevator. Get into. The cut scene shows Lara inside the elevator. When she exits, she takes a look around. Takamoto appears, holding the sword fragment, and says that she disrespected him, broke into his house and killed his men. Lara wants what he possesses, but he will not let her take it that easily. Destroying Takamoto - [Checkpoint] It is obvious that the sword gives power to its possessor. Takamoto will use it to kill you, because the sword throws a green harmful light that takes some of your health when it hits you. Apart from him, there are four turrets that start shooting at you. Takamoto is standing on the ledge above, so do not stay on the ground. Go behind one of the statues, grab the pole, climb up and jump to the ledge, where Takamoto is standing and the turrets cannot spot you. Use a pole that is opposite him. Stay away from him. The farther, the better. Position Lara behind one of the statues and keep your weapons drawn. The green light cannot hit you if you stay behind the statue. Make sure you stay in the middle, where the part of the statue is higher (as shown in this screenshot). When Takamoto stops using the sword, and whilst having your weapons drawn, reveal yourself and shoot him. When you see him using the sword, go hide again behind the statue. Sometimes the light hits you, because Takamoto is not exactly opposite you. If he is a bit diagonally opposite, every time he throws the light, run forwards and Lara will grab the ledge. That way, the light cannot hit you (if you hang behind the statue). If he moves to a statue next to you, move behind another statue and stay opposite him. You can see Takamoto's life at the top right corner of your screen. Alternative method - The above procedure takes some time, which is not helpful at all if you play in Time Trial mode. Here is another quicker strategy: When Takamoto fires his bolts, they come either high or low. If they are high, you need to Crouch to avoid them. If they are low, you need to Jump over them. As soon as you climb on the ledge where Takamoto is, run after him. As you approach him, avoid his bolts, by either jumping over or rolling beneath them. Do not approach him much, because you will probably not have time to avoid his bolts. Stay 10ft. (about 3 meters) away from him and jump over\ crouch beneath the bolts. Be careful, however, because Takamoto will probably fire vertical bolts that you will need to avoid by side-jumping. Soon, Takamoto will stop and need a couple of moments in order to start firing his bolts again, which is a really helpful time to start shooting at him. If you have a powerful weapon with you, he will lose about one third of his health. Repeat this procedure once or twice, and he will go down after one minute or so. (Thanks to Mona Sax for this method.) When Takamoto dies, the cut scene shows Lara getting the sword fragment. Alister is suprised by the sword's power. Nishimura brought a helicopter for Lara and is now waiting outside for her. Nishimura throws a ladder and Lara climbs up it. When she reaches the top and enters the helicopter, she is very relived she found him here. Nishimura asks what happened to Takamoto and where he is. Lara says it depends on whether he was naughty or nice. Zip says that he found Rutland and asks Lara is she wants to go to Ghana. Lara of course wants to go, as Africa is one of her favorites continents.
|
||
| « Level 2: Peru - Return to Paraiso | Index | Level 4: Ghana - Persuing James Rutland » |
Tomb Raider: Legend Walkthrough & Game Guide © 2000-2007 www.tombraiderhub.com |
||