Level 3: The Lost Valley
Kills: 17
Supplies: 21 (plus the Shotgun)
Artifacts: 2
Relics: 1
Additional Secrets: 1
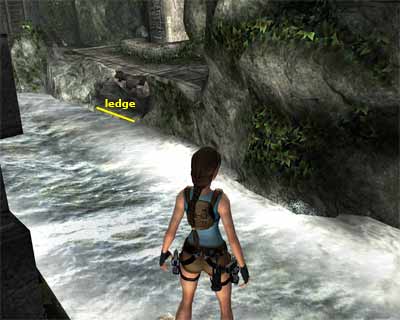
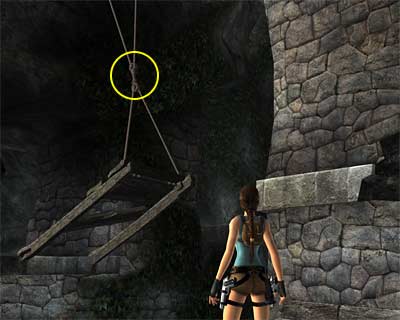
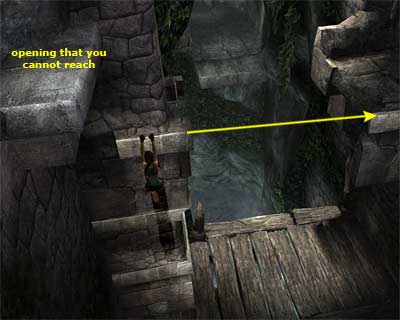
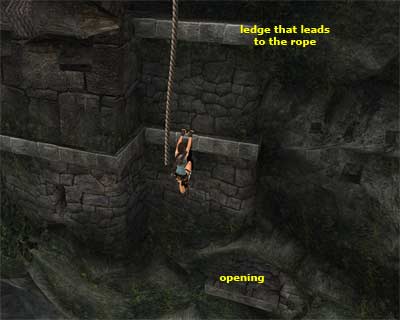
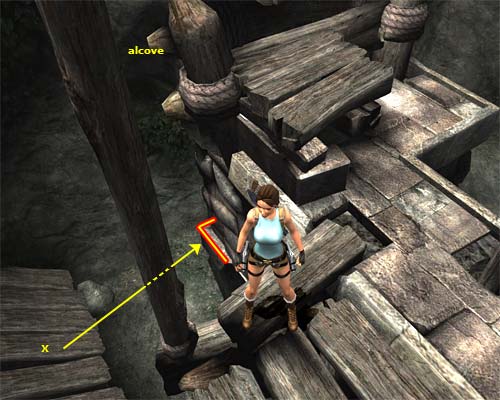
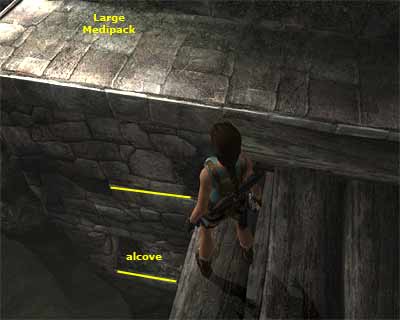
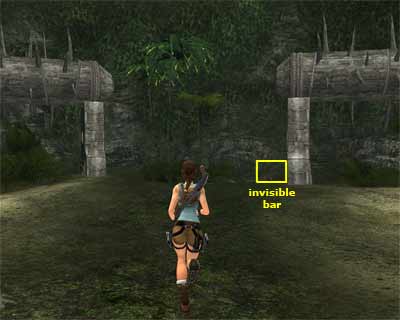
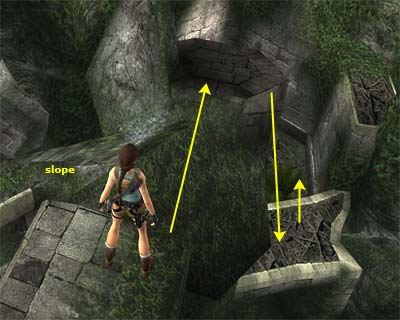
[Checkpoint] Area with waterfall - The level begins where the previous one left you. Exit through the opening ahead to reach an area with a huge waterfall. [Checkpoint] Go to the right to alert two wolves. You can kill them from above or by stepping on the broken stairs. Once you are done, drop down and go to the far left where you will find the Cog #1 (the first of the three you need). If you scoot the area around, you will see a ladder to the right of the waterfall (as you face it) that gets you to a ledge. This is where you can place the Cog you just found, but do not go there yet until you find the second one. [Note: You can go and place the first Cog, then go for the one called Cog #3 in the walkthrough (area with T-Rex) and search for the last one as you return back. This is faster for the Time Trial procedure.] Secret - For now, jump into the water and swim through the underwater tunnel. When you surface, climb out of the water and pick up the Small Medipack. Return back outside the same way you came. Going to the top of the waterfall - You need to reach the top of the waterfall, so climb up the rocks close to where you found the Cog. Jump to grab the narrow ledge on the wall, jump to grab the upper one, shimmy left and around the corner, and pull up. Climb on the next ledge and pick up the Shotgun Ammo. Grab the right hand ledge, jump to grab the one on the right, traverse around the rocky pillar and jump to grab the ledge above. Pull up and climb on the next ledge. [Note (and SPOILERS): If you accidentally fall into the water, the current will drag you to the pool, so you need to take the long route back. There is a ledge though that will come in use later in the level (once you stop the current). However, you can use it when the current is still active and climb out of the water before falling into the pool. This screenshot shows the location of the ledge and this video gives an example. To make sure Lara will climb out, try to swim on the surface.) At the top of the waterfall - Go to the right and through the small cave that goes parallel to the water. [Checkpoint] When you exit, jump across the river to grab the ledge at the other side and pull up. Use the two narrow ledges on the right to reach the wooden small ledge. Turn to face the hanging small bridge and draw weapons. Aim for the part that holds the rope (as shown in this screenshot) and shoot it. The bridge will collapse and reveal a horizontal pole. Jump to grab the narrow ledge on the wall, shimmy left and around the corner, jump to grab the pole, swing and jump into the passage. Follow it around to the right. Area with wooden bridge - Jump off the ledge and use the Grapple in midair to catch the gold ring above. Swing and jump to the platform ahead. Use the narrow ledges on the right hand pillar and when you reach the topmost, jump to grab the ledge on the right. (From the topmost ledge, you will be able to see an opening above to the left, as shown here, but you cannot reach it now.) Pull up and follow the short passage that gets you to a wooden bridge. Cross it and pick up the Cog #2. [Checkpoint] Two bats will soon attack, so kill them. Keep your weapons drawn and shoot the gold ring that holds the ropes of the bridge. The latter will shatter, creating a ladder at the other side and making the gold ring accessible for the Grapple. Do not do anything with these right now (you will see why in a while). Using the switch that opens the gate for the Relic - Go to the end of the ledge and jump to grab the rotating horizontal pole. Swing and jump to grab the small ledge on the wooden structure. Use the rest two and when you reach the last one, jump to grab the edge of the opening you saw before. Follow the passage and use the switch to open a gate elsewhere. This gate will give you the access to the level's Relic, so make sure you use it. Do not drop down from here. Instead, go back and hang from the edge of the opening. Shimmy to the very right and release to grab the topmost ledge of the pillar. If you do not shimmy to the very right, Lara will drop down by realeasing, losing some health. In that case, climb up the ledges of the pillar. Once again, jump to grab the ledge opposite the pillar, pull up and go through the passage. Hang from the edge (where the wooden bridge used to be) and climb down until you see an opening on your right. Jump to grab its edge and pull up. Follow the tunnel and pick up the Shotgun and Large Medipack. Return back to the opening* and drop into the water. The current will drag you and throw you in the pool at the bottom of the waterfall. (*Note: It seems that Lara cannot grab the edge of the opening on your way back and she falls in the water no matter what. If you had come here before using the switch for the Relic, you would have ended at the bottom of the waterfall and had to take the really long route for the switch, unless you had followed the instructions of the Note (and SPOILERS) above. Also, you can complete the above part using an alternative way. First use the switch that opens the gate to the Relic and then retrieve the Cog. You can find details in this page.) Using the first two cogs - Climb out of the water and draw weapons. Three wolves will attack from the cave beyond, so quickly run and climb on the rocks where you found the first Cog. Kill them from there and drop back down. Climb up the wooden ladder, place one of the Cogs you have and use the switch. The mechanism will place the Cog to its correct position. This will make the big wooden cogs work, giving you the access to the place where you need to use the other Cog. [Checkpoint] The now working wooden Cogs have three poles on them that you can use and reach the second ladder. When you do that, climb to the top, place the second Cog and use the switch. Again, the mechanism will place the Cog to its correct position and make the next big wooden cogs work which give you the access to the place where you need to use the third Cog that you do not have at the moment. [Checkpoint] Going for the third Cog/ Reaching the opening at the exact opposite side - Grab the handhold next to the switch and jump to grab the next one on the right. Shimmy to the right and around the corner, jump to grab the narrow ledge above and finally jump to grab the wooden platform behind you; pull up. The rotating wooden platform gets you to the area where you have to place the third Cog, so do not go there yet. Turn around and jump to grab the narrow ledge diagonally to the right. Traverse to the right and around the corner, but before going for the upper ledge (that leads to the rope), notice the opening below (as shown here). Release to grab its edge and pull into. You slide to a small room, so climb on the wooden ledge and pick up the Large Medipack. The slope on the left will get you back to the bottom of the area. You have to reach the narrow ledge before realeasing for the opening (where the above screenshot shows), following the same way as before. Once there, jump to grab the ledge above and jump to grab the rope. Turn left and swing on the rope. You need enough momentum in order to reach the narrow ledge on the opposite wall. When you grab it, traverse to the right and around the corner, jump to grab the sill above the opening and drop down. Lara's weight will make the ladder fall down, revealing a horizontal pole that you will use later. For now, go through the opening and climb on the rock. [Checkpoint] Follow the passage as it goes and crawl under the rock to reach a room with a rock structure on the left. Area with stone structure and bear - Draw weapons, because a bear will come around the rock structure. You can climb on the rocks for a breather, but the bear usually plays "hide-and-seek" when you climb there and goes behind the structure. Once it is dead, climb on the rocks and make your way to the top of the structure where you will find some Caliber Pistol Ammo. Artifact #1 - You have probably noticed the alcove with the Artifact. Its retrieval is quite tricky and here is how you can do it: Drop to the ledge where the two vertical poles are. You have to jump on the wooden slope below and jump to grab the narrow ledge on the structure. For the latter, you have to land on the correct spot of the wooden slope (as the yellow X of this screenshot shows), otherwise Lara will drop to the ground. Once there, traverse left and around the corner and jump to grab the edge of the alcove. Pull up and pick up the Artifact (you will get the Small Medipack behind the bars later). (Alternative method for getting the Artifact - If you cannot do the above way, see this page which includes detailed screenshots for an alternative method.) Drop down and make your way back to the ledge with the two vertical poles. Grab the first pole and turn the camera to face the entrance of this area, so you can spot the two narrow ledges on the wall. Jump to grab the first ledge, then the second one. Jump on the first pole, then to the second one and finally to the wooden ledge ahead. Slide down to the next area (ignore the vertical poles on the right, since they lead back) and follow the passage. [Checkpoint] Go up the steps and pick up the Shotgun Ammo. Approach the edge of the deep pit. This is a long drop down, so be careful. Passing the two deep pits - Jump on the wooden slope ahead, slide down a bit and jump to grab the opposite ledge. Shimmy right and jump to grab the wooden platform. Pull up and pick up the Shotgun Ammo. Jump to grab the horizontal pole, swing and jump to grab the ledge ahead. Use the next upper ledge to reach the safe ground. [Checkpoint] Go to the right and jump to grab the narrow ledge on the wall. Traverse to the left and around the corner, jump to grab the ledge behind you and make your way to the ledge on the right. Draw weapons and kill the two bats that attack. Then pick up the Large Medipack. Hang from the edge of the pit and use the handholds to reach the alcove below (as shown in this screenshot). Pick up the Large Medipack and use the handholds opposite the alcove to return back up. Follow the ledge to its natural conclusion and climb into the crawlspace that gets you to a misty passage which ends to a wooden platform. [Checkpoint] When you step on it, it falls apart and you slide into the next area. Proceed a bit to reach the Lost Valley. [Checkpoint] The Lost Valley - As soon as you reach the outside area, look for some Caliber Pistol Ammo on the right. Also, take a mental note of the stone block on the left, as it will become useful in just a bit. When you proceed a bit further into the Valley, three raptors will come from the left. Quickly run and jump on the stone block next to entrance. Kill the threats from there and drop back down. Soon enough, three more raptors will join you. Again, jump on the stone block and kill them. [Checkpoint] The cut scene shows more raptors coming from around the corner, but this time they are not alone. Mama T-Rex makes her appearance and the raptors along with Lara try to escape. Be prepared for the Interactive cut scene. Press the correct buttons (as they appear on your screen) to save Lara from the threats. [Checkpoint] Dealing with T-Rex - When the cut scene is over, Lara is found in the next area and the T-Rex is after her. You have to kill it, but it is strong enough so it will take some time. Unfortunately, there is not any safe ledge around the area, so prepare your skills to fight. At the top right of your screen, you can see two bars. The yellow one is the creature's health, which means that it dies when the bar drops to zero. The red bar indicates the enemy's rage. When you shoot repeatedly, the bar starts filling, causing the T-Rex to become enraged. In that case, it attacks and you can use the Adrenaline Dodge. Do not let its size scare you! The area is large which means you have enough space to move around. There are three spiked rims in the area, which you have to use if you want to get rid of the creature quickly. Stand in front of each rim and shoot the T-Rex until it becomes enraged. When it attacks, use the Adrenaline Dodge. If you do it correctly, the creature will fall on the rim and lose 1/3 of its health. The Adrenaline Dodge (followed by the Head Shot) - Are you sure you are doing it correctly? When you shoot repeatedly, the red bar starts filling. When it flashes, the creature is enraged, so stop shooting. When the screens becomes blurred, the creature will attack. Immediately press the left or right direction key along with the Crouch button (or the down direction key, but if you stand in front of the rim, you cannot go anywhere from behind). Do not just tap the Crouch button. Press and hold it. As Lara jumps sideways, two gray reticules will appear on your screen; one from the left and one from the right. When they join, you will see a red reticule on the creature's head. You have to shoot in order to apply the Head Shot. Alternative way (by badboy70) - If you cannot do the above way, you can use a "safe" area and use the T-Rex from there. Once you gain control of Lara, turn left and head to the pair of spiked rims (those that are next to each other). Approach the right hand rim and go to its left side (as shown in this screenshot). You will notice that an invisible bar (or something like that) prevents you from continuing further, but if you keep running towards it and jump, you will get behind. The invisible bar blocks the T-Rex from reaching you, but you have to stay there and not move; otherwise, the creature will be able to reach you. You may notice that Lara does not aim at it immediately. In this case, you have to shoot a few times and then use the Manual Aim (as shown in this screenshot). There is one catch in this method though: the T-Rex must be in front of the rim and not to the side. If the latter happens, the creature will be able to reach you. When its health bar drops to zero, be prepared for an Interactive cut scene. Press the correct buttons to save Lara from T-Rex's teeth. If everything goes well, the creature will drop dead, destroying a part of the nearby Temple. [Checkpoint] Once the T-Rex is dead/ Heading back - If you did not do it during the battle, pick up the Small Medipack and two sets of Caliber Pistol Ammo (one of them is hidden in the plants to the left of the pair of round wooden spiked rims). Go to the right hand side of the Temple, vault onto the low rock and jump on the ledge. Enter the Temple [Checkpoint] and jump on the ledge ahead to get the Cog #3. Jump into the water and swim through the tunnel. Surface at the end and climb out of the water. Grab the vertical pole, climb up a bit and jump to the ledge. Use the two narrow ledges on the left hand wall and jump to grab the small crevice, then jump on the vertical pole. Before losing your balance, jump to grab the narrow ledge on the pillar, then the next one. Shimmy to the left and jump to the opening. [Checkpoint] Top of the Temple/ Going around the perimeter - Vault on the gray ledge to the right and go to the front side where you will find a Small Medipack. Return back and climb on the rocks next to the opening, then on the topmost gray ledge that gets you to the other side. Drop down and go to the other side of the ledge. You have to move around the perimeter of the area until you reach a vertical pole. Grab it, climb up a bit and jump to the passage. Follow it to the end and jump to grab the narrow ledge. Traverse around the pillar, jumping and grabbing the ledges as you go. Finally, jump to land on the wooden bridge behind you. Go around to the right, but do not slide down the ramp yet. The area below is the one when you first entered the Valley. If you did not explore it before, you can go down and pick up a Large and three Small Medipacks (one of them is hidden among the plants, where the waterfall is - to the left of the entrance as you face it). If you have already got them, you can jump to the wooden platform below (that is do not slide down the ramp), climb on the vertical pole, jump on the wall and drop into the building where you will find a Small Medipack. Then follow the passage and climb up the ledges to reach the broken wooden bridge. If you went down into the Valley, climb on the stone block and jump on the wooden platform. Jump to grab the ledge and go through the opening to enter the building. The left way leads to a Small Medipack, so once you get it, return back and climb up the ledges to reach the wooden broken bridge. Wooden broken bridge - Jump to grab the opposite side and pull up (or land directly on it). The area beyond includes a Large Medipack, so once you get it, return back and use the handholds on the right hand wall (right, as you return back). These handholds will get you to the top of the wall and next to a rocky slope. Artifact #2 - Before using the slope, jump over it to land on the opposite flat ledge. Drop to the low wall on the right, then to the area behind the wall (see this screenshot to get oriented). Pick up the Artifact, climb on the wall and drop down to the other side (where you got the Medipack before). Once again, use the handholds to reach the top of the wall, next to the rocky slope. This time, jump on the slope and slide down. Jump before reaching the end to land on a second slope and again jump to grab the horizontal pole. Swing, jump to grab the next pole and finally jump to grab the wooden platform. Pull up, jump to the next platform and go through the opening. [Checkpoint] The misty passage will get you back to the deep pit you passed before, so be careful when you reach it. Back to the pits - From the edge, slide down the slope and jump to grab the narrow ledge ahead. Jump to grab the ledge behind and release to grab the lower ledge. Traverse to the right and around the corner and jump to the platform behind you. [Checkpoint] Make your way back the same way you came, using the wooden slopes and the various narrow ledges on the walls. When you reach the other side of the pit, go down the steps. [Checkpoint] Grab the vertical pole and jump on the short wooden slope. Immediately jump on the pole, then into the opening ahead. Or, grab the vertical pole, climb to the top and jump to land on the second pole. Before sliding down the ramp, drop into the room on the left where you will find a Small Medipack. Climb back up, slide down the ramp and carefully make your way to the ground. Follow the opening to return back to the ledge that overlooks the area at the beginning of the level. Back at the start - Turn left, jump to grab the horizontal pole, swing and jump to the opposite side (at the top of the waterfall). From here, jump into the pool below. Surface and climb out of the water. You have to go back to the wooden ledge next to the rotating wooden platform (passing from the ledges where you placed the first two Cogs). When you reach this ledge, you have to jump on the rotating platform when it reaches the horizontal position, then quickly jump to the ledge ahead. Place the third Cog and use the switch. The mechanism places the cog to its correct position which activates a huge stone breaker that stops the falling water. This reveals an opening which was hidden behind the waterfall. [Checkpoint] From here jump into the pool. Relic - Before going through the opening, climb out of the water and make your way to the top of the waterfall. Crouch beneath the big wooden bar and drop into the water. There is no current anymore, so dive down and swim through the tunnel on the right. Surface and climb out of the water. Pick up the Kero Mug and and make your way back to the pool the same way you came. [If the gate to the Relic is closed - If the gate that leads to the Relic is closed, it means you missed a switch that opens it. The switch is close to this area and you can refer to the specific part at the beginning of the walkthrough (At the top of the waterfall and Using the switch that opens the gate for the Relic) to see how you can reach it. This screenshot shows the location. If you want to avoid going the long route, once you catch the gold ring with your Grapple, you can turn right, swing and grab the ledge beneath the switch. See this page for details.] Climb out of the water where the waterfall used to be and go through the opening to end the level.
|
||
| « Level 2: City of Vilcabamba | Index | Level 4: Tomb of Qualopec » |
| Last update: 15 June 2007 18 July 2007: Alternative method for getting the Artifact #1 |
||
Tomb Raider: Anniversary Walkthrough & Game Guide © 2000-2007 www.tombraiderhub.com |
||