Level 9: Temple of Khamoon
Kills: 24
Supplies: 36
Artifacts: 3
Relics: 1
Additional Secrets: 3
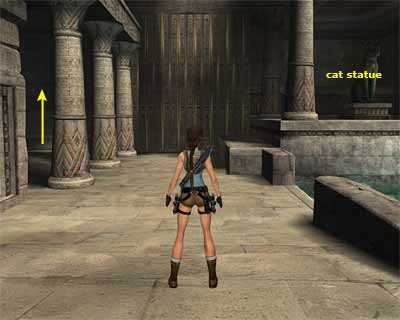
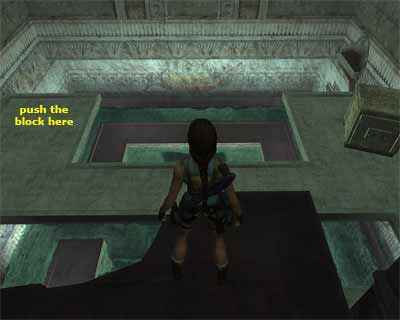
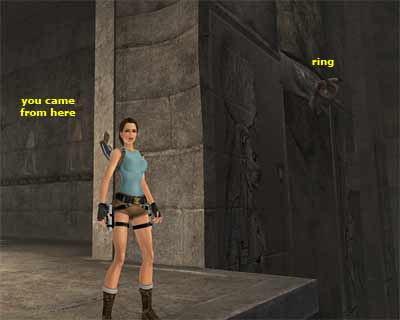
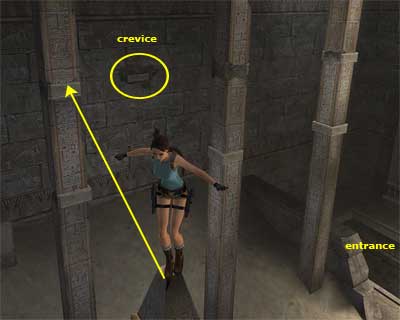
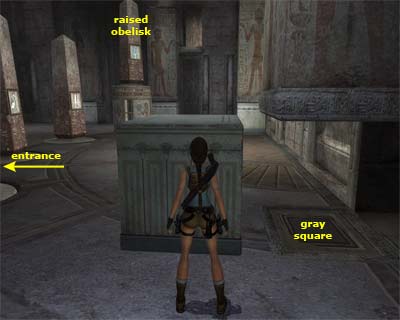
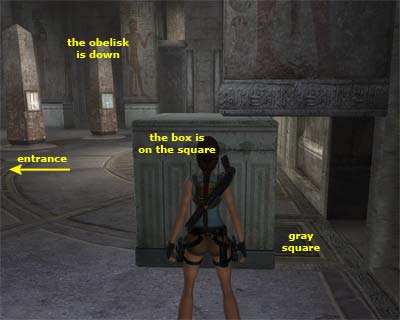
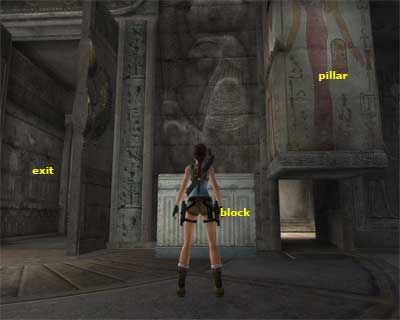
The brief cut scene shows Lara reaching the opening of the Temple by riding a bike. [Checkpoint] You begin the level with the Scion of Tihocan in your backpack. Follow the tunnel to reach an opening. You have to drop to the ground by either grabbing the edge and releasing, or jumping to the fallen pillar on the right and sliding down. [Checkpoint] Notice the gold ring on the pillar in the far right corner. Use the Grapple to catch it and pull the pillar down. There is a same pillar on the left, only this time a stone block is left in front of a ledge. Locate the movable block in the back left corner. Pull it to reveal an alcove behind. Enter and pick up the Shotgun Ammo and Small Medipack. Exit and climb on the stone block, then to the next ledge. Pick up the Small Medipack and jump to grab the crevice on the left. Traverse around the corner and jump to grab the next crevice. Climb up the two crevices above and jump to grab the horizontal pole. Swing and jump to land on the fallen pillar. Just before reaching the end, jump to grab the ledge ahead. Traverse around the corner and jump to grab the horizontal pole behind you. Jump to grab the next one, then the block in the corner; pull up. Grab the crevice on the right, then the next one. Traverse to the right and jump to grab the edge of the opening; pull up. [Checkpoint] Jump to grab the decorative scarab ahead and jump to grab the ledge above before the scarab slides back down. Pull up and follow the passage to a pit. Slide down the slope on the right and jump to grab the pole. Swing and jump to grab the decorative scarab on the other side. Again, jump to grab the ledge above before the scarab slides down. Pull up and follow the passage to the next room. [Checkpoint] The dramatic music alerts you to the situation. Once you slide into the room, a black panther will attack from the right, so quickly climb on the ledge opposite the entrance and kill it from safety. Once it is dead, do not forget to pick up the Shotgun Ammo from the left of the entrance (as you face it). Secret #1 - Climb on the ledge opposite the entrance and turn left. Jump to grab the crevice and traverse around the corner. Pull into the opening and go to the left. Jump to grab the crevice and traverse around the two corners. Pull onto the ledge above the entrance and pick up the Large Medipack. Drop down, climb into the opening opposite the entrance and slide into the City of Khamoon. The cut scene shows Lara sliding down the slope. She takes a look around and spots a still mummy in front of the Sphinx. When she makes one step forward, she hears a growling that comes from the right. She turns her head and sees a second mummy. The latter realises her appearance and turns around. It is obvious that it is not happy and starts moaning. This alerts the other mummy that runs towards Lara. Area with Sphinx and obelisk - Immediately draw weapons and kill the two mummies. Pick up the Caliber Pistol Ammo from the bottom of the slope and the Shotgun Ammo from the far left corner. Jump into the pool and get the Small Medipack. You will find one more behind the pillar to the right of the Sphinx with the destroyed face (as you face it). The obelisk above the pool has four receptacles, but you do not have the pieces yet. Going up and around the perimeter of the area - Locate the low broken pillar to the left of the Sphinx. Vault on it and jump to grab the crevice of the first pillar. Jump to grab the upper one and traverse around. Jump to grab the second pillar and climb to the top. From there, climb on the stone ledge in the corner. [Checkpoint] Jump to grab the next ledge and pull up. Shoot the button on the wall to extend a pole. It will slide back inside in a few seconds, so quickly jump to grab it, swing and jump to the opposite side. Pick up the Caliber Pistol Ammo and go around to the left. Jump to the pillar, then to the next one below. From there, jump to the small ledge at the bottom of the ladder. Climb up the ladder and jump to the Sphinx's head. Artifact #1 - Climb into the opening above the Sphinx's head, then into the one on the right. Get the Artifact and return back to the Sphinx's head. Jump off the head and use the Grapple to catch the gold ring above. Swing and jump to the pillar head. Jump to grab the ledge in the corner and pull up. Jump to grab the gold ring on the wall and perform the wall run to grab the second ring. Again, perform the wall run to reach the platform on the left. If you accidentally fall down, while using the Grapple, and survive from the drop, turn to face the pool and go to the left. You will see a pillar with several crevices (as shown here). Use them to return back and try again. After using the Grapple, go to the end of the platform and jump to the fallen ledge to slide behind the Sphinx's head. Crawl under the fallen ledge and pick up the Large Medipack. Exit and use the switch to open the door at the front of the Sphinx. [Checkpoint] Carefully make your way down and go through the opening. Follow the passage to the next room. [Checkpoint] Room with six statues - As you enter the room, take a mental note of the stone block to the right. If you take a look at the other side of the room, you will see two black panthers in an opening. They come out when you proceed further, so jump on the stone block and kill the panthers from there. Go to the end of the room and use the switch. This will make the statues slide forward and open two gates close to the entrance that will release two black panthers. Kill the threats and enter one of the rooms where you will find a Small Medipack. The statues slide back after a few seconds, so go back to the switch and use it again. Run back to the entrance and climb on the stone block. Jump to grab the ledge of the first statue and pull up. Jump to the opposite statue (not the next one) and then to the next two. Jump to grab with your Grapple the gold ring on the wall and perfrom the wall run to catch the crevice on the right. Release to grab the lower crevice and shimmy right. The door closes when you grab it, so you have to be quick and jump to grab the sill above. Once there, jump to grab the next crevice and traverse around to reach the opening; pull up. [Checkpoint] Follow the passage to a pit. Slide down the slope and kill the three rats that come from around the corner. There is a movable block next to the slope you slid. Pull it outside the alcove and go behind it. Pick up the Small Medipack and push the block to the end of the pit.* Pick up another Small Medipack and climb on the block. Jump to grab the ledge above and pull up. The passage gets you to a second pit. Slide down and pick up the Shotgun Ammo. Then use the crevices in the wall to return back up. Jump to grab the pole that extends, swing and jump to grab the next pole. Swing and jump to grab the decorative scarab, then quickly the ledge above. Follow the passage to the next area. [Checkpoint] (*Note: The Medipack behind the block sometimes does not appear. It probably has to do with the previous loaded Checkpoints in this area. If you do not find it, the final Supplies will be 35.) Room with two obelisks and cat statue - Hang from the edge to alert a crocodile from the opening below and pull up. You may have troubles aiming at it from here, but you can jump down, climb on one of the low ledges to the left (as you face the cat statue) and kill the threat from there. A second crocodile is lurking around, so stay sharp. Enter the opening beneath the entrance and pick up the Small Medipack. Secret #2 - Go to the far left corner of the area behind the pillars (as shown in this screenshot) and climb into the opening. Pick up the Small Medipack and Shotgun Ammo and return back. Jump into the pool. Swim through the opening in the floor and use the lever to open a gate at the end of the tunnel. It will start closing, so quickly swim to pass through it. [Checkpoint] Room with pool and ledges - Swim to the far right corner of the pool and get the Large Medipack from the bottom. Climb out of the water and locate the decorative scarab to the left of the entrance. Jump to grab it and quickly jump to grab the crevice above. Jump to grab the platform on the right and pull up. The platform will start sliding into the wall, so run to the right and jump to the opposite platform. Jump to grab the crevice ahead, then the one on the left. Wait for the platform to come back outside, jump backwards and onto the platform, run and jump to grab the decorative scarab on the right. Quickly jump to grab the crevice above before the scarab slides back down. Jump to grab the ledge on the right and pull up. Go up the steps and drop into the right hand pit where you will find a Small Medipack. Climb back up and jump to grab the vertical structure. Climb to the top and jump to grab the decorative scarab. Quickly jump to grab the crevice above, then the next one. Jump to land on the vertical structure and jump to grab the vertical pole. Jump to the alcove in front of the barred window and pick up the Large Medipack and Caliber Pistol Ammo. Jump back to grab the vertical pole and then jump to the opening. Pick up the Caliber Pistol Ammo and use the switch to make a platform in the previous room slide into the wall and let a block fall down. [Checkpoint] Carefully make your way down and return to the room with the pool. [Checkpoint] Drop to the platform below and push/ pull the movable block to the other side of the platform (as shown in this screenshot). Climb on the block and jump to grab the crevice in the wall, then the next one. Jump to grab the platform behind you and pull up. Again, the platform will start sliding inside the wall, so quickly jump to its next part, then jump to grab the decorative scarab. Quickly jump to grab the crevice above. Jump to grab the decorative scarab on the right and quickly jump to grab the crevice above. Jump to grab the next crevice, then the horizontal pole behind you. Swing and jump to grab the ledge; pull up. Use the Grapple to catch the ring of the door on the opposite side. Pull it to fully open it (90 degrees). When you do that, Lara de-catches the ring automatically. Quickly jump to grab the gold ring on the ceiling, swing once (let Lara swing away from your screen once) and jump to the door before it closes. Use the switch to re-open the door and also open the trapdoors at the top of the room. [Checkpoint] Jump to grab the ledge of the right hand door, then the next one above. Jump to grab the horizontal pole behind you, swing and jump to grab the other trapdoor. Pull into the room above and use the switch to open the trapdoors around the cat statue. Approach the opening. [Checkpoint] Artifact #2 - Before dropping down, notice the gold ring on the left hand wall (as shown here). Jump to grab it with your Grapple and perform the wall run to reach the crevice in the wall. Jump to grab the gold ring on the ceiling behind you and turn around. Notice the other two gold rings. Use them to reach the top of the temple of the cat. Pick up the Artifact and make your way to the ground. Room with central pillar - You can kill the two crocodiles from the ledges around the cat statue. Jump to grab the pillar of the statue and climb to the bottom. Slide down the slope and follow the passage to reach a room with a central pillar. [Checkpoint] Pick up the two Caliber Pistol Ammo's from the two corners and drop to the lower ledge. Kill the black panther from here and carefully drop down. Three black panthers will exit from the small room on the left, so kill them. [Checkpoint] Enter the room they came from and pick up the Large Medipack. Exit and go to the gate on the other side. The two black panthers will get released once you use the switch and open the gate, so draw weapons and kill them. [Checkpoint] Climb up the two crevices to the left of the gate and jump to grab the latter. Quickly jump to grab the ledge behind you, then the next one above. Jump to grab the ledge on the right and let it fully rotate. Jump to grab the crevice on the left, then the next one above. Jump to grab the ledge of the central pillar and pull up. Secret #3 - Turn left and shoot the button on the opposite wall. This will lower a gold ring from a small opening in the ceiling. [Checkpoint] Jump to catch it with your Grapple and jump to the opposite ledge. Pick up the Large Medipack and Caliber Pistol Ammo and swing back to the ledge of the central pillar. Go to the other side and through the opening. Follow the passage to the next room with your weapons drawn. [Checkpoint] Kill the black panther and enter the room. The camera will focus on a part of the ceiling, which indicates that something will happen there later. Climb into the opening opposite the entrance and climb up the ladder. Draw weapons and kill the mummy that attacks. There is a mechanical scarab in the room, but you cannot do anything with it at the moment. Go to the back right corner of the room and climb up the stone blocks to get some Caliber Pistol Ammo and a Large Medipack. Artifact #3 - From the block you got the Medipack, jump to grab the gold ring on the wall. Do not perform the wall run. Instead, stop swinging and climb up the Grapple line until you reach the bottom of the barred window. Jump to land on the vertical structure behind you and then jump to grab the thin pillar on your left (as shown in this screenshot). There two more same thin pillars on your right. Use them to reach the crevice in the wall. From there, jump to grab the gold ring on the wall and perform the wall run to reach the ledge. Pick up the Artifact and carefully make your way down. Go through the opening and climb up the ladder. The passage gets you back to the room with the six huge statues. [Checkpoint] Use the switch to make the statues slide forward, revealing some stone blocks at the top. The statues will start sliding back, so quickly jump to the first block and make a "zig-zag" procedure to jump from block to block until you reach the ledge at the other side. Go to the left and pick up the Large Medipack. Follow the passage and use the switch to remove two sticks from the mechanical scarab and make the statues slide forward, this time permanently. [Checkpoint] [Note: If you have troubles with the timed statues, you can earn some seconds. When you use the switch, the camera shows the statues sliding forward and once you gain the control of Lara, the blocks are already out. Wait until the two front blocks (left and right ones) start sliding back. Use the switch again to make them slide forward. This time, the camera will not prevent you from moving. Straightly go and jump on the first block while it slides forward. That way, you earn the seconds that the camera "steals" from you where it shows the blocks sliding forward. Thanks to Dimi for the hint.] Return back to the room with the mechanical scarab the same way you came. Again, climb on the stone blocks in the corner and use the Grapple to catch the gold ring on the wall. Climb up the Grapple line until you reach the bottom of the barred window and jump to land on the vertical structure. This time, jump to the next vertical structure on the right, then jump to grab the crevice in the wall. Traverse to the left and jump to grab the horizontal pole of the mechanical scarab. Lara's weight will balance the scale and this will open a trapdoor, dumping the sand to the room below. Release the pole. [Checkpoint] Obelisk puzzle - Using the ledges of the trapdoors, drop to the sand. Climb into the opening and follow the passage to reach a room with the four obelisks and eight movable blocks. [Checkpoint] The door opposite the entrance is the exit and will open once you solve the puzzle. To solve it, you have to rotate the four obelisks to the correct position. The latter is shown in the side rooms behind the movable blocks. We will start from the block to the right of the door and move clockwise. Pull the first block and quickly climb on it. A black panther will exit from the side room, so kill it from above. Turn to see the obelisks and notice the that the first one from the left (assuming the entrance is to your back) has been raised (as shown here). If the obelisk is still down, it means that the movable box is still on the gray square in front of the entrance of the side room (this screenshot shows the wrong position of the box; it is still on the gray square, even half of it, and the obelisk is down). The obelisk that has been raised is "connected" to the side room. Enter the room and pick up the Shotgun Ammo. The hieroglyphic shows an Egyptian that holds two white glasses, so exit and go to the obelisk you raised. Rotate it, so that the same painting reaches the line on the floor (as shown in this screenshot). You will know that that you have rotated the obelisk correctly when you hear a soft "locking-sound". The side room behind the second block does not include or show anything, so do not bother with it, unless you want to see everything. Pull the third block to raise the second from the right obelisk. Enter the room behind. The hieroglyphic shows an Egyptian that holds a green glass, so exit and rotate the obelisk so that the same painting reaches the line on the floor. Again, you will know that that you have rotated the obelisk correctly when you hear a soft "locking-sound". Pull the fourth block and enter the room to get some Shotgun Ammo. Exit and pull the fifth block. Enter the room behind, pick up the Caliber Pistol Ammo and exit. Pull the sixth block to raise the second from the left obelisk. Quickly climb on the block because a black panther emerges from inside the room. Kill it and enter the room. The hieroglyphic shows an Egyptian that holds a blue vase. Exit and go to the obelisk. You will see that the painting is already above the line, so you do not have to rotate it. Pull the seventh block and enter the side room to get some Caliber Pistol Ammo. Exit and pull the eighth block to raise the first from the right obelisk. The hieroglyphic shows an Egyptian that holds a female figure. Exit and rotate the obelisk so the same painting reaches the line on the floor. When you do everything correctly, the exit door opens. Relic - Before leaving, let's go for a Secret. Position the first block you used to the left of the pillar (as shown in this screenshot). Climb on the block and jump to grab the crevice in the pillar, then the next one above. Traverse around the two corners and jump to grab the ledge behind you. Jump to grab the crevice of the next pillar and traverse around the corner. Jump to grab the above crevice and then jump on the first obelisk. Jump from obelisk to obelisk until you reach the last one. From there, jump to grab the crevice in the pillar, traverse around the corner and release to grab the lower crevice. Shimmy to the right and pull into the room. Pick up the Large Medipack and Mummified Cat. Drop to the ground and go through the exit to end the level.
|
||
| « Level 8: Tomb of Tihocan | Index | Level 10: Obelisk of Khamoon » |
| Last update: 21 June 2007 | ||
Tomb Raider: Anniversary Walkthrough & Game Guide © 2000-2007 www.tombraiderhub.com |
||